
1. Introduzione
Grazie per l'acquistoasing the Vissani 1.5 cu. ft. Countertop Convection Microwave Oven. This appliance combines the convenience of a microwave with the versatility of a convection oven and air fryer, offering multiple cooking functions including sensor cook. To ensure safe and efficient operation, please read this manual thoroughly before using the appliance and retain it for future reference.
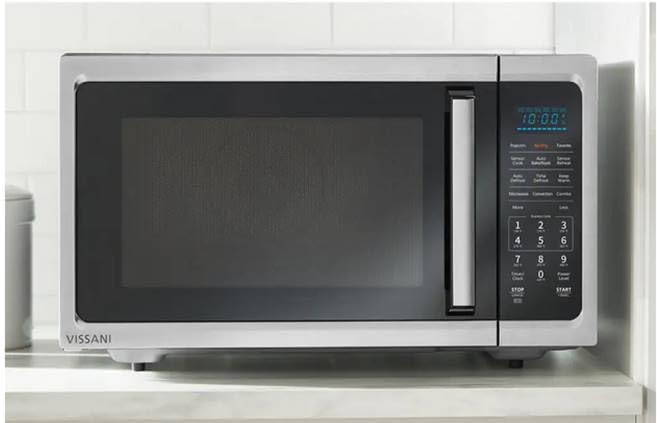
Immagine 1.1: anteriore view of the Vissani 1.5 cu. ft. Countertop Convection Microwave Oven.
2. Importanti istruzioni di sicurezza
Quando si utilizzano apparecchi elettrici, è necessario adottare le seguenti precauzioni di sicurezza di base, tra cui:
- Leggere tutte le istruzioni prima di utilizzare l'apparecchio.
- Non utilizzare il forno se lo sportello è danneggiato o se il forno non funziona correttamente.
- Non tentare di riparare o riparare il forno da soli. Contattare personale qualificato.
- Assicurare una ventilazione adeguata. Non ostruire le aperture di ventilazione.
- Non utilizzare prodotti chimici o vapori corrosivi in questo apparecchio.
- Non riscaldare liquidi o altri alimenti in contenitori sigillati poiché potrebbero esplodere.
- Always use oven mitts when handling hot items from the oven, especially during convection or air fry modes.
- Metallic items should not be used in microwave mode.
3. Configurazione e installazione
3.1 Disimballaggio
Carefully remove the oven from its packaging. Remove all packing materials, including any protective film or tape. Inspect the oven for any damage. If any damage is observed, do not operate the oven and contact customer service.
3.2 Posizionamento
Place the oven on a flat, stable surface that can support its weight. Ensure there is adequate space around the oven for proper ventilation:
- Minimum 4 inches (10 cm) of clearance on the top, back, and sides.
- Non posizionare il forno vicino a fonti di calore o in luoghi con elevata umidità.
3.3 Montaggio del giradischi
The oven comes with a glass turntable and a turntable ring. Assemble them as follows:
- Place the turntable ring securely in the center of the oven cavity.
- Carefully place the glass turntable on top of the ring, ensuring it sits properly in the center support.
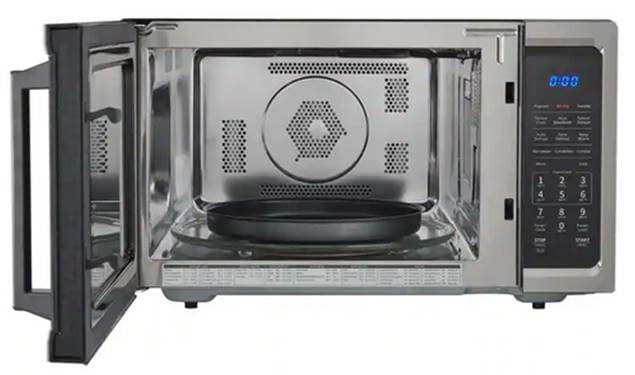
Immagine 3.1: Interno view showing the turntable and rack placement.
3.4 Collegamento di alimentazione
Collegare il cavo di alimentazione a una presa elettrica con messa a terra. Assicurarsi che il volumetage corrisponde alle specifiche del forno.
4. Istruzioni per l'uso
4.1 Pannello di controllo Sopraview
Familiarize yourself with the control panel buttons and display. The panel includes numeric keys, function buttons (Popcorn, Air Fry, Sensor Cook, Convection, etc.), and control buttons (Start, Stop/Cancel, Timer/Clock, Power Level).
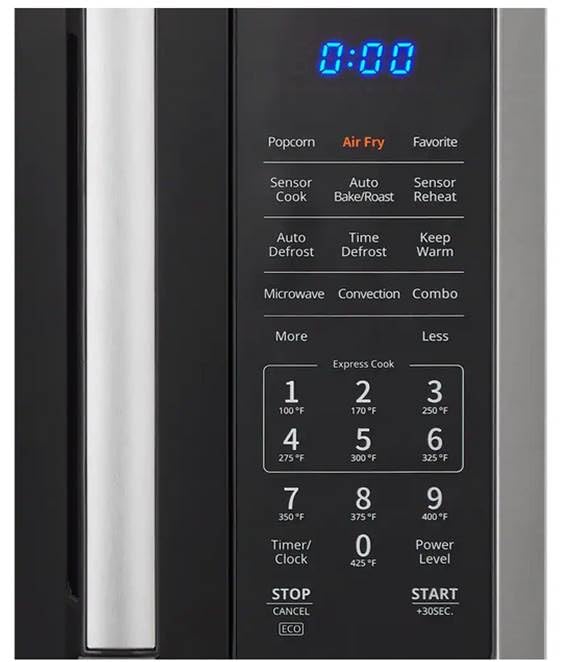
Immagine 4.1: Dettagliata view del pannello di controllo.
4.2 Impostazione dell'orologio
- Premere il tasto Timer/Orologio pulsante una volta.
- Utilizzare il tastierino numerico per immettere l'ora corrente (ad esempio, 1-2-3-0 per 12:30).
- Premere Timer/Orologio di nuovo per confermare.
4.3 Cottura a microonde
- Disporre il cibo in un contenitore adatto al microonde sul piatto girevole.
- Inserire il tempo di cottura desiderato utilizzando il tastierino numerico.
- Per regolare il livello di potenza, premere Livello di potenza and then enter a number from 1 to 10 (10 being 100% power). Skip this step for full power.
- Premere Inizio/+30 sec. per iniziare a cucinare.
4.4 Cottura a convezione
Convection cooking uses a heating element and fan to circulate hot air, similar to a traditional oven.
- Place food on the metal rack provided (if applicable for convection).
- Premere il tasto Convezione pulsante.
- Use the number pad to select the desired temperature (e.g., 3-5-0 for 350°F).
- Premere Inizio/+30 sec. to preheat. The oven will beep when preheated.
- Place food inside, close the door, enter cooking time, and press Inizio/+30 sec. Ancora.
4.5 Air Fry Function
The Air Fry function uses high-speed hot air circulation for crispy results.
- Place food in an air fry basket or on a suitable rack.
- Premere il tasto Frittura ad aria pulsante.
- Select the desired air fry preset or temperature using the number pad.
- Inserire il tempo di cottura.
- Premere Inizio/+30 sec. per iniziare.
4.6 Cottura/Riscaldamento tramite sensore
These functions automatically adjust cooking time based on the food's moisture and temperature.
- Mettere il cibo nel forno.
- Premere Sensore di cottura or Riscaldamento del sensore.
- Premere Inizio/+30 sec. The oven will detect and cook automatically.
4.7 Auto Defrost/Time Defrost
Use these functions to defrost food efficiently.
- Auto scongelamento: Premere Auto scongelamento, select food type/weight, and press Inizio/+30 sec.
- Scongelamento a tempo: Premere Scongelamento a tempo, enter defrosting time, and press Inizio/+30 sec.
4.8 Resta al caldo
To keep cooked food warm, press Mantieniti al caldo poi Inizio/+30 sec.
4.9 Child Lock (Control Lock)
Per attivare il blocco bambini, tenere premuto Interrompi/Annulla for 3 seconds. The display will show a lock indicator. To deactivate, press and hold Interrompi/Annulla di nuovo per 3 secondi.
5. Manutenzione e pulizia
Regular cleaning helps maintain the performance and longevity of your oven.
5.1 Pulizia esterna
Pulire le superfici esterne con un panno morbido, damp cloth. For stainless steel finishes, use a non-abrasive stainless steel cleaner. Avoid harsh chemicals or abrasive pads.
5.2 Pulizia degli interni
Clean the interior cavity with a mild detergent and a soft cloth. For stubborn food splatters, place a bowl of water with lemon slices inside and microwave on high for 2-3 minutes to loosen residue, then wipe clean. Ensure the oven is cool before cleaning.
5.3 Giradischi e anello
Il piatto girevole in vetro e l'anello girevole possono essere rimossi e lavati in acqua calda e sapone o in lavastoviglie. Assicurarsi che siano completamente asciutti prima di rimetterli nel forno.
6. Risoluzione Dei Problemi
Se riscontri problemi con il tuo forno, consulta la tabella seguente per i problemi più comuni e le relative soluzioni.
| Problema | Possibile causa | Soluzione |
|---|---|---|
| Il forno non si avvia | Cavo di alimentazione scollegato; sportello non chiuso correttamente; fusibile bruciato o interruttore automatico scattato. | Ensure power cord is plugged in; Close door firmly; Check household fuse/circuit breaker. |
| Il cibo non cuoce in modo uniforme | Food not stirred or rotated; Incorrect power level/cooking time; Turntable not rotating. | Stir or rotate food during cooking; Adjust power level/time; Check turntable assembly. |
| Rumore eccessivo durante il funzionamento | Piatto girevole o anello rotante non posizionati correttamente; corpo estraneo nella cavità. | Re-position turntable and ring; Remove any foreign objects. |
| Il display mostra un codice di errore | Malfunzionamento interno. | Scollegare il forno per 1 minuto, quindi ricollegarlo. Se l'errore persiste, contattare il servizio clienti. |
If the problem persists after attempting these solutions, please contact Vissani customer support for assistance.
7. Specifiche
This section provides technical details for your Vissani Convection Microwave Oven.
| Caratteristica | Dettaglio |
|---|---|
| Marca | Vissani |
| Numero di modello | EC042A2KJ |
| Capacità | 1.5 piedi cubi |
| Dimensioni (P x L x A) | 61.5 cm x 57.5 cm x 37.5 cm (24.2 pollici x 22.6 pollici x 14.8 pollici) |
| Cosatage (microonde) | 1000 Watt |
| Materiale | Stainless Steel (Exterior and Interior) |
| Livelli di potenza | 10 |
| Metodo di riscaldamento | Convection and Microwave Radiation |
| Tipo di installazione | Piano di lavoro |
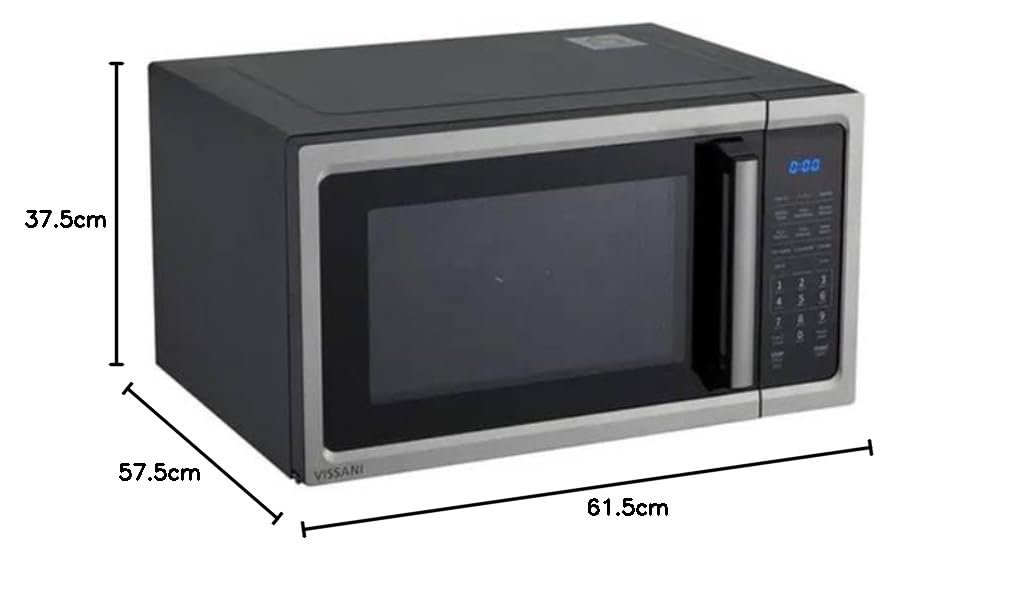
Immagine 7.1: Dimensioni del prodotto per riferimento di posizionamento.
8. Garanzia e supporto
For warranty information and customer support, please refer to the warranty card included with your product or visit the official Vissani websito. Conservare la ricevuta d'acquisto come prova d'acquisto per eventuali reclami in garanzia.
If you require technical assistance or have questions regarding the operation of your oven, please contact Vissani customer service.