PARKSIDE PHET 15 C2
PARKSIDE PHET 15 C2 Electric Stapler Instruction Manual
Modello: PHET 15 C2
Introduzione
Thank you for choosing the PARKSIDE PHET 15 C2 Electric Stapler. This manual provides important information regarding the safe operation, setup, maintenance, and troubleshooting of your new tool. Please read this manual thoroughly before first use and keep it for future reference.
Istruzioni di sicurezza
Osservare sempre le seguenti precauzioni di sicurezza per ridurre il rischio di scosse elettriche, incendi e lesioni gravi.
- Sicurezza dell'area di lavoro: Mantenere l'area di lavoro pulita e ben illuminata. Aree disordinate o buie possono favorire incidenti. Non utilizzare utensili elettrici in atmosfere esplosive, ad esempio in presenza di liquidi, gas o polveri infiammabili.
- Sicurezza elettrica: Le spine degli elettroutensili devono essere adatte alla presa. Non modificare mai la spina in alcun modo. Non utilizzare il cavo in modo improprio. Non utilizzare mai il cavo per trasportare, tirare o scollegare l'elettroutensile. Tenere il cavo lontano da fonti di calore, olio, bordi taglienti o parti in movimento.
- Sicurezza personale: Indossare sempre protezioni per gli occhi. Utilizzare protezioni acustiche durante l'uso prolungato. Vestirsi in modo appropriato; evitare abiti larghi o gioielli. Tenere capelli, indumenti e guanti lontani dalle parti in movimento.
- Uso e cura dello strumento: Non forzare l'utensile elettrico. Utilizzare l'utensile elettrico corretto per l'applicazione desiderata. Scollegare la spina dalla presa di corrente prima di effettuare qualsiasi regolazione, sostituire accessori o riporre l'utensile elettrico.
- Sicurezza specifica della cucitrice: Always assume the tool contains fasteners. Do not point the tool at yourself or others. Keep hands and body parts away from the discharge area. Ensure the workpiece is stable before fastening.
Prodotto finitoview
The PARKSIDE PHET 15 C2 is a lightweight and compact electric stapler designed for quick and comfortable fastening tasks. It features a non-slip soft grip for comfortable one-handed operation.

Figura 1: lato view of the PARKSIDE PHET 15 C2 Electric Stapler, highlighting its compact design and ergonomic grip. The power cord is visible at the rear.

Figure 2: The PARKSIDE PHET 15 C2 Electric Stapler displayed with a selection of compatible staples and nails, ready for use.
Componenti chiave:
- Grilletto: Attiva il meccanismo di pinzatura.
- Rivista: Holds staples or nails. Features a level indicator.
- Nose/Discharge Area: Where fasteners exit the tool.
- Impugnatura morbida: Provides comfort and control during operation.
- Cavo di alimentazione: Collega l'utensile a una presa elettrica.
Impostare
1. Caricamento degli elementi di fissaggio
Ensure the tool is unplugged from the power source before loading fasteners.
- Individuare il meccanismo di rilascio del caricatore, solitamente nella parte inferiore o posteriore dell'utensile.
- Slide open the magazine.
- Insert the appropriate staples (6-14 mm) or nails (14-15 mm) into the magazine. Ensure they are oriented correctly, with the points facing forward.
- Close the magazine securely until it clicks into place. The level indicator on both sides of the magazine will show the remaining fastener quantity.
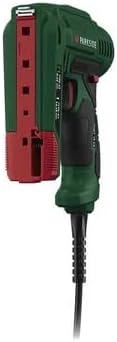
Figura 3: Posteriore view of the stapler with the magazine open, illustrating how to load staples or nails. The red tab indicates the magazine release.
2. Collegamento dell'alimentazione
Once fasteners are loaded, plug the power cord into a suitable electrical outlet (230V AC, 50Hz).
Istruzioni per l'uso
The PARKSIDE PHET 15 C2 is designed for comfortable one-handed operation with its soft grip.
- Preparare il pezzo da lavorare: Ensure the material you are fastening is clean, dry, and free from obstructions.
- Strumento di posizione: Place the nose of the stapler firmly against the workpiece at the desired fastening point. Ensure the tool is held perpendicular to the surface for optimal penetration.
- Attivare: Press the trigger to drive a fastener into the material. Release the trigger to stop.
- Controllare il fissaggio: Inspect the driven fastener to ensure it is properly seated. Adjust pressure or position if necessary for subsequent fastenings.
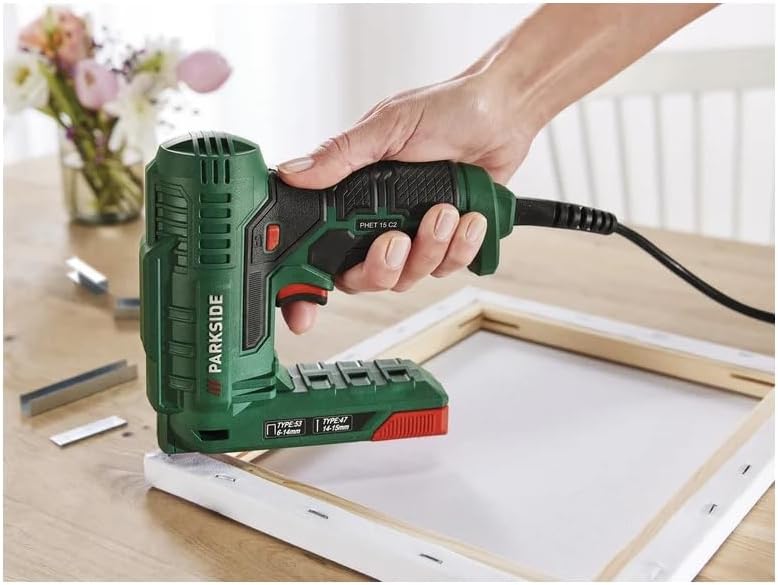
Figure 4: The electric stapler in action, securing fabric to a canvas frame. This illustrates the tool's ease of use for upholstery and crafting projects.
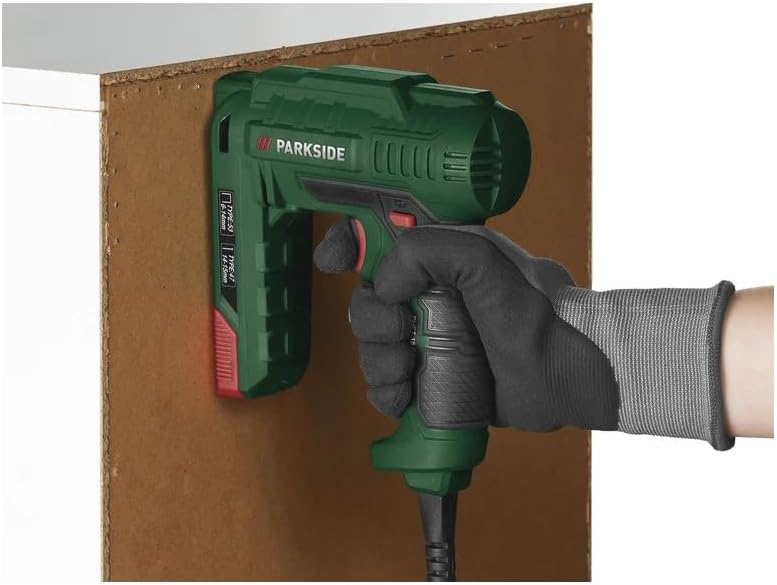
Figure 5: The stapler being used to attach a board, showcasing its application in general DIY and construction tasks.
Applicazioni:
This electric stapler is suitable for various tasks including:
- Decoration projects
- DIY crafts
- Tappezzeria leggera
- Home repairs and fastening tasks

Figure 6: Detail of fabric securely fastened to a wooden chair frame using staples, demonstrating a typical upholstery application.
Manutenzione
Regular maintenance ensures the longevity and safe operation of your electric stapler.
- Pulizia: Disconnect the tool from the power supply. Use a dry cloth to wipe down the exterior. Do not use harsh chemicals or abrasive cleaners. Periodically clear any dust or debris from the magazine and discharge area.
- Magazzinaggio: Store the tool in a dry, secure location out of reach of children. Ensure the power cord is neatly coiled and not kinked.
- Ispezione: Before each use, inspect the power cord for damage. Check the tool for any loose parts or signs of wear. Do not use a damaged tool.
Risoluzione dei problemi
Per i problemi più comuni e le relative soluzioni, fare riferimento alla tabella seguente.
| Problema | Possibile causa | Soluzione |
|---|---|---|
| Lo strumento non funziona. | Nessuna alimentazione elettrica. | Verificare che il cavo di alimentazione sia collegato saldamente a una presa funzionante. |
| Fasteners do not drive properly. | Dimensione o tipo di elemento di fissaggio non corretti. Caricatore vuoto. Tool not pressed firmly against workpiece. | Ensure correct staples/nails (6-14mm staples, 14-15mm nails) are used. Reload magazine. Apply firm, even pressure to the tool. |
| Marmellata di elementi di fissaggio. | Debris in magazine or discharge area. Elementi di fissaggio piegati. | Scollega lo strumento. Open the magazine and carefully remove any jammed fasteners or debris. Use only undamaged fasteners. |
Se i problemi persistono dopo aver provato queste soluzioni, contattare l'assistenza clienti.
Specifiche
- Modello: Corso di laurea triennale in ingegneria aeronautica 15 C2
- Energia: 70 L
- Ingresso volumetage: 230V AC 50Hz
- Graffette compatibili: Tipo 53, 6-14 mm
- Unghie compatibili: Tipo 47, 14-15 mm
- Modalità operativa: Automatico
- Caratteristiche: Lightweight, compact, soft grip, double-sided level indicator.
- Accessori inclusi: 400 x 10 mm staples, 100 x 14 mm nails.
Garanzia e supporto
Per informazioni sulla garanzia o assistenza tecnica, consultare la documentazione fornita con l'acquisto o contattare direttamente il produttore. Conservare la prova d'acquisto per eventuali reclami in garanzia.
Ask a question about this manual
Ask about setup, troubleshooting, compatibility, parts, safety, or missing instructions. Manuals+ will review the question and use this page’s manual context to help answer it.