1. Introduzione
Thank you for choosing the Crivit Auriol Radio-Controlled Projection Alarm Clock. This device combines a precise radio-controlled clock with a clear LCD display, dual alarms, and a convenient projection feature. This manual will guide you through the setup, operation, and maintenance of your new alarm clock.

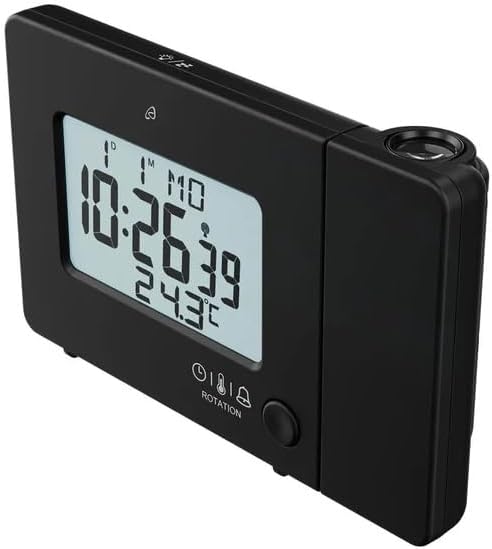
Davanti view of the alarm clock displaying time, date, and temperature.
2. Istruzioni di sicurezza
- Leggere attentamente tutte le istruzioni prima dell'uso e conservarle per riferimento futuro.
- Non esporre il dispositivo a temperature estreme, alla luce solare diretta o a elevata umidità.
- Evitare di far cadere o sottoporre il dispositivo a forti impatti.
- Non tentare di smontare o riparare il dispositivo da soli. Contattare personale di assistenza qualificato.
- Tenere le batterie fuori dalla portata dei bambini. Smaltire le batterie usate secondo le normative locali.
- Use only the provided AC adapter or one with identical specifications.
3. Contenuto della confezione
Si prega di controllare la confezione per verificare la presenza dei seguenti elementi:
- Crivit Auriol Radio-Controlled Projection Alarm Clock (Model 373928)
- Adattatore di alimentazione CA.
- Batterie (preinstallate o separate)
- Manuale dell'utente (questo documento)

Included AC power adapter.
4. Caratteristiche del prodotto
- Ora radiocontrollata: Automatic time synchronization for precise timekeeping.
- Funzione di proiezione: Projects time, alarm times, or ambient temperature onto a wall or ceiling.
- Pivoting Projection Arm: Adjustable projection angle with easy focus adjustment.
- Schermo LCD: Clear screen showing time, day, month, week number/day of the week, and indoor temperature.
- Doppi allarmi: Two independent alarm settings with snooze function.
- Sensore tattile: Activates short-term projection and screen backlight.
- Opzioni di alimentazione: Operates via AC adapter or batteries.
- Porta di ricarica USB-A: Convenient 5V, 800mA output for charging external devices.
- Luminosità regolabile: Customizable display brightness.
5. Identificazione dei componenti
Davanti View:
Davanti view con display LCD.
- Schermo LCD: Shows time, date, temperature, alarm status, and radio control signal.
- Touch Sensor Area: Located above the display, for temporary backlight and projection.
- Projection Indicator: Icon indicating projection is active.
- Indicatori di allarme: Icone per Sveglia 1 e Sveglia 2.
- Pulsante di rotazione: Adjusts projection orientation.
Lato View (Projection Arm):
Lato view with projection arm extended.
- Braccio di proiezione: Pivots to direct the projection.
- Ruota di messa a fuoco: Regola la nitidezza dell'immagine proiettata.
- Lente di proiezione: Emits the time/temperature display.
Posteriore View:

Posteriore view with control buttons and ports.
- -/WEEK Button: Decreases values, sets week display.
- +/ZONE Button: Increases values, sets time zone.
- Pulsante °C/°F: Attiva/disattiva l'unità di temperatura.
- LANG Button: Selects display language for day of the week.
- Pulsante 12/24: Toggles 12/24 hour format.
- Pulsante MODE: Cycles through settings modes (Time, Alarm 1, Alarm 2).
- Pulsante IMPOSTA: Enters setting mode for current display.
- Pulsante di reset: Resets the device to factory defaults (use a pointed object).
- Vano batteria: For backup batteries.
- Porta CC IN: Per collegare l'adattatore di alimentazione CA.
- Porta di uscita USB-A: Per caricare dispositivi esterni.
6. Impostazione
6.1. Accensione
The alarm clock can be powered by either the included AC adapter or batteries for backup.
- Installazione della batteria: Open the battery compartment on the rear of the unit. Insert the included batteries, observing the correct polarity (+/-). Batteries primarily serve as backup in case of power outage.
- Collegamento dell'adattatore CA: Connect the small plug of the AC adapter into the DC IN port on the back of the alarm clock. Plug the AC adapter into a standard wall outlet. The display will light up.
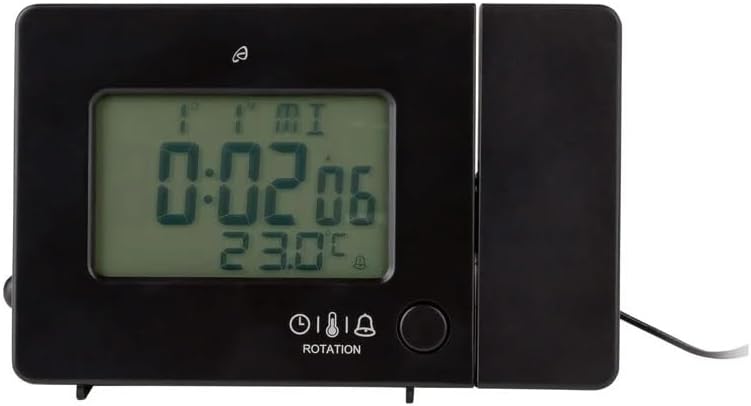
Alarm clock connected to power.
6.2. Initial Setup and Radio Control Synchronization
Upon first power-up or after a reset, the clock will automatically attempt to synchronize with the radio-controlled time signal (DCF77). This process can take several minutes to an hour, depending on your location and signal strength. During synchronization, a radio tower icon will flash on the display.
- Posizionare l'orologio vicino a una finestra per una migliore ricezione del segnale.
- Evitare di posizionarlo vicino a dispositivi elettronici che potrebbero causare interferenze.
- Once synchronized, the radio tower icon will appear solid on the display.
If the radio signal is not received, you may need to set the time manually (see Section 7.1).
6.3. Basic Settings (if not automatically set or for adjustment)
Premere il tasto IMPOSTATO button to enter setting mode. Use the -/WEEK E +/ZONE pulsanti per regolare i valori e IMPOSTATO per confermare e passare all'impostazione successiva.
- Fuso orario: Adjust if you are not in the standard time zone for the radio signal.
- Formato 12/24 ore: Premere il tasto 12/24 button to toggle between 12-hour (with AM/PM) and 24-hour formats.
- Unità di temperatura: Premere il tasto ° C / ° F pulsante per passare da Celsius a Fahrenheit.
- Visualizza la lingua: Premere il tasto LINGUA button to select the language for the day of the week display (5 languages available).
7. Istruzioni per l'uso
7.1. Impostazione manuale dell'ora
If the radio-controlled time signal is weak or unavailable, you can set the time manually:
- Premere e tenere premuto il tasto IMPOSTATO finché le cifre dell'ora non lampeggiano.
- Utilizzare il -/WEEK E +/ZONE pulsanti per regolare l'ora.
- Premere IMPOSTATO to confirm and move to minutes, then year, month, and day.
- Premere IMPOSTATO again to exit manual time setting.
7.2. Impostazione degli allarmi (allarme 1 e allarme 2)
L'orologio è dotato di due sveglie indipendenti.
- Premere il tasto MODALITÀ button once to display Alarm 1 time, or twice for Alarm 2 time. The corresponding alarm icon (e.g., A1) will flash.
- Mentre viene visualizzata l'ora della sveglia, tenere premuto il tasto IMPOSTATO finché le cifre dell'ora non lampeggiano.
- Utilizzare il -/WEEK E +/ZONE pulsanti per regolare l'ora.
- Premere IMPOSTATO to confirm and move to minutes. Adjust minutes using -/WEEK E +/ZONE.
- Premere IMPOSTATO again to confirm and exit alarm setting.
- Per attivare/disattivare un allarme, premere il tasto MODALITÀ button to display the desired alarm, then press the +/ZONE button. The alarm icon (bell) will appear/disappear on the display.
7.3. Funzione snooze
Quando suona un allarme, toccare il Area del sensore di tocco oppure premere il tasto SNOOZE / LIGHT button (if available, otherwise use the touch sensor) to activate the snooze function. The alarm will pause for approximately 5 minutes and then sound again. To stop the alarm completely, press any other button.
7.4. Funzione di proiezione
The alarm clock can project the time, alarm times, or ambient temperature onto a wall or ceiling.
- Attiva proiezione: The projection is continuously active when powered by the AC adapter. If running on batteries, touch the Area del sensore di tocco for short-term projection.
- Regola l'angolo di proiezione: Pivot the projection arm to direct the image to your desired location.
- Regola la messa a fuoco: Utilizzare il Ruota di messa a fuoco on the projection arm to sharpen the projected image.
- Change Projected Content: Premere il tasto MODALITÀ button repeatedly to cycle through projecting Time, Alarm 1, Alarm 2, or Temperature.
- Ruota proiezione: Premere il tasto ROTAZIONE button to rotate the projected image by 90-degree increments (4 orientations available).

Time projected onto a surface.
7.5. Retroilluminazione del display
When powered by the AC adapter, the display backlight is continuously on. When running on batteries, touch the Area del sensore di tocco to activate the backlight for a few seconds.
7.6. Uscita di ricarica USB
The USB-A port on the back of the unit provides a 5V, 800mA output for charging small electronic devices like smartphones or tablets. Connect your device's USB charging cable to this port.
8. Manutenzione
- Pulizia: Pulire il dispositivo con un panno morbido e asciutto. Non utilizzare detergenti abrasivi o solventi.
- Sostituzione della batteria: If using batteries for backup, replace them annually or when the display becomes dim during power outages. Ensure correct polarity.
- Magazzinaggio: Se si conserva il dispositivo per un periodo prolungato, rimuovere le batterie per evitare perdite.
9. Risoluzione Dei Problemi
| Problema | Possibile causa | Soluzione |
|---|---|---|
| Il display è vuoto o poco luminoso. | No power, dead batteries, or AC adapter not connected. | Ensure AC adapter is securely connected. Replace batteries if using for backup. |
| Ora radiocontrollata non sincronizzata. | Weak signal, interference, or incorrect time zone. | Move the clock to a window or open area. Avoid electronic devices. Manually set time if necessary. Check time zone setting. |
| La proiezione è sfocata. | Messa a fuoco non regolata. | Regolare il Ruota di messa a fuoco on the projection arm. |
| L'allarme non suona. | Allarme non attivato o impostato in modo errato. | Ensure the alarm icon is visible on the display. Recheck alarm time settings. |
| La ricarica USB non funziona. | Device not properly connected, or device requires more power than 800mA. | Ensure the USB cable is securely connected. Check if your device's charging requirements exceed 5V/800mA. |
10. Specifiche

Dimensioni del prodotto.
- Numero modello: 373928
- Dimensioni (L x P x A): 15 x 3.81 x 9.5 cm (approx. 15l x 9.5H centimeters)
- Materiale: Plastica
- Tipo di visualizzazione: LCD digitale
- Fonte di energia: AC Adapter (included) or Batteries (included)
- Uscita USB: 5 V, 800 mA
- Caratteristiche speciali: Adjustable brightness, Snooze, Projection, Radio-controlled time
- Tipo di movimento: Quarzo
- Tipo di montaggio: Da tavolo
- Uso interno/esterno: Al chiuso
11. Garanzia e supporto
This Crivit Auriol Projection Alarm Clock comes with a standard manufacturer's warranty. Please refer to the warranty card included in your package or contact your retailer for specific warranty terms and conditions.
For technical support or inquiries, please contact the customer service department of your retailer or the Crivit support line as indicated on the product packaging or official websito.