
Introduzione
This manual provides essential information for the safe and efficient operation, maintenance, and troubleshooting of your Gevi 20Bar Semi-Automatic Espresso Machine. Please read all instructions carefully before first use and retain this manual for future reference.
Importanti istruzioni di sicurezza
Quando si utilizzano apparecchi elettrici, seguire sempre le precauzioni di sicurezza di base per ridurre il rischio di incendi, scosse elettriche e lesioni personali. Tra queste rientrano:
- Leggi tutte le istruzioni.
- Non toccare le superfici calde. Utilizzare maniglie o manopole.
- Per proteggersi da incendi, scosse elettriche e lesioni alle persone, non immergere il cavo, le spine o l'apparecchio in acqua o altri liquidi.
- È necessaria un'attenta supervisione quando un elettrodomestico viene utilizzato da bambini o nelle loro vicinanze.
- Scollegare dalla presa quando non in uso e prima di pulire. Lasciare raffreddare prima di mettere o togliere parti e prima di pulire l'apparecchio.
- Non utilizzare alcun apparecchio con un cavo o una spina danneggiati, dopo che l'apparecchio stesso non funziona correttamente o è stato danneggiato in qualsiasi modo.
- L'uso di accessori non consigliati dal produttore dell'apparecchio può causare incendi, scosse elettriche o lesioni alle persone.
- Non utilizzare all'aperto.
- Non lasciare che il cavo penda dal bordo del tavolo o del bancone o che tocchi superfici calde.
- Non posizionare sopra o vicino a un fornello a gas o elettrico caldo, oppure in un forno caldo.
- Collegare sempre prima la spina all'apparecchio, quindi collegare il cavo alla presa a muro. Per scollegare, portare qualsiasi controllo su "off", quindi rimuovere la spina dalla presa a muro.
- Non utilizzare l'apparecchio per scopi diversi da quelli previsti.
Prodotto finitoview e componenti
The Gevi 20Bar Semi-Automatic Espresso Machine is an all-in-one unit featuring an integrated grinder, dual heating system, and steam wand for versatile coffee preparation.

Figura 1: Fronte view of the Gevi 20Bar Semi-Automatic Espresso Machine, showcasing its integrated grinder, control panel, portafilter, and steam wand.
Componenti chiave:
- Tramoggia dei fagioli: Detachable, high-capacity (approx. 250g) with UV protection, for storing coffee beans.
- Macinacaffè integrato: Features 31 adjustable grind settings from coarse to fine.
- Pannello di controllo: Buttons for Power, Grind, Brew, Program, and a pressure gauge.
- Manometro: Provides a visual indication of brewing pressure.
- 58mm Cafe Group Head: Professional-grade group head for optimal extraction.
- Portafiltro: Includes single and double shot filter baskets.
- Lancia vapore: 360° swivel action for frothing milk.
- Serbatoio dell'acqua: Removable, with a maximum capacity of 2.8 liters.
- vassoio antigoccia: Rimovibile per una facile pulizia.
- Tamplui: Acciaio inossidabile tamper for compacting ground coffee.

Figure 2: Gevi Espresso Machine with key dimensions: 16.9 inches wide, 16.1 inches high, and 12.7 inches deep.
Impostare
1. Disimballaggio
Carefully remove all packaging materials and ensure all components are present. Inspect the machine for any damage. Place the machine on a stable, flat, heat-resistant surface.
2. Installazione e riempimento del serbatoio dell'acqua
- Rimuovere il serbatoio dell'acqua dal retro della macchina.
- Fill the tank with fresh, cold water up to the MAX line (2.8L). Do not exceed the MAX line.
- Riposizionare il serbatoio dell'acqua nella sua posizione originale, assicurandosi che sia saldamente fissato.

Figura 3: Posteriore view of the Gevi Espresso Machine showing the removable water tank with clear MAX and MIN indicators.
3. Bean Hopper Installation and Filling
- Place the bean hopper onto the grinder opening at the top of the machine. Ensure it locks into place.
- Riempire il contenitore dei chicchi di caffè con chicchi di caffè freschi e interi.
- Adjust the grind setting by rotating the bean hopper. Refer to the 'Grinding Coffee' section for details.

Figure 4: Close-up of the detachable bean hopper with 31 grind settings, ranging from coarse to fine, for optimal flavor extraction.
4. Initial Cleaning and Priming
Before first use, it is recommended to run a few cycles of hot water through the machine without coffee to clean the internal components and prime the system.
- Assicurarsi che il serbatoio dell'acqua sia pieno.
- Insert the portafilter (without coffee) into the group head.
- Posizionare una tazza sotto il portafiltro.
- Premere il pulsante 'Power' per accendere la macchina.
- Once the machine is heated (indicator lights stable), press the 'Brew' button for a single shot to run hot water through. Repeat 2-3 times.
- Activate the steam wand to release any air and ensure it's ready for use.
Istruzioni per l'uso
1. Macinazione del caffè
The integrated grinder offers 31 settings to achieve the perfect grind for your espresso.
- Assicurarsi che il contenitore dei chicchi di caffè sia riempito con chicchi di caffè freschi.
- Select your desired grind setting by rotating the bean hopper. Finer settings (0-10) are for slower extraction, while coarser settings (20-30) are for faster extraction. Medium settings (10-20) provide a balanced extraction.
- Posizionare il portafiltro sotto l'uscita del macinacaffè.
- Press the 'Grind' button. You can choose between single shot, double shot, or manual grind modes.
- Once ground, use the included tamper to evenly compact the coffee in the portafilter.

Figura 5: dettagliata view of the grind settings on the bean hopper, illustrating the range from coarse to fine and their impact on extraction speed.
2. Preparazione dell'espresso
The machine features customizable brew settings and a pressure gauge for optimal espresso extraction.
- Inserire il ripieno e tamped portafilter into the group head, twisting it firmly to lock.
- Posizionare la/le tazzina/e da espresso sotto i beccucci del portafiltro.
- Select your desired brew mode: single shot (25-90ml), double shot (45-180ml), or manual shot.
- Press the 'Brew' button. The machine will begin pre-infusion, followed by extraction.
- Monitor the pressure gauge during extraction. The ideal pressure range is typically indicated in the green zone.
- For manual mode, press the 'Brew' button to start and again to stop extraction when the desired volume is reached.

Figure 6: Control panel showing customizable brew settings for single, double, and manual coffee volumes.
Video 1: Demonstration of the Gevi 20Bar Espresso Machine in operation, showing the brewing process and various features.
Video 2: A closer look at the espresso making process with the Gevi 20Bar machine, highlighting the extraction quality.
3. Latte fumante
The 360° swivel steam wand allows for easy milk frothing for lattes and cappuccinos.
- Riempire una lattiera in acciaio inossidabile con latte freddo (con o senza lattosio) fino a poco sotto il beccuccio.
- Posizionare la lancia vapore nel latte, appena sotto la superficie.
- Turn the steam/hot water selector knob to the steam position.
- Abbassare leggermente la brocca per introdurre aria e creare la schiuma, quindi immergere la lancia più in profondità per riscaldare il latte.
- Once the desired temperature and texture are achieved, turn the steam knob off and remove the pitcher.
- Pulire immediatamente la lancia vapore con un pannoamp panno per evitare che i residui di latte si asciughino.

Figure 7: The powerful 360° swivel steam wand in action, demonstrating its ability to create perfectly textured microfoam for various coffee beverages.
Video 3: A recipe demonstration for a brown sugar iced shaken espresso, showcasing the machine's ability to produce espresso and froth milk for complex drinks.
4. Funzione acqua calda
The machine can dispense hot water for tea or Americanos.
- Metti una tazza sotto la lancia vapore.
- Turn the steam/hot water selector knob to the hot water position.
- Hot water will dispense from the steam wand. Turn the knob back to the standby position to stop.
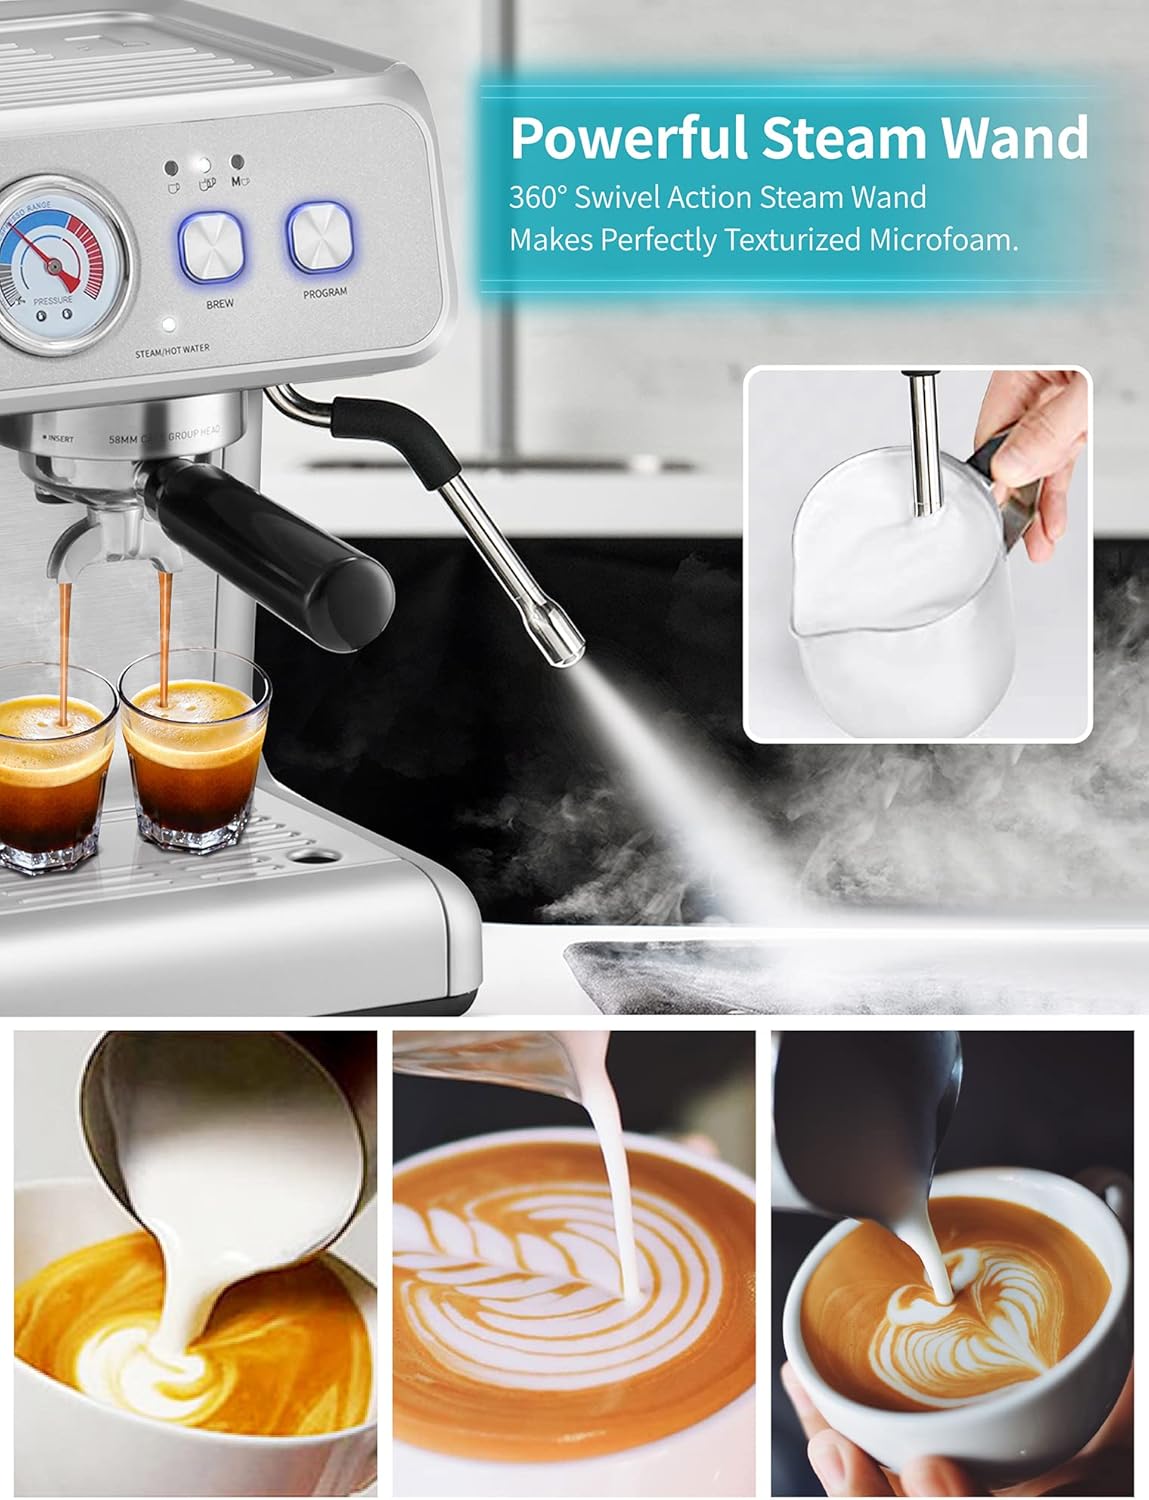
Figure 8: The hot water function knob on the side of the machine, allowing for easy dispensing of hot water.
Manutenzione
1. Pulizia quotidiana
- Portafiltro e filtri: Dopo ogni utilizzo, rimuovere il portafiltro, gettare via i fondi di caffè e sciacquare il portafiltro e il filtro sotto l'acqua calda.
- Capogruppo: Wipe the group head with a damp panno per rimuovere eventuali residui di caffè.
- Lancia vapore: Subito dopo aver montato il latte, pulire la lancia vapore con un panno.amp cloth. Purge the wand briefly to clear any milk residue from the inside.
- vassoio antigoccia: Empty and rinse the drip tray daily or when the 'Empty Me' indicator appears.
2. Pulizia del macinino
The bean hopper and burr grinder are detachable for easy cleaning.
- Assicurarsi che la macchina sia spenta e scollegata.
- Rimuovere il contenitore dei chicchi.
- Remove the upper burr grinder. Use the provided cleaning brush to remove any loose coffee grounds.
- Wipe the bean hopper and grinder components with a dry cloth. Do not wash with water.
- Reassemble the grinder components and bean hopper.
3. Decalcificazione
Descaling is essential to remove mineral buildup and maintain machine performance. The machine may have a 'Clean' indicator light to prompt descaling.
- Per una corretta diluizione, fare riferimento alle istruzioni del produttore della soluzione decalcificante.
- Riempire il serbatoio dell'acqua con la soluzione decalcificante.
- Posizionare un contenitore capiente sotto il gruppo erogatore e la lancia vapore.
- Follow the specific descaling procedure outlined in the full product manual (usually involves running cycles through the brew head and steam wand).
- Dopo la decalcificazione, sciacquare accuratamente il serbatoio dell'acqua e far scorrere più volte acqua fresca nella macchina per rimuovere eventuali residui di soluzione decalcificante.
Risoluzione dei problemi
| Problema | Possibile causa | Soluzione |
|---|---|---|
| Nessuna erogazione di caffè | Serbatoio dell'acqua vuoto; filtro intasato; macchina non riscaldata. | Fill water tank; clean filter basket; allow machine to heat up. |
| Espresso flows too slowly/quickly | Grind size incorrect; coffee tamped too lightly/firmly. | Adjust grind size (finer for slow, coarser for fast); adjust tamppressione di avanzamento. |
| La lancia vapore non produce vapore | Lancia vapore intasata; la macchina non ha raggiunto la temperatura di erogazione del vapore. | Pulire il foro della lancia vapore; attendere che la macchina raggiunga la temperatura del vapore. |
| Perdita d'acqua dalla macchina | Serbatoio dell'acqua non posizionato correttamente; vaschetta raccogligocce piena. | Assicurarsi che il serbatoio dell'acqua sia installato correttamente; svuotare la vaschetta raccogli-gocce. |
| Il macinacaffè non funziona | Contenitore dei chicchi vuoto; chicchi inceppati; macinacaffè intasato. | Fill bean hopper; clear any jammed beans; clean grinder components. |
Specifiche
| Caratteristica | Dettaglio |
|---|---|
| Marca | gevi |
| Numero di modello | E020DE |
| Pressione | 20 barra |
| Capacità (serbatoio dell'acqua) | 2.8 litri |
| Capacità (tramoggia per fagioli) | Circa 250 g |
| Cosatage | 1350 watt |
| Voltage | 220 Volt |
| Modalità di funzionamento | Semiautomatico |
| Caratteristiche speciali | Integrated Coffee Grinder, Milk Frother, Dual Heating System, Active Temp Control |
| Dimensioni (circa) | 16.9" L x 16.1" A x 12.7" P |
| Peso dell'articolo | 27.9 libbre |
Garanzia e supporto
Your Gevi 20Bar Semi-Automatic Espresso Machine is covered by a manufacturer's warranty. Please refer to the warranty card included with your product for specific terms and conditions. For technical support, troubleshooting assistance, or to inquire about replacement parts, please contact Gevi customer service through their official websito o le informazioni di contatto fornite nella confezione del prodotto.
For more information, visit the official Gevi Store: Gevi Store on Amazon