
1. Introduzione
This user manual provides comprehensive instructions for the setup, operation, and maintenance of your FULLJA 17-inch Dual-WiFi Digital Picture Frame. This device allows you to instantly share photos and videos with loved ones from anywhere using the VPhoto app or email, supporting both 2.4 GHz and 5 GHz Wi-Fi networks. With its large display, ample storage, and versatile features, it is designed to preserve and display your precious memories with ease.
2. Informazioni sulla sicurezza
Please read all safety instructions carefully before using the device to ensure proper operation and to prevent damage or injury. Keep this manual for future reference.
- Non esporre il dispositivo all'acqua o a umidità eccessiva.
- Evitare di posizionare il dispositivo vicino a fonti di calore come termosifoni, bocchette di riscaldamento, stufe o altri apparecchi (inclusi amplificatori) che producono calore.
- Utilizzare solo l'alimentatore fornito con il dispositivo.
- Non ostruire le aperture di ventilazione. Installare secondo le istruzioni del produttore.
- Proteggere il cavo di alimentazione dal calpestio o schiacciamento, in particolare in corrispondenza di spine, prese multiple e nel punto in cui escono dal dispositivo.
- Scollegare il dispositivo durante i temporali o quando non viene utilizzato per lunghi periodi di tempo.
- Affidare tutti gli interventi di assistenza a personale qualificato. L'assistenza è richiesta quando il dispositivo è stato danneggiato in qualsiasi modo, ad esempio se il cavo di alimentazione o la spina sono danneggiati, se è stato versato del liquido o sono caduti degli oggetti nel dispositivo, se il dispositivo è stato esposto a pioggia o umidità, se non funziona normalmente o se è caduto.
- Pulire solo con un panno asciutto.
3. Contenuto della confezione
Verificare che tutti gli articoli siano presenti nel pacco:
- 1x FULLJA 17-inch Digital Picture Frame
- 1x Manuale utente
- 1x adattatore di alimentazione
- 1x Bracket (for stand)
- 1x telecomando
- Cavo 1x Micro USB

Image: FULLJA Brand Logo
This image displays the official FULLJA brand logo, typically found on product packaging and documentation.

Image: FULLJA 17-inch Digital Picture Frame
This image shows the 17-inch FULLJA Digital Picture Frame in a vertical orientation, resting on a surface.
4. Prodotto finitoview
4.1. Componenti e controlli
Familiarize yourself with the various parts of your digital picture frame:
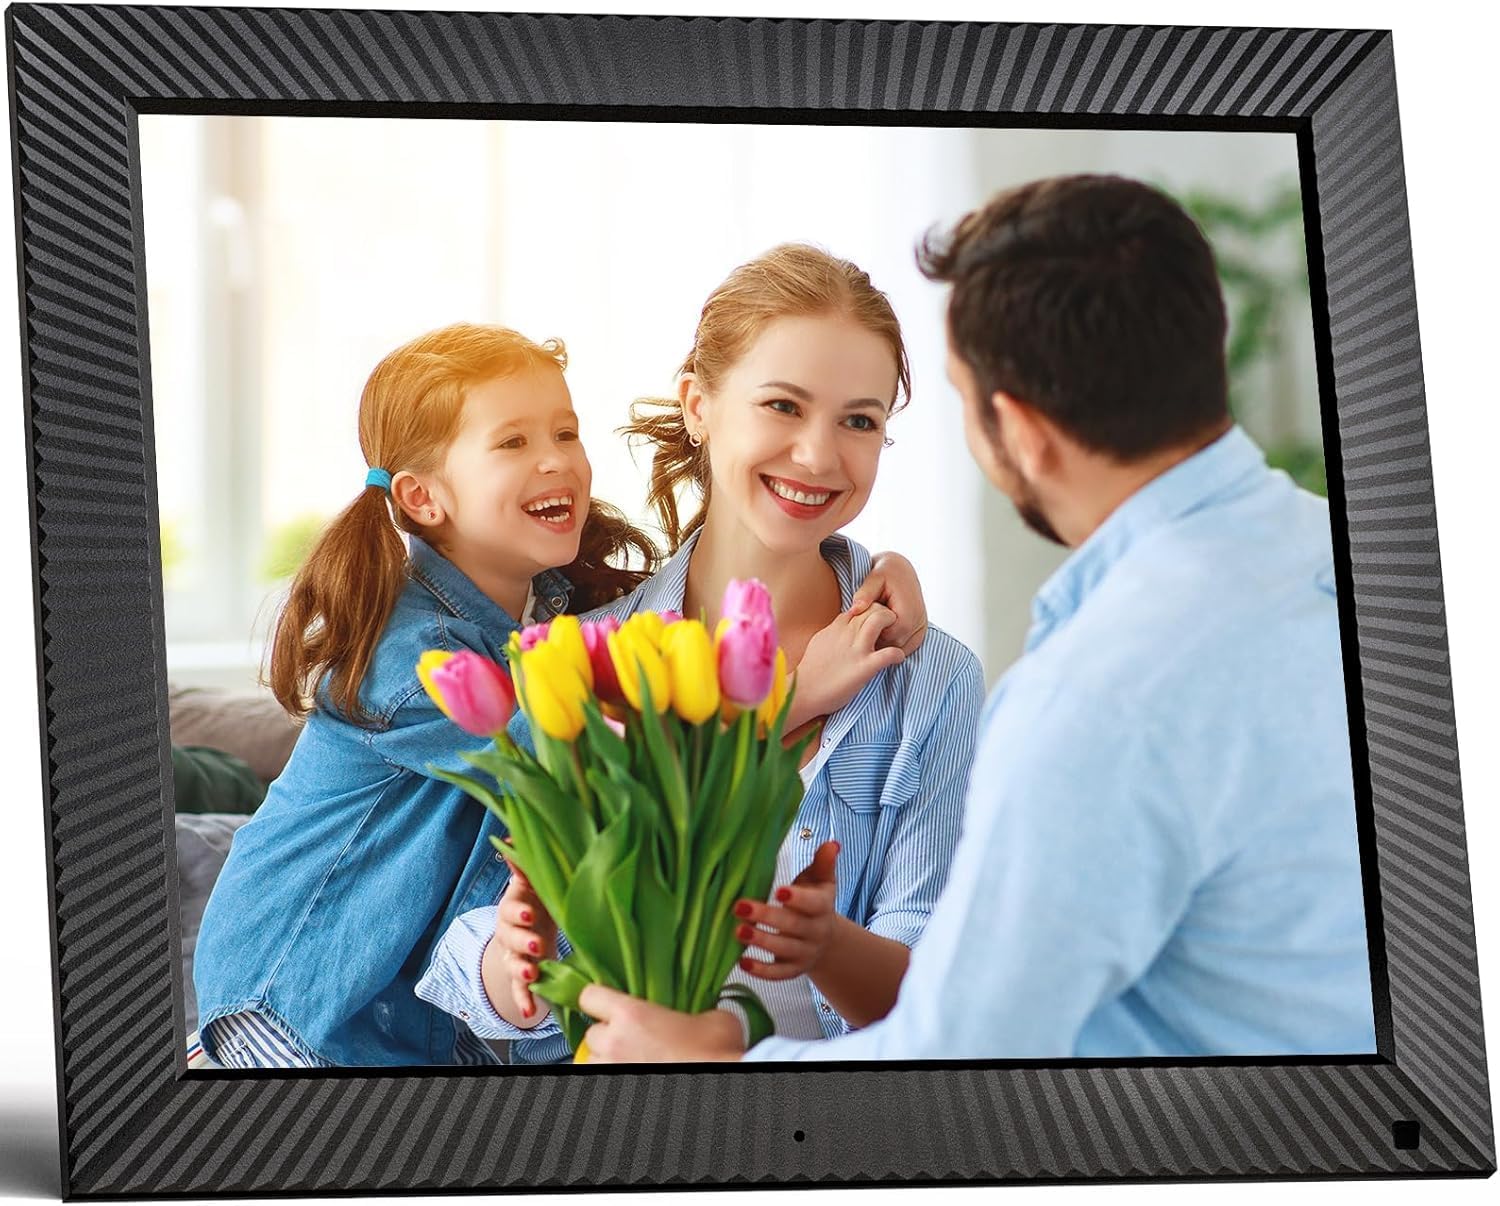
Immagine: Frontale view of the FULLJA 17-inch Digital Picture Frame
This image displays the front of the digital picture frame, showcasing its large screen with a family photo displayed. The frame has a textured black border.

Image: Features of the FULLJA 17-inch Digital Picture Frame
This image highlights key features of the 17-inch digital picture frame, including its touch screen, HD 1280x1024 pixel resolution, 4:3 aspect ratio, and remote control functionality. It shows the frame in both landscape and portrait orientations, with a view of the back panel and stand.
- Schermo di visualizzazione: 17-inch IPS display with 1280x1024 resolution. Touch-enabled for direct interaction.
- Pulsante di accensione: Located on the back or side, used to turn the frame on/off or put it into standby.
- Porta USB: For connecting USB sticks to transfer photos/videos.
- Slot per schede TF: For inserting TF (MicroSD) cards (up to 64GB) to expand storage or transfer media.
- Porta micro USB: For connecting to a computer for data transfer or firmware updates.
- Ingresso alimentazione CC: Per collegare l'adattatore di alimentazione.
- Sensore di movimento: Detects presence to automatically turn the screen on/off, saving energy.
- Altoparlante incorporato: For audio playback with videos or background music.
- Fori per montaggio a parete: VESA compatible holes on the back for wall mounting.
- Supporto di supporto: Attachable bracket for desktop placement in portrait or landscape orientation.
4.2. Controllo remoto
The included remote control provides convenient access to various functions without touching the screen.
- Energia: Turn the frame on/off.
- Menù/Impostazioni: Accedi al menu principale e alle impostazioni.
- Pulsanti di navigazione (su/giù/sinistra/destra): Navigare attraverso i menu e le opzioni.
- OK/Inserisci: Conferma le selezioni.
- Indietro/Esci: Torna alla schermata precedente o esci da un menu.
- Volume +/-: Regola il volume dell'audio.
- Riproduci/Pausa: Controlla la riproduzione multimediale.
- Successivo/Precedente: Skip to the next or previous photo/video.
5. Impostazione
5.1. Accensione iniziale
- Unpack the digital picture frame and all accessories.
- Attach the stand bracket to the back of the frame if you intend to place it on a desk or shelf. Ensure it is securely fastened.
- Connect the power adapter to the DC power input port on the frame, then plug the adapter into a wall outlet.
- The frame will automatically power on or you may need to press the power button.
- Segui le istruzioni sullo schermo per selezionare la lingua e il fuso orario.
5.2. Connessione al Wi-Fi
A Wi-Fi connection is essential for sharing photos via the app or email.
- Dal menu principale, vai a Impostazioni.
- Selezionare Wifi.
- The frame will scan for available networks. Select your desired 2.4 GHz or 5 GHz network from the list.
- Inserisci la password Wi-Fi utilizzando la tastiera sullo schermo.
- Rubinetto Collegare. Once connected, a Wi-Fi icon will appear on the screen.

Image: Digital Picture Frame with Wi-Fi Sharing
This image illustrates the capability of the digital picture frame to share photos and videos wirelessly via Wi-Fi. It shows the frame displaying a family photo, with a smartphone in the foreground indicating app-based sharing.
5.3. Installing the VPhoto App
The VPhoto app is available for both iOS and Android devices and is the primary method for sharing content remotely.
- Cercare "VPhoto" in the Apple App Store (for iOS) or Google Play Store (for Android).
- Scarica e installa l'app sul tuo smartphone o tablet.
- Open the VPhoto app and create an account or log in.
- To connect your frame, go to the Impostazioni menu on your digital picture frame and find the unique binding code.
- In the VPhoto app, select Aggiungi dispositivo and enter the binding code displayed on your frame.
- Once connected, you can start sending photos and videos to your frame. Up to 30 app accounts can be bound to one frame.

Image: Sharing Options for Digital Picture Frame
This image demonstrates the various ways to share content with the digital picture frame, including the free VPhoto app for iOS and Android, unlimited cloud storage with 32GB built-in, and the ability to invite multiple family members to share. It shows the frame displaying a photo and a smartphone screen with the VPhoto app interface.
6. Istruzioni per l'uso
6.1. Invio di foto e video
There are multiple ways to send media to your FULLJA digital picture frame:
- Via VPhoto App: Open the VPhoto app, select the photos/videos you wish to send (up to 50 at a time), choose your connected frame, and tap send.
- Via e-mail: Each frame has a unique email address. You can send photos and short videos as attachments to this email address. The frame will automatically receive and display them.
- Via USB Stick/TF Card: Insert a USB stick or TF card into the respective port. Navigate to the Cartella foto or Video section on the frame, select the external storage, and copy files to the internal memory if desired.

Image: Digital Picture Frame with 32GB Internal Storage
This image highlights the frame's built-in 32GB internal storage, capable of storing approximately 80,000+ photos. The main frame displays a photo of a mother and child, surrounded by smaller circular images representing the vast number of memories that can be stored.
6.2. Funzioni di base
- Slideshow Playback: Photos and videos will automatically play in a slideshow. You can adjust the display interval and transition effects in the settings.
- Photo/Video Browsing: Tap the screen or use the remote to manually browse through your media.
- Controllo del volume: Adjust the volume for videos or background music using the touch screen controls or the remote.
- Rotazione automatica: The frame automatically adjusts the display orientation (portrait or landscape) based on how it is positioned.
6.3. Funzioni avanzate
- Sensore di movimento: Enable this feature in settings to have the frame automatically turn on when motion is detected and off when no motion is detected for a set period, saving energy.
- Auto Screen On/Off: Set specific times for the frame to automatically turn on and off daily.
- Orologio e calendario: Access the built-in clock and calendar functions from the main menu.
- Allarme: Imposta degli allarmi per i promemoria.
- Schermo diviso: Display multiple photos simultaneously (check settings for layout options).
- Text Captions: Add captions to your photos via the VPhoto app.
- Riproduzione musicale: Play background music during slideshows (ensure music files are on the frame's internal storage or connected USB/TF card).

Image: Digital Picture Frame with Function Icons
This image showcases the multi-functional capabilities of the digital picture frame, including Wi-Fi connectivity, weather display, clock, calendar, photo and video playback, music, and slideshow features. Two frames are shown, one on a wall and one on a cabinet, with icons representing these functions below.
7. Manutenzione
7.1. Pulizia del telaio
- Scollegare sempre il telaio prima di pulirlo.
- Utilizzare un panno morbido, asciutto e privo di lanugine per pulire delicatamente lo schermo e la cornice.
- Per macchie ostinate sullo schermo, applicare leggermenteampen the cloth with water or a screen-cleaning solution (specifically designed for electronics) and wipe carefully. Do not spray liquid directly onto the screen.
- Avoid using abrasive cleaners, waxes, or solvents as they may damage the surface.
7.2. Aggiornamenti software
Periodically check for software updates in the frame's settings menu to ensure optimal performance and access to new features. Updates are typically downloaded and installed over Wi-Fi.
7.3. Gestione dell'archiviazione
While the frame has 32GB of internal storage and unlimited cloud storage, you may occasionally want to manage local files:
- Accedi al Cartella foto or File Manager nelle impostazioni per view, delete, or organize stored media.
- Puoi trasferire files to/from a USB stick or TF card to manage internal storage.
8. Risoluzione Dei Problemi
Se riscontri problemi con la tua cornice digitale, fai riferimento ai seguenti problemi comuni e alle relative soluzioni:
| Problema | Possibile causa/soluzione |
|---|---|
| Il telaio non si accende. |
|
| Impossibile connettersi al Wi-Fi. |
|
| Foto/video non visualizzati sulla cornice. |
|
| Lo schermo si blocca o non risponde. |
|
| Il sensore di movimento non funziona. |
|
9. Specifiche
| Caratteristica | Dettaglio |
|---|---|
| Numero di modello | B0CCVBSM87 |
| Marca | PIENOJA |
| Dimensioni dello schermo | 17 pollici |
| Risoluzione dello schermo | 1280 x 1024 pixel (IPS) |
| Proporzioni | 4:3 |
| Memoria interna | 32 GB |
| Supporto per archiviazione esterna | USB stick, TF card (MicroSD) up to 64GB |
| Connettività Wi-Fi | Doppia banda 2.4 GHz / 5 GHz |
| Metodo di controllo | Touch Screen, Remote Control, VPhoto App |
| Sensore di movimento | SÌ |
| Rotazione automatica | SÌ |
| Montabile a parete | SÌ |
| Dimensioni del prodotto | Dimensioni: 29.67 x 43.51 x 2.51 cm |
| Peso del prodotto | 2.52 kg |
| Colore | Nero |
10. Garanzia e supporto
10.1. Garanzia limitata
The FULLJA 17-inch Dual-WiFi Digital Picture Frame comes with a garanzia limitata di un anno from the date of purchase. This warranty covers defects in materials and workmanship under normal use. It does not cover damage caused by accident, misuse, abuse, neglect, unauthorized modification, or improper installation.
To make a warranty claim, please retain your proof of purchase and contact FULLJA customer support.
10.2. Assistenza clienti
For any questions, technical assistance, or support inquiries, please contact FULLJA customer service. We offer lifetime support and aim to provide a prompt response within 24 hours.
Please refer to the contact information provided on the product packaging or the official FULLJA websito per i canali di supporto più aggiornati.