1. Introduzione
This manual provides essential information for the safe and efficient operation of your Optoma X341 DLP Portable Projector. Please read this manual thoroughly before using the projector and retain it for future reference. The Optoma X341 is designed for clear XGA projection, suitable for various environments including small classrooms and businesses, offering accurate color reproduction and image enhancement features.
2. Informazioni sulla sicurezza
- Non guardare direttamente nell'obiettivo del proiettore quando lamp è acceso. La luce intensa può causare danni agli occhi.
- Assicurare una ventilazione adeguata. Non ostruire le aperture di ventilazione. Il surriscaldamento può causare malfunzionamenti o incendi.
- Non posizionare il proiettore su un carrello, un supporto o un tavolo instabile. Il proiettore potrebbe cadere, causando gravi lesioni a bambini o adulti e gravi danni all'unità.
- Non esporre il proiettore alla pioggia o all'umidità per ridurre il rischio di incendi o scosse elettriche.
- Affidare tutti gli interventi di assistenza a personale qualificato.
- Disconnect the power cord from the wall outlet if the projector is not to be used for an extended period.
3. Contenuto della confezione
Verifica che tutti gli articoli elencati di seguito siano inclusi nel tuo pacchetto:
- Optoma X341 DLP Portable Projector
- Cavo di alimentazione
- Telecomando
- Cavo HDMI
- Manuale dell'utente (questo documento)
4. Proiettore sopraview
4.1 Collegamenti del pannello posteriore
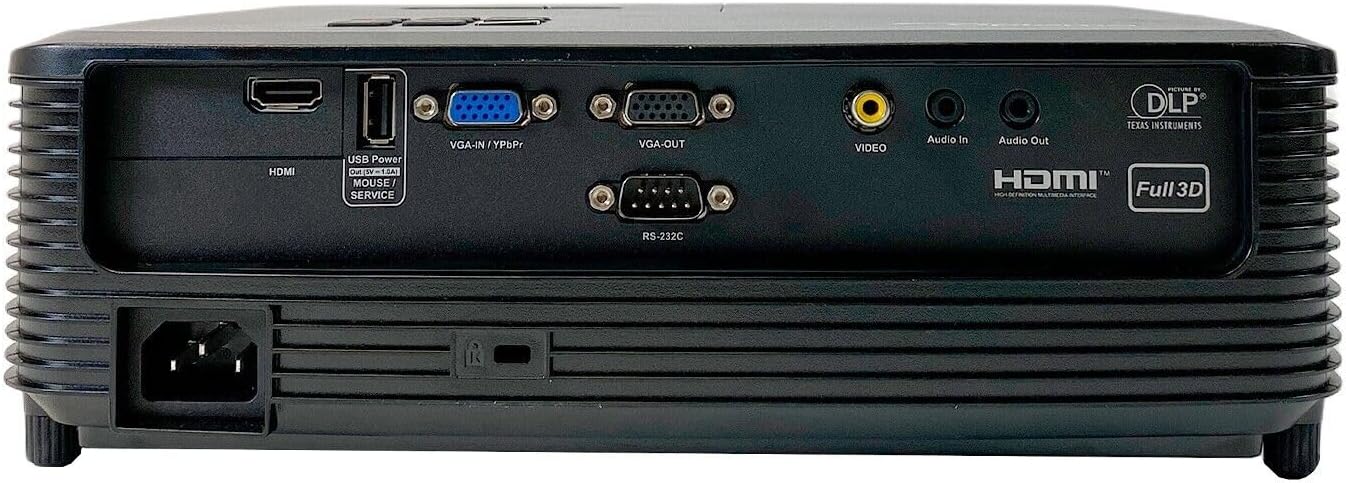
This image displays the rear panel of the Optoma X341 projector, highlighting its connectivity options. From left to right, you can see the power input, an HDMI port, a USB Power/Service port, VGA-IN/YPbPr, VGA-OUT, Video input (RCA), Audio In, Audio Out, and an RS-232C port for control. These ports allow connection to various devices such as computers, gaming consoles, and audio systems.
4.2 Controlli del pannello superiore

The top panel of the Optoma X341 projector features the focus and zoom rings for image adjustment, along with an array of control buttons. These buttons include power on/off, menu navigation, source selection, and other function keys for direct control of the projector settings.
4.3 Side Panels and Ventilation
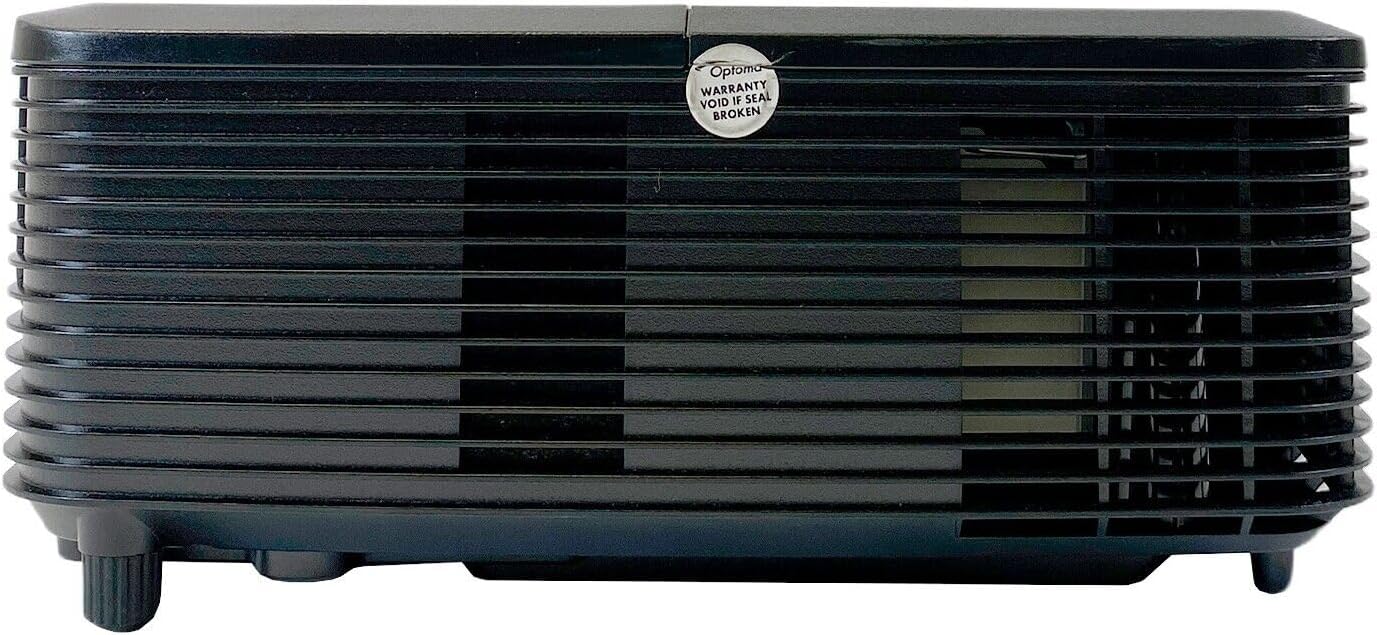
Questa immagine mostra un lato view of the Optoma X341 projector, emphasizing the ventilation grilles. These grilles are crucial for dissipating heat generated during operation, ensuring the projector maintains optimal performance and longevity. It is important to keep these vents unobstructed.
4.4 Bottom Panel and Label

The bottom panel of the Optoma X341 projector is visible in this image, displaying the mounting points for ceiling or tabletop installation. Also visible is the product information label, which includes regulatory details, model number (DAXSHG), power requirements, and manufacturing origin.
5. Impostazione
5.1 Posizionamento
- Posizionare il proiettore su una superficie stabile e piana oppure montarlo saldamente.
- Assicurarsi che vi sia spazio sufficiente attorno al proiettore per la ventilazione.
- Position the projector perpendicular to the screen for optimal image geometry.
- The maximum throw distance is 10 feet for optimal image size and clarity.
5.2 Collegamento dell'alimentazione
- Connect the provided power cable to the projector's power input port (located on the rear panel).
- Collegare l'altra estremità del cavo di alimentazione a una presa elettrica dotata di messa a terra.
5.3 Collegamento delle sorgenti di ingresso
- HDMI: Connect an HDMI cable from your source device (e.g., laptop, gaming console, Blu-ray player) to the HDMI port on the projector.
- VGA: Connect a VGA cable from your computer to the VGA-IN port on the projector.
- Video (RCA): Use an RCA composite video cable to connect older video sources to the yellow 'VIDEO' port.
- Audio: Connect external audio sources to the 'Audio In' port or use the 'Audio Out' port to connect to external speakers.
5.4 Regolazione della messa a fuoco e dello zoom
- Accendere il proiettore e visualizzare un'immagine.
- Ruotare il Anello dello zoom on the top of the projector to adjust the image size.
- Ruotare il Anello di messa a fuoco to sharpen the image until it is clear and legible.
6. Funzionamento del proiettore
6.1 Accensione/Spegnimento
- Accensione: Premere il pulsante di accensione sul pannello di controllo del proiettore o sul telecomando. La spia di accensione diventerà blu.
- Spegni: Press the power button twice. The projector will enter a cooling cycle before shutting down completely. Do not unplug the projector during the cooling cycle.
6.2 Selezione della sorgente di input
- Press the 'Source' button on the projector or remote control.
- Use the arrow keys to navigate through the available input sources (HDMI, VGA, Video) and press 'Enter' to select.
6.3 Navigazione nel menu
- Press the 'Menu' button to access the On-Screen Display (OSD) menu.
- Utilizzare i tasti freccia per navigare tra le opzioni del menu.
- Press 'Enter' to select an option or confirm a setting.
- Press 'Menu' again to exit the OSD.
6.4 Regolazioni dell'immagine
- Luminosità/Contrasto: Adjust these settings in the OSD menu to optimize image visibility for your viewambiente di lavoro.
- Colore: The projector supports sRGB color space for accurate color reproduction. Adjust color settings as needed.
- Regolazione del colore della parete: This feature uses various gamma profiles to improve brightness and color accuracy when projecting onto non-white surfaces. Access this setting in the OSD menu.
- Edge Mask: This technology helps eliminate soft edges and jaggies at the border of the projection image, resulting in a smoother, more consistent display. Enable or disable this feature via the OSD menu.
6.5 Operazione 3D
The Optoma X341 supports Full HD 3D content. To view 3D content, you will need compatible 3D glasses and a 3D-enabled source device. Refer to your 3D source device's manual for specific setup instructions.
7. Manutenzione
- Pulizia delle lenti: Pulire delicatamente la lente con un panno morbido e privo di lanugine, specificamente progettato per superfici ottiche. Non utilizzare detergenti abrasivi o solventi.
- Projector Body Cleaning: Utilizzare un panno morbido e asciutto per pulire l'esterno del proiettore. Per macchie ostinate, utilizzare un panno leggermenteamp è possibile utilizzare un panno con un detergente delicato, seguito da una passata asciutta.
- Ventilazione: Regularly check and clean the ventilation grilles to ensure proper airflow. Use a soft brush or compressed air to remove dust accumulation.
- Lamp Sostituzione: Il proiettore lamp ha una durata di vita finita. Quando lamp l'indicatore si illumina o l'immagine diventa scura, lamp potrebbe essere necessario sostituirlo. Consultare un tecnico qualificato per lamp sostituzione per garantire una corretta manipolazione e sicurezza.
8. Risoluzione Dei Problemi
| Problema | Possibile soluzione |
|---|---|
| Nessuna immagine sullo schermo | Check power connection. Ensure input source is correctly selected. Verify source device is powered on and outputting a signal. |
| L'immagine è sfocata | Adjust the focus ring on the projector lens. Ensure the projector is within the recommended throw distance. |
| Image is distorted or trapezoidal | Adjust the keystone correction in the OSD menu. Ensure the projector is placed perpendicular to the screen. |
| Nessun audio | Check audio cable connections. Ensure volume is not muted or set too low on both the projector and the source device. |
| Il proiettore si surriscalda e si spegne | Ensure ventilation openings are not blocked. Clean any dust from the vents. Operate in a well-ventilated area. |
9. Specifiche
| Caratteristica | Specificazione |
|---|---|
| Modello | X341 |
| Tecnologia di visualizzazione | DLP |
| Risoluzione nativa | Risoluzione: 1024 x 768 (XGA) |
| Risoluzione massima | 1920 x 1080 (Full HD) |
| Luminosità | 3300 ANSI Lumen |
| Rapporto di contrasto | 22,000:1 |
| Connettività | HDMI, VGA-IN/YPbPr, VGA-OUT, Video (RCA), Audio In, Audio Out, RS-232C, USB Power/Service |
| Caratteristiche speciali | Portable, Full 3D Support, Wall Color Adjustment, Edge Mask |
| Metodo di controllo | Telecomando |
| Dimensioni (L x P x A) | 10 cm L x 12 cm P x 8 cm A |
10. Garanzia e supporto
For warranty information and technical support, please refer to the documentation provided with your purchase or visit the official Optoma website. Keep your proof of purchase for warranty claims. Do not attempt to service the projector yourself, as this may void your warranty and expose you to electrical hazards.