Vector Optics OPSL28
VictOptics Cerato C3 3-9x32 Riflescope User Manual
Model: OPSL28 | Brand: Vector Optics
Introduzione
The Vector VictOptics Cerato C3 is an ultra-compact riflescope, measuring only 20.3 cm (8 inches) in length. It features a 3-9x magnification range and a 32mm objective lens. This riflescope is equipped with stepless red/green illumination and lockable BDC turrets. Designed for rifles, it can be mounted using Weaver-style rings. Constructed from durable aluminum, it weighs 380 grams. The Cerato C3 is ideal for target sports and offers parallax adjustment down to 3 meters (3 yards).

Figure 1: VictOptics Cerato C3 Riflescope, showing its compact design.
Cosa c'è nella scatola
Upon unboxing your VictOptics Cerato C3 Riflescope, please verify that all components listed below are present:
- VictOptics Cerato C3 Riflescope
- Weaver Mounts (20mm base width)
- Parasole
- Tappi per lenti ribaltabili
Note: If your rifle requires 11mm dovetail mounts, separate mounts must be purchased as the included Weaver mounts are not compatible.
Configurazione e installazione
1. Montaggio del cannocchiale
The Cerato C3 comes with Weaver mounts designed for 20mm base rails. Ensure your rifle's rail is compatible. For 11mm dovetail rails, acquire appropriate mounts separately.
- Attach the Weaver mounts to your rifle's rail, ensuring they are securely fastened.
- Place the riflescope into the mounts. Adjust its position forward or backward to achieve optimal eye relief. Eye relief is the distance between your eye and the eyepiece lens when the full field of view è visibile.
- Rotate the riflescope to ensure the reticle is level.
- Tighten the mount rings evenly to secure the riflescope without over-tightening, which could damage the scope tube.
2. Battery Installation (for Illumination)
The riflescope requires a CR1620 battery for the reticle illumination. The battery compartment is typically located on the illumination control knob.
- Unscrew the battery cap on the illumination control knob.
- Inserire una batteria CR1620 nuova con il lato positivo (+) rivolto verso l'esterno.
- Carefully screw the battery cap back on, ensuring a tight seal to prevent moisture ingress.
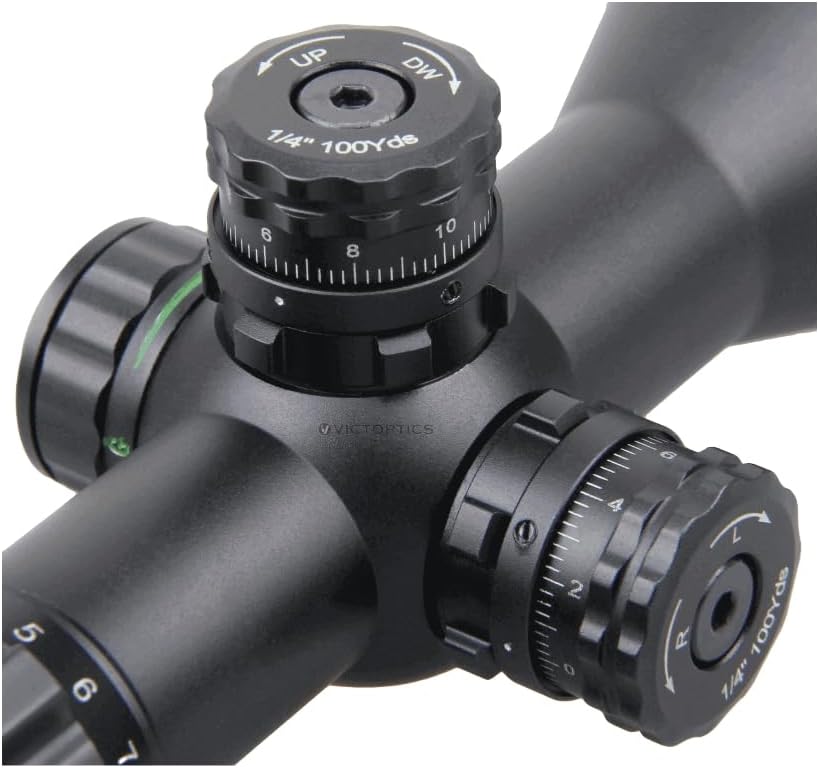
Figure 2: Detail of the windage, elevation, and illumination turrets.
Istruzioni per l'uso
1. Regolazione dell'ingrandimento
The Cerato C3 offers a variable magnification from 3x to 9x. Rotate the magnification ring, located near the eyepiece, to adjust the desired power. The numbers on the ring indicate the current magnification setting.
2. Regolazione della parallasse
Parallax is the apparent shift in the reticle's position relative to the target when the eye moves. The Cerato C3 features an adjustable objective (AO) parallax, allowing focus down to 3 meters (3 yards). Rotate the objective lens ring to adjust for parallax at different distances. This ensures the reticle and target are on the same focal plane, eliminating parallax error.
3. Illuminazione del reticolo
The riflescope features stepless red and green reticle illumination. The illumination control knob is typically located on the left side of the main tube. Rotate this knob to turn on the illumination and adjust its brightness. Rotate it further to switch between red and green colors. Turn it off when not in use to conserve battery life.

Figura 3: Oltreview of key features: Min 3yds Parallax, Red & Green Illuminated Reticle, Turret Lock, and 3x Zoom Factor.
4. Regolazione della derivazione e dell'elevazione (torrette)
The Cerato C3 is equipped with lockable BDC (Bullet Drop Compensation) turrets for windage and elevation adjustments. Each click adjusts the point of impact by 1/4" at 100 yards.
- Sblocco delle torrette: To make adjustments, pull the turret knob upwards to unlock it.
- Adjusting Elevation (UP/DW): Rotate the top turret. Turning "UP" moves the point of impact up; turning "DW" moves it down.
- Adjusting Windage (L/R): Rotate the side turret. Turning "L" moves the point of impact left; turning "R" moves it right.
- Locking Turrets: Once adjustments are made, push the turret knob back down to lock it in place. This prevents accidental changes to your zero.
- Azzeramento: After zeroing your rifle, you can reset the turrets to "0" without affecting your internal adjustments. Pull the turret up, rotate the numbered ring to "0", and then push it back down to lock.
5. Reticle Information (SFP Mildot)
The riflescope features a Second Focal Plane (SFP) Mildot reticle. In an SFP reticle, the size of the reticle appears constant regardless of the magnification setting. This means that the Mildot subtensions (the spacing between the dots) are only accurate for range estimation or holdovers at a specific magnification, typically the highest magnification (9x) for this scope. Refer to the reticle diagram for specific subtension values.

Figure 4: Mildot Reticle at 9x Magnification (MOA values shown).
Manutenzione e cura
- Pulizia delle lenti: Use a soft, clean lens cloth or a lens pen to remove dust and smudges. For stubborn marks, use a small amount of lens cleaning fluid specifically designed for optical lenses. Avoid using harsh chemicals or abrasive materials.
- Pulizia del corpo: Pulisci il corpo del cannocchiale con un panno morbido eamp stoffa.
- Magazzinaggio: Store the riflescope in a cool, dry place, away from direct sunlight and extreme temperatures. Use the included flip-up lens caps to protect the lenses when not in use.
- Batteria: Remove the battery if the riflescope will not be used for an extended period to prevent leakage.
Risoluzione dei problemi
| Problema | Possibile causa | Soluzione |
|---|---|---|
| Blurry image / Cannot focus | Improper parallax adjustment; Diopter out of focus; Dirty lenses. | Adjust the parallax ring (objective lens). Adjust the diopter on the eyepiece. Clean the lenses. |
| L'illuminazione del reticolo non funziona | Dead battery; Battery inserted incorrectly; Loose battery cap. | Replace battery (CR1620). Ensure battery is inserted with positive (+) side up. Tighten battery cap. |
| Spostamenti del punto di impatto | Mounts are loose; Turrets not locked; Recoil. | Check and tighten mount rings. Ensure turrets are pushed down and locked. |
Specifiche
| Caratteristica | Dettaglio |
|---|---|
| Numero di modello | OPSL28 |
| Ingrandimento | 3-9x |
| Diametro della lente dell'obiettivo | 32mm |
| Lunghezza | 20.3 cm (8 pollici) |
| Peso | 380 grammi |
| Materiale | Alluminio |
| Tipo di reticolo | Second Focal Plane (SFP) Mildot |
| Illuminazione | Stepless Red/Green |
| Regolazione parallasse | Adjustable Objective (AO), down to 3 meters (3 yards) |
| Fare clic su Valore | 1/4" at 100 yards |
| Torrette | Lockable BDC (Bullet Drop Compensation) |
| Tipo di montaggio | Weaver (20mm base width) |
| Dispositivi compatibili | Fucile |
| Componenti inclusi | Riflescope, Weaver Mounts, Sunshade, Flip-up Lens Caps |

Figure 5: Dimensional drawing of the Cerato C3 Riflescope.
Garanzia e supporto
For warranty information, technical support, or service inquiries regarding your VictOptics Cerato C3 Riflescope, please contact Vector Optics directly or the authorized retailer from whom you purchased the product. Retain your proof of purchase for warranty claims.
Spesso è possibile trovare i dettagli di contatto sul sito ufficiale del produttore websito o tramite i canali di supporto del venditore.
Ask a question about this manual
Ask about setup, troubleshooting, compatibility, parts, safety, or missing instructions. Manuals+ will review the question and use this page’s manual context to help answer it.