
Importanti istruzioni di sicurezza
Si prega di leggere attentamente tutte le istruzioni prima di iniziare l'installazione. Il mancato rispetto di queste istruzioni potrebbe causare scosse elettriche, incendi o lesioni personali.
- AVVERTIMENTO: Per ridurre il rischio di scosse elettriche, prima di iniziare assicurarsi che la corrente elettrica sia stata interrotta tramite l'interruttore automatico o la scatola dei fusibili.
- Tutti i cablaggi devono essere conformi alle normative elettriche nazionali e locali. Se non si ha familiarità con i cablaggi, consultare un elettricista qualificato.
- Il ventilatore deve essere montato a una distanza minima di 7 piedi (2.1 metri) dal pavimento al bordo di uscita delle pale.
- Ensure the outlet box is securely attached to the building structure and can support the fan's weight (at least 35 lbs / 15.9 kg).
- Non utilizzare il ventilatore con pale danneggiate. Sostituire tutte le pale se una è danneggiata.
- Non inserire oggetti nel percorso delle pale del ventilatore.
Contenuto della confezione
Carefully unpack your fan and inspect the contents. You should have the following items:
- Assemblaggio dell'alloggiamento del motore
- Pale del ventilatore (3)
- Staffe per lame
- Assemblaggio asta
- Staffa di fissaggio
- Assemblaggio kit luci
- Telecomando con supporto a parete
- Pacchetto hardware (viti, rondelle, dadi per cavi)
- Manuale di istruzioni
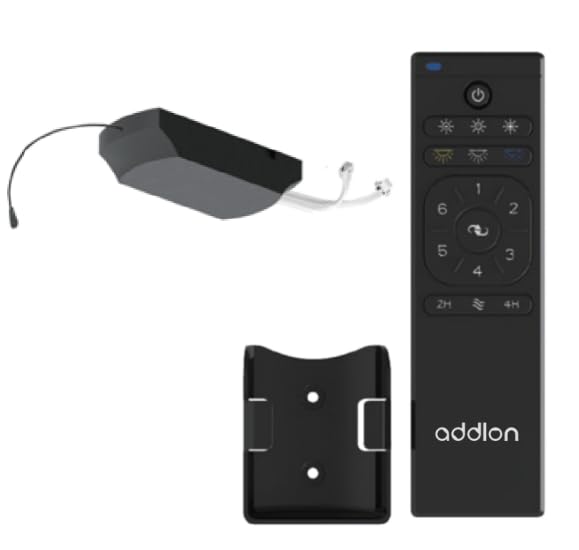
Figure 1: addlon 80-inch 3 Wood Blades Ceiling Fan with Light. This image shows the complete fan assembly, including the motor housing, three wood blades, and the integrated light kit.
Configurazione e installazione
Follow these steps to properly install your addlon ceiling fan. Ensure power is OFF at the circuit breaker before proceeding.
- Installazione della staffa di montaggio: Secure the mounting bracket to the ceiling outlet box using the screws provided. Ensure the bracket is firmly attached to a structural beam or a fan-rated outlet box.
- Assemblaggio dell'asta discendente: Insert the downrod through the canopy and coupling cover. Feed the motor wires through the downrod. Secure the downrod to the motor housing with the provided pin and screws.
- Appendere il ventilatore: Carefully lift the fan assembly and place the downrod ball into the mounting bracket opening. Ensure the tab on the mounting bracket aligns with the slot on the downrod ball.
- Collegamenti elettrici: Connect the fan's electrical wires to the house wiring according to the wiring diagram in this manual (typically black to black, white to white, and green/bare copper to ground). Use the provided wire nuts and ensure all connections are secure.
- Attacco lama: Attach each fan blade to its blade bracket using the screws provided. Then, attach the blade brackets to the motor housing. Ensure all screws are tightened securely.
- Installazione del kit luci: Connect the light kit wires to the fan motor wires (usually blue to blue, white to white). Secure the light kit assembly to the bottom of the fan motor housing. Install the light cover.
- Accoppiamento telecomando: Once installation is complete and power is restored, follow the remote control pairing instructions provided in the remote control section to synchronize the remote with your fan.
Istruzioni per l'uso
Your addlon ceiling fan is operated by the included remote control. Ensure the remote has fresh batteries installed (2x AAA, not included).
- Ventola ON/OFF: Premere il tasto VENTOLA ON/OFF pulsante per accendere o spegnere la ventola.
- Controllo della velocità della ventola: Utilizzare il VELOCITÀ buttons (usually marked with fan icons or numbers) to cycle through different fan speeds (e.g., Low, Medium, High).
- Luce accesa/spenta: Premere il tasto LUCE ACCESA/SPENTA pulsante per accendere o spegnere la luce.
- Oscuramento della luce: If your light kit supports dimming, press and hold the LEGGERO button to adjust the brightness. Release when the desired brightness is reached.
- Funzione inversa: Premere il tasto INVERSIONE button to change the direction of the fan blades. This is useful for seasonal comfort (downward airflow for cooling in summer, upward airflow for circulating warm air in winter). Allow the fan to stop completely before reversing direction.
- Funzione timer: Some models include a timer function. Press the TIMER button (e.g., 1H, 2H, 4H) to set the fan to turn off automatically after a set period.
Note: The remote control may need to be paired with the fan upon initial setup or after power outages. Refer to the remote control's specific instructions for pairing procedures.
Manutenzione
Regular maintenance ensures the longevity and optimal performance of your addlon ceiling fan. Always turn off power at the circuit breaker before performing any maintenance.
- Pulizia: Utilizzare un morbido, damp panno per pulire le pale della ventola e l'alloggiamento del motore. Non utilizzare detergenti abrasivi o solventi, poiché potrebbero danneggiare la finitura.
- Cura della lama: Periodically check the blade screws for tightness. Loose screws can cause wobbling and noise.
- Sostituzione della lampadina: If the light bulb needs replacement, ensure the power is off. Allow the bulb to cool before removing. Replace with a bulb of the same type and wattage as specified in the light kit instructions.
- Controllo annuale: Annually, check all connections and screws for tightness. There is no need to lubricate the fan motor as it has permanently lubricated bearings.
Risoluzione dei problemi
Before contacting customer support, try these troubleshooting steps for common issues:
| Problema | Possibile causa | Soluzione |
|---|---|---|
| La ventola non si avvia | No power to the fan; Loose wire connections; Remote control not paired or dead batteries. | Check circuit breaker; Verify all wire connections; Replace remote batteries and re-pair remote. |
| La luce non funziona | Loose wire connection; Faulty bulb; Remote control issue. | Check light kit wiring; Replace bulb; Check remote batteries and pairing. |
| La ventola traballa | Viti delle lame allentate; Lame sbilanciate; Staffa di montaggio allentata. | Tighten all blade screws; Use a balancing kit (not included) to balance blades; Ensure mounting bracket is secure. |
| Funzionamento rumoroso | Viti allentate; ronzio del motore; le lame urtano un ostacolo. | Check and tighten all screws; Ensure no wires are rubbing against the motor housing; Verify blades are clear of obstructions. |
Specifiche
| Caratteristica | Dettaglio |
|---|---|
| Marca | addlon |
| Modello | 80-inch 3 Wood Blades Ceiling Fan with Light |
| Stile | Moderno |
| Tipologia di camera | Camera da letto, soggiorno |
| Tipo di controllore | Telecomando |
| Materiale | Wood (Blades) |
| Numero di lame | 3 |
| Metodo di controllo | Remoto |
| Codice UPC | 850056663090 |
| ASIN | B0CHJKZ5GD |
Garanzia e assistenza clienti
addlon products are manufactured to the highest quality standards and are warranted against defects in materials and workmanship. Please refer to the warranty card included with your purchase for specific terms and conditions.
For technical assistance, replacement parts, or general inquiries, please contact addlon customer support:
- Websito: addlon Official Store on Amazon
- E-mail: support@addlon.com (placeholder email, as none provided)
- Telefono: 1-800-XXX-XXXX (placeholder phone, as none provided)
Please have your model number (80-inch 3 Wood Blades Ceiling Fan with Light) and purchase date available when contacting support.