1. Introduzione
Thank you for choosing the TRESKO 4200W Infrared Gas Heater. This manual provides essential information for the safe and efficient operation, installation, and maintenance of your heater. Please read this manual thoroughly before use and retain it for future reference.
This infrared gas heater is designed to provide comfortable radiant heat for various indoor and outdoor well-ventilated spaces, such as balconies, terraces, workshops, and other areas requiring supplemental heating.
2. Importanti istruzioni di sicurezza
Failure to follow these instructions may result in fire, explosion, property damage, personal injury, or death.
2.1 Avvertenze generali di sicurezza
- Ventilazione: Always ensure adequate ventilation when operating the heater, especially indoors. This heater consumes oxygen and produces carbon monoxide. Insufficient ventilation can lead to carbon monoxide poisoning.
- Liquidazione: Maintain a safe distance from combustible materials (e.g., curtains, furniture, paper). Refer to the specifications for minimum clearance distances.
- Supervisione: Never leave the operating heater unattended. Keep children and pets away from the heater.
- Superficie stabile: Posizionare sempre la stufa su una superficie solida, piana e non combustibile.
- Materiali infiammabili: Non conservare o utilizzare benzina o altri vapori e liquidi infiammabili nelle vicinanze di questo o di altri apparecchi.
- In movimento: Non spostare la stufa mentre è in funzione o è ancora calda.
- Modifiche: Do not modify the heater or its components. Use only original spare parts and accessories.
- Danno: Do not operate the heater if it is damaged or malfunctioning. Contact qualified service personnel.
- Protezione: The heater is equipped with an anti-tilt protection system and an oxygen depletion sensor (ODS) for your safety. Do not bypass or tamper with these safety features.
2.2 Sicurezza del gas
- Tipo di gas: This heater is designed for use with butane, propane, or a mixture of both (LPG) gas cylinders up to 15 kg. Ensure the gas bottle type matches the heater's requirements.
- Controlli delle perdite: Always perform a leak test with soapy water after connecting a new gas bottle or if you suspect a leak. Never use an open flame to check for leaks.
- Gas Bottle Storage: Store gas bottles in a well-ventilated area, away from heat sources and direct sunlight. Never store gas bottles indoors unless connected to the heater.
- Regolatore e tubo: Use only the supplied gas regulator and hose. Ensure they are correctly installed and free from damage. Replace them if they show signs of wear or damage.
- Ventilazione: When changing gas bottles, do so in a well-ventilated area, away from ignition sources.
3. Contenuto della confezione
Disimballare con cura la scatola e assicurarsi che tutti gli articoli siano presenti e integri. Se alcuni articoli risultano mancanti o danneggiati, contattare il rivenditore.
- TRESKO Infrared Gas Heater
- Gas Regulator (50 mbar)
- Tubo del gas
- Copertura protettiva
- Manuale d'uso
4. Prodotto finitoview
The TRESKO Infrared Gas Heater is a mobile and efficient heating solution. It features a robust steel casing, three adjustable heating levels, and multiple safety mechanisms.

Figure 1: TRESKO 4200W Infrared Gas Heater (White)

Figure 2: Key features including 360° swivel wheels, integrated handle, and side tilt protection.
5. Installazione e assemblaggio
5.1 Disimballaggio e ispezione iniziale
- Remove all packaging materials and inspect the heater for any signs of damage.
- Assicurarsi che tutti i componenti elencati nella Sezione 3 siano presenti.
5.2 Attaching Wheels (if not pre-assembled)
The heater comes with four 360° swivel wheels for easy mobility. Attach them securely to the base of the heater using the provided hardware.
5.3 Collegamento della bombola del gas
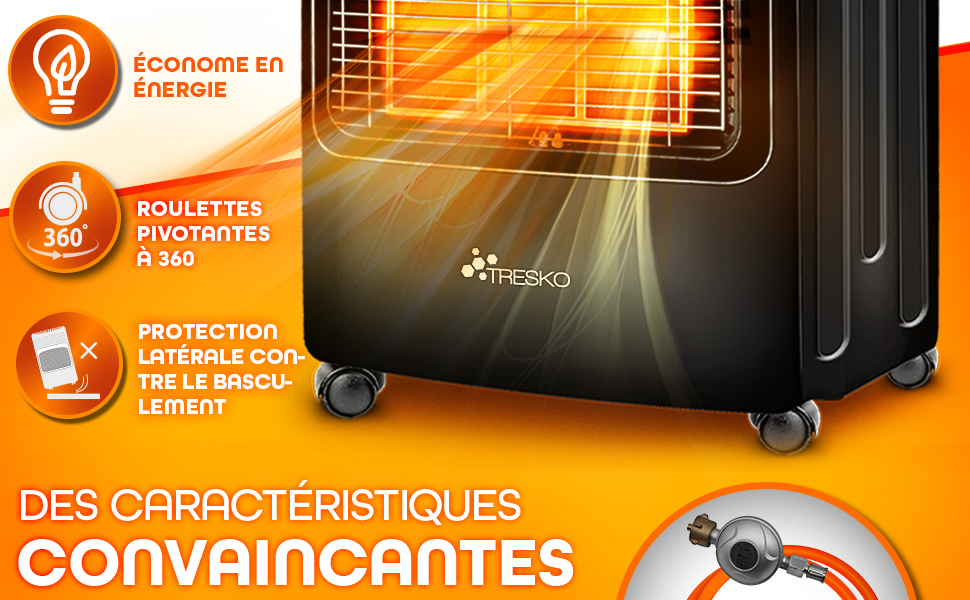
Figure 3: Gas bottle connection and compatible sizes (15kg, 11kg, 5kg Butane, Propane, or LPG).
- Open the rear panel of the heater to access the gas bottle compartment.
- Place a compatible gas bottle (up to 15 kg) inside the compartment.
- Connect the gas hose to the heater's gas inlet. Ensure the connection is tight.
- Attach the gas regulator to the gas bottle valve. Tighten firmly by hand, then use a wrench if necessary, but do not overtighten.
- Ensure the gas bottle is secured within the compartment.
5.4 Initial Leak Test
After connecting the gas bottle, it is crucial to perform a leak test:
- Mix soapy water (e.g., dish soap and water) in a spray bottle or bowl.
- Open the gas bottle valve slowly.
- Apply the soapy water solution to all gas connections (regulator to bottle, hose to regulator, hose to heater).
- If bubbles appear, there is a gas leak. Immediately close the gas bottle valve and re-tighten the connections. Repeat the test. If leaks persist, do not use the heater and contact service.
- Once no bubbles are observed, close the gas bottle valve.
6. Istruzioni per l'uso
6.1 Avviamento del riscaldatore

Figure 4: Control panel with piezo ignition and heat level settings.
- Ensure the heater is on a stable surface and in a well-ventilated area.
- Open the gas bottle valve fully.
- Press and hold the control knob (piezo ignition button) while turning it to the desired heat level (Level 1, 2, or 3).
- Continue to hold the knob for 10-15 seconds after ignition to allow the thermocouple to heat up and engage the flame failure device.
- Release the knob. The heater should remain lit. If it extinguishes, repeat the process.
6.2 Regolazione dei livelli di calore
Il riscaldatore offre tre impostazioni di calore:
- Livello 1: 1500W (approx. 100 g/h gas consumption)
- Livello 2: 2800W (approx. 200 g/h gas consumption)
- Livello 3: 4200W (approx. 300 g/h gas consumption)
To adjust the heat, simply turn the control knob to the desired level. The ceramic plates will adjust accordingly.
6.3 Spegnimento
- Ruotare la manopola di controllo in posizione "OFF".
- Close the gas bottle valve completely. This is the primary method for shutting off the gas supply.
- Lasciare raffreddare completamente la stufa prima di spostarla o riporla.
7. Manutenzione e conservazione
7.1 Pulizia
- Prima di procedere alla pulizia, assicurarsi sempre che il riscaldatore sia spento, che l'alimentazione del gas sia chiusa e che l'unità sia completamente fredda.
- Pulire le superfici esterne con un panno morbido, damp panno. Non usare detergenti abrasivi o solventi.
- Keep the air inlets and outlets clear of dust and debris. Use a soft brush or vacuum cleaner if necessary.
- Non spruzzare acqua direttamente sulla stufa.
7.2 Conservazione

Figure 5: Heater in folded state for space-saving storage.

Figure 6: Heater stored with its protective cover.
- Ensure the heater is completely cool and the gas bottle is disconnected and stored separately in a well-ventilated area.
- The heater features a foldable design for space-saving storage. Remove the wheels and support plate, then fold the marked sides inwards.
- Use the provided protective cover to shield the heater from dust and moisture during storage.
- Store the heater in a dry, cool place, away from direct sunlight and flammable materials.
8. Risoluzione Dei Problemi
Se riscontri problemi con il tuo riscaldatore, consulta la tabella sottostante per i problemi più comuni e le relative soluzioni.
| Problema | Possibile causa | Soluzione |
|---|---|---|
| La stufa non si accende. | Valvola della bombola del gas chiusa. Empty gas bottle. Gas connections loose. Accenditore piezoelettrico difettoso. | Aprire la valvola della bombola del gas. Sostituire la bombola del gas. Check and tighten all gas connections; perform leak test. Contattare il Servizio. |
| Heater ignites but extinguishes when knob is released. | La manopola di controllo non è stata tenuta premuta abbastanza a lungo. Termocoppia difettosa. | Tenere premuta la manopola di controllo per 10-15 secondi dopo l'accensione. Contattare il Servizio. |
| Heater produces a strong gas smell. | Perdita di gas. | Immediately close gas bottle valve. Ventilate the area. Perform a leak test. Do not operate if leak persists. Contact service. |
| Il riscaldamento si spegne inaspettatamente. | Oxygen Depletion Sensor (ODS) activated. Anti-tilt protection activated. Empty gas bottle. | Ensure adequate ventilation. Move to a more ventilated area. Assicurarsi che la stufa sia posizionata su una superficie stabile e piana. Sostituire la bombola del gas. |
9. Specifiche tecniche

Figure 7: Energy efficiency label and heating coverage.

Figure 8: Product dimensions (L x W x H).
| Caratteristica | Specificazione |
|---|---|
| Marca | TRESKO |
| Numero di modello | 1537 |
| Colore | Bianco |
| Dimensioni (L x P x A) | Dimensioni: 35 x 42 x 74 cm |
| Peso | 9.37 kg |
| Heating Power Levels | 3 (1500W, 2800W, 4200W) |
| Consumo di gas | 100 g/h (min), 200 g/h (medium), 305 g/h (max) |
| Tipo di gas | LPG (Butane, Propane, or mixture) |
| Capacità della bombola del gas | Fino a 15 kg |
| Regolatore di pressione | 50 mbar (included) |
| Metodo di riscaldamento | Radiante |
| Classe di efficienza energetica | A |
| Dimensioni consigliate della stanza | Fino a 82 mq |
| Caratteristiche di sicurezza | Oxygen Depletion Sensor (ODS), Flame Failure Device (FFD), Anti-tilt Protection, Safety Grid |
| Mobilità | 4 x 360° Swivel Wheels, Integrated Handles |
| Paese di origine | Cina |
10. Garanzia e supporto
Per informazioni sulla garanzia, supporto tecnico o richieste di assistenza, contattare direttamente il rivenditore o il produttore. Conservare la prova d'acquisto per eventuali reclami in garanzia.