1. Prodotto finitoview
The SanJie Wireless Door Chime system provides an alert when a door or window is opened. It is designed for various applications including home security, monitoring children or elderly individuals, and notifying staff in business environments. The system includes one contact sensor and two plug-in receivers, offering a range of up to 500 feet.
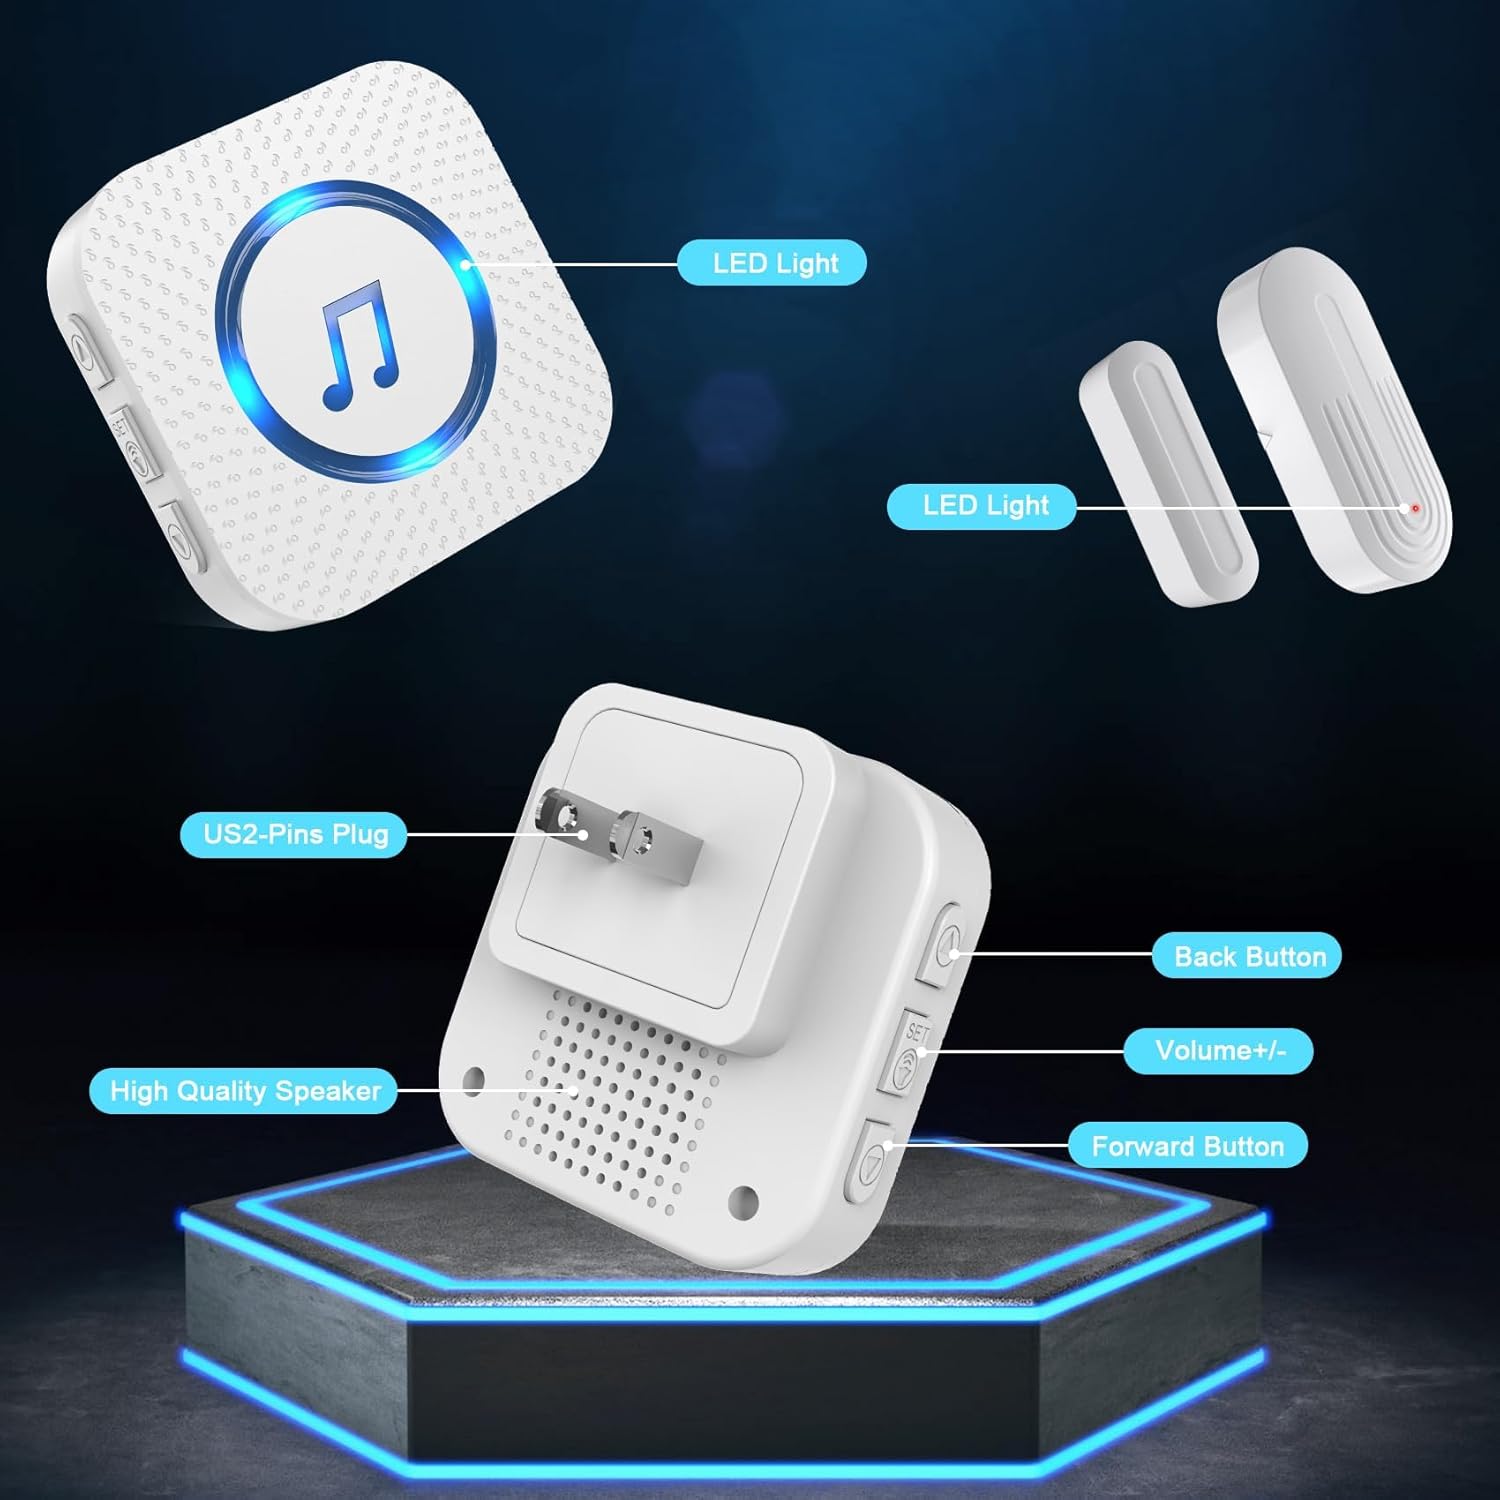
Figura 1: Componenti del sistema. This image illustrates the main components: a plug-in receiver with labeled buttons for volume and chime selection, and a two-part magnetic contact sensor, each with an LED indicator.
2. Configurazione e installazione
2.1 Initial Pairing (Pre-paired)
The door sensor and receiver units are pre-paired at the factory. No manual pairing is typically required for initial use.
2.2 Posizionamento del ricevitore
- Plug each receiver into a standard 120V AC outlet in desired locations within your home or business. Ensure the chosen locations allow you to hear the chime effectively.
- The receivers feature 5 adjustable volume levels and 26 selectable chimes. Use the volume buttons on the side of the receiver to adjust the sound level. Use the forward/back buttons to cycle through the available chimes.
2.3 Installazione del sensore
- Identify the door or window where the sensor will be installed.
- Clean the surface where the sensor parts will be attached to ensure proper adhesion.
- Attach the larger sensor unit to the door or window frame using the provided double-sided adhesive tape or screws.
- Attach the smaller magnetic unit to the moving part of the door or window, aligning it with the larger sensor unit. The gap between the two parts should be less than 0.4 inches (approximately 1 cm) when the door/window is closed. Ensure the arrows on both parts face each other.
- The sensor has an ON/OFF switch on its side. Turn the sensor ON after installation.

Figure 2: Sensor Installation Steps. This diagram illustrates the process of attaching the magnetic sensor parts to a door or window frame using adhesive tape, emphasizing correct alignment and the maximum allowable gap.
Video 1: Wireless Door Chime Installation and Operation. This video demonstrates the ease of installation and how the wireless door chime functions when a door is opened, triggering an alert.
3. Istruzioni per l'uso
3.1 Chime Activation
When the magnetic contact between the two sensor parts is broken (i.e., the door or window opens), the sensor transmits a signal to the paired receiver(s). The receiver will then emit the selected chime and its LED indicator will flash.
3.2 Adjusting Volume and Chime
On the receiver unit, use the dedicated buttons on the side to:
- Volume +/-: Press to cycle through 5 adjustable volume levels, from mute to 110dB.
- Pulsanti Avanti/Indietro: Press to cycle through the 26 available chimes. The receiver has a memory function that retains the last selected chime even after being unplugged.
3.3 Pairing Additional Sensors/Receivers
The system is expandable. You can pair an unlimited number of additional magnetic sensors to a receiver, or additional receivers to a sensor. To pair:
- Press and hold the Volume (Set) button on the receiver until the LED light emits a ding sound, indicating it has entered pairing mode.
- Quickly separate the door sensor from its magnet. The door sensor indicator light will flash, and the receiver will make a "dingding" sound, confirming successful pairing.
- Repeat this process for any additional sensors or receivers you wish to pair.
Video 2: SanJie Door Chime Pairing and Ringtone Change. This video demonstrates the steps to pair additional sensors or receivers and how to change the ringtone on the receiver unit.
4. Manutenzione
4.1 Sostituzione della batteria
The sensor unit requires one 12V battery (included). The average battery life is approximately 1 year, or up to 100,000 uses due to low power consumption. When the sensor's LED indicator no longer lights up or the signal becomes unreliable, it is time to replace the battery. A small screwdriver (often included) may be needed to open the sensor casing for battery access.

Figura 3: Durata prolungata della batteria. The sensor is designed for low power consumption, allowing for up to 100,000 uses or 3-5 years of battery life.
5. Risoluzione Dei Problemi
- No Sound/Intermittent Operation:
- Check if the sensor is turned ON.
- Ensure the sensor and receiver are properly paired. If not, re-pair them following the instructions in Section 3.3.
- Verify the gap between the sensor and magnet is less than 0.4 inches when the door/window is closed.
- Replace the sensor battery if it's old or the indicator light is dim/off.
- Assicurarsi che il ricevitore sia collegato saldamente a una presa di corrente funzionante.
- Check for excessive interference or obstructions between the sensor and receiver, which might reduce the 500ft range.
- Unable to Change Chime:
- After selecting a new chime, ensure you press and hold the Volume (Set) button on the receiver to save the setting. Some users have found re-pairing the receiver immediately after changing the chime helps retain the setting.
- Difficulty Expanding System:
- Follow the pairing instructions (Section 3.3) carefully for each new sensor or receiver. Ensure the receiver is in pairing mode before activating the new sensor.
6. Specifiche
| Caratteristica | Specificazione |
|---|---|
| Voltage | 120 Volt (CA) |
| Metodo di controllo | Remoto |
| Livello di rumore | Fino a 110 decibel |
| Portata massima | 500 piedi |
| Tecnologia | Sensore di contatto |
| Cosatage | 1 watt |
| Materiale | addominali |
| Metodo di installazione | Autoadesivo |
| Batterie (sensore) | 1 batteria da 12 V (inclusa) |
| Durata media della batteria | 1 year (up to 100,000 uses) |
| Componenti inclusi | Adhesive tape, Product manual, Receiver, Screws, Sensor (battery included) |
7. Garanzia e supporto
The SanJie Wireless Door Chime comes with a lifetime warranty. For any product issues, free return and exchange are available within 30 days of purchase. Please contact customer service through your order details for assistance.


