Sharp SPC5028AMZ
Sharp Digital Alarm Clock User Manual
Model: SPC5028AMZ
Introduzione
Thank you for choosing the Sharp Digital Alarm Clock. This manual provides detailed instructions for setting up, operating, and maintaining your new alarm clock. Designed for clarity and convenience, this clock features an easy-to-read LCD display with an optional always-on backlight, dual alarm settings, and a USB charging port for your devices. Please read this manual thoroughly before use to ensure optimal performance and longevity of your product.

Davanti view of the Sharp Digital Alarm Clock, displaying time, month, date, day, and temperature on its colorful LCD screen.
Informazioni sulla sicurezza
Please observe the following safety precautions to prevent damage to the unit or personal injury:
- Non esporre l'unità a temperature estreme, alla luce solare diretta o a elevata umidità.
- Evitare di far cadere l'unità o di sottoporla a forti urti.
- Non mischiare batterie vecchie e nuove o diversi tipi di batterie.
- Rimuovere le batterie se l'unità non verrà utilizzata per un periodo prolungato per evitare perdite.
- Tenere l'unità lontana dall'acqua e da altri liquidi.
- Non tentare di smontare o riparare l'unità da soli. Per qualsiasi intervento di assistenza, rivolgersi a personale qualificato.
Contenuto della confezione
Verificare che tutti gli articoli siano presenti nel pacco:
- Sharp Digital Alarm Clock (Model SPC5028AMZ)
- Manuale dell'utente (questo documento)
Note: 3 x AAA batteries are required and not included.
Prodotto finitoview
Display frontale

Diagram illustrating key features of the alarm clock, including atomic accuracy, 1.5-inch tall time display, on/off display nightlight, indoor temperature display, calendar display, bright color display, wall mountable or tabletop viewing, and battery operation (3x AAA batteries).
The front of the clock features a clear LCD display that shows the time, month, date, day of the week, and indoor temperature. The main time display is approximately 1.5 inches tall for easy readability.
Pannello posteriore e controlli

Dettagliato view of the clock's rear panel, showing the location of the battery compartment, various control buttons (Calendar, Time, Alarm, 12/24, Up, °C/°F, Down, Wave), the ON/OFF switch for the nightlight, and the backstand for tabletop viewing. Dimensions (6.45"W x 5"H) are also indicated.
- CALENDAR Set Button: Used to set the date and year.
- TIME Set Button: Used to set the time manually.
- ALARM Set & ON/OFF Button: Utilizzato per impostare e attivare/disattivare gli allarmi.
- Pulsante 12/24: Alterna il formato orario a 12 ore e a 24 ore.
- Pulsante SU: Adjusts settings upwards.
- Pulsante °C/°F: Alterna la visualizzazione della temperatura tra Celsius e Fahrenheit.
- Pulsante GI: Regola le impostazioni verso il basso.
- WAVE (Atomic Search) Button: Initiates a manual search for the atomic time signal.
- ON/OFF Switch (Nightlight): Controls the always-on backlight feature.
- Vano batteria: Contiene 3 batterie AAA.
- Backstand: For tabletop viewing.
- Foro per montaggio a parete: For hanging the clock on a wall.
Impostare
Installazione della batteria
- Open the battery compartment cover on the rear of the clock.
- Inserire 3 batterie AAA nuove, assicurandosi della corretta polarità (+ e -).
- Chiudere saldamente il coperchio del vano batterie.
Accensione iniziale
Upon battery installation, the clock will power on and attempt to synchronize with the atomic time signal.
Atomic Time Synchronization (WWVB)
The Sharp Digital Alarm Clock is designed to automatically synchronize with the WWVB atomic time signal broadcast from Fort Collins, Colorado, ensuring precise timekeeping.

Map of the United States showing the WWVB radio broadcast signal originating from Fort Collins, Colorado, which the atomic clock uses for synchronization.
- The clock will automatically attempt to receive the signal daily, typically overnight when electronic interference is minimal.
- For optimal reception, place the clock near a window and orient its front or rear panel towards Fort Collins, Colorado.
- A signal strength indicator (antenna icon) on the display will show the reception status.
- Per avviare manualmente una ricerca del segnale, premere il tasto ONDA pulsante sul pannello posteriore.

Graphic depicting a full moon, with text 'LESS ELECTRONIC INTERFERENCE AT NIGHT SET BY MORNING', indicating optimal atomic clock synchronization occurs during nighttime hours.
Setting Time Zone
Even with atomic synchronization, you must manually select your local time zone for the correct hourly time display.
- Premere e tenere premuto il tasto TEMPO button until the time zone indicator flashes.
- Utilizzare il UP or GIÙ buttons to select your desired time zone (e.g., PST, MST, CST, EST).
- Premere il tasto TEMPO di nuovo per confermare ed uscire.
Impostazione manuale di ora e data
If atomic synchronization is not desired or available, you can set the time and date manually.
- Per impostare l'ora: Premere e tenere premuto il tasto TEMPO button until the hour flashes. Use UP/GIÙ per regolare. Premere TEMPO to move to minutes, then adjust. Press TEMPO di nuovo per salvare.
- Per impostare la data: Premere e tenere premuto il tasto CALENDARIO button until the year flashes. Use UP/GIÙ per regolare. Premere CALENDARIO to move to month, then day, adjusting each. Press CALENDARIO di nuovo per salvare.
- Formato 12/24 ore: Premere il tasto 12/24 button to switch between 12-hour (with AM/PM indicator) and 24-hour formats.
Istruzioni per l'uso
Adjusting Display Brightness and Backlight
The clock features an optional always-on backlight with adjustable brightness for optimal viewin varie condizioni di illuminazione.
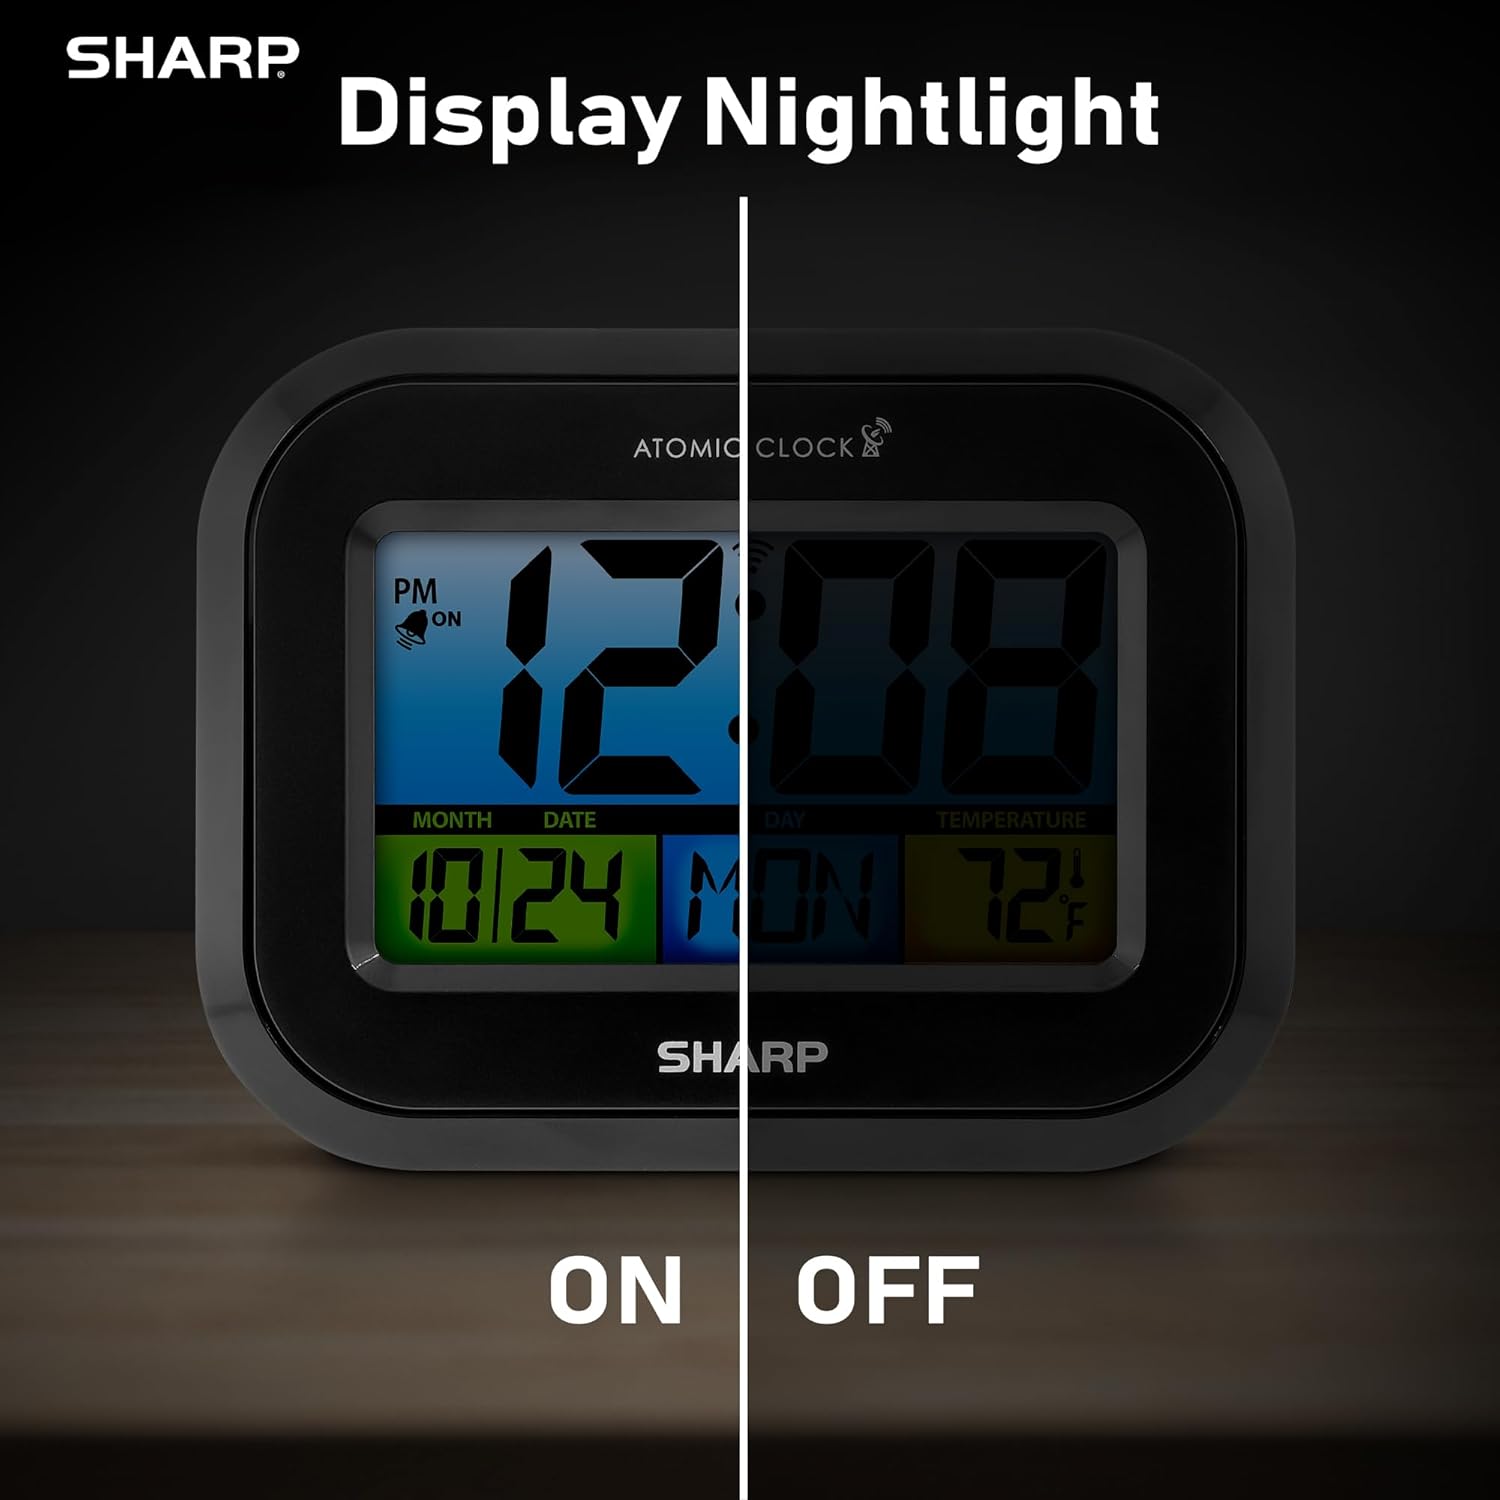
Comparison image showing the clock's display with the nightlight off (dim) and on (illuminated) in both day and night settings.
- Always-On Backlight: Utilizzare il Interruttore ON/OFF on the rear panel to activate or deactivate the continuous backlight. When ON, the display will have a soft glow.
- Retroilluminazione su richiesta: Even if the always-on backlight is OFF, you can momentarily illuminate the display by pressing the RETROILLUMINAZIONE button (usually located on the top edge, though not explicitly labeled in the provided image, it's a common feature). This provides a brighter illumination for a few seconds.

Image highlighting the physical ON/OFF switch on the rear of the clock for controlling the display nightlight, indicating its function for soft glowing backlight in the dark.
Impostazione di doppi allarmi
L'orologio supporta due impostazioni di sveglia indipendenti.
- Premere il tasto ALLARME button once to select Alarm 1. Press again for Alarm 2.
- Mentre viene visualizzata l'ora della sveglia, tenere premuto il tasto ALLARME finché l'ora non lampeggia.
- Utilizzare il UP or GIÙ pulsanti per regolare l'ora. Premere ALLARME per passare ai minuti, quindi regolare.
- Premere ALLARME di nuovo per salvare l'orario della sveglia.
- Per attivare/disattivare un allarme, premere il tasto ALLARME button repeatedly until the alarm icon (bell) appears/disappears for the desired alarm.
Utilizzo della porta di ricarica USB
The clock includes a USB charging port for convenient charging of small electronic devices. Locate the USB port on the side or rear of the unit (specific location not detailed in provided images, but implied by feature bullets). Connect your device's USB cable to this port to begin charging.
Visualizzazione della temperatura (°C/°F)
The clock displays the indoor temperature. To switch between Celsius and Fahrenheit, press the ° C / ° F pulsante sul pannello posteriore.
Viewing Angle Optimization
Like most LCD screens, this display is best viewed from the front or slightly above. Visibility may appear reduced at sharp side or low angles. For the best viewing experience, use the built-in kickstand to position the clock to face you.

Illustration demonstrating the optimal viewing angle for the LCD display, showing that the clock is best viewed from above or straight on, with a built-in kickstand to position it.
Wall Mounting and Tabletop Use
The clock is designed for versatile placement. Use the integrated backstand for tabletop viewing or the wall mount hole on the rear for hanging it on a wall.

The Sharp Digital Alarm Clock displayed in a home office setting, showing its versatility for both wall mounting and tabletop placement.
Manutenzione
Pulizia
Pulisci l'orologio con un panno morbido e asciutto. Non utilizzare detergenti abrasivi o solventi, poiché potrebbero danneggiarne la superficie.
Sostituzione della batteria
When the display becomes dim or the clock stops functioning, it's time to replace the batteries. Follow the battery installation steps in the Setup section. It is recommended to replace all three AAA batteries at the same time with new ones.
Risoluzione dei problemi
| Problema | Possibile soluzione |
|---|---|
| Il display è scuro o vuoto. | Check battery polarity and ensure batteries are fresh. Replace all 3 AAA batteries. Ensure the backlight ON/OFF switch is in the 'ON' position if continuous illumination is desired. |
| Il tempo atomico non è sincronizzato. | Ensure the clock is placed near a window and oriented towards Fort Collins, Colorado. Avoid placing near electronic devices that may cause interference. Try initiating a manual search by pressing the WAVE button. Synchronization is often best overnight. |
| Time or date is incorrect after battery change. | Manually set the time zone. Allow time for atomic synchronization, or manually set the time and date using the TIME and CALENDAR buttons. |
| Display is hard to read from certain angles. | This is a characteristic of LCD technology. Adjust the clock's position using the kickstand to ensure it is viewed straight-on or from slightly above eye level. |
| L'allarme non suona. | Ensure the alarm is set and activated (bell icon visible). Check battery level. |
Specifiche
| Proprietà | Valore |
|---|---|
| Marca | Affilato |
| Numero di modello | SPC5028AMZ |
| Tipo di visualizzazione | LCD |
| Colore | Nero |
| Dimensioni del prodotto | 6.45"L x 5"A |
| Peso dell'articolo | 10.8 once (0.31 chilogrammi) |
| Fonte di alimentazione | Alimentato a batteria (3 x AAA, non incluse) |
| Modalità di funzionamento | Atomico |
| Caratteristiche speciali | Cordless, Dual Alarm, USB Charging Port, Indoor Temperature Display, Always-On Backlight |
| Tipo di montaggio | Montaggio a parete, da tavolo |
| Materiale del telaio | Plastica |
Garanzia e supporto
Sharp products are manufactured to the highest quality standards. For warranty information or technical support, please refer to the documentation included with your purchase or visit the official Sharp websito. Conservare la ricevuta d'acquisto come prova d'acquisto per eventuali reclami in garanzia.

Sharp Time Solutions
Ask a question about this manual
Ask about setup, troubleshooting, compatibility, parts, safety, or missing instructions. Manuals+ will review the question and use this page’s manual context to help answer it.