
1. Introduzione
The Leotec SENIOR SMART BAND 4G GPS is a smart bracelet designed for monitoring and communication, particularly for seniors. It features 4G connectivity, real-time GPS tracking, heart rate monitoring, a pedometer, and call functionality. This manual provides instructions for setting up, operating, and maintaining your device.
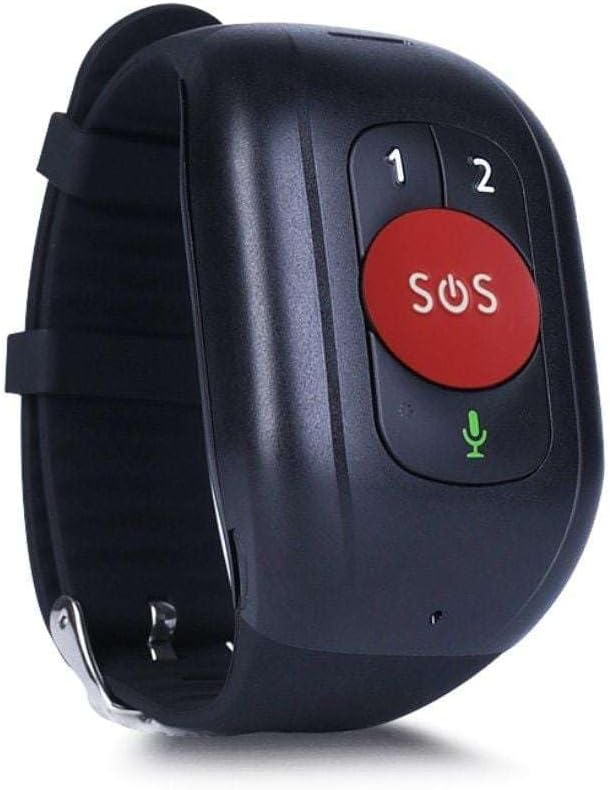
Figura 1: Leotec SENIOR SMART BAND 4G GPS RED. The device features a large red SOS button, two smaller call buttons labeled '1' and '2', and a microphone icon.
2. Guida all'installazione
2.1. Contenuto della confezione
- Leotec SENIOR SMART BAND 4G GPS
- Manuale d'uso
- Charging Cable/Connector
2.2. Installazione della scheda SIM
The device requires a nanoSIM card for 4G LTE and 2G GSM connectivity. Ensure the SIM card is from any mobile phone operator on the market.
- Individua lo slot della scheda SIM sul dispositivo.
- Carefully insert the nanoSIM card into the slot, ensuring correct orientation.
- Chiudere bene il coperchio dello slot della scheda SIM per proteggerlo da polvere e umidità.
2.3. Carica del dispositivo
Before first use, fully charge the smart band.
- Connect the charging cable to the charging port on the smart band.
- Collegare l'altra estremità del cavo a un adattatore di alimentazione USB (non incluso) o a una porta USB del computer.
- The device will indicate charging status. A full charge typically takes approximately 2 hours.
2.4. Application Download and Pairing
To utilize all features, download the recommended application on your smartphone.
- The application is available for both Google Android and Apple iOS devices.
- Cercare "Leotec Senior" or the specified app name in your device's app store.
- Install the application and follow the on-screen instructions to create an account and pair your smart band.
- A web-based interface is also available for greater convenience.
3. Istruzioni per l'uso
3.1. Accensione/spegnimento
- Accensione: Press and hold the power button (if available, otherwise assume automatic power on after charging/SIM insertion) until the device vibrates or the screen illuminates.
- Spegni: Access the power off option through the device menu or the companion app, or press and hold the power button for several seconds.
3.2. Real-time Geolocation
The smart band incorporates a real GPS chip, 4G LTE, 2G GSM, WiFi, and LBS networks for accurate location tracking.
- Location can be viewed in real-time via the companion application or the web interfaccia.
- The margin of error for GPS location is approximately 5 meters.
3.3. Effettuare e ricevere chiamate
With an installed nanoSIM card, the device supports two-way communication.
- Effettuare le chiamate: Use the pre-configured buttons (labeled '1' and '2' on the device) to call authorized contacts. These contacts are set up through the companion application.
- Ricevere chiamate: The device will ring for incoming calls from authorized numbers. Answer calls directly from the smart band.
3.4. Funzione SOS
The large red SOS button is for emergency situations.
- Press and hold the SOS button for a few seconds to activate the emergency protocol.
- The device will automatically call pre-authorized emergency contacts and send location alerts.
3.5. Monitoraggio delle attività
The smart band monitors various health and activity metrics.
- Pedometro: Tiene traccia dei passi compiuti durante il giorno.
- Cardiofrequenzimetro: Measures heart rate. Consult the app for detailed readings and historical data.
- View all activity data and trends within the companion application.
4. Manutenzione
4.1. Pulizia
- Pulire regolarmente il dispositivo con un panno morbido eamp stoffa.
- Evitare l'uso di prodotti chimici aggressivi o detergenti abrasivi, poiché potrebbero danneggiare il dispositivo.
- Ensure the charging port and SIM card slot are free from debris.
4.2. Cura della batteria
- Caricare regolarmente il dispositivo per mantenere la batteria in condizioni ottimali.
- Avoid extreme temperatures, as these can affect battery performance and lifespan.
- Se il dispositivo non verrà utilizzato per un periodo prolungato, caricarlo fino a circa il 50% prima di riporlo.
4.3. Conservazione
Store the smart band in a cool, dry place away from direct sunlight and extreme temperatures.
5. Risoluzione Dei Problemi
5.1. Il dispositivo non si accende
- Assicurati che il dispositivo sia completamente carico. Collegalo al caricabatterie e attendi qualche minuto prima di riprovare ad accenderlo.
- Controllare che il cavo di ricarica e l'adattatore non siano danneggiati.
5.2. No Network Connectivity (4G/2G)
- Verify that the nanoSIM card is correctly inserted and activated with a mobile network plan.
- Verifica la copertura di rete nella tua posizione attuale.
- Riavviare il dispositivo.
- Ensure the SIM card has sufficient credit or data allowance.
5.3. Posizione GPS imprecisa
- Assicurarsi che il dispositivo abbia uno spazio libero view del cielo per una ricezione ottimale del segnale GPS.
- Location accuracy can be affected by dense urban areas, indoor environments, or adverse weather conditions.
- The device also uses WiFi and LBS for location, which may be less precise than GPS.
5.4. Calls Not Working
- Confirm that the SIM card is active and has calling capabilities.
- Ensure that the contact numbers are correctly configured as authorized contacts in the companion application.
- Check the device's volume settings.
5.5. Problemi di connessione all'app
- Assicurati che il tuo smartphone abbia una connessione Internet attiva.
- Verify that Bluetooth (if applicable for initial pairing) is enabled on your smartphone.
- Restart both the smart band and your smartphone.
- Update the companion application to the latest version.
6. Specifiche
| Nome del modello | LESB01R |
| Tecnologia di connettività | 4G LTE, 2G GSM, GPS, WiFi, LBS, USB |
| Location Accuracy (GPS) | Circa 5 metri |
| Tipo di batteria | Sono necessarie 1 batteria AAAA (inclusa). |
| Durata della batteria | Fino a 12 ore |
| Tipo di montaggio | Supporto da polso |
| Componenti inclusi | Manuale utente, cavo o connettore |
| Produttore | Leotec |
| ASIN | B0CHYCX55N |
7. Informazioni sulla garanzia
This Leotec product comes with a garanzia di tre anni contro difetti di fabbricazione. Si prega di conservare la prova d'acquisto per eventuali reclami in garanzia. La garanzia non copre danni causati da uso improprio, incidenti, modifiche non autorizzate o normale usura.
8. Assistenza clienti
For technical assistance, troubleshooting beyond this manual, or warranty inquiries, please contact Leotec customer support. Refer to the official Leotec websito o sulla confezione del prodotto per le informazioni di contatto più aggiornate.
Risorse online: Visit the official Leotec websito per FAQ, aggiornamenti software e materiale di supporto aggiuntivo.