
1. Informazioni sulla sicurezza
Leggere attentamente tutte le istruzioni prima dell'installazione e dell'uso. Conservare il manuale per riferimento futuro.
- This pot filler faucet is designed for cold water use only. Connecting it to a hot water supply may cause damage or injury.
- Prima di iniziare l'installazione, assicurarsi che tutte le linee di alimentazione idrica siano chiuse.
- In caso di dubbi su qualsiasi fase del processo di installazione, consultare un idraulico qualificato.
- Regularly check for leaks after installation and during use.
2. Prodotto finitoview
Caratteristiche principali
- Materiale: Constructed from solid brass for durability and resistance to rust and corrosion.
- Progetto: Features a dual-handle design with a 360° swivel arm for flexible positioning and easy pot filling. The folding arm retracts to save space when not in use.
- Aerators: Includes a standard 1.8 GPM aerator for water efficiency and splash prevention, and an additional 3.5 GPM aerator for faster filling. Both are removable for cleaning.
- Valve Cores: Equipped with durable brass valve cores, with a spare included for convenience.
- Funzionalità: Double closing function ensures reliable water control.
Componenti (cosa c'è nella scatola)

Image: The package includes the pot filler faucet, a pair of gloves, an installation guide, Teflon tape, a hex key, an extra 4 GPM aerator, an NPT 1/2 inch connector, a valve, a wrench, screws, and Fischer nylon anchors.
3. Specifiche
Specifiche tecniche
| Caratteristica | Specificazione |
|---|---|
| Marca | ALEASHA |
| Nome del modello | AL-1A69G |
| Usi consigliati | Cucina |
| Tipo di montaggio | Montaggio a parete |
| Tipo di finitura | Spazzolato |
| Materiale | Ottone |
| Colore | Oro spazzolato |
| Numero di maniglie | 2 |
| Conteggio dei fori | 1 |
| Tipo di installazione | Foro singolo |
| Portata massima | 1.8 galloni al minuto (GPM) |
| Altezza del becco | 2.83 pollici |
| Portata del becco | 23.5 pollici |
| Peso dell'articolo | 3.49 libbre |
| Dimensioni del prodotto | 12 x 7.8 x 1.5 pollici |
Diagramma delle dimensioni del prodotto
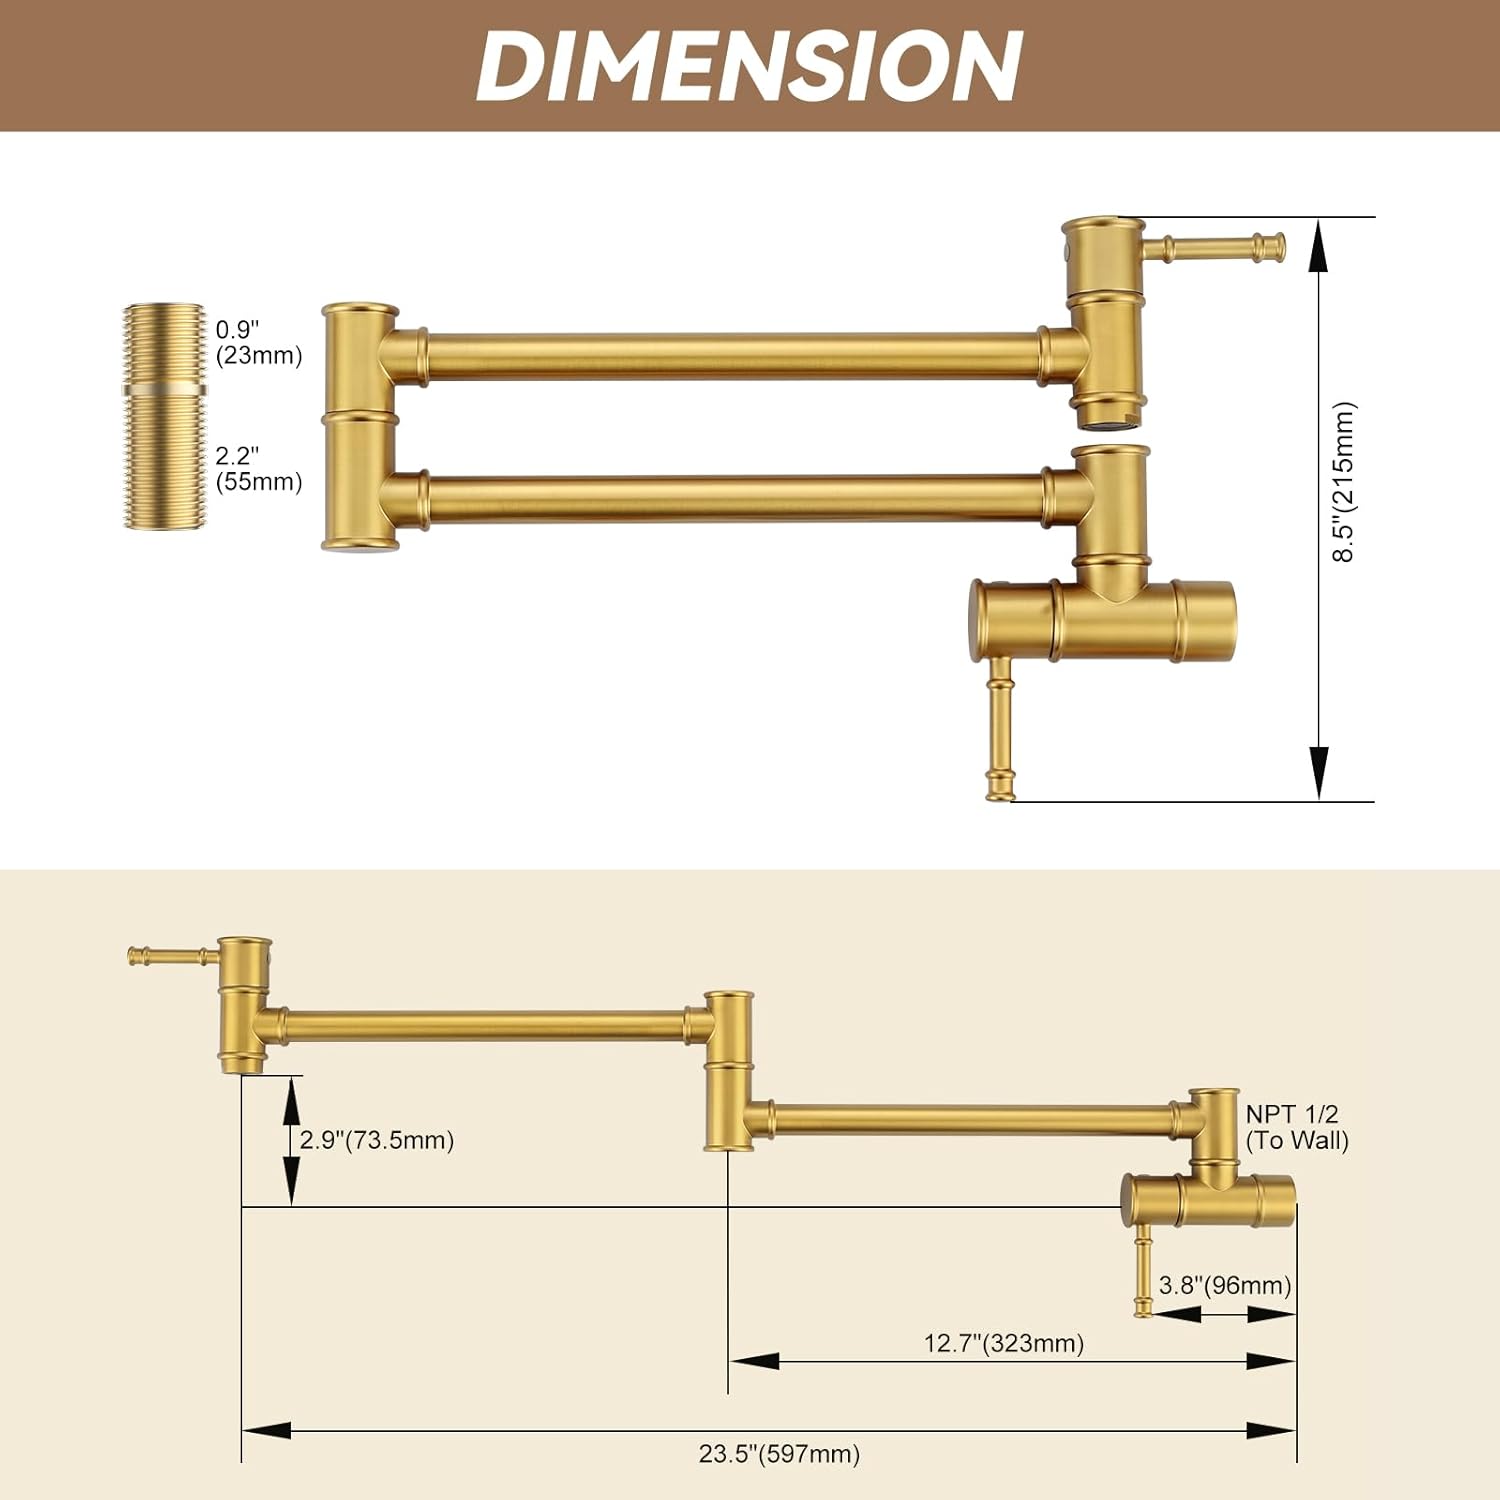
Image: Detailed diagram illustrating the dimensions of the pot filler faucet, including the 0.9 inch (23mm) threaded connection, 2.2 inch (55mm) nipple length, 8.5 inch (215mm) height, 23.5 inch (597mm) total reach, and 12.7 inch (323mm) arm length.
4. Guida all'installazione
Prima di iniziare
- Chiudere l'erogazione principale dell'acqua in cucina.
- Clear the area above your stove where the faucet will be installed.
- Ensure you have the necessary tools: adjustable wrench, pipe wrench, drill, level, pencil, and the included hex key and Teflon tape.
Installazione passo dopo passo
- Contrassegnare la posizione di montaggio: Position the mounting plate against the wall at the desired height above your stove. Use a level to ensure it is straight and mark the drill points with a pencil.
- Forare i fori e inserire gli ancoraggi: Drill holes at the marked positions using a 15/64 inch (6mm) drill bit. Insert the provided Fischer nylon anchors into the drilled holes.
- Prepare and Install Base: Apply 4-5 wraps of Teflon tape to the NPT 1/2 inch threaded connection on the wall. Attach the base and gasket to the wall using the provided screws, ensuring a tight and secure fit.
- Fissare il corpo del rubinetto: Carefully align the pot filler faucet body with the installed base. Secure it by tightening the set screw with the hex key.
- Collegamento all'impianto idraulico: Ensure the 2.2 inch brass nipple is properly connected to your plumbing and the faucet. Apply Teflon tape during this connection to prevent leaks.
- Test per perdite: Slowly turn on the main water supply. Check all connections for any signs of leakage. If leaks occur, turn off the water, tighten connections, and re-test.

Image: Use the faucet's base to mark the precise location for drilling on the wall.

Image: Drill holes and insert the wall anchors to secure the faucet base.

Image: Apply Teflon tape to the water pipe connection and mount the base plate with the gasket.

Image: Attach the main faucet body to the base and tighten the securing screw.

Image: The 2.2 inch brass nipple connects the faucet to the water pipe. Apply Teflon tape for a secure, leak-free seal.
Video di installazione
Video: An official ALEASHA HOME video demonstrating the installation process of the Wall Mount Pot Filler Faucet. This video provides a visual guide to complement the written instructions.
5. Funzionamento
Using Your Pot Filler Faucet
- Extend the Arm: Gently pull the folding arm of the faucet to extend it over your pot on the stove. The 360° swivel joints allow for flexible positioning to reach all burners.
- Accendi l'acqua: Use the dual handles to turn on the cold water flow. The faucet is designed for fast water injection.
- Chiudere l'acqua: Turn both handles to the off position to stop the water flow. The double closing function provides added security against drips.
- Retract the Arm: Once done, gently fold the arm back against the wall to save space and keep your cooking area clear.
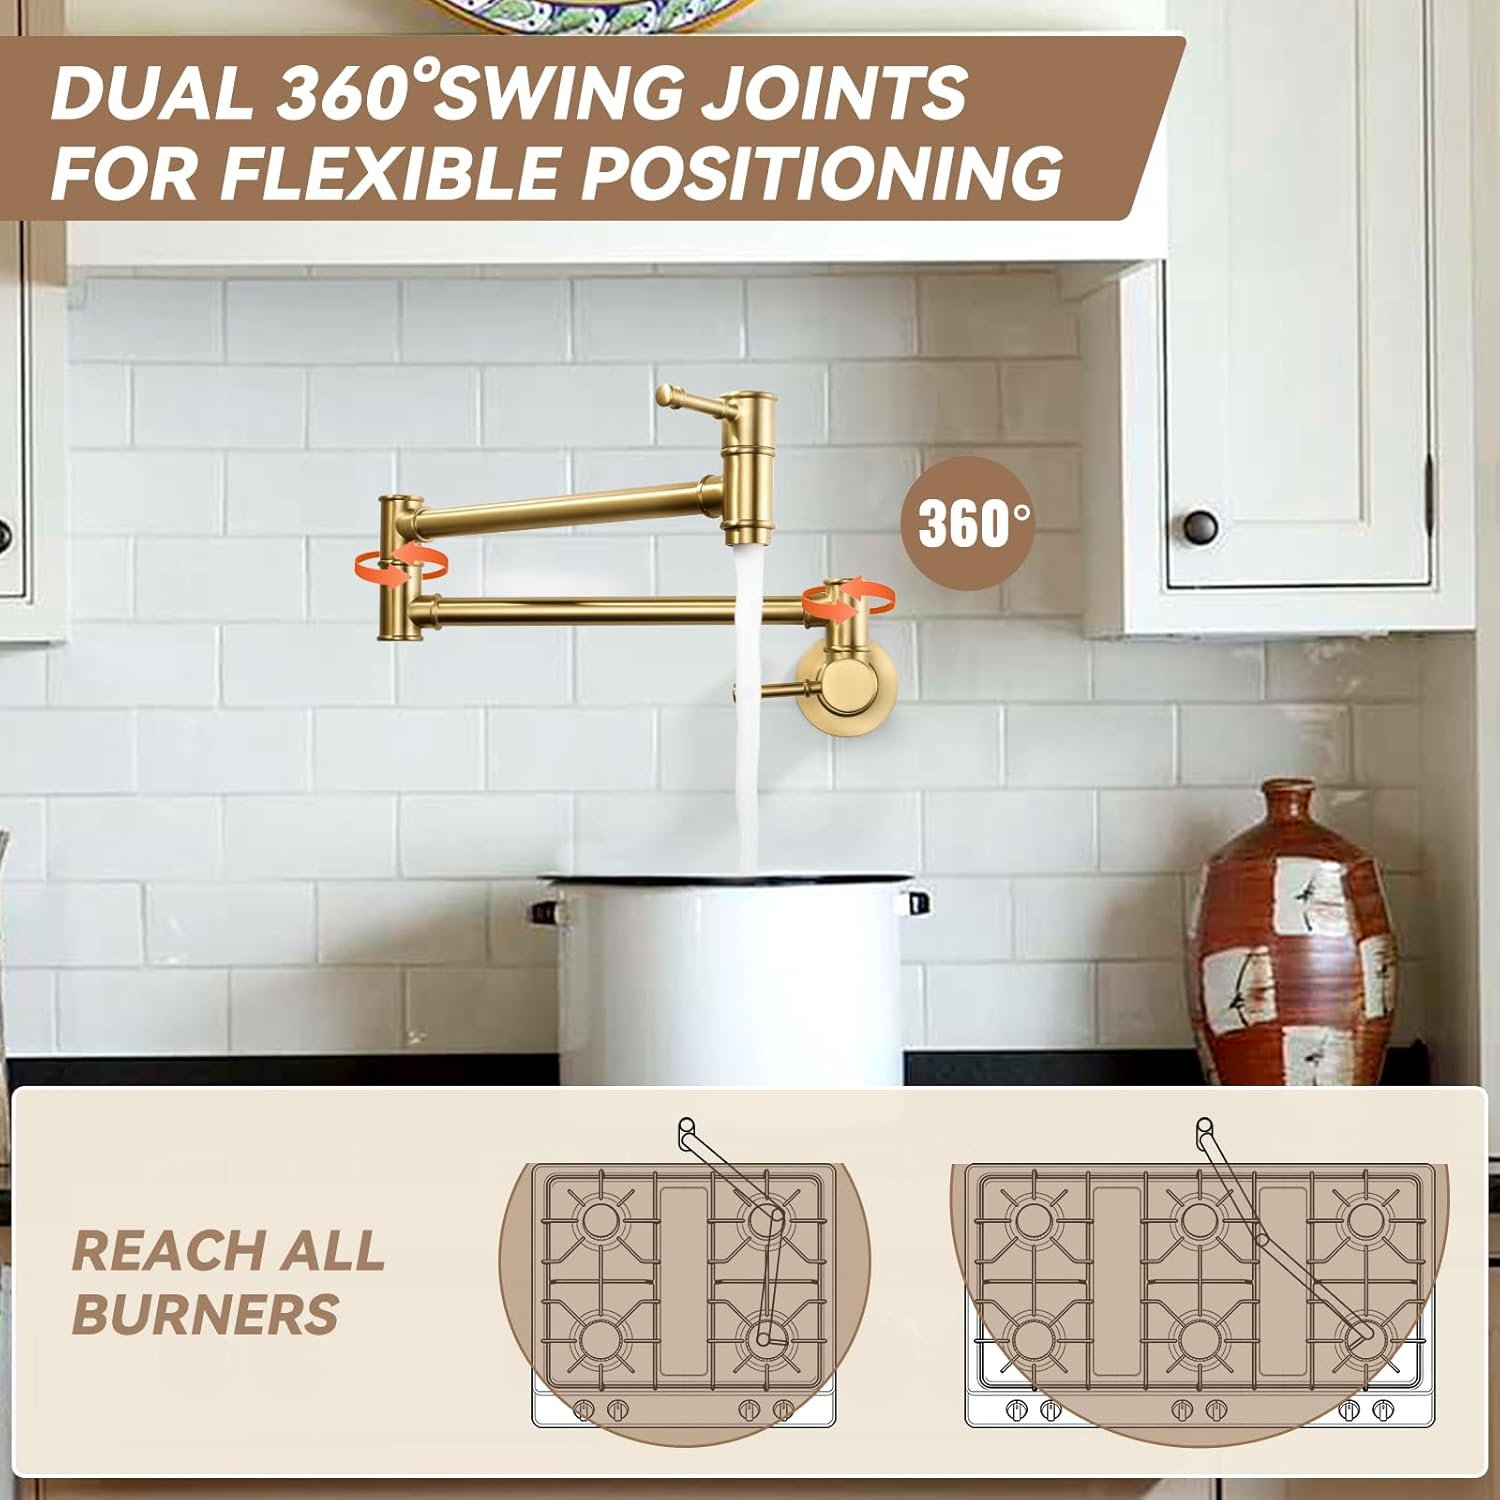
Image: The dual 360° swing joints allow the faucet to extend and reach various positions over the stove, making it easy to fill pots on any burner.
6. Manutenzione
Pulizia e cura
- Pulizia delle superfici: Pulisci regolarmente il rubinetto con un panno morbido eamp cloth and mild soap. Avoid using abrasive cleaners, harsh chemicals, or scouring pads, as these can damage the brushed gold finish.
- Manutenzione dell'aeratore: If water flow becomes weak or irregular, the aerator may be clogged. Unscrew the aerator from the spout, clean any debris or mineral buildup, and rinse thoroughly before reattaching. An extra aerator (3.5 GPM) is provided for replacement or faster flow.
- Valve Core Replacement: A spare brass valve core is included. If you experience persistent dripping or issues with water control, the valve core may need replacement. Consult the installation guide for instructions on disassembling and reassembling the valve.
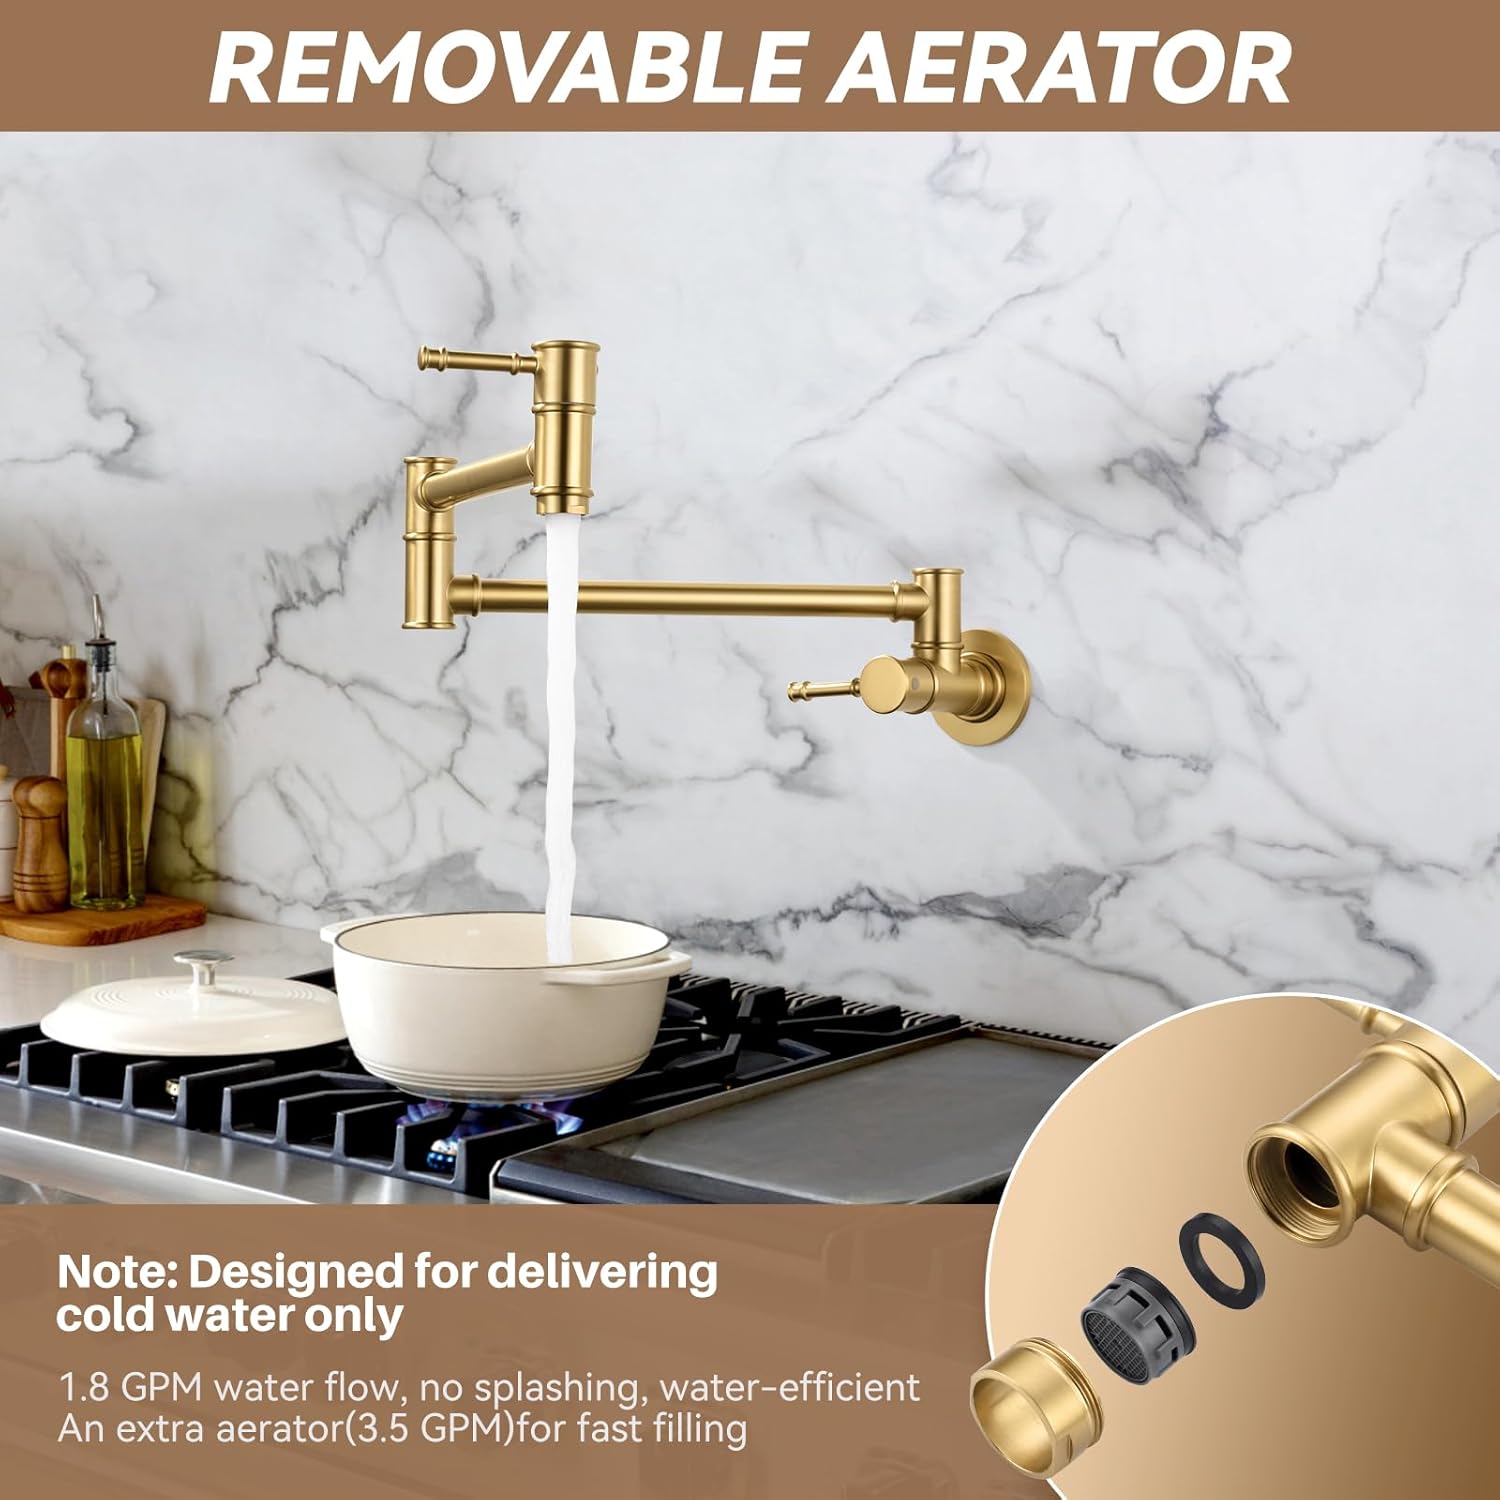
Image: The faucet features a removable aerator. A standard 1.8 GPM aerator is installed, and an additional 3.5 GPM aerator is included for faster filling.
7. Risoluzione Dei Problemi
Problemi comuni e soluzioni
- Issue: Water Leakage
Soluzione: Ensure all connections, especially the NPT 1/2 inch connection to the wall, are tightly secured. Verify that sufficient Teflon tape was applied during installation. Check the valve cores for any damage or improper seating. - Problema: flusso d'acqua basso
Soluzione: The aerator might be clogged with debris or mineral deposits. Remove and clean the aerator as described in the Maintenance section. - Issue: Faucet Arm Does Not Move Smoothly
Soluzione: Check for any obstructions around the swivel joints. Ensure the joints are clean and free of debris. - Issue: Dripping from Spout
Soluzione: This often indicates a worn or faulty valve core. Replace the valve core with the spare provided, following the instructions in the Maintenance section.
8. Garanzia e supporto
Informazioni sulla garanzia
The ALEASHA AL-1A69G Pot Filler Faucet comes with a Garanzia limitata di 5 annoLa presente garanzia copre i difetti di fabbricazione e garantisce che il prodotto sia esente da difetti di materiale e di lavorazione in condizioni di normale utilizzo.
Additionally, the product is covered by a Politica di reso di 90 giorni dalla data di acquisto.
Assistenza clienti
For any questions, technical assistance, or warranty claims, please contact ALEASHA customer support. Refer to your purchase documentation for specific contact details or visit the official ALEASHA websito.