Introduzione
This manual provides essential information for the proper setup, operation, and maintenance of your AODSK AD-X1 Digital Piano and ALP-22 Adjustable Piano Bench. Please read these instructions carefully before use to ensure optimal performance and longevity of your instruments.

Figure 1: Assembled AODSK AD-X1 Digital Piano and ALP-22 Adjustable Piano Bench.
Installazione e assemblaggio
Carefully unpack all components and ensure all parts are present before beginning assembly. Refer to the included hardware package for specific fasteners.
1. Digital Piano Assembly (AD-X1)
- Attach the four legs to the underside of the digital piano body using the provided screws. Ensure they are securely fastened.
- Inserire il leggio nell'apposito alloggiamento sul pannello superiore del pianoforte digitale.
- Connect the sustain pedal or triple pedal unit to the appropriate port on the rear panel of the piano.

Figure 2: Digital Piano dimensions. Length: 53.15 inches, Depth: 12.2 inches, Height: 24.8 inches (without music rest).
2. Piano Bench Assembly (ALP-22)
- Attach the four legs to the base of the piano bench using the provided hardware.
- Ensure the height adjustment mechanism is properly aligned and functional.
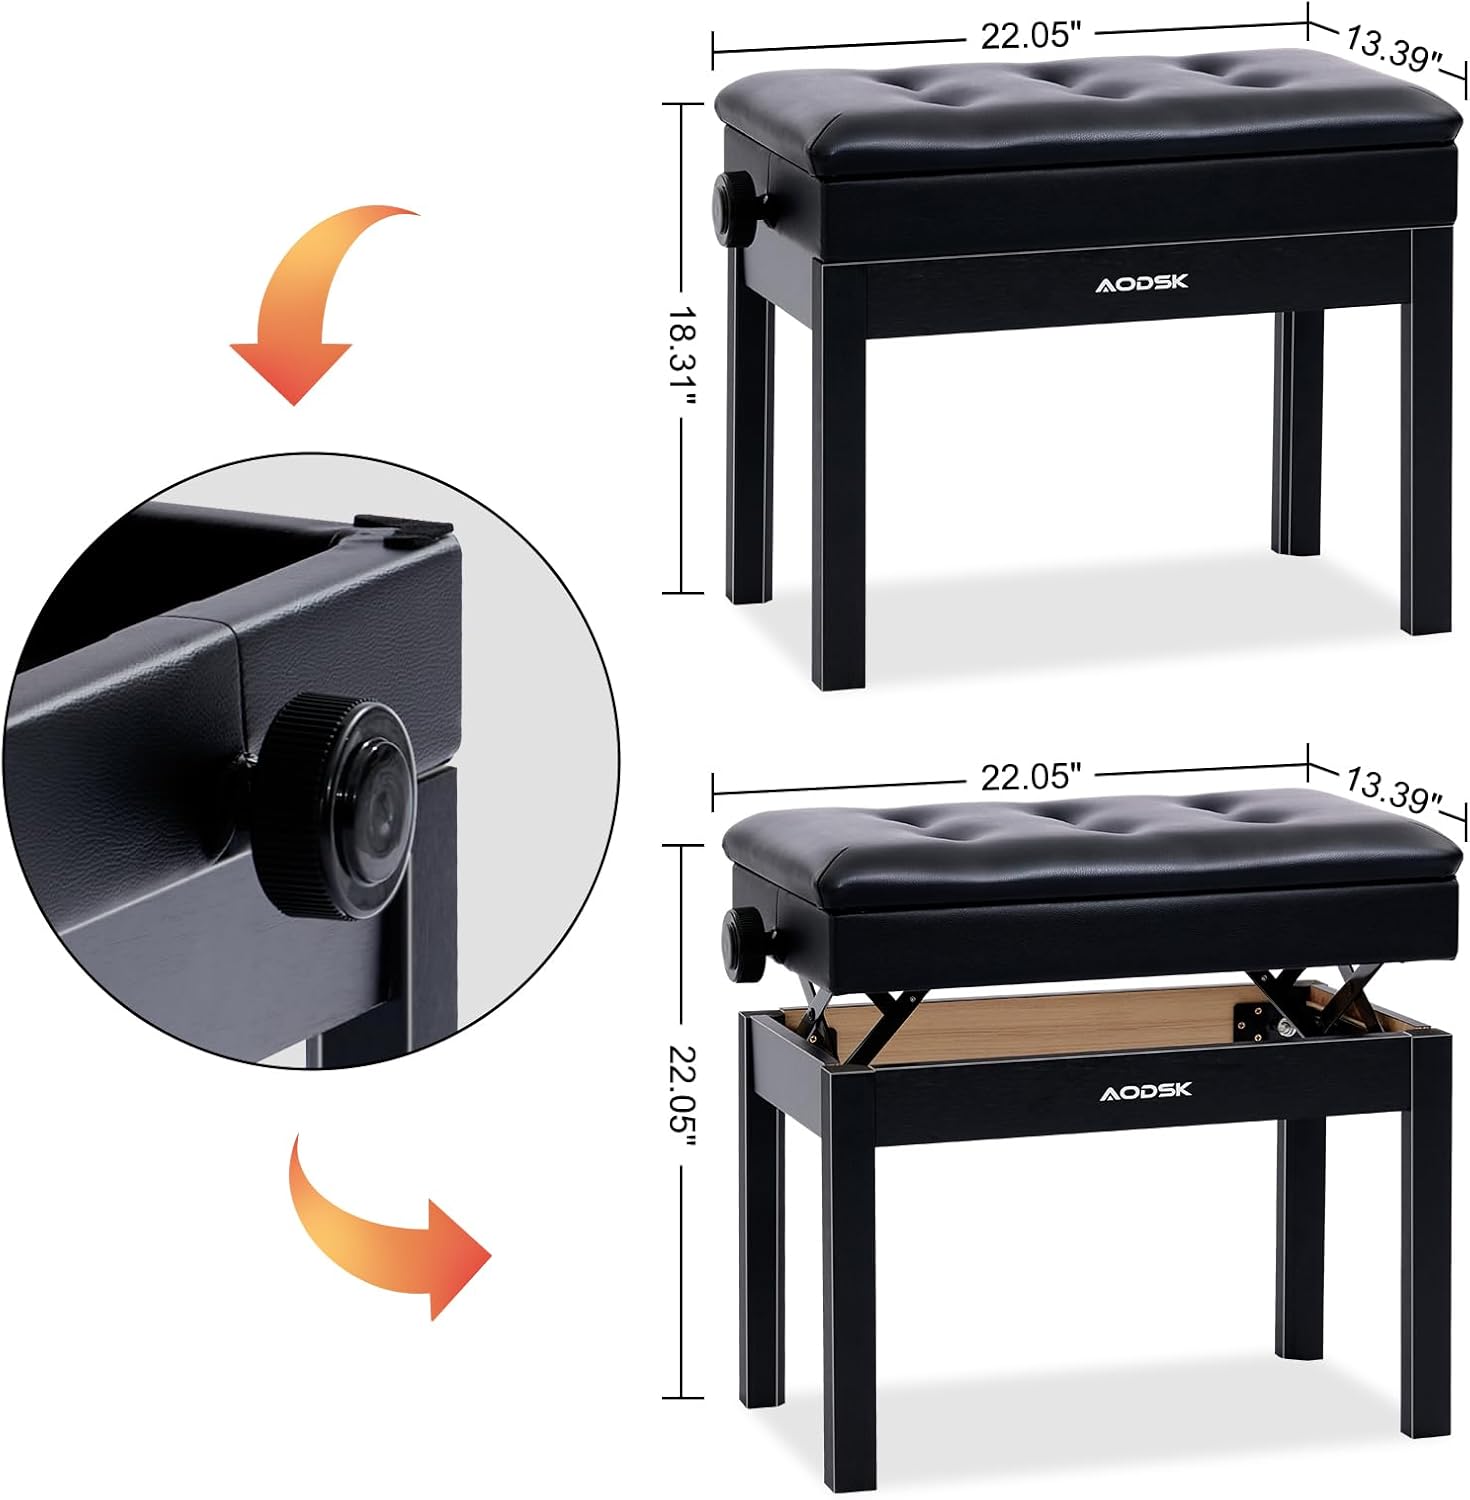
Figure 3: Piano Bench dimensions. Length: 22.05 inches, Width: 13.39 inches. Adjustable height range: 18.31 to 22.05 inches.
Operating the Digital Piano (AD-X1)
1. Accensione/spegnimento
- Connect the power adapter to the DC IN port (3) on the rear panel and plug it into a standard electrical outlet.
- Premere il tasto ENERGIA pulsante sul pannello di controllo per accendere o spegnere il pianoforte.
2. Funzioni del pannello di controllo
The control panel provides access to various features and settings:

Figure 4: Digital Piano control panel with buttons for DEMO, RHYTHM, VOLUME, TONE, RECORD, SPLIT, TOUCH, RE-PLAY, CHORD, SYNC, METRONOME, START/STOP, POWER, and DATA WHEEL.
- DIMOSTRAZIONE: Plays built-in demonstration songs (80 available).
- RITMO: Selects from 128 available rhythms.
- VOLUME: Regola il livello di uscita audio complessivo.
- TONO: Selects from 128 available instrument timbres.
- DISCO: Avvia la registrazione della tua performance.
- DIVISO: Divides the keyboard into two sections for different voices.
- TOCCO: Adjusts touch sensitivity of the keys.
- RE-PLAY: Plays back recorded performances.
- ACCORDO: Activates chord recognition mode.
- SINCRONIZZAZIONE: Synchronizes rhythm playback.
- METRONOMO: Activates the metronome function for practice.
- AVVIO/ARRESTO: Starts or stops rhythm/demo playback.
- DATA WHEEL: Utilizzato per navigare nei menu e regolare i valori.
3. Headphone Mode
To practice privately, connect headphones to the Headphone Jack (1) on the rear panel. The internal speakers will automatically mute.

Figure 5: Headphone jack for private practice.
4. Connettività
The rear panel offers various connection options:
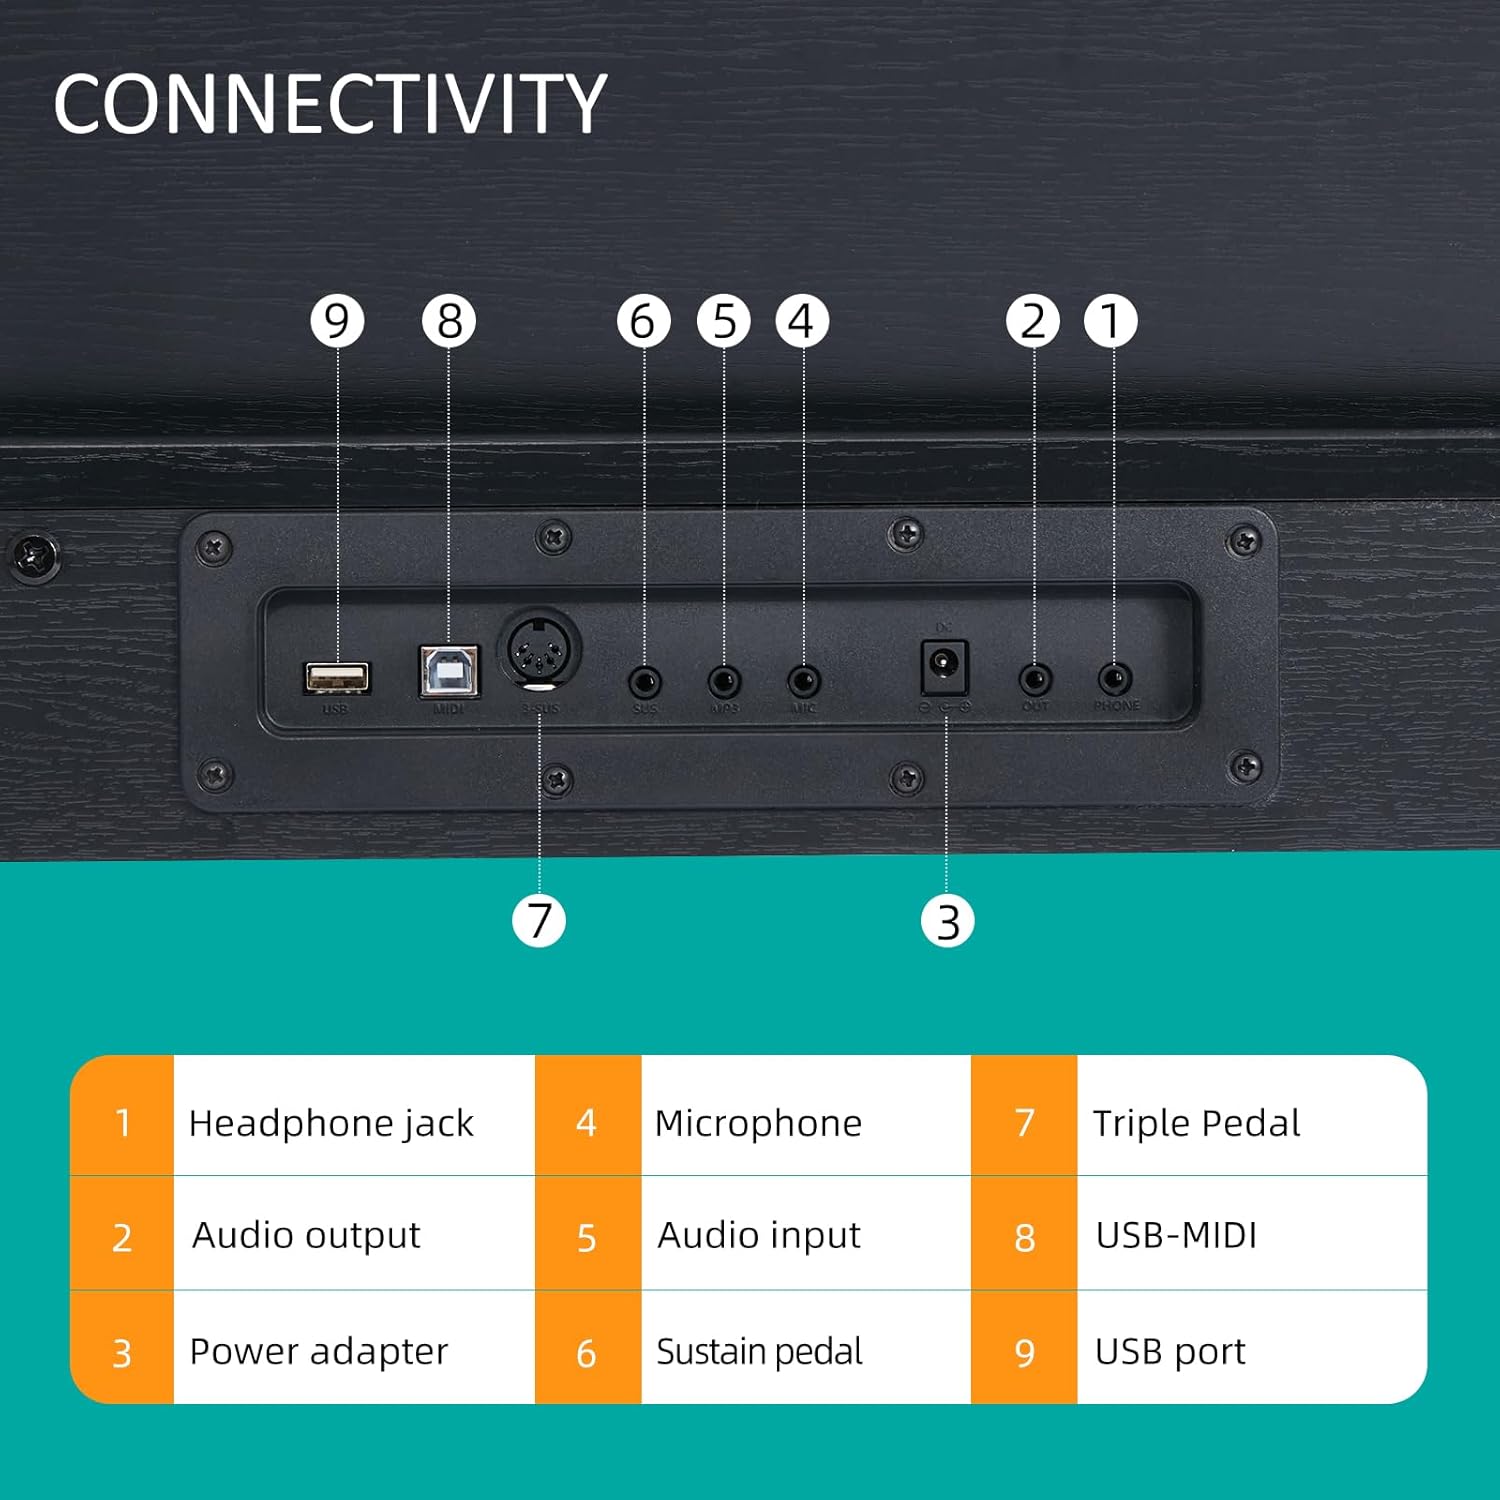
Figure 6: Connectivity panel with labeled ports.
- 1. Jack per cuffie: Per collegare le cuffie (3.5 mm).
- 2. Uscita audio: Per il collegamento a dispositivi esterni ampsistemi di identificazione o dispositivi di registrazione.
- 3. Adattatore di alimentazione: DC IN port for the power supply.
- 4. Microfono: Input for a microphone.
- 5. Ingresso audio: Per collegare sorgenti audio esterne.
- 6. Sustain Pedal: Input for a single sustain pedal.
- 7. Triple Pedal: Input for the included triple pedal unit.
- 8. USB-MIDI: For connecting to a computer or MIDI devices.
- 9. Porta USB: Per collegare dispositivi di archiviazione USB o altre periferiche.
Operating the Piano Bench (ALP-22)
1. Regolazione dell'altezza
The ALP-22 piano bench features an adjustable height mechanism. Locate the knob on the side of the bench. Rotate the knob to raise or lower the seat to your desired height. The adjustable range is from 18.31 inches to 22.05 inches.

Figure 7: Adjusting the piano bench height using the side knob.
2. Vano portaoggetti
The padded seat of the ALP-22 bench can be lifted to reveal a storage compartment. This space is suitable for storing sheet music, books, and small accessories.

Figure 8: Storage compartment beneath the piano bench seat.
Manutenzione
1. Pulizia
- Wipe the surfaces of the digital piano and bench with a soft, dry cloth.
- Per sporco ostinato, leggermente dampen the cloth with water and a mild, non-abrasive cleaner. Avoid harsh chemicals or solvents.
- Do not allow liquids to enter the piano's internal components.
2. Conservazione
- Store the instruments in a dry environment, away from direct sunlight and extreme temperature fluctuations.
- Avoid placing heavy objects on the piano or bench.
Risoluzione dei problemi
- Nessun suono:
- Assicurarsi che l'adattatore di alimentazione sia collegato correttamente e che il pianoforte sia acceso.
- Controllare il livello del volume.
- Se le cuffie sono collegate, scollegarle per abilitare l'uscita degli altoparlanti.
- Verify external audio connections if using an amppiù vivace.
- I tasti non rispondono:
- Restart the piano.
- Assicurarsi che non vi siano oggetti estranei incastrati tra i tasti.
- Pedal Not Functioning:
- Check that the pedal cable is securely connected to the correct port on the piano's rear panel.
Specifiche
AODSK AD-X1 Digital Piano
| Caratteristica | Specificazione |
|---|---|
| Nome del modello | AD-X1 |
| Numero di chiavi | 88 Standard Keys (A2-C5 range) |
| Max Polyphony | 128 |
| Timbri | 128 |
| ritmi | 128 |
| Canzoni demo | 80 |
| Connettività | 3.5mm Headphone Jack, Audio Output, Microphone Input, Audio Input, Sustain Pedal Input, Triple Pedal Input, USB-MIDI, USB Port |
| Fonte di alimentazione | Elettrico con cavo |
| Tipo di finitura | Opaco |
| Livello di abilità | Principiante |
AODSK ALP-22 Adjustable Piano Bench
| Caratteristica | Specificazione |
|---|---|
| Nome del modello | ALP-22 |
| Intervallo di altezza regolabile | 18.31'' - 22.05'' |
| Materiale del sedile | Padded, High-elastic sponge |
| Magazzinaggio | Integrated compartment under seat |
Garanzia e supporto
For warranty information or technical support, please refer to the documentation included with your purchase or contact AODSK customer service directly. Keep your purchase receipt as proof of purchase.