1. Introduzione
Thank you for choosing the Conentool 21V Cordless Impact Drill/Driver Kit. This tool is designed for various drilling and screwdriving tasks in wood, metal, plastics, and masonry. Please read this manual carefully before operating the tool to ensure safe and efficient use. Keep this manual for future reference.

Image 1.1: The Conentool 21V Cordless Impact Drill/Driver Kit, including the drill, two 2500mAh batteries, charger, and a variety of drill bits and accessories in a carrying case.
2. Istruzioni generali di sicurezza
AVVERTENZA: leggere tutte le avvertenze di sicurezza, le istruzioni, le illustrazioni e le specifiche fornite con questo utensile elettrico. La mancata osservanza di tutte le istruzioni elencate di seguito può causare scosse elettriche, incendi e/o lesioni gravi.
2.1 Sicurezza dell'area di lavoro
- Mantenere l'area di lavoro pulita e ben illuminata. Le aree disordinate o buie favoriscono gli incidenti.
- Non utilizzare utensili elettrici in atmosfere esplosive, come in presenza di liquidi, gas o polvere infiammabili. Gli utensili elettrici creano scintille che possono incendiare la polvere o i fumi.
- Tenere lontani bambini e astanti mentre si utilizza un elettroutensile. Le distrazioni possono causare la perdita del controllo.
2.2 Sicurezza elettrica
- Le spine degli utensili elettrici devono essere adatte alla presa. Non modificare mai la spina in alcun modo.
- Evitare il contatto del corpo con superfici messe a terra o collegate a massa, come tubi, radiatori, fornelli e frigoriferi. C'è un rischio maggiore di scosse elettriche se il corpo è collegato a massa o collegato a massa.
- Non esporre gli utensili elettrici alla pioggia o a condizioni di bagnato. L'ingresso di acqua in un utensile elettrico aumenta il rischio di scosse elettriche.
2.3 Sicurezza personale
- Indossare sempre protezioni per gli occhi. Utilizzare occhiali di sicurezza, maschere o una visiera.
- Indossare protezioni acustiche quando si utilizza l'utensile per periodi prolungati.
- Vestiti in modo appropriato. Non indossare abiti larghi o gioielli. Tieni i capelli e gli abiti lontani dalle parti in movimento.
- Siate vigili, fate attenzione a ciò che fate e usate il buon senso quando utilizzate un elettroutensile.
3. Contenuto della confezione
Verifica che tutti gli articoli elencati di seguito siano inclusi nel pacco. Se alcuni articoli risultano mancanti o danneggiati, contatta l'assistenza clienti.
- 1 x Conentool 21V Cordless Impact Drill/Driver
- 2 batterie agli ioni di litio da 2500 mAh
- Caricabatteria 1 x
- 1 x Flexible Shaft Extension
- Various Drill Bits (for wood, metal, masonry)
- Various Screwdriver Bits
- Adattatori per prese
- Custodia per il trasporto
- Manuale d'uso

Immagine 3.1: Un completo overview of the kit contents, including the drill, two batteries, charger, flexible shaft, various drill bits, screwdriver bits, and socket adapters, all neatly arranged.
4. Prodotto finitoview
Familiarize yourself with the main components of your drill/driver:
- Mandrino: Contiene punte da trapano e punte da cacciavite.
- Anello di regolazione della coppia: Selects the desired torque setting.
- Anello selettore modalità: Switches between screwdriving, drilling, and impact drilling modes.
- Interruttore selettore velocità: Changes between high and low-speed gears.
- Interruttore a grilletto: Attiva l'utensile e controlla la velocità (velocità variabile).
- Selettore avanti/indietro: Cambia la direzione di rotazione.
- Luce da lavoro a LED: Illumina l'area di lavoro.
- Batteria: Fornisce energia allo strumento.
- Pulsante di rilascio della batteria: Per rimuovere la batteria.
- Maniglia: Impugnatura ergonomica per un utilizzo confortevole.

Immagine 4.1: Un interno view highlighting the brushless motor, which provides increased power, efficiency, and a quieter operation with no sparks.
5. Impostazione
5.1 Caricamento della batteria
The battery pack is not fully charged at the time of purchase. It is recommended to fully charge the battery before first use.
- Collegare il caricabatterie a una presa di corrente standard.
- Slide the battery pack onto the charger base. Ensure it clicks into place.
- The charger indicator light will show the charging status. A red light typically indicates charging, and a green light indicates a full charge.
- Una volta completata la carica, scollegare il caricabatterie dalla presa di corrente e rimuovere la batteria.

Image 5.1: The battery charger connected to a wall outlet, with a battery pack inserted for charging. The red light indicates charging, and the green light indicates a completed charge.
5.2 Installazione e rimozione della batteria
- Per installare: Allineare il pacco batteria alla base dell'impugnatura dell'utensile e farlo scorrere finché non scatta saldamente in posizione.
- Per rimuovere: Press the battery release button (usually located at the front of the battery) and slide the battery pack out of the tool.

Immagine 5.2: Uno spaccato view of the 2500mAh battery pack, illustrating its internal lithium-ion cells and power management system, designed for up to 90 minutes of use per battery.
5.3 Installing and Removing Drill/Screwdriver Bits
- Per installare: Rotate the chuck counter-clockwise to open the jaws. Insert the desired bit into the chuck as far as it will go. Rotate the chuck clockwise to tighten the jaws firmly around the bit.
- Per rimuovere: Ruotare il mandrino in senso antiorario per allentare le ganasce ed estrarre la punta.
Ensure the bit is securely fastened to prevent it from slipping during operation.
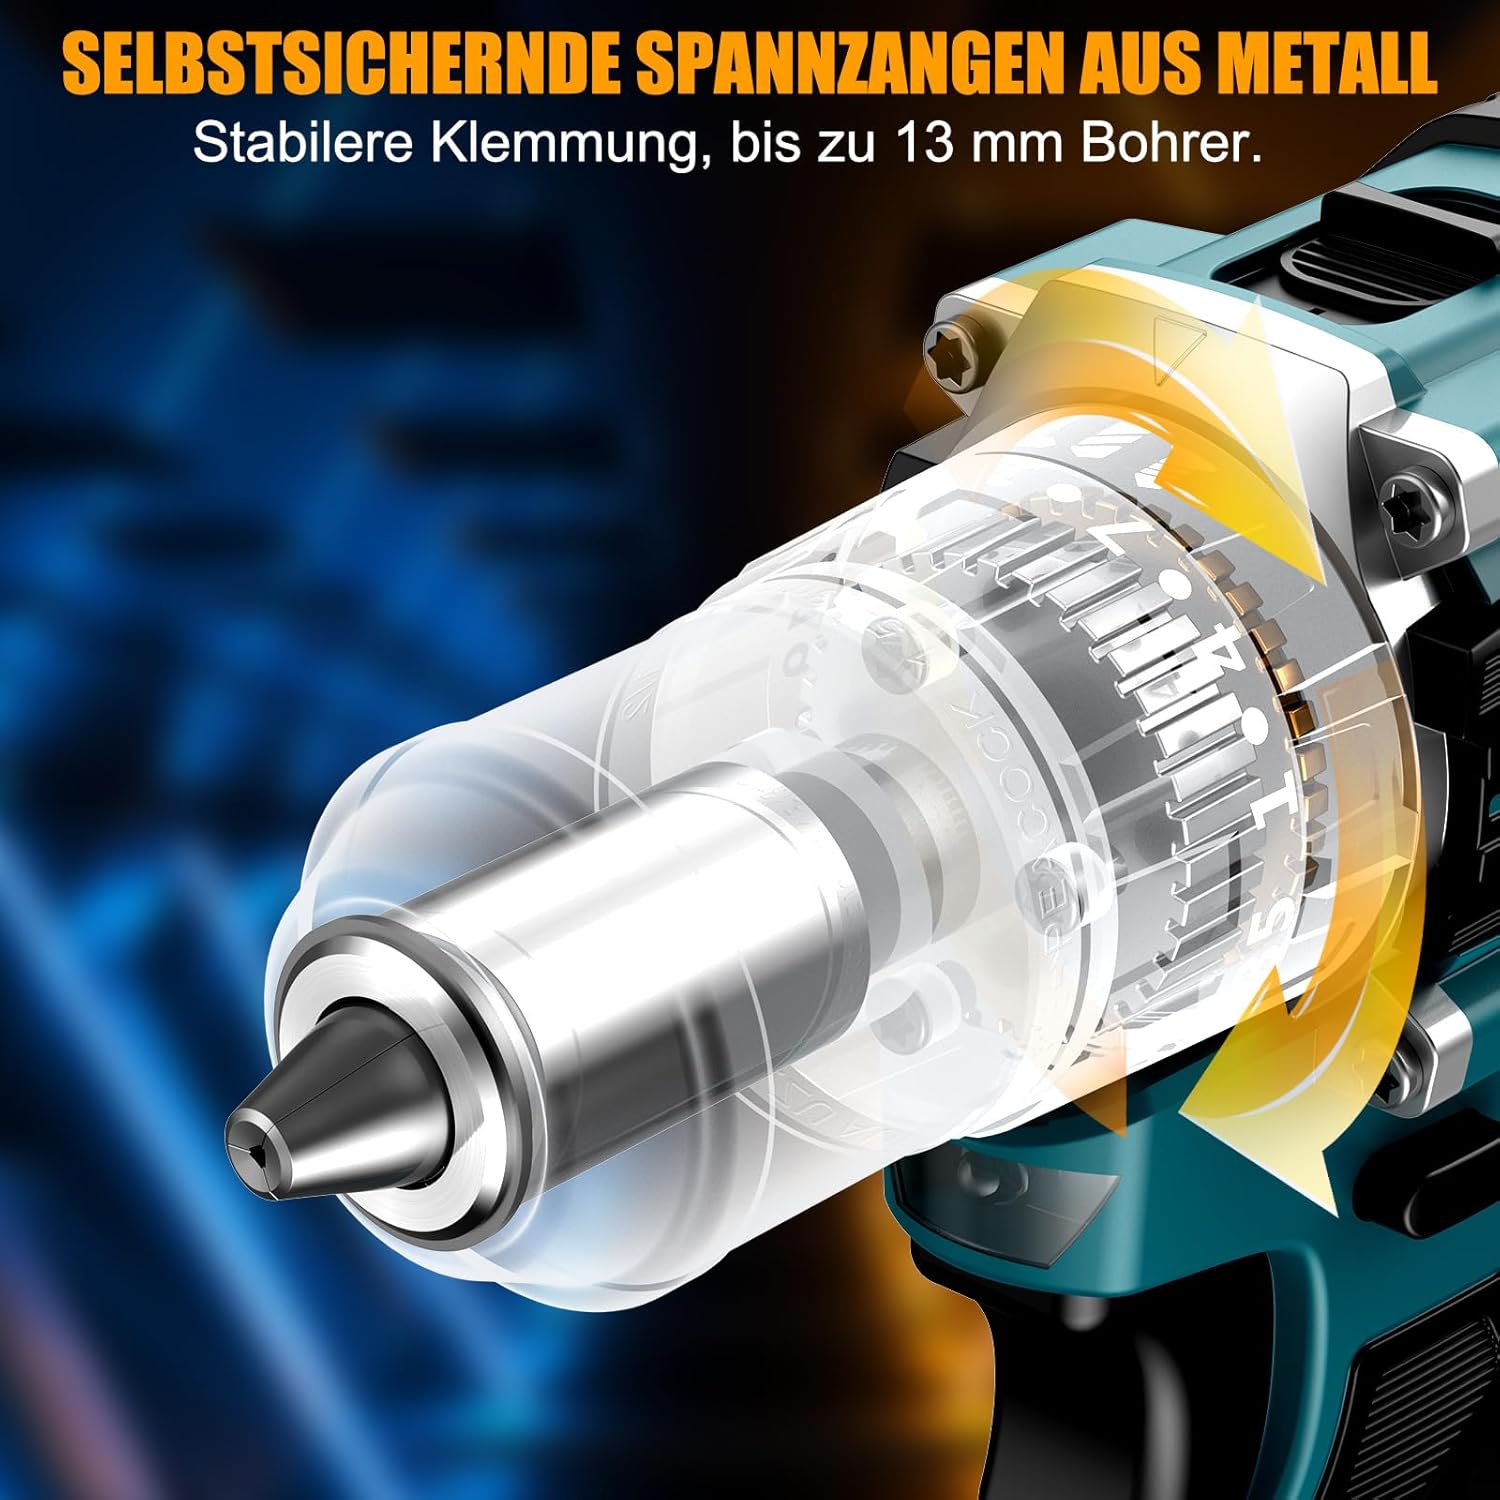
Immagine 5.3: Un dettaglio view of the self-locking metal chuck, demonstrating its stable clamping mechanism capable of holding drill bits up to 13mm securely.
6. Istruzioni per l'uso
6.1 Accensione/spegnimento e controllo della velocità
- To turn the tool ON, press the trigger switch. The speed is variable; press the trigger further for higher speed.
- Per spegnere l'utensile, rilasciare l'interruttore a grilletto.
- La luce di lavoro a LED integrata si accende quando si preme il grilletto, garantendo visibilità anche in aree scarsamente illuminate.
6.2 Rotazione avanti/indietro
The forward/reverse selector switch is located above the trigger. Push it to the left for forward rotation (for screwdriving and drilling) and to the right for reverse rotation (for removing screws or freeing jammed bits). Ensure the tool is stopped before changing direction.
6.3 Speed Gear Selection
The drill features a 2-speed gear selector switch on top of the tool:
- Gear 1 (Low Speed, 0-650 RPM): Ideal for high-torque applications like driving large screws or drilling large holes.
- Gear 2 (High Speed, 0-1850 RPM): Suitable for fast drilling in softer materials and smaller diameter holes.
Always select the appropriate gear for the task. Change gears only when the tool is completely stopped.
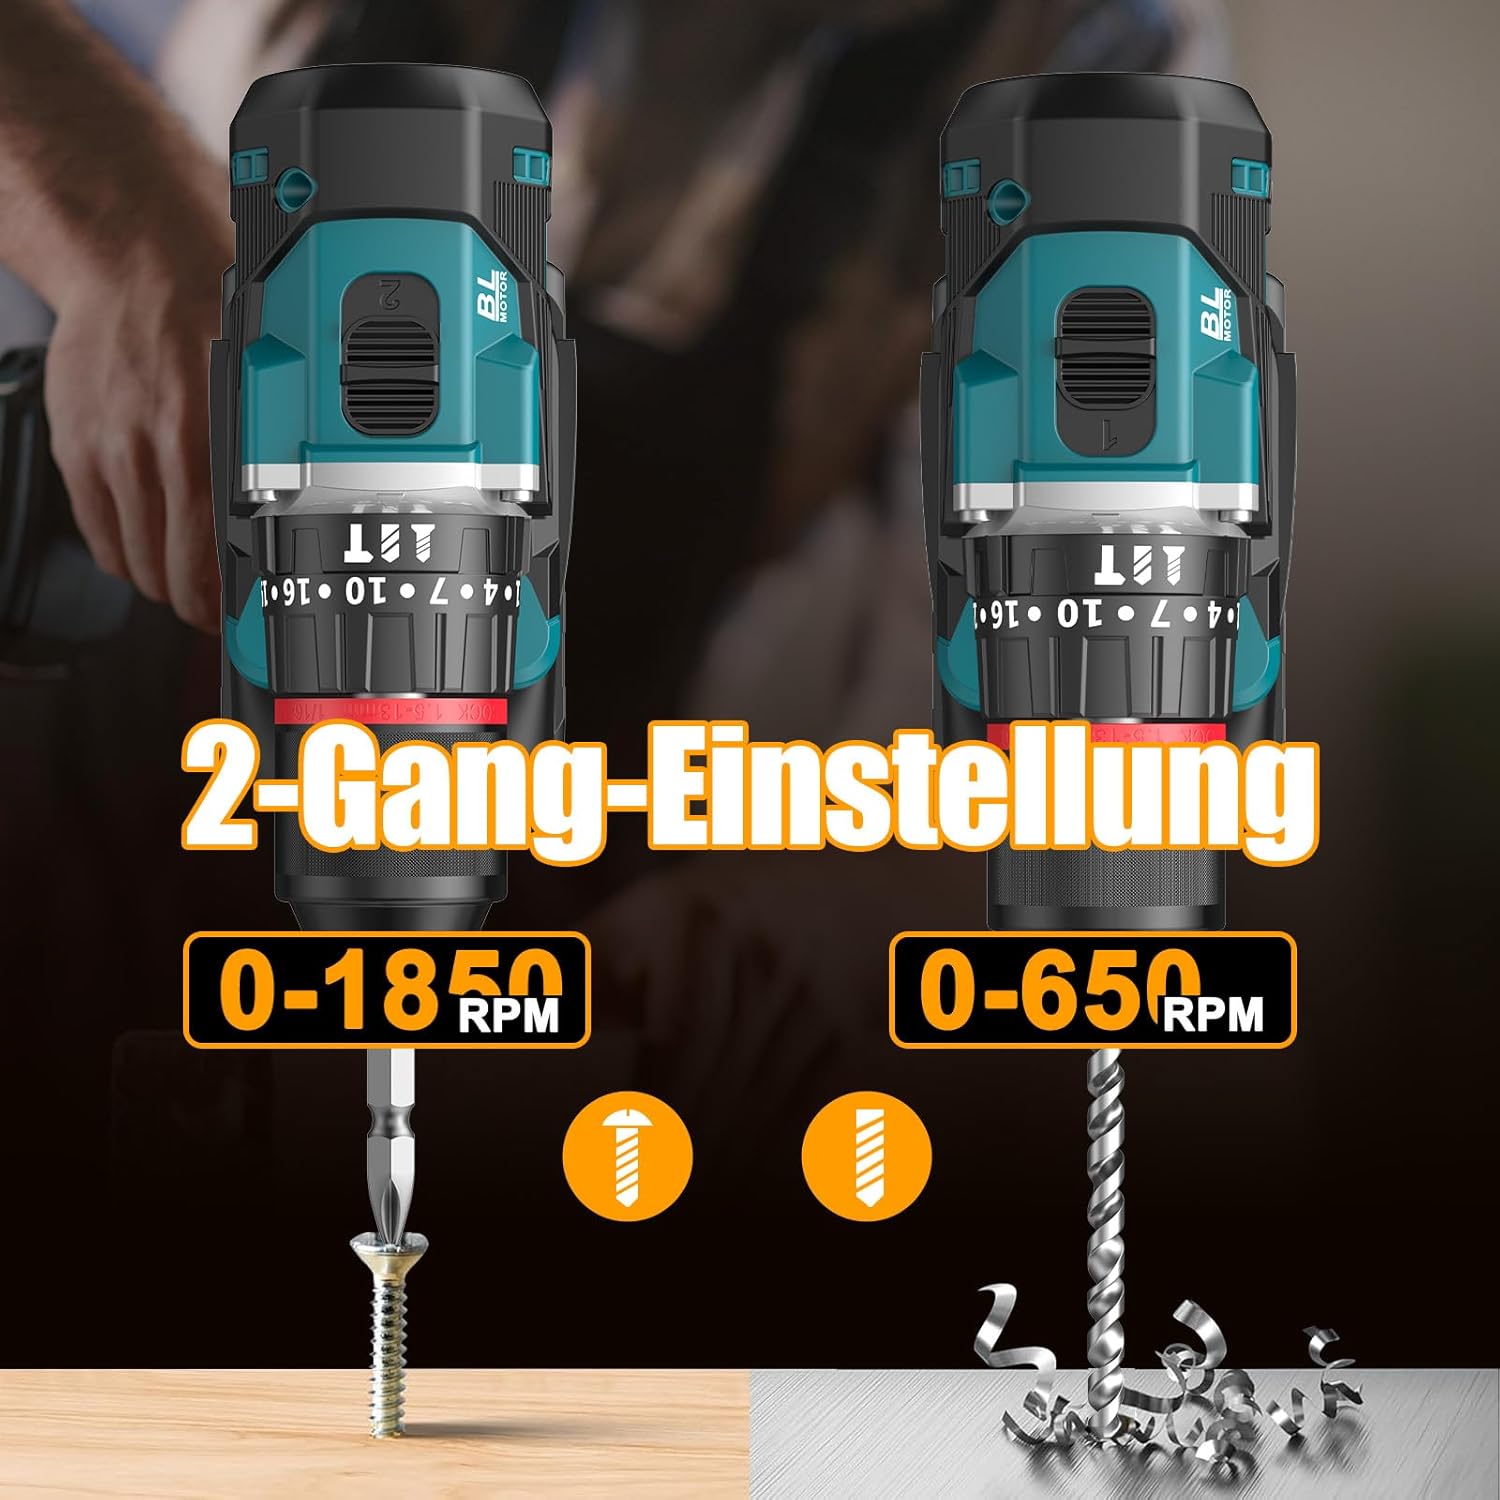
Image 6.1: An illustration demonstrating the two-speed gear settings: Gear 1 (0-650 RPM) for screwdriving and Gear 2 (0-1850 RPM) for drilling, allowing for optimal performance based on the application.
6.4 Regolazione della coppia e selezione della modalità
The torque adjustment ring allows you to set the desired torque for screwdriving applications, preventing overtightening or stripping screws. The mode selector ring allows you to switch between different operating modes.
- Screwdriving Mode (Torque Settings 1-35): Use these settings to match the torque to the screw size and material. Lower numbers for smaller screws/softer materials, higher numbers for larger screws/harder materials.
- Modalità di perforazione (Icona della punta del trapano): For general drilling without impact. The clutch is disengaged, providing maximum torque.
- Modalità di perforazione a impatto (Icona del martello): For drilling into masonry or concrete, providing a hammering action in addition to rotation.
The drill offers 35+3 settings, including 35 torque settings for screwdriving and 3 modes (screwdriving, drilling, impact drilling).

Image 6.2: A visual representation of the 35+3 torque and mode settings, indicating precise power control and a maximum torque of 55 N.m, suitable for various materials like wood, brick, plastic, and metal.
7. Manutenzione
7.1 Pulizia
- Scollegare sempre la batteria prima di effettuare qualsiasi operazione di pulizia o manutenzione.
- Mantenere pulite le aperture di ventilazione dell'utensile per evitare il surriscaldamento.
- Utilizzare un morbido, damp panno per pulire l'utensile casing. Non utilizzare prodotti chimici aggressivi o detergenti abrasivi.
7.2 Conservazione
- Conservare l'utensile e le batterie in un luogo fresco e asciutto, lontano dalla luce solare diretta e dall'umidità.
- Store the tool in its carrying case to protect it from dust and damage.
- Tenere fuori dalla portata dei bambini.

Image 7.1: A person carrying the Conentool drill kit in its durable black carrying case, designed for convenient storage and transport of the tool and its accessories.
7.3 Cura della batteria
- Non conservare le batterie scariche. Ricaricarle regolarmente, soprattutto se non utilizzate per periodi prolungati.
- Evitare di esporre le batterie a temperature estreme.
- Non tentare di smontare o modificare il pacco batteria.
8. Risoluzione Dei Problemi
| Problema | Possibile causa | Soluzione |
|---|---|---|
| Lo strumento non si avvia | Batteria non carica o installata in modo errato. | Assicurarsi che la batteria sia completamente carica e inserita correttamente. |
| Potenza o velocità ridotte | La batteria è scarica. | Ricaricare la batteria. |
| La punta scivola nel mandrino | Mandrino non serrato a sufficienza. | Tighten the chuck firmly around the bit. Ensure the bit shank is clean. |
| Surriscaldamento | Fessure di ventilazione bloccate; uso intenso e continuo. | Pulire le fessure di ventilazione. Lasciare raffreddare l'utensile durante un uso prolungato. |
9. Specifiche
| Caratteristica | Specificazione |
|---|---|
| Numero di modello | ebvc-sd-de |
| Voltage | 21 Volt |
| Tipo di batteria | Agli ioni di litio |
| Capacità della batteria | 2500 mAh (ciascuno) |
| Coppia massima | 55 Nm |
| Impostazioni di coppia | 35 + 3 Modes (Screwdriving, Drilling, Impact Drilling) |
| Velocità a vuoto (marcia 1) | 0-650 giri/min |
| Velocità a vuoto (marcia 2) | 0-1850 giri/min |
| Dimensioni del mandrino | 13 mm (3/8 pollice) senza chiave |
| Dimensioni del prodotto | Dimensioni: 35 x 31 x 10 cm |
| Peso (con batteria) | 1.5 chilogrammi |
10. Garanzia e supporto
Conentool products are manufactured to high-quality standards. In the unlikely event of a defect due to material or manufacturing fault, please contact your retailer or Conentool customer service. Please retain your proof of purchase for warranty claims.
For further assistance, technical support, or to inquire about spare parts, please refer to the contact information provided with your purchase or visit the official Conentool websito.