
TAB Fairy 10
Manuale utente del robot aspirapolvere e lavapavimenti TAB Fairy10
Model: Fairy 10
1. Introduzione
Thank you for choosing the TAB Fairy10 Robot Vacuum and Mop Combo. This advanced cleaning device is designed to provide a comprehensive and hands-free cleaning experience for your home. Featuring powerful suction, intelligent navigation, and a multifunctional docking station, the Fairy10 simplifies floor maintenance. This manual provides essential information for setup, operation, and maintenance to ensure optimal performance and longevity of your device.
2. Informazioni sulla sicurezza
Leggere attentamente tutte le istruzioni di sicurezza prima di utilizzare il dispositivo. Conservare il presente manuale per riferimento futuro.
- Non permettere ai bambini o agli animali domestici di utilizzare il robot.
- Assicurarsi che il cavo di alimentazione non sia danneggiato e che sia collegato correttamente.
- Non utilizzare il robot in ambienti umidi o in prossimità di materiali infiammabili.
- Prima di pulire, rimuovere eventuali cavi allentati, piccoli oggetti o elementi fragili dal pavimento per evitare che si aggroviglino o si danneggino.
- Non utilizzare il robot per raccogliere detriti di grandi dimensioni, oggetti appuntiti o liquidi.
- Utilizzare solo accessori e pezzi di ricambio specificati dal produttore.
3. Contenuto della confezione
Verificare che tutti i componenti siano presenti nella confezione:
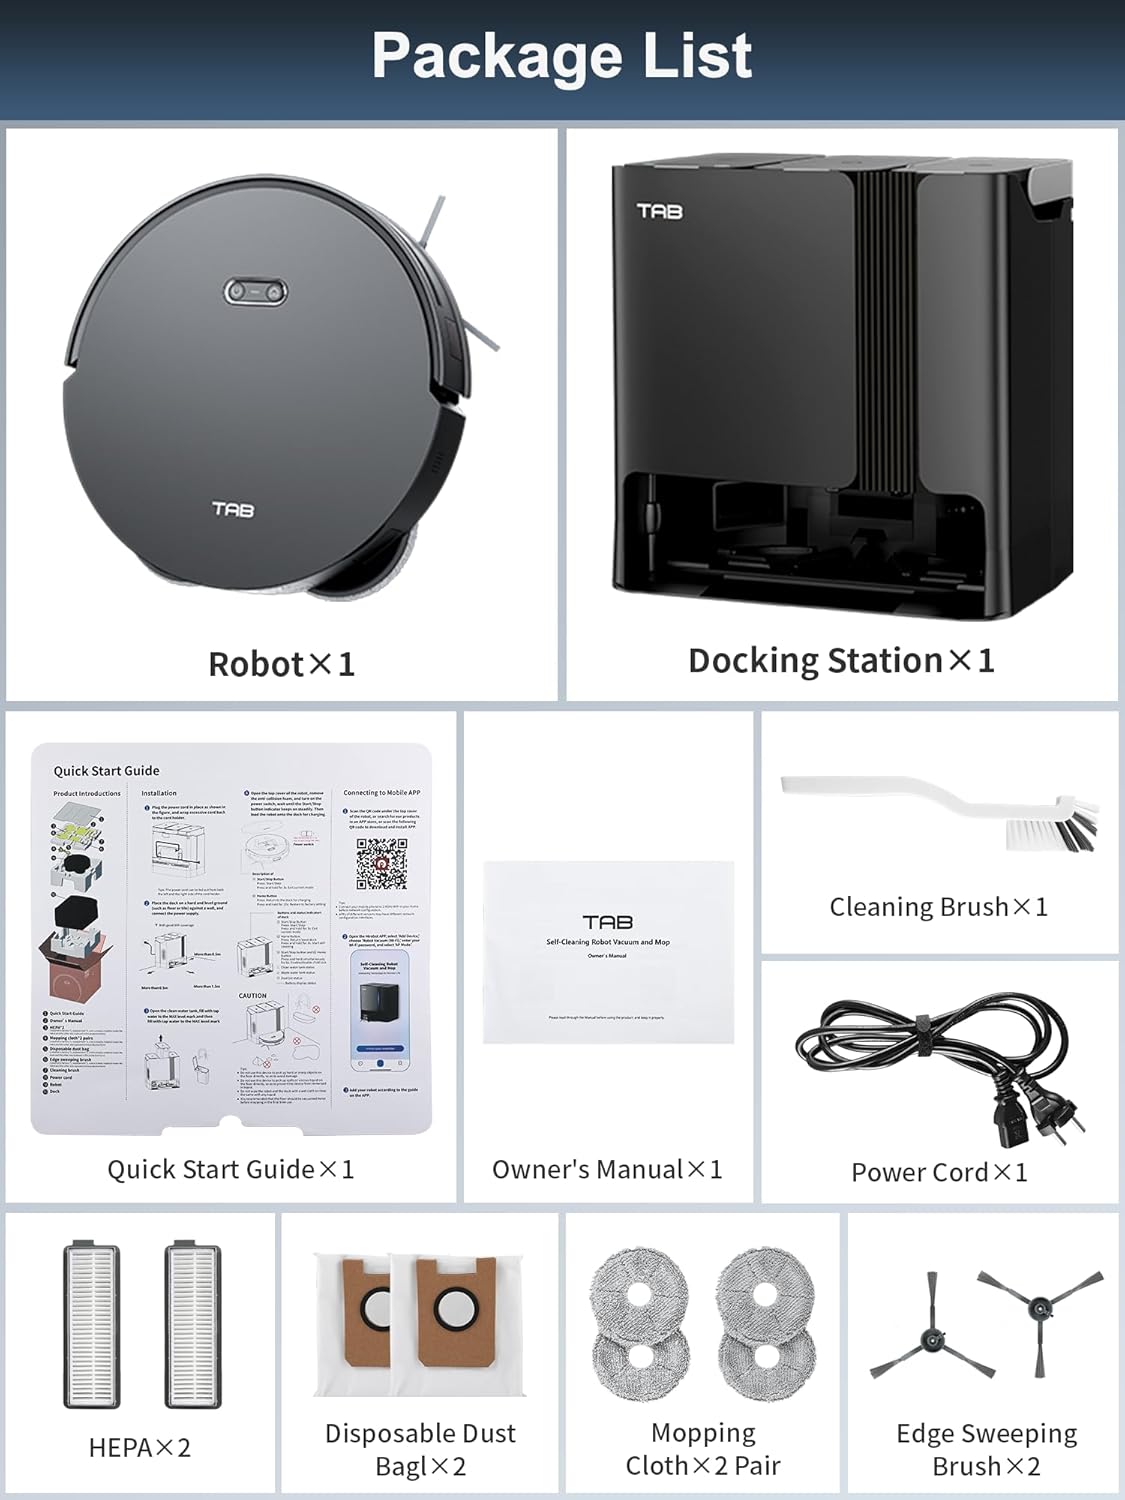
Image: All components included in the TAB Fairy10 package, neatly laid out.
- Robot aspirapolvere ×1
- Base di ricarica ×1
- Adattatore × 1
- HEPA Filters ×2
- Spazzola per la pulizia × 1
- Side Brush ×2 Pair
- Mop Cloth ×2 Pair
- Disposable Dust Bag ×2
- Guida rapida ×1
- Owner's Manual ×1
4. Prodotto finitoview
The TAB Fairy10 consists of the robot vacuum and a multifunctional docking station.

Image: The TAB Fairy10 robot vacuum positioned in front of its docking station, with a smartphone showing the companion app.
4.1 Robot Aspirapolvere
The robot features a compact design with hidden LiDAR navigation, allowing it to access tighter spaces. It is equipped with a multi-directional floating brush and dual rotary mops for effective cleaning.
4.2 Multifunctional Docking Station
The docking station serves as an all-in-one hub for the robot, providing self-draining, self-washing, self-drying, self-cleaning, and self-refilling capabilities.

Image: A visual representation of the docking station's capabilities, including self-mop cleaning, self-dust emptying, self-mop drying, and self-refilling.
5. Impostazione
5.1 Disimballaggio
Rimuovere con cautela tutti i componenti dall'imballaggio. Conservare il materiale di imballaggio per un eventuale trasporto o stoccaggio futuro.
5.2 posizionamento della stazione di aggancio
Place the docking station on a hard, level surface against a wall. Ensure there is at least 0.5 meters (1.6 feet) of clear space on both sides and 1.5 meters (4.9 feet) in front of the station for the robot to dock properly. Connect the power adapter to the docking station and plug it into a wall outlet.
5.3 Preparazione del robot
Install the side brushes by pressing them into their slots until they click. Ensure the mop pads are securely attached to the mop module.
5.4 Carica iniziale
Place the robot onto the docking station. Ensure the charging contacts align. The robot will begin charging automatically. For first use, fully charge the robot before operation.
5.5 Installazione e connessione dell'app
Download the official TAB app from your smartphone's app store. Follow the in-app instructions to connect your Fairy10 robot. This typically involves creating an account, adding the device, and connecting it to your home Wi-Fi network.
5.6 Mappatura
Once connected, initiate a mapping run through the app. The hidden LiDAR navigation system will efficiently scan and map your home, creating a detailed floor plan for optimized cleaning routes.

Image: The robot vacuum actively mapping a room using its LiDAR system, with a visual representation of the map being created on a smartphone screen.
6. Istruzioni per l'uso
6.1 Avvio/Arresto della pulizia
You can start or stop a cleaning cycle using the button on the robot or through the TAB app. The robot will automatically return to the docking station upon completion or when its battery is low.
6.2 modalità di pulizia
The Fairy10 offers versatile cleaning modes to suit your needs:

Immagine: Visual examples of the four available cleaning modes: sweep only, mop only, sweep then mop, and mop while sweeping.
- Only Sweep: For dry debris collection with 6000 Pa suction.
- Only Mop: For wet cleaning with dual rotating mops.
- Sweep Then Mop: Completa un ciclo di aspirazione completo prima di iniziare la pulizia.
- Mop While Sweep: Simultaneous vacuuming and mopping for combined cleaning.

Image: The robot vacuum demonstrating its powerful 6000Pa suction on a carpeted surface.

Image: The robot vacuum actively mopping a hard floor, showcasing its dual rotating mops and key specifications like rotation speed, lift, and pressure.
6.3 Pulizia programmata
Set specific cleaning times via the app to automate your cleaning routine. The robot will start and return to the dock as scheduled.

Image: The robot vacuum returning to its base, indicating a successful scheduled cleaning setup.
6.4 Targeted Cleaning Zones
Use the app to define specific areas for cleaning, such as the kitchen, living room, or bedroom, allowing for customized cleaning preferences.

Image: The app interface displaying targeted cleaning zones, with corresponding images of the robot cleaning different rooms.
6.5 Zone vietate
Set virtual boundaries or no-go zones in the app to prevent the robot from entering specific areas, protecting delicate items or preventing access to certain rooms.

Image: The robot vacuum avoiding a designated 'No-Go Zone' in a home environment.
6.6 Blocco bambini
Activate the child lock feature in the app to prevent unintended operation by children or pets, ensuring safety.

Image: The robot vacuum with a child lock icon, illustrating its safety feature when children or pets are present.
6.7 Lidar Navigation and Obstacle Avoidance
The hidden LiDAR navigation system allows the robot to create precise maps and navigate efficiently, even in tight spaces. AI 3.0 Obstacle Avoidance helps the robot detect and avoid objects on the floor, reducing the need for pre-cleaning.

Image: The robot vacuum demonstrating its hidden LiDAR navigation by cleaning under a sofa, highlighting its ability to access tight spaces.
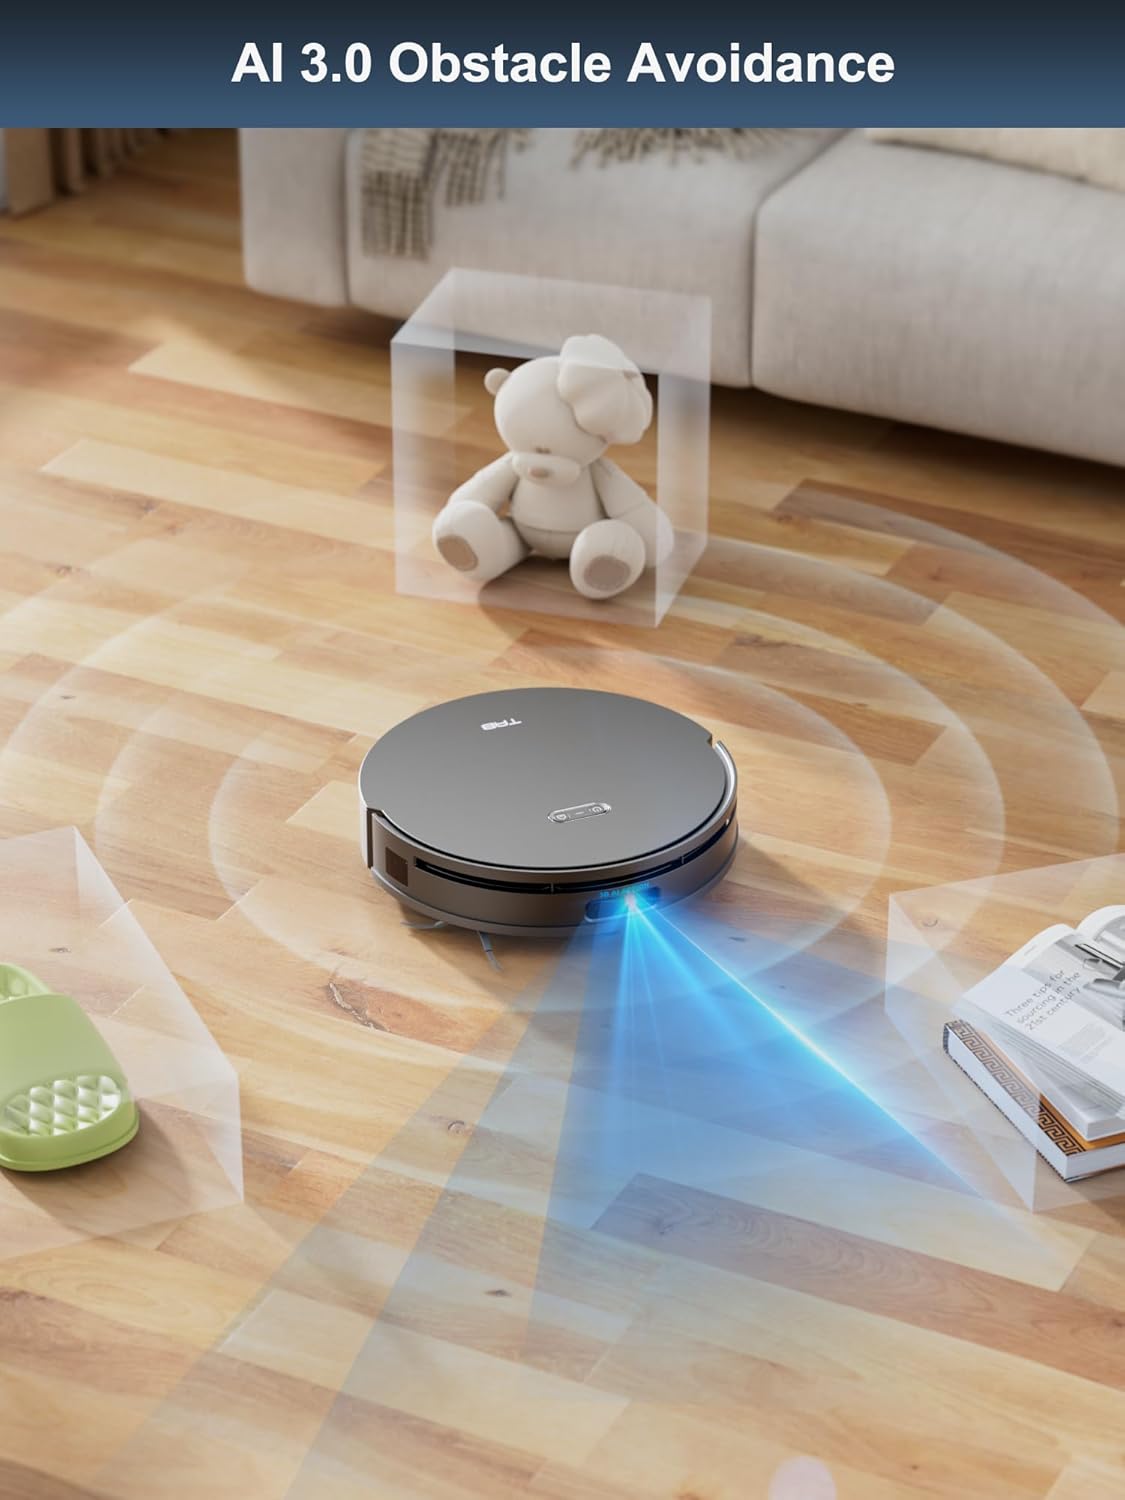
Image: The robot vacuum employing AI 3.0 obstacle avoidance to detect and navigate around various items on the floor.
6.8 Sollevamento automatico del mocio
The robot automatically lifts its mops by 15mm when it detects carpets, preventing them from getting wet during vacuuming cycles.
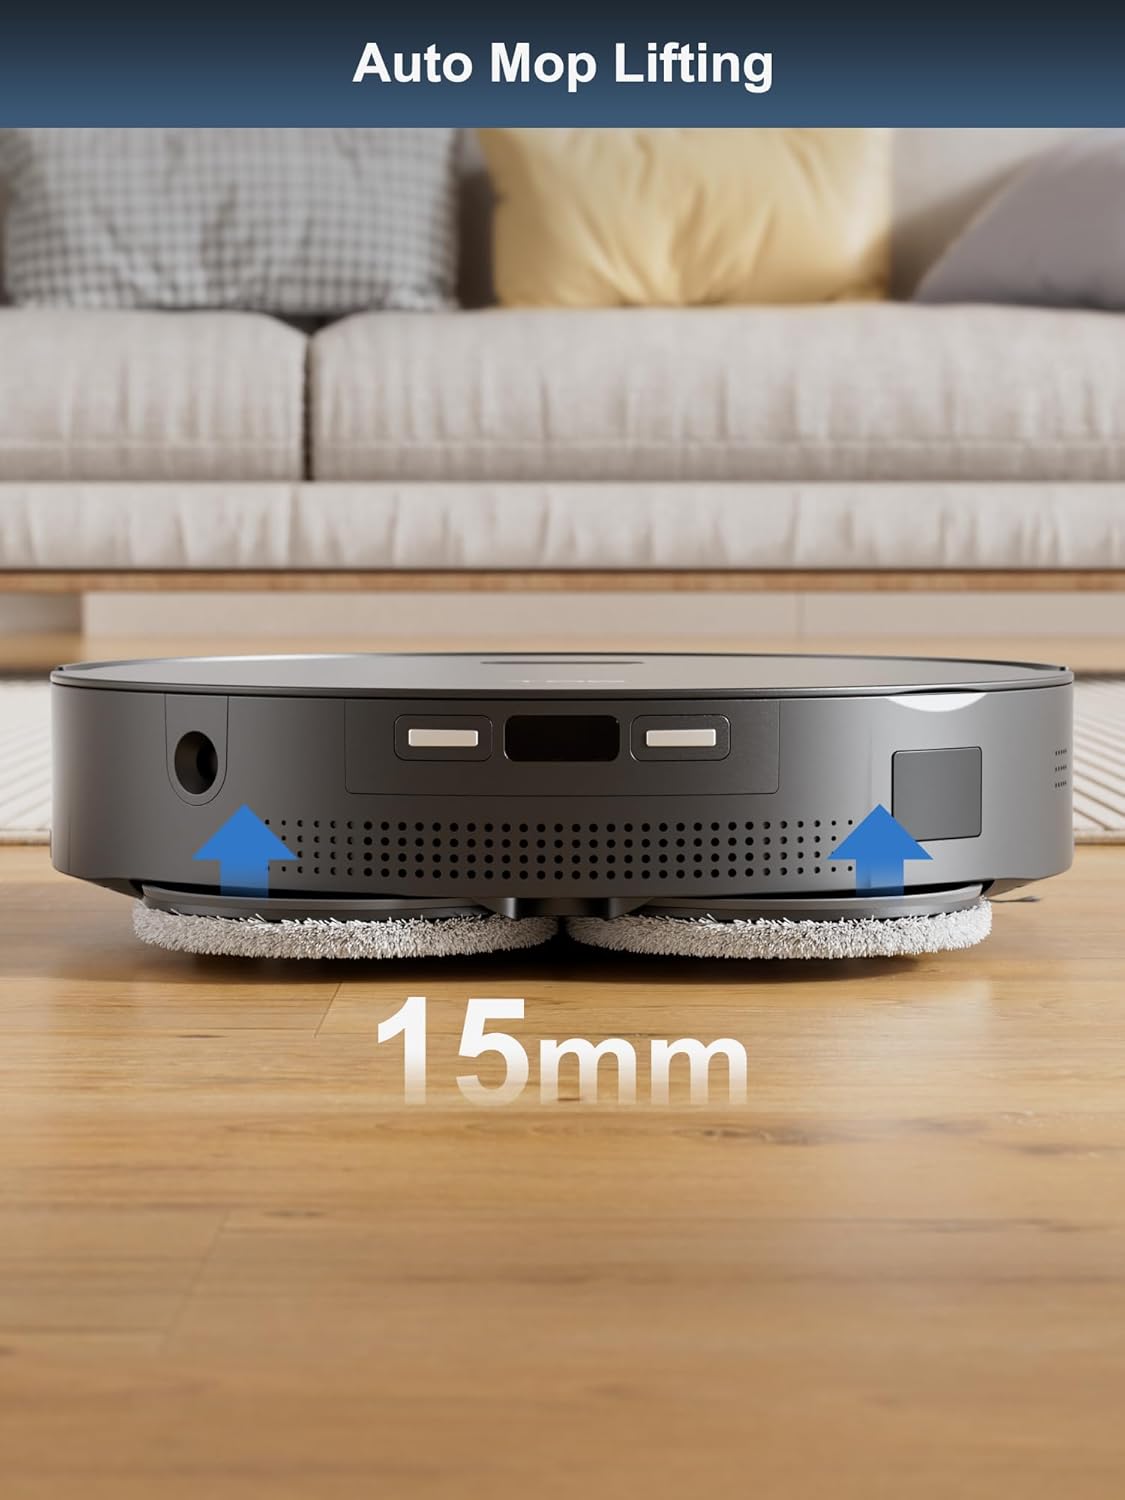
Image: The robot vacuum demonstrating its auto mop lifting feature, raising its mops by 15mm as it approaches a carpet.
7. Manutenzione
Regular maintenance ensures the optimal performance and longevity of your TAB Fairy10.
7.1 Funzioni autopulenti
La docking station automatizza diverse attività di manutenzione:
- Svuotamento automatico: The robot's dustbin is automatically emptied into a disposable dust bag in the docking station.
- Lavaggio del mocio: The mop pads are automatically washed at the docking station to remove dirt and debris.
- Asciugatura del mocio: Dopo il lavaggio, i panni per mocio vengono asciugati con aria calda per prevenire la formazione di odori e muffa.
- Auto-ricarica: The robot's water tank is automatically refilled from the clean water tank in the docking station.

Image: The self-cleaning and hot air drying processes for the mop pads within the docking station.

Immagine: Un trasparente view of the docking station illustrating the automatic dust emptying process.
7.2 Pulizia del robot
- Spazzola principale: Regularly remove hair and debris from the main brush. Use the cleaning tool provided.
- Spazzole laterali: Check for tangled hair or debris and clean as needed. Replace if worn.
- Sensori: Pulire tutti i sensori (sensori di scogliera, sensori a parete, contatti di ricarica) con un panno pulito e asciutto.
- Ruote: Pulire eventuali detriti dalle ruote motrici e dalla ruota orientabile.
7.3 Cleaning the Docking Station
- Sacchetto antipolvere: Sostituire il sacchetto per la polvere usa e getta quando è pieno.
- Serbatoi di acqua pulita/sporca: Empty the dirty water tank and refill the clean water tank as needed. Clean both tanks regularly to prevent buildup.
- Vassoio per il lavaggio del mocio: Clean the mop washing tray to remove any residue.
7.4 Sostituzione dei materiali di consumo
Replace consumables according to usage or as indicated by the app:
- Filtri HEPA: Sostituire ogni 3-6 mesi.
- Disposable Dust Bags: Replace when full.
- Panni per mocio: Replace every 1-3 months depending on usage.
- Spazzole laterali: Sostituire ogni 3-6 mesi.
8. Risoluzione Dei Problemi
If you encounter issues with your TAB Fairy10, refer to the following common solutions:
| Problema | Possibile causa | Soluzione |
|---|---|---|
| Il robot non si accende | Batteria scarica; interruttore di alimentazione spento | Caricare il robot; Assicurarsi che l'interruttore di alimentazione sia acceso |
| Il robot non può attraccare | Docking station obstructed; Incorrect placement | Clear obstacles around the dock; Ensure proper placement as per setup instructions |
| Scarse prestazioni di pulizia | Full dustbin; Clogged brushes/filters; Worn mop pads | Empty dustbin/replace dust bag; Clean brushes/filters; Replace mop pads |
| Problemi di connettività dell'app | Incorrect Wi-Fi password; Robot too far from router; App outdated | Verify Wi-Fi credentials; Move robot closer to router; Update app to latest version |
| Mops not drying | Air vents blocked; Drying cycle not initiated | Check for obstructions in air vents; Ensure drying function is enabled in app |
For further assistance, please refer to the support section of the TAB app or visit the official TAB websito.
9. Specifiche
| Caratteristica | Specificazione |
|---|---|
| Marca | SCHEDA |
| Nome del modello | Fairy 10 |
| Caratteristica speciale | Auto Mop Washing, Auto-Docking, Automatic Dust Collection |
| Colore | Nero |
| Dimensioni del prodotto | 18.8 cm L x 18.8 cm P x 19.2 cm A |
| Tipo di filtro | Cartuccia |
| Durata della batteria | 120 minuti |
| Fonte di alimentazione | Alimentato a batteria |
| Metodo di controllo | Applicazione |
| Dispositivi compatibili | Smartphone |
| Peso dell'articolo | 42.1 libbre |
10. Garanzia e supporto
For warranty information and customer support, please refer to the official TAB website or contact their customer service directly. Details can typically be found in the TAB app under the 'Support' or 'About Us' sections.
Risorse online:
- Visitare il Official TAB Store on Amazon per aggiornamenti e supporto sui prodotti.
Ask a question about this manual
Ask about setup, troubleshooting, compatibility, parts, safety, or missing instructions. Manuals+ will review the question and use this page’s manual context to help answer it.