
REVO TK2130-1-US+VT1023-US+VT1024-US
Kit catena di distribuzione REVO con ingranaggi VVT per motore BMW N20: Manuale di installazione e manutenzione
Brand: REVO | Model: TK2130-1-US+VT1023-US+VT1024-US
1. Introduzione
This manual provides essential information for the installation and maintenance of the REVO Timing Chain Kit with VVT Gears. This kit is designed for specific BMW N20 engines to ensure precise engine timing and optimal performance. Proper installation is crucial for the longevity and correct operation of your vehicle's engine.
2. Compatibilità
This timing chain kit is compatible with BMW vehicles equipped with the 2.0T N20 engine, manufactured between 2012 and 2017/2018, depending on the specific model. Please verify your vehicle's engine code and model year before installation.
Modelli compatibili:
- BMW 1 Series (F20) 125i 2.0T N20 B20 A (2012-2017)
- BMW 3 Series (F30, F80) 320i 2.0T N20 B20 A (2012-2018)
- BMW 3 Series Gran Turismo (F34) 320i 2.0T N20 B20 B (2013-2016)
- BMW 3 Series Touring (F31) 328i 2.0T N20 B20 A (2012-2015)
- BMW 4 Series Gran Coupe (F36) 420i 2.0T N20 B20 B (2014-2017)
- BMW 4 Series Gran Coupe (F36) 428i 2.0T N26 B20 A (2014-2016)
- BMW 5 Series (F10) 520i 2.0T N20 B20 B (2011-2016)
- BMW 5 Series Touring (F11) 528i N20 B20 A (2011-2017)
- BMW X1 (E84) xDrive 20i 2.0T N20 B20 A (2011-2015)
- BMW X3 (F25) xDrive 20i 2.0T N20 B20 A (2011-2017)
- BMW X5 (F15, F85) xDrive 40e 2.0T N20 B20 A (2015-2018)
- BMW Z4 Roadster (E89) sDrive 28i 2.0T N20 B20 A (2011-2016)
3. Kit Components and Specifications
The REVO Timing Chain Kit includes the following components, designed to meet original equipment (OE) standards for your BMW N20 engine.
Parti incluse:
- 1x Timing Chain (148 Link) - Reference: 11318648732; 11317516074; 11317584084
- 1x Timing Chain Tensioner - Reference: 11317567680; 11311439851
- 2x Timing Chain Guides - Reference: 11317592850; 11317516079; 11317584651; 552015610 (one guide), 11317592877 (second guide)
- 1x Sprocket Gear (19T) - Reference: 11317603944
- 2x Variable Valve Timing (VVT) Sprockets - Reference: 11367583818 (one VVT sprocket), 11367583819 (second VVT sprocket)
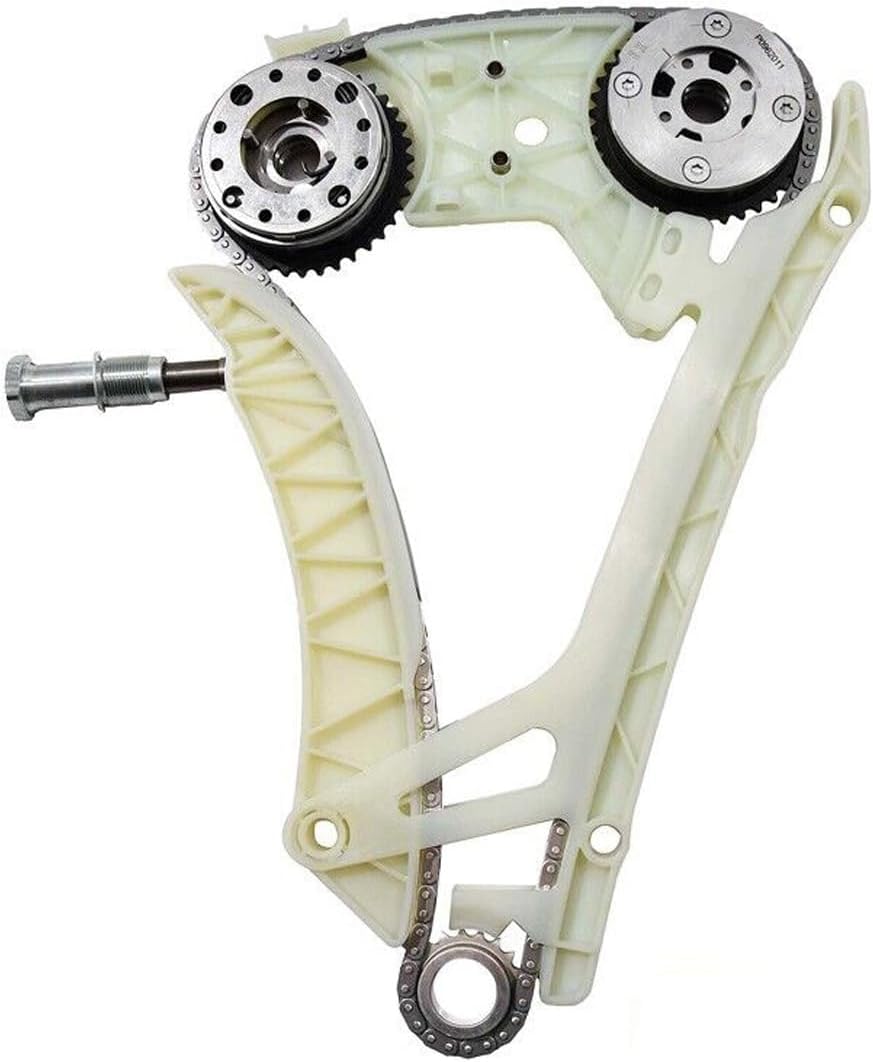
Figura 3.1: Sopraview of the REVO Timing Chain Kit components, including chains, guides, tensioner, and VVT gears.

Figura 3.2: Avvicinamento view of the timing chain, a critical component for engine synchronization.

Figura 3.3: The timing chain tensioner, responsible for maintaining proper chain tension.

Figura 3.4: One of the timing chain guides, which directs the chain's path.

Figura 3.5: Another timing chain guide, ensuring smooth operation and preventing chain slack.

Figura 3.6: The sprocket gear, an essential part of the timing mechanism.

Figura 3.7: One of the Variable Valve Timing (VVT) sprockets, crucial for valve timing adjustment.

Figura 3.8: The second VVT sprocket, working in conjunction with the first for precise valve control.
4. Guida all'installazione
Importante: Installation of a timing chain kit requires specialized knowledge and tools. It is highly recommended that this procedure be performed by a qualified mechanic. Refer to the appropriate shop manual for your specific vehicle model to obtain detailed, step-by-step instructions and torque specifications.
General Installation Steps (Consult a Professional Manual for Details):
- Preparazione: Ensure the engine is cool. Disconnect the battery. Drain engine oil and coolant if necessary for access.
- Accesso: Remove all components obstructing access to the timing chain cover (e.g., belts, pulleys, valve cover, oil pan, front engine cover).
- Timing Alignment: Before removing old components, carefully align the engine to Top Dead Center (TDC) for cylinder 1. Mark all timing components (camshafts, crankshaft) relative to the engine block to ensure correct reassembly.
- Rimozione dei componenti: Remove the old timing chain, guides, tensioner, and sprockets. Inspect surrounding components for wear or damage.
- Installazione del nuovo componente: Install the new REVO timing chain, guides, tensioner, and VVT sprockets. Ensure all components are correctly seated and aligned with the timing marks established in step 3.
- Installazione del tenditore: Install the new timing chain tensioner. Follow the manufacturer's specific instructions for tensioner activation and setting.
- Verifica: Manually rotate the crankshaft several times (e.g., two full rotations) and re-check all timing marks to confirm correct alignment.
- Rimontaggio: Reinstall the timing chain cover, valve cover, oil pan, and all other removed components. Replace gaskets and seals as required.
- Ricarica del fluido: Rabboccare l'olio motore e il liquido di raffreddamento fino ai livelli appropriati.
- Avvio iniziale: Start the engine and check for any unusual noises or warning lights. Allow the engine to reach operating temperature.
- VANOS Adaptation: As noted by experienced users, performing a VANOS adaptation after installation is crucial to avoid error codes and ensure optimal engine performance. This typically requires a diagnostic tool.
Installation Support Videos:
4.1 video: generale finitaview of a timing chain kit installation for BMW N20/N26 engines. This video provides a visual reference for the components and process.
4.2 video: Demonstration on how to use a timing tool for BMW N20 N26 engines. This is essential for accurate camshaft and crankshaft alignment during installation.
4.3 video: Sopraview of an oil pump timing chain kit with camshaft gear for BMW 2.0L engines. Provides additional context for related timing components.
4.4 video: A general video showcasing a timing chain kit, highlighting its components and function within an engine.
5. Considerazioni post-installazione
After successful installation of the timing chain kit, it is important to monitor engine performance and address any potential issues promptly.
- Rumore del motore: Listen for any unusual noises, especially from the timing chain area. A properly installed timing chain should operate quietly.
- Spie luminose: Ensure no engine warning lights (e.g., Check Engine Light) illuminate after initial start-up and driving.
- Prestazione: The engine should run smoothly with no noticeable loss of power or erratic idling.
- Scansione diagnostica: A professional diagnostic scan can confirm proper VANOS operation and absence of timing-related fault codes.
6. Manutenzione
While timing chains are designed for long service life, regular engine maintenance contributes to their longevity and overall engine health.
- Cambio dell'olio: Adhere to the manufacturer's recommended oil change intervals and use the specified engine oil type. Clean engine oil is vital for the hydraulic tensioner and VVT system operation.
- Livello dell'olio: Regularly check and maintain the correct engine oil level. Low oil levels can affect hydraulic tensioner performance.
- Ascolta il rumore: Pay attention to any new rattling or ticking noises from the engine, especially during cold starts, as these can indicate timing chain wear or tensioner issues.
- Ispezione professionale: Consider periodic professional inspections of the timing system, especially on high-mileage vehicles, to detect early signs of wear.
7. Risoluzione Dei Problemi
If you experience issues after installing the timing chain kit, consider the following common problems and potential solutions. Always consult a qualified mechanic for diagnosis and repair.
Problemi comuni:
- Rattling Noise from Engine:
- Possibile causa: Incorrectly installed timing chain tensioner, faulty tensioner, worn chain guides, or incorrect chain tension.
- Azione: Immediately cease engine operation to prevent further damage. Have a qualified mechanic inspect the timing chain system, focusing on tensioner function and chain tension.
- Check Engine Light (CEL) with Timing-Related Codes:
- Possibile causa: Incorrect timing alignment, VVT sprocket malfunction, or issues with VANOS adaptation.
- Azione: Use a diagnostic scanner to retrieve fault codes. Perform a VANOS adaptation procedure if not already done. If codes persist, professional diagnosis of timing components and VVT system is required.
- Rough Idling or Reduced Performance:
- Possibile causa: Incorrect timing, VVT system issues, or other engine-related problems.
- Azione: Verify timing alignment. Check for proper VVT operation. A comprehensive engine diagnostic by a professional is recommended.
8. Garanzia e supporto
REVO products are manufactured using qualified technology and are designed for perfect fitment. All products can be returned or exchanged within 60 days unconditionally. For any questions or support, please contact REVO customer service. We aim to respond within 24 working hours.
Informazioni sui contatti: Please refer to your purchase documentation or the REVO websito per i dettagli di contatto attuali del servizio clienti.
Ask a question about this manual
Ask about setup, troubleshooting, compatibility, parts, safety, or missing instructions. Manuals+ will review the question and use this page’s manual context to help answer it.