Introduzione
This manual provides detailed instructions for the safe and effective use of your GOYOJO 1/4" 2-24N.m Torque Wrench. Please read this manual thoroughly before operation and retain it for future reference. This tool is designed for precise torque applications on various fasteners, commonly used for bicycles, motorcycles, and light vehicle maintenance.
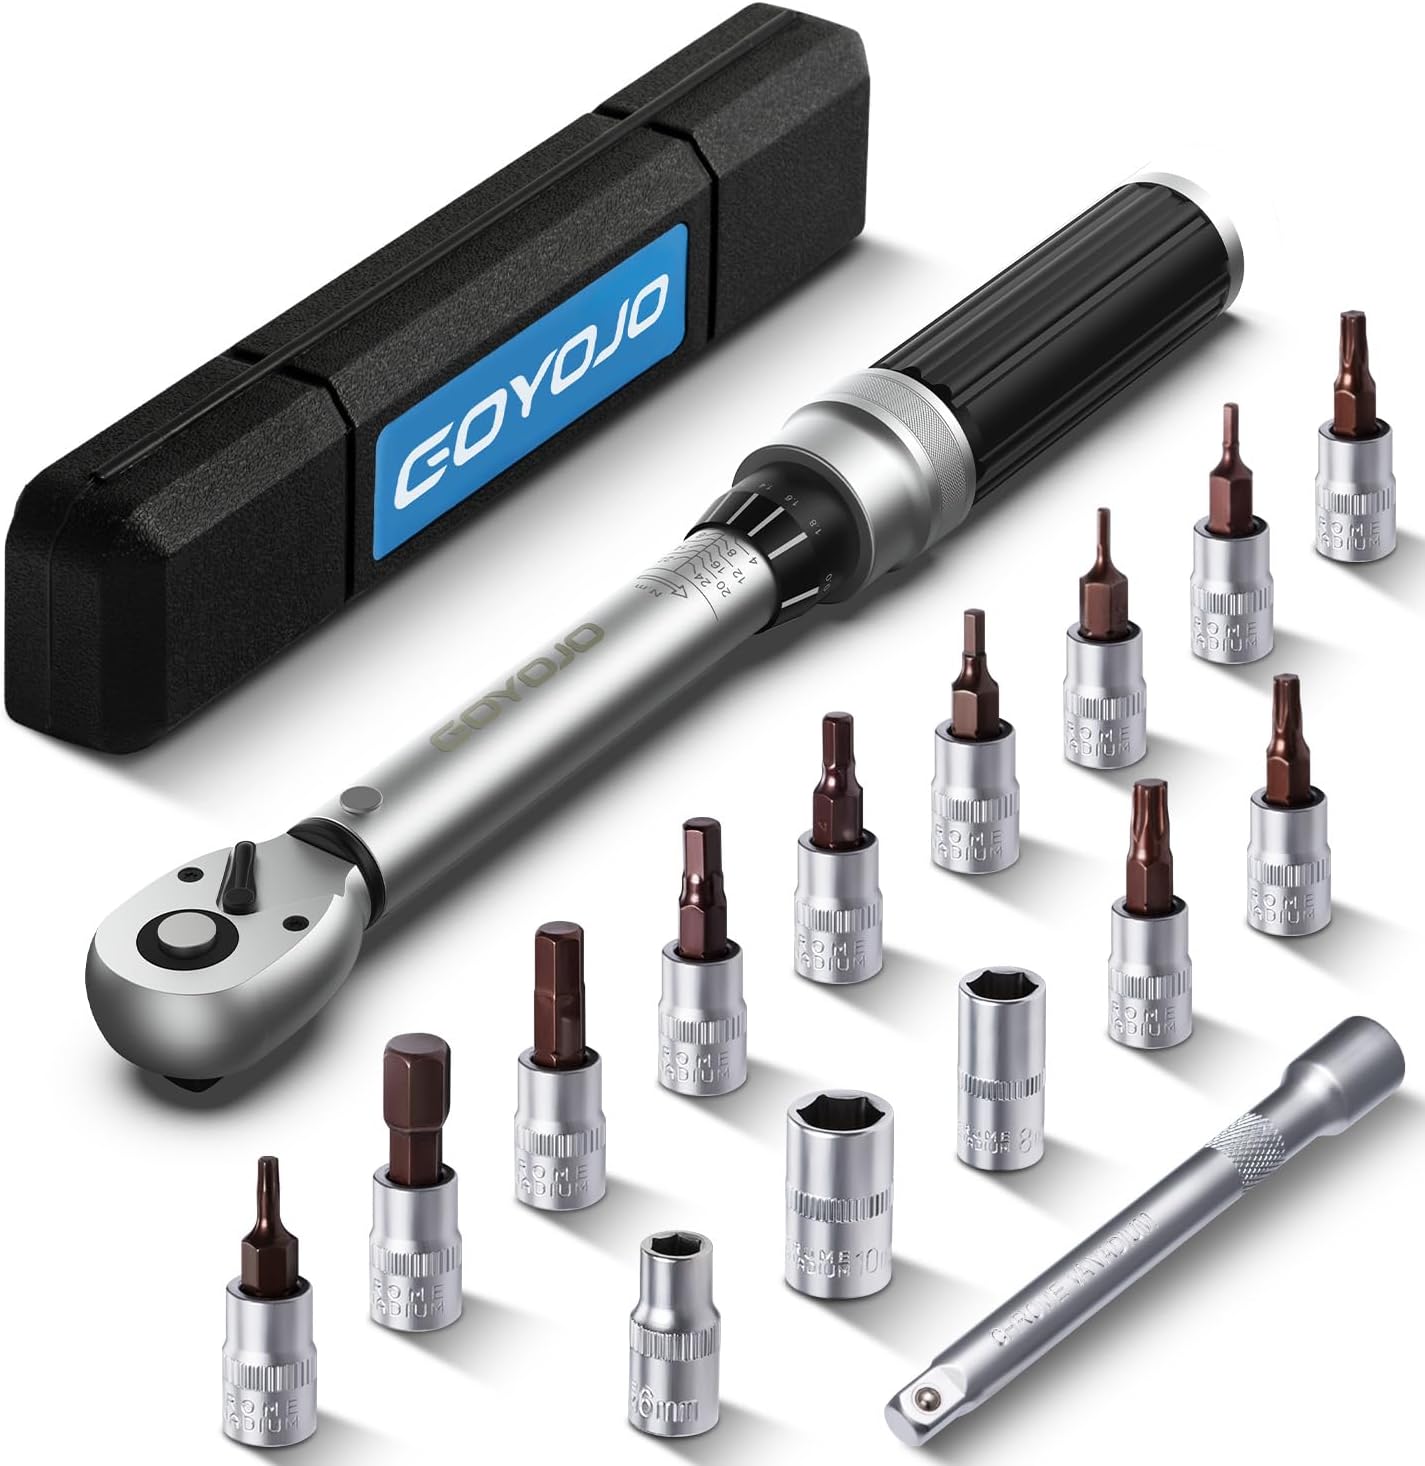
Image: The GOYOJO 1/4" 2-24N.m Torque Wrench kit, including the wrench, various hex and Torx bits, and an extension bar, all neatly arranged with its protective case.
Informazioni sulla sicurezza
Osservare sempre le seguenti precauzioni di sicurezza:
- Indossare dispositivi di protezione individuale adeguati, come occhiali di sicurezza.
- Assicurarsi che il pezzo sia saldamente clamped before applying torque.
- Do not use the torque wrench as a breaker bar or for loosening seized fasteners.
- Avoid dropping the tool, as this can affect its calibration.
- Store the torque wrench at its lowest torque setting (or zero, if applicable) when not in use to relieve spring tension.
- Keep the tool clean and free from oil or grease to maintain a secure grip.
Componenti del prodotto
The GOYOJO 1/4" 2-24N.m Torque Wrench set typically includes:
- 1/4" Drive Torque Wrench (2-24 N.m range)
- Hex Bits: H2, H2.5, H3, H4, H5, H6, H8
- Torx Bits: T10, T20, T25, T30
- Barra di estensione da 1/4"
- Custodia di stoccaggio
Impostare
1. Selecting the Correct Bit/Socket
Choose the appropriate hex or Torx bit, or a 1/4" drive socket, that matches the fastener you intend to tighten. Insert the chosen bit or socket firmly onto the 1/4" square drive of the torque wrench.

Image: A hand demonstrating the quick-release mechanism for installing and removing bits or sockets on the torque wrench.
2. Impostazione del valore di coppia
The torque wrench features a dual-scale display for Newton-meters (N.m) and Inch-pounds (IN.LB). To set the desired torque:
- Sbloccare: Press down on the locking ring located at the base of the handle.
- Regolare: Rotate the handle. Turning it clockwise increases the torque value, while turning it counter-clockwise decreases it. Align the desired torque value on the main scale with the zero mark on the micrometer scale. Then, rotate the handle further until the exact desired value on the micrometer scale aligns with the main scale line.
- Serratura: Release the locking ring to secure the torque setting. Ensure the ring springs back into place to prevent accidental changes during operation.

Image: Visual guide illustrating the process of unlocking and locking the torque wrench handle to adjust the torque setting.
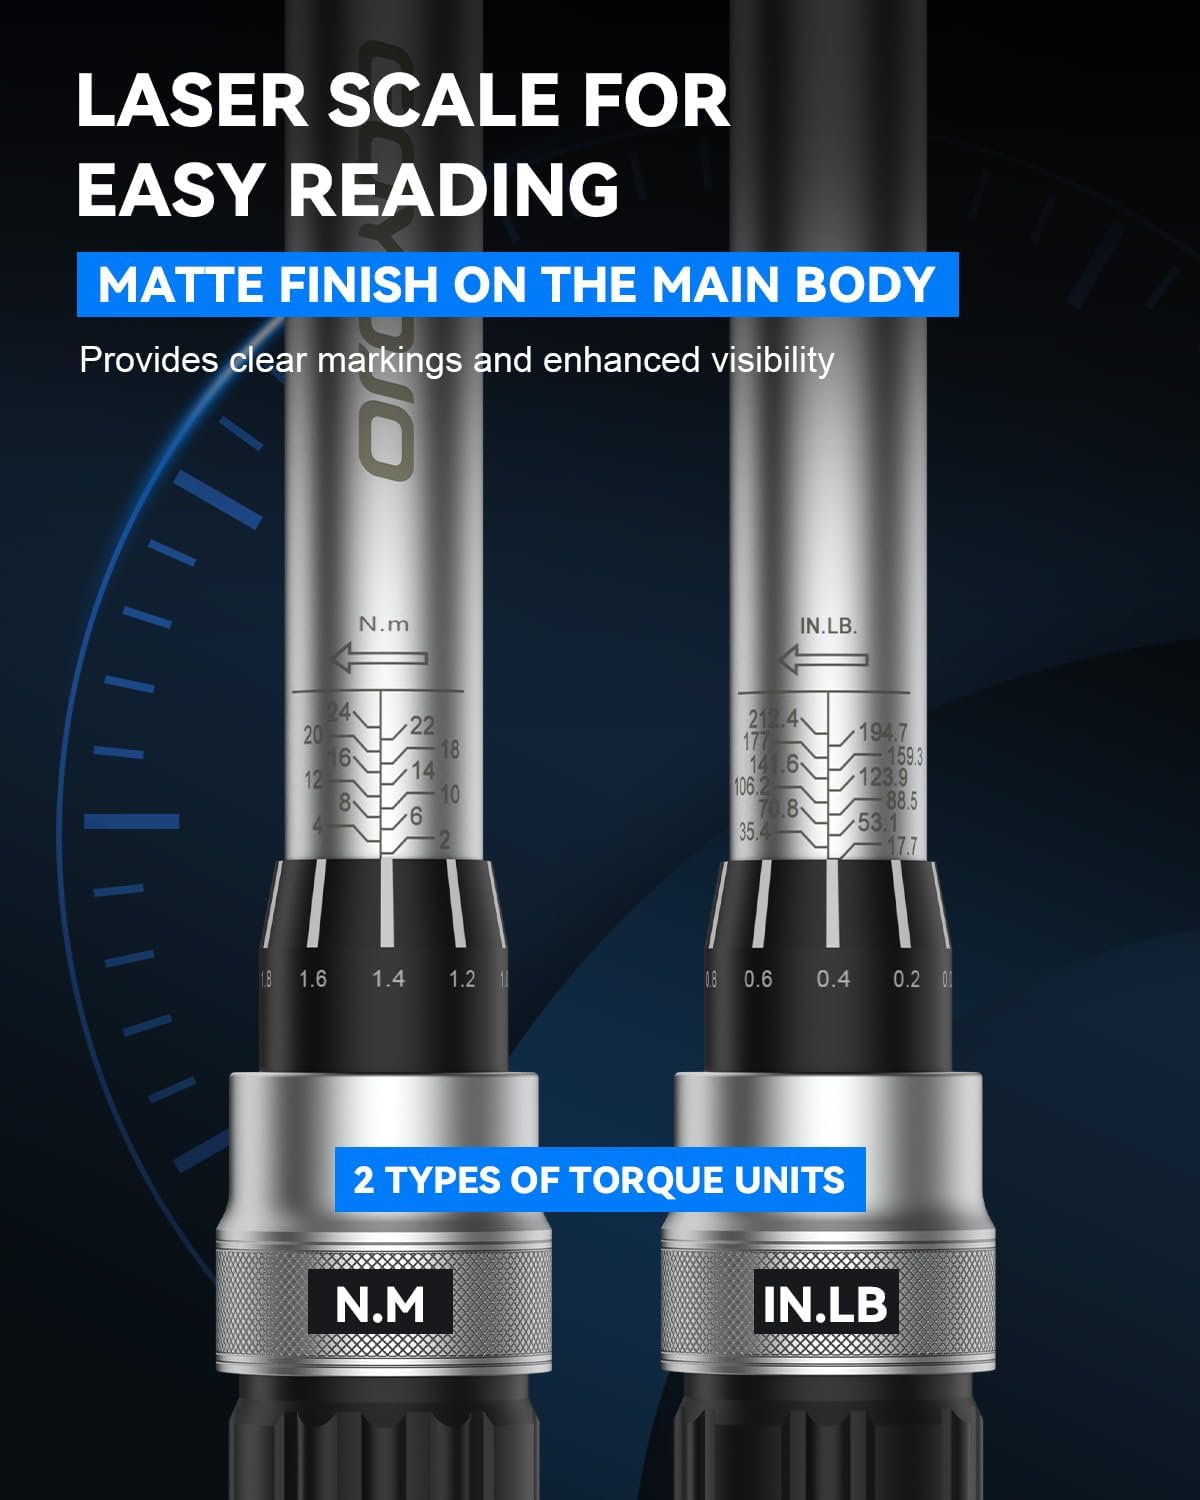
Immagine: Un dettaglio view of the laser-etched scale on the torque wrench, displaying both Newton-meter (N.m) and Inch-pound (IN.LB) units for accurate torque measurement.
Istruzioni per l'uso
1. Direction Adjustment
The torque wrench features a 72-tooth ratchet head with a bi-directional mechanism. Use the small lever on the ratchet head to select the desired direction:
- Move the lever to the Sinistra for counter-clockwise rotation (loosening).
- Move the lever to the Giusto for clockwise rotation (tightening).

Image: Illustration of the bi-directional ratchet head, indicating how to switch between clockwise (right) and counter-clockwise (left) operation.
2. Applicazione della coppia
Once the torque value is set and locked, and the direction is selected:
- Place the bit/socket onto the fastener.
- Hold the wrench by the handle and apply steady, increasing pressure. Do not jerk or apply sudden force.
- Continue applying pressure until you feel and hear a distinct "click" from the wrench. This indicates that the preset torque value has been reached.
- Immediately stop applying force once the click is detected. Over-tightening can damage the fastener or the component.
- For critical applications, it is recommended to tighten the fastener in two stages: first to approximately 70-80% of the final torque, then to the full specified torque.

Image: The torque wrench in use on a bicycle component, emphasizing its high precision calibration with a stated accuracy error of +/- 3%.
Manutenzione
- Pulizia: Wipe the torque wrench clean with a soft, dry cloth after each use. Do not use solvents or harsh chemicals, as these can damage the finish or internal components.
- Magazzinaggio: Always return the torque wrench to its lowest torque setting (2 N.m) before storing it in its protective case. This relieves tension on the internal spring mechanism, preserving its accuracy over time. Store in a dry, clean environment.
- Calibrazione: Torque wrenches are precision instruments and should be recalibrated periodically, especially after heavy use or if dropped. The manufacturer recommends professional recalibration every 12 months or after 5,000 cycles, whichever comes first.
- Lubrificazione: The internal mechanism is factory-lubricated and generally does not require user lubrication. Do not attempt to lubricate the internal components unless specifically instructed by the manufacturer.
Risoluzione dei problemi
| Problema | Possibile causa | Soluzione |
|---|---|---|
| Wrench does not "click" | Torque setting too high; Fastener already tight; Wrench malfunction. | Verify the required torque value. Ensure the fastener is not already at the desired torque. If the issue persists, the wrench may require recalibration or repair. |
| Applicazione imprecisa della coppia | Incorrect torque setting; Improper grip; Wrench out of calibration. | Double-check the torque setting. Hold the wrench by the handle, not the head. Have the wrench professionally recalibrated. |
| Handle difficult to rotate for setting torque | Locking ring not fully disengaged; Dirt/debris in mechanism. | Ensure the locking ring is pressed down completely. Clean the handle area. Do not force rotation. |
Specifiche
- Modello: 2-24N·m
- Dimensioni unità: 1/4 pollici
- Gamma di coppia: 2-24 N.m (Newton-meters)
- Precisione: ±3%
- Meccanismo a cricchetto: 72-tooth, Bi-directional
- Materiale: Chrome-Vanadium Stainless Steel
- Dimensioni: Circa 27 x 7 x 7 cm
- Peso: Circa 657.71 grammi (1.45 libbre)
- Accessori inclusi: Hex bits (H2, H2.5, H3, H4, H5, H6, H8), Torx bits (T10, T20, T25, T30), 1/4" Extension Bar, Storage Case.
Garanzia e supporto
GOYOJO stands behind the quality of its products. Each manual tool is tested for precision before shipment. In case of any product issues, please contact our customer service team. We commit to responding within 12 hours and working to resolve any concerns.
Per assistenza, fare riferimento alle informazioni di contatto fornite con l'acquisto o visitare il sito ufficiale GOYOJO websito.
Nota: Due to packaging size, only an English instruction manual is included in the box. For instructions in other languages, please contact our customer service team.