
1. Introduzione
This manual provides essential information for the safe operation, maintenance, and troubleshooting of your VITO 1800W 2-in-1 Combined Circular Saw and Miter Saw, model VISCC18250. This versatile tool is designed for precise cutting of wood and aluminum materials, offering both miter saw and table saw functionalities. Please read this manual thoroughly before operating the machine to ensure safe and efficient use.

Figura 1: Oltreview of the VITO 2-in-1 Combined Circular Saw and Miter Saw.
2. Istruzioni di sicurezza
Seguire sempre le precauzioni di sicurezza di base per ridurre il rischio di incendi, scosse elettriche e lesioni personali. Conservare questo manuale per riferimento futuro.
2.1 Sicurezza generale degli utensili elettrici
- Sicurezza dell'area di lavoro: Mantenere l'area di lavoro pulita e ben illuminata. Aree disordinate o buie possono favorire incidenti. Non utilizzare utensili elettrici in atmosfere esplosive, ad esempio in presenza di liquidi, gas o polveri infiammabili.
- Sicurezza elettrica: Le spine degli elettroutensili devono essere adatte alla presa. Non modificare mai la spina in alcun modo. Evitare il contatto del corpo con superfici messe a terra o a massa come tubi, termosifoni, cucine e frigoriferi.
- Sicurezza personale: Indossare sempre protezioni per gli occhi, protezioni per l'udito e una maschera antipolvere. Vestirsi in modo appropriato; evitare abiti larghi o gioielli. Tenere capelli, indumenti e guanti lontani dalle parti in movimento.
- Uso e cura dello strumento: Non forzare l'utensile elettrico. Utilizzare l'utensile elettrico corretto per l'applicazione desiderata. Scollegare la spina dalla presa di corrente prima di effettuare qualsiasi regolazione, sostituire accessori o riporre l'utensile elettrico.
2.2 Specific Saw Safety
- Always use the blade guard. Ensure it operates correctly before each use.
- Secure the workpiece firmly. Do not hold small pieces by hand.
- Non toccare mai la zona della lama mentre la sega è in funzione o è collegata all'alimentazione.
- Use only blades specified for this tool and suitable for the material being cut.
- Maintain a safe distance from the blade. Keep hands clear of the cutting path.
3. Componenti finitiview
Familiarize yourself with the main components of your VITO combined saw:
- Alloggiamento del motore: Contiene il motore da 1800 W.
- Protezione lama: Protegge l'utente dalla lama rotante.
- Lama tagliente: 250mm diameter, 30mm bore, 36 teeth.
- Tavolo per mitra: Rotates for angle adjustments in miter saw mode.
- Table Saw Top: Upper cutting surface for table saw mode.
- Recinto di strappo: Adjustable guide for straight cuts in table saw mode.
- Calibro mitra: For angled cuts in table saw mode (not explicitly shown but implied).
- Regolazione smusso: Mechanism to tilt the blade for angled cuts.
- Porta di raccolta polvere: For connecting a dust extraction system.
- Interruttore On/Off: Power control for the tool.

Figura 2: lato view of the saw in miter saw configuration, showing blade guard and motor.

Figura 3: in alto view of the saw in table saw configuration, showing the rip fence and table surface.
4. Impostazione
4.1 Disimballaggio e ispezione
Carefully remove the saw from its packaging. Inspect for any damage that may have occurred during shipping. Ensure all components listed in the packing list are present. Do not operate the tool if any damage is found.
4.2 Fissaggio della sega
For stable and safe operation, the saw must be securely mounted to a workbench or a dedicated saw stand. Use appropriate bolts and nuts to fasten the saw through the mounting holes in its base.
4.3 Installazione/sostituzione della lama
- Scollegare l'alimentazione: Always unplug the saw from the power source before performing any maintenance or blade changes.
- Access Blade: Depending on the mode (miter or table saw), lift or remove the necessary guards to access the blade.
- Allentare il dado dell'albero: Use the provided wrench to loosen the arbor nut while holding the arbor lock button.
- Rimuovere la vecchia lama: Rimuovere con cautela la vecchia lama, prestando attenzione al senso di rotazione.
- Installare la nuova lama: Place the new 250mm blade onto the arbor, ensuring the teeth are oriented correctly for cutting (usually indicated by an arrow on the blade matching an arrow on the guard).
- Serrare il dado dell'albero: Securely tighten the arbor nut with the wrench while holding the arbor lock.
- Sostituisci le protezioni: Ensure all guards are properly reinstalled and functioning before reconnecting power.
5. Istruzioni per l'uso
This saw offers two primary modes of operation: miter saw and table saw. Ensure the saw is in the correct configuration for your desired cut.
5.1 Passaggio dalla modalità sega troncatrice alla modalità sega da tavolo
The saw features a 2-in-1 design. To switch modes, carefully follow the instructions in your saw's specific manual for unlocking and rotating the cutting head assembly. Ensure the mechanism is fully locked in place for the chosen mode before operation.
5.2 Funzionamento della sega troncatrice
- Set Miter Angle: Loosen the miter lock knob, rotate the miter table to the desired angle (from -45° to 45°), and tighten the knob securely.
- Set Bevel Angle: For bevel cuts, loosen the bevel lock, tilt the motor/blade assembly to the desired angle (from 0° to 45°), and tighten the lock.
- Posizione del pezzo: Posizionare il pezzo in lavorazione saldamente contro la guida e il tavolo per tagli obliqui. Utilizzare clampse necessario.
- Avviare la sega: Press the ON switch. Allow the blade to reach full speed.
- Effettua il taglio: Slowly and steadily bring the blade down through the workpiece. Do not force the cut.
- Return Blade: Once the cut is complete, release the switch and allow the blade to stop before raising it.
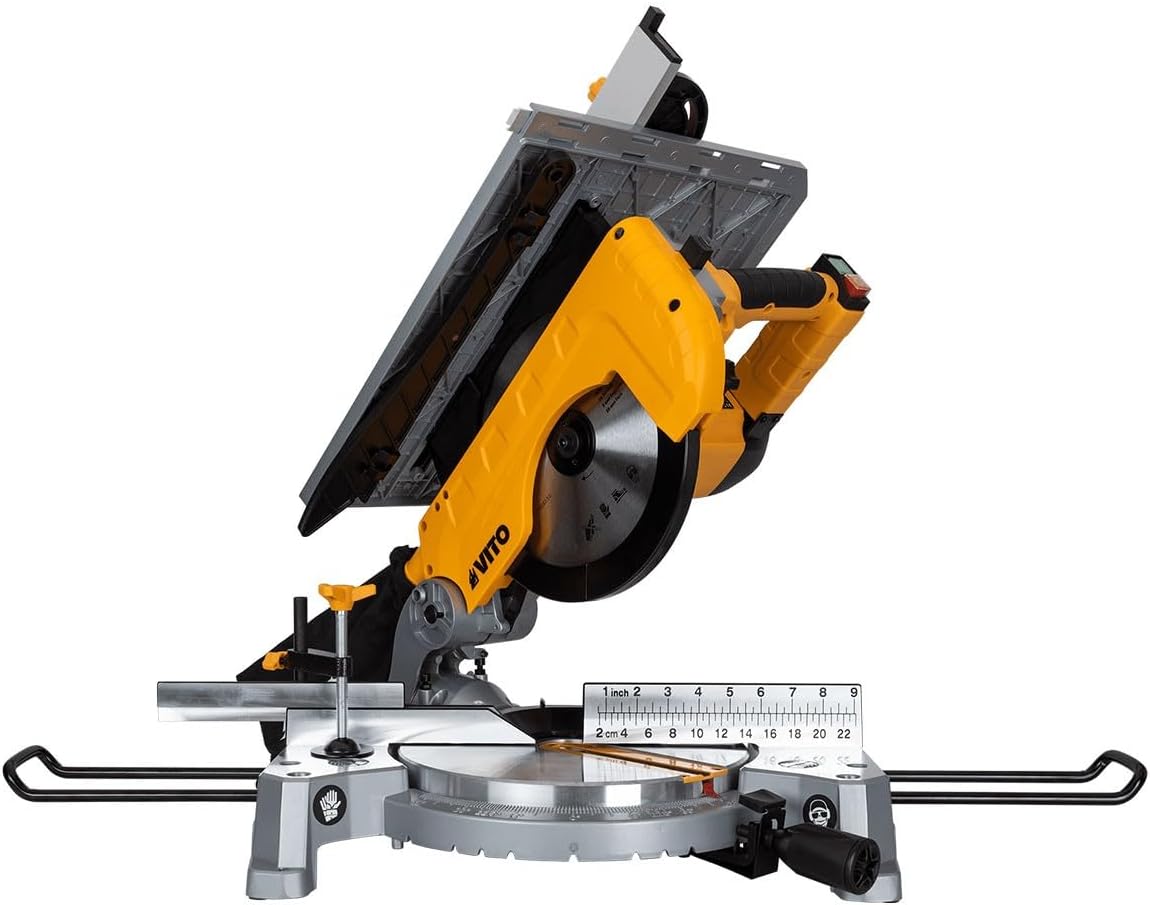
Figure 4: Miter saw configuration demonstrating blade tilt for bevel cuts.
5.3 Funzionamento della sega da tavolo
- Configure for Table Saw: Ensure the saw head is locked in the upright table saw position.
- Adjust Rip Fence: Position the rip fence to the desired cutting width. Lock it securely.
- Regola l'altezza della lama: Use the blade height adjustment mechanism to set the blade exposure slightly above the workpiece thickness.
- Posizione del pezzo: Place the workpiece flat on the table, against the rip fence.
- Avviare la sega: Press the ON switch. Allow the blade to reach full speed.
- Effettua il taglio: Using a push stick, slowly and steadily feed the workpiece into the blade. Keep hands clear of the blade path.
- Taglio completo: Continue feeding until the cut is complete. Turn off the saw and wait for the blade to stop before removing the workpiece.

Figure 5: Table saw configuration, showing the rip fence and cutting surface.
6. Manutenzione
Regular maintenance ensures the longevity and safe operation of your saw. Always disconnect the power before performing any maintenance.
- Pulizia: After each use, clean the saw thoroughly. Remove sawdust and debris from the motor vents, blade guard, and table surfaces. Use a brush or compressed air. Do not use solvents that could damage plastic parts.
- Ispezione della lama: Regularly inspect the blade for sharpness, missing teeth, or cracks. A dull or damaged blade can cause kickback and poor cut quality. Replace damaged blades immediately.
- Funzionalità di guardia: Ensure all blade guards move freely and return to their protective position automatically.
- Elementi di fissaggio: Controllare che tutti i dadi, i bulloni e le viti siano ben serrati. Serrare eventuali elementi di fissaggio allentati.
- Spazzole di carbone: If the motor performance decreases, the carbon brushes may need inspection and replacement. This should ideally be done by a qualified service technician.
7. Risoluzione Dei Problemi
Consulta questa sezione per i problemi più comuni e le relative soluzioni. Se il problema persiste, contatta l'assistenza clienti.
| Problema | Possibile causa | Soluzione |
|---|---|---|
| Saw non si avvia | Nessuna alimentazione; interruttore difettoso; spazzole di carbone usurate. | Check power connection and circuit breaker. Test switch. Replace carbon brushes (professional service recommended). |
| Scarsa qualità del taglio (ruvido, scheggiato) | Lama smussata o non corretta; velocità di avanzamento non corretta; pezzo in lavorazione non fissato. | Replace blade with a sharp, appropriate one. Adjust feed rate. Secure workpiece firmly. |
| Vibrazione eccessiva | Lama allentata; lama danneggiata; sega non montata saldamente. | Controllare che la lama non sia danneggiata o non sia ben serrata. Assicurarsi che la sega sia fissata saldamente su una superficie stabile. |
| Surriscaldamento del motore | Blocked ventilation slots; continuous heavy use; dull blade. | Clean ventilation slots. Allow motor to cool. Use a sharp blade to reduce motor strain. |
8. Specifiche
| Caratteristica | Valore |
|---|---|
| Numero di modello | VISCC18250 |
| Potenza in ingresso | 1800 L |
| Velocità a vuoto | 4500 giri al minuto |
| Diametro lama | 250 millimetri |
| Foro della lama | 30 millimetri |
| Numero di denti | 36 |
| Gamma dell'angolo obliquo | -45° a 45° |
| Gamma dell'angolo di smussatura | Da 0° a 45° |
| Peso | 13.9 kg |
| Superfici consigliate | Wood, Aluminum |
9. Garanzia e supporto
This VITO product is covered by a manufacturer's warranty against defects in materials and workmanship. For specific warranty terms and conditions, please refer to the warranty card included with your product or visit the official VITO website. For technical support, spare parts, or service inquiries, please contact your retailer or the authorized VITO service center in your region. Always provide the model number (VISCC18250) and serial number when contacting support.