Introduzione
The SONICAKE A-Factory is a versatile acoustic guitar effects pedal designed to enhance your instrument's tone with an analog preamp and digital reverb. It features a built-in notch filter for feedback suppression, high impedance input, and a balanced XLR output, making it suitable for various performance and recording setups. This manual provides detailed instructions for setup, operation, maintenance, and troubleshooting to ensure optimal performance of your A-Factory pedal.

Immagine: Frontale view of the SONICAKE A-Factory pedal, showcasing its controls and footswitches.
Caratteristiche principali
- Analogico Preamp and Digital Reverb: Combines essential acoustic guitar tone shaping with lush digital reverb effects.
- Built-in Notch Filter and MUTE: Features adjustable gain and frequency range to quickly eliminate whistling feedback, along with a MUTE function for silent tuning or instrument changes.
- High Impedance Input and XLR Balanced Output: Ensures signal integrity from your instrument and provides professional connectivity to mixers or PA systems.
- Specially Designed Buffer Bypass Circuit: Maintains the pristine quality of your instrument's signal when the effect is bypassed.
- 9V Center Negative Power Supply: Compatible with standard pedal power supplies (not included).
Controlli e connessioni

Image: Labeled diagram of the A-Factory pedal's controls and connections.
Manopole di controllo:
- ALTI: Adjusts the high-frequency content of your tone.
- VOLUME: Controlla il volume di uscita complessivo del pedale.
- N.FREQ (Notch Frequency): Sets the frequency point for the notch filter to target and reduce.
- TACCA: Adjusts the depth of the notch filter, used to eliminate feedback.
- GND LIFT (Ground Lift Switch): Aiuta a eliminare il ronzio causato dai loop di terra.
- R.DECAY (Reverb Decay): Controlla la lunghezza della coda del riverbero.
- R.MIX (Reverb Mix): Adjusts the blend of the dry signal with the reverb effect.
- BASSO: Adjusts the low-frequency content of your tone.
- MEZZO: Adjusts the mid-range frequency content of your tone.
Interruttori a pedale:
- Pedale REVERB: Toggles the digital reverb effect on or off. Hold down to activate the MUTE function.
- PREAMP Interruttore a pedale: Toggles the analog preamp sezione attivata o disattivata.
Jack di ingresso/uscita:
- INPUT (1/4-inch): Connect your acoustic instrument here.
- OUTPUT (1/4-inch): Connettiti al tuo amplifier o pedale successivo nella catena del segnale.
- XLR OUT (Balanced XLR Output): Provides a balanced signal for direct connection to a mixer or audio interface.
- CC 9V: Ingresso di alimentazione per un alimentatore da 9 V CC con centro negativo.

Immagine: Primo piano views of the pedal's input, output, and power connections, highlighting its robust aluminum-alloy casing.
Impostare
- Collegamento elettrico: Connect a standard 9V DC center-negative power supply (not included) to the DC 9V input jack on the pedal. Ensure the power supply meets the specified voltage requisiti di polarità.
- Collegamento dello strumento: Plug your acoustic guitar or instrument into the 1/4-inch INPUT jack on the pedal using a standard instrument cable.
- Connessione di uscita:
- Per il collegamento a una chitarra amplifier or other effects pedals, use a 1/4-inch instrument cable from the OUTPUT jack.
- For direct connection to a mixer, PA system, or audio interface, use an XLR cable from the XLR OUT jack.
- Impostazioni iniziali: Before powering on, set all control knobs to their middle (12 o'clock) position. Ensure both footswitches are disengaged (LEDs off).
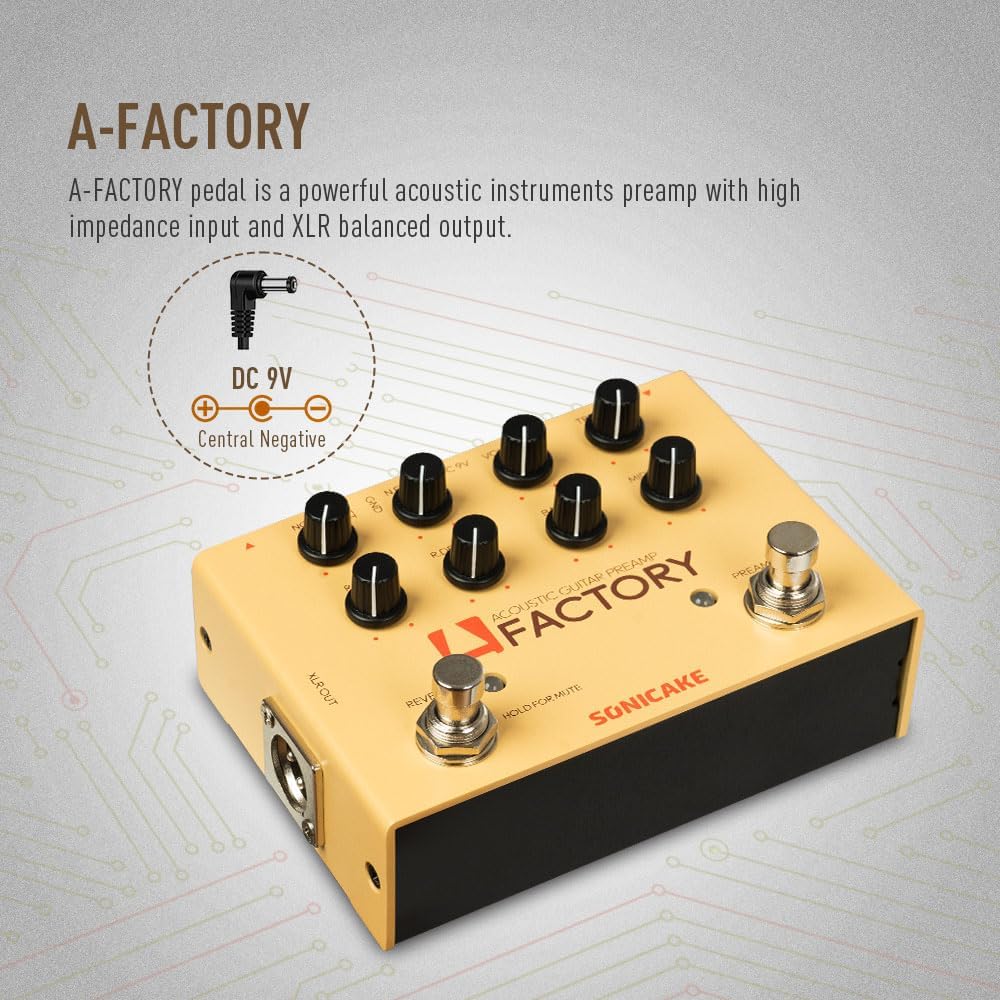
Image: The A-Factory pedal illustrating the 9V DC center-negative power input requirement.
Istruzioni per l'uso
Engaging the Preamp:
Tocca il PREAMP footswitch to activate the analog preamp section. The corresponding LED will illuminate, indicating the preamp is active. This provides tone shaping capabilities via the BASS, MIDDLE, and TREBLE controls.
Using the Reverb and Mute Function:
Tocca il RIVERBERO footswitch to engage or disengage the digital reverb effect. The LED will light up when the reverb is active. To activate the MUTE function, press and hold the REVERB footswitch for approximately 2 seconds. This will silence the output, useful for silent tuning or instrument changes. Press and hold again to unmute.

Image: Diagram illustrating how to tap the Reverb footswitch for reverb on/off and hold for the Mute function.
Adjusting Tone (EQ):
Utilizzare il BASS, MEZZO, E ALTI knobs to sculpt your acoustic guitar's tone. Adjust these to suit your instrument, playing style, and the acoustic environment.
Utilizing the Notch Filter:
The notch filter is crucial for feedback suppression. If you experience feedback, slowly turn the NOTCH knob while playing. If the feedback persists, adjust the N.FREQ knob to sweep through frequencies until the feedback is minimized or eliminated. The SOLLEVAMENTO TERRA switch can also help reduce hum or noise from ground loops, especially when using the XLR output.

Image: Diagram detailing the Notch Filter controls (NOTCH and N.FREQ) and their function in eliminating feedback.
Controlling Reverb Effect:
IL R.MIX knob controls the amount of reverb blended with your dry signal. Turn clockwise for more reverb. The R.DECAY knob adjusts the length of the reverb tail; clockwise increases the decay time.
Setting Overall Volume:
IL VOLUME knob controls the master output level of the pedal. Adjust this to achieve the desired loudness without clipping your amplifier or mixer input.
Manutenzione
- Pulizia: Use a soft, dry cloth to clean the pedal's surface. Avoid using abrasive cleaners, solvents, or waxes, as they may damage the finish or internal components.
- Magazzinaggio: When not in use for extended periods, disconnect the power supply and store the pedal in a cool, dry place away from direct sunlight and extreme temperatures.
- Alimentazione elettrica: Always use a regulated 9V DC center-negative power supply to prevent damage to the unit. Unplug the power supply when not in use.
- Connessioni: Controllare periodicamente tutti i collegamenti dei cavi per verificarne l'usura. Assicurarsi che i cavi siano saldamente collegati per evitare perdite di segnale o problemi intermittenti.
Risoluzione dei problemi
| Problema | Possibile causa | Soluzione |
|---|---|---|
| Nessun suono dal pedale. | Incorrect power supply, loose cables, pedal bypassed, MUTE engaged. | Verify 9V DC center-negative power supply. Check all cable connections. Ensure PREAMP and REVERB are engaged (LEDs on). Disengage MUTE by holding REVERB footswitch. |
| Ronzio o rumore eccessivo. | Loop di terra, cavi difettosi, interferenze. | Engage the GND LIFT switch. Try different cables. Ensure power supply is isolated and regulated. Move pedal away from power sources or other electronics. |
| Feedback (howling) when playing. | Microphonic feedback from instrument, high volume. | Adjust the NOTCH and N.FREQ knobs to find and eliminate the problematic frequency. Reduce overall VOLUME. Move further from the amplifier/PA speakers. |
| L'effetto riverbero è troppo sottile o troppo forte. | R.MIX or R.DECAY settings. | Adjust the R.MIX knob to control the blend of the reverb effect. Adjust the R.DECAY knob to control the length of the reverb tail. |
Specifiche
- Modello: QDS-04 (A Factory)
- Peso dell'articolo: 13.7 once (0.39 chilogrammi)
- Dimensioni del prodotto: 4.72"L x 1.42"W x 3.43"H (12 x 3.6 x 8.7 cm)
- Fonte di energia: Elettrico con cavo
- Voltage: 9 Volt CC (centro negativo)
- Formato del segnale: Analog (Preamp), Digital (Reverb)
- Interfaccia hardware: Audio da 1/4 di pollice, XLR
- Tipo di connettore: 1/4" TS Input/Output, XLR Output
Garanzia e supporto
SONICAKE products are designed for reliability and performance. For warranty information, technical support, or service inquiries, please refer to the official SONICAKE webo contattare direttamente l'assistenza clienti. Conservare la ricevuta d'acquisto come prova d'acquisto per eventuali reclami in garanzia.