Introduzione
The Nilight 6 Gang Switch Panel is a universal circuit control relay system designed to manage up to six auxiliary electrical devices in various vehicles, including off-road vehicles, ATVs, UTVs, trucks, cars, SUVs, boats, and RVs. This all-in-one system simplifies wiring and provides a centralized control point for your accessories, featuring integrated relays, fuses, and automatic dimmable LED backlighting.
Caratteristiche principali
- Controllo a 6 bande: Manages up to six independent 12V DC accessories with a maximum output power of 720 Watts and a maximum input current of 60A.
- Automatic Dimmable Backlight: The switch panel's backlight adjusts automatically based on ambient light conditions, ensuring optimal visibility without glare.
- Etichette personalizzabili: Includes 50 reusable stickers to personalize each switch function.
- Funzionalità di sicurezza integrate: Dotato di sovra-volumetage, over-current, overheat, and reverse polarity protection for enhanced safety.
- Installazione semplice: Features a plug-and-play wiring harness with an extension cable and two mounting options for flexible setup.
- Design tutto in uno: Combines the switch panel, circuit control relay system, fuses, and wiring harness into a compact unit.
Contenuto della confezione
Verifica che tutti i componenti siano presenti nel tuo pacchetto:
- Pannello interruttori a 6 bande
- Circuit Control Box with Relay System
- Wiring Harness with Extension Cable
- Assorted Auto Fuses
- 50 Reusable Switch Labels
- Double-sided Tape for Mounting
- Staffa di montaggio regolabile
- Mounting Hardware (Screws, Nuts, Washers, Allen Keys)

Image: All components included in the Nilight 6 Gang Switch Panel package.
Specifiche
| Caratteristica | Specificazione |
|---|---|
| Ingresso volumetage | 12V CC |
| Potenza di uscita massima | 720W |
| Corrente di ingresso massima | 60A |
| Dimensioni del pannello degli interruttori | 3.74" x 2.65" |
| Dimensioni della scatola di controllo del circuito | 6.26" x 3.52" x 3.27" |
| Temperatura di esercizio | da -40°C a +105°C |
| Protezione | Over-Voltage, sovracorrente, surriscaldamento, polarità inversa |
| Grado di protezione IP | Grado di protezione IP65 |
| Numero di modello | 90285 °F |
Configurazione e installazione
1. Schema elettrico sopraview
The system is designed for straightforward installation. The main components include the switch panel, the circuit control box (containing relays and fuses), and the wiring harness. Ensure your vehicle's battery is disconnected before beginning installation.
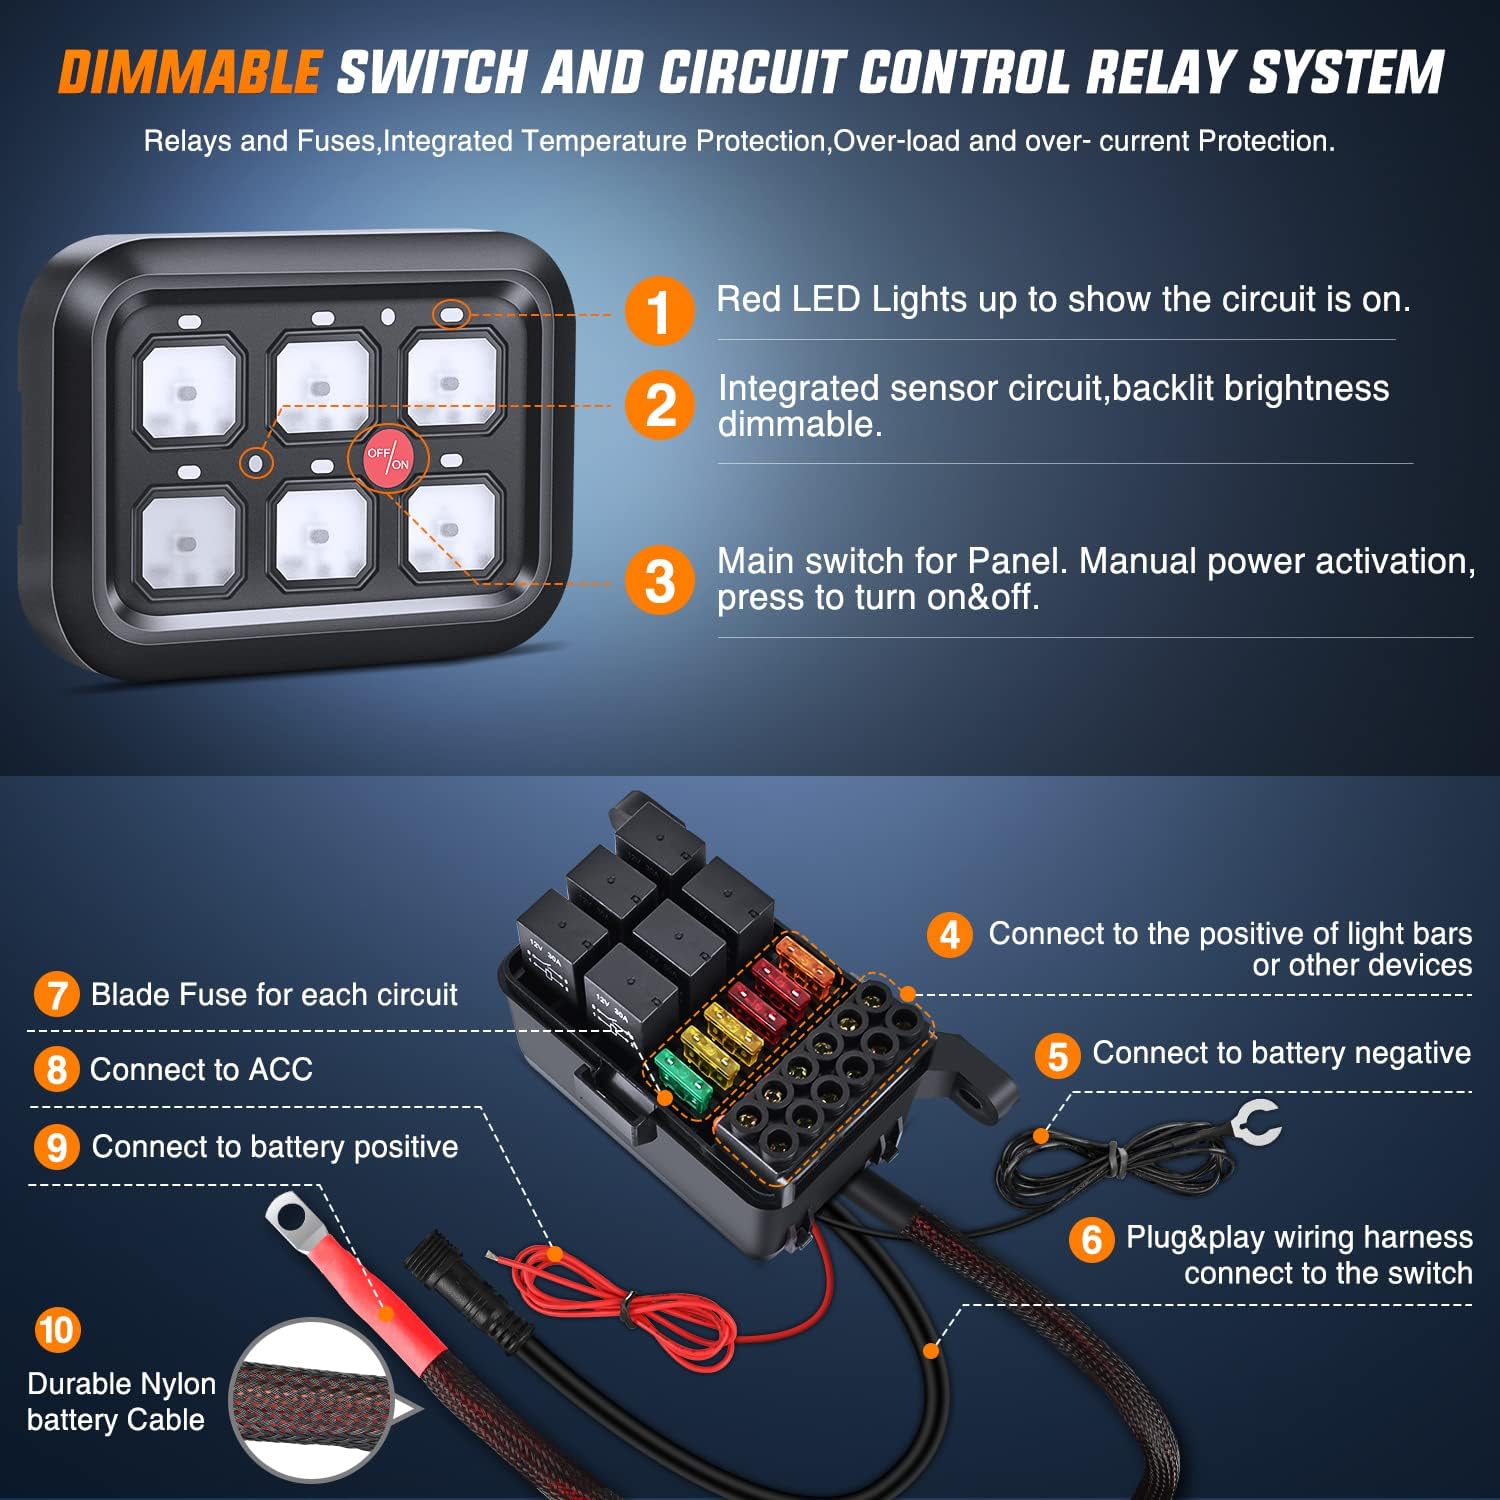
Image: Wiring connections for the switch panel and control box.
The diagram illustrates how to connect the control box to your vehicle's battery (positive and negative terminals) and an ACC (Accessory) power source. Each of the six outputs from the control box connects to a separate accessory (e.g., light bars, fog lights). The switch panel then connects to the control box via a single plug-and-play cable.
Video: Un oltreview of the Nilight 6 Gang Switch Controller Circuit Control System, demonstrating its components and basic wiring setup.
2. Mounting the Switch Panel
Two primary mounting options are provided for the switch panel:
- Nastro biadesivo: For a flush, low-profile installation on flat surfaces. Ensure the surface is clean and dry before applying.
- Staffa di montaggio regolabile: For more flexible positioning, allowing the panel to be angled or mounted on uneven surfaces.

Image: Illustration of the double-sided tape and adjustable bracket mounting methods.
Video: Demonstrates the mounting process of the 6-gang switch panel using double-sided tape and applying custom labels.
3. Collegamento degli accessori
Each of the six output terminals on the circuit control box is designed to connect to a specific accessory. Ensure that the total wattage of connected accessories does not exceed the system's maximum output power of 720W.
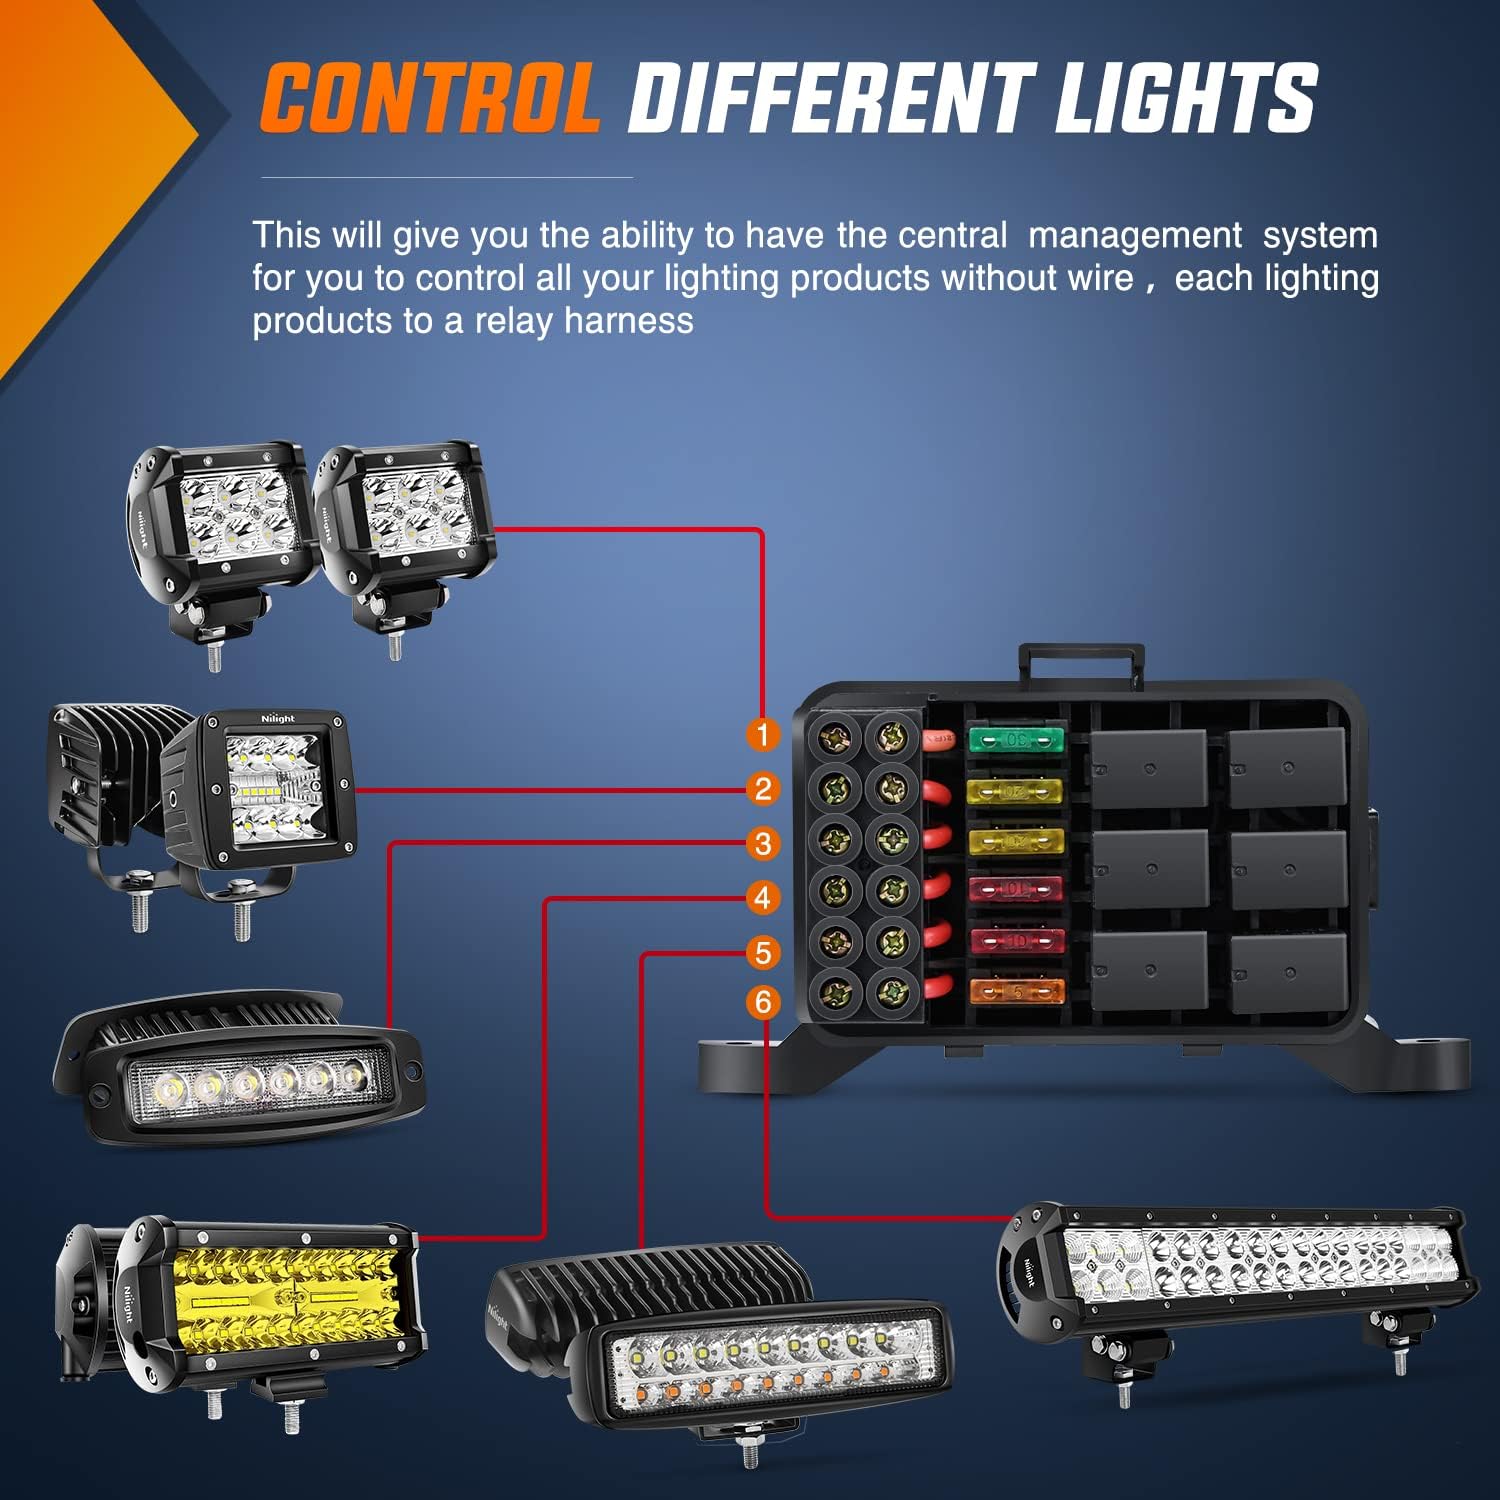
Immagine: Example connections of different lighting products to the relay harness.
Istruzioni per l'uso
1. Main Switch Operation
The switch panel features a central 'OFF/ON' button. Press this button to activate or deactivate the entire switch panel system. Individual accessory switches will only function when the main switch is in the 'ON' position.
2. Dimmable Backlight Function
The switch panel's backlight automatically adjusts its brightness based on the surrounding environment. This feature ensures comfortable visibility during both daytime and nighttime driving conditions, preventing the backlight from being too bright or too dim.

Image: The switch panel's dimmable backlight adjusts for daytime and nighttime visibility.
3. Personalizzazione delle etichette degli interruttori
The kit includes 50 reusable labels to clearly identify the function of each switch. Simply peel and apply the appropriate label to the desired switch button.

Image: A selection of 50 reusable labels for personalizing the switch panel.
Video: Instructions on how to configure buttons for momentary action on the Nilight switch panel.
Manutenzione
- Ispezione regolare: Controllare periodicamente tutti i collegamenti elettrici per verificarne la tenuta e l'assenza di segni di usura o corrosione.
- Pulizia: Wipe the switch panel and control box with a soft, damp stoffa. Evitare l'uso di prodotti chimici aggressivi o detergenti abrasivi.
- Sostituzione fusibile: If an accessory stops working, check the corresponding fuse in the control box. Replace blown fuses with new ones of the same ampvalutazione di età.
Risoluzione dei problemi
- Il pannello non si accende: Check the main power connection to the battery and the ACC wire. Ensure the main 'OFF/ON' switch is engaged.
- Accessorio individuale non funzionante: Verify the specific switch is pressed. Check the fuse for that circuit in the control box. Inspect the wiring connection from the control box to the accessory.
- Problemi di retroilluminazione: If the backlight is too dim or too bright, ensure the integrated sensor is not obstructed. The dimming is automatic based on ambient light.
- Pulsanti che non rispondono: Ensure all connections are secure. If the issue persists, refer to the momentary mode setting instructions if applicable.
Garanzia e supporto
For warranty information, please refer to the documentation included with your purchase or contact Nilight customer support directly. Keep your proof of purchase for any warranty claims. For technical assistance or further inquiries, visit the official Nilight websito o contattare il loro servizio clienti.