
DieseRC 1 Receiver with 1 Transmitter Kit
DieseRC Smart Wireless Roller Shutter Controller Module User Manual
Model: 1 Receiver with 1 Transmitter Kit
1. Introduzione
This manual provides detailed instructions for the installation, operation, and maintenance of your DieseRC Smart Wireless Roller Shutter Controller Module. Please read this manual carefully before installation and use to ensure proper function and safety.
2. Prodotto finitoview
The DieseRC Smart Wireless Roller Shutter Controller Module is designed to upgrade traditional roller shutter switches, allowing for smart control via a mobile application, RF remote control, and voice commands. It integrates Wi-Fi and RF 433Mhz technologies for versatile control options.

Image: DieseRC Smart Wireless Roller Shutter Controller Module, showing the compact design of the receiver and the included RF remote control.
3. Caratteristiche principali
- Metodi di controllo multipli: Supports control via mobile application (Tuya/Smart Life), 433Mhz RF remote control, and traditional manual wall switch.
- Controllo APP intelligente: Compatible with "Tuya" and "Smart Life" applications for unlimited wireless control via 2.4GHz Wi-Fi network from Android and iOS devices.
- Integrazione del controllo vocale: Works with Amazon Alexa (Echo/Dot/Spot) and Google Home for convenient voice commands.
- Controllo wireless RF: Features a 433Mhz RF remote control with stable performance and high reception sensitivity. Offers a control range of 30-50 meters in open areas, with signal penetration through walls and floors.
- Design compatto: Module dimensions of 45x45x16 mm allow for easy concealment within most electrical boxes or junction boxes.
- percentualetage Control & Timer Function: The mobile application allows for precise percentage control of shutter opening/closing and programmable timer functions.
- Ampia applicazione: Suitable for controlling various AC motors, including roller blinds, electric curtains, awnings, and garage doors. Compatible with 4-wire AC motors (2 input phase wires, 1 neutral wire, 1 ground wire).
- Componenti durevoli: Equipped with a high-quality relay designed for over 400,000 operations, supporting a 10A current and a maximum inductive load of approximately 5A.
- Ampia vol.tage Compatibilità: Receiver operates on AC 100V~240V.
- High-Quality Remote: The RF remote transmitter is designed for over 500,000 clicks, is removable from its base, and includes a replaceable 27A 12V battery with an approximate 3-year lifespan.
4. Contenuto della confezione
Il pacchetto standard include:
- 1 x DieseRC Smart Wireless Roller Shutter Controller Module (Receiver)
- 1 x RF Remote Control Transmitter
- 1 x Remote Control Base (for wall mounting)
- Mounting Screws / Double-sided Adhesive for remote base
- 1 x 27A 12V Battery (pre-installed in remote)
- Manuale dell'utente (questo documento)
5. Specifiche
| Parametro | Valore |
|---|---|
| Marca | DieseRC |
| Numero di modello | 1 Receiver with 1 Transmitter Kit |
| Dimensioni del prodotto | Dimensioni: 4.5 x 4.5 x 1.6 cm |
| Peso del prodotto | 120 grammi |
| Volume di eserciziotage | CA 100 V ~ 240 V |
| Corrente nominale | 10 Amperi |
| Max Inductive Load | ~5 Amperi |
| Energia elettrica | Up to 3520 Watts (depending on voltage) |
| Connettività wireless | Wi-Fi 2.4GHz, RF 433Mhz |
| Gamma di controllo RF | 30-50 metri (area aperta) |
| Compatibilità APP | Tuya Vita intelligente, intelligente |
| Compatibilità con l'assistente vocale | Amazon Alexa, Google Home |
| Compatibilità motore | 4-wire AC motors (2 phase, 1 neutral, 1 ground) |
| Batteria remota | 1 x 27A 12V alcalina (inclusa) |
| Materiale | Plastica |
| Paese di origine | Cina |
6. Informazioni sulla sicurezza
Si prega di osservare le seguenti precauzioni di sicurezza:
- L'installazione deve essere eseguita solo da un elettricista qualificato o in conformità con le normative elettriche locali.
- Ensure power is disconnected at the circuit breaker before performing any wiring.
- Do not exceed the maximum load ratings of the module (10A, ~5A inductive, 3520W).
- Questo dispositivo è progettato esclusivamente per uso interno. Evitare l'esposizione a umidità o temperature estreme.
- Tenere il dispositivo fuori dalla portata dei bambini.
- Ensure proper grounding for the AC motor as specified.
7. Configurazione e installazione
7.1 Schema elettrico
The module is compatible with 4-wire AC motors. Ensure your motor has two phase wires (for up/down), one neutral wire, and one ground wire. The module can be installed with or without an existing manual panel switch.

Image: Detailed wiring diagrams showing connections for the controller module with an existing panel switch (left) and without a panel switch (right). The diagrams illustrate connections for AC 100V-240V power, the AC motor, and the module's terminals (L, N, L1, L2, S1, S2, Earth).
Fasi di cablaggio:
- Scollegare l'alimentazione: Prima di iniziare qualsiasi cablaggio, disattivare l'alimentazione principale tramite l'interruttore automatico.
- Identificare i fili: Identify the Live (L), Neutral (N), and motor control wires (L1 for one direction, L2 for the other direction) from your existing setup. Also, identify the Ground (E) wire from your AC motor.
- Collegare l'alimentazione al modulo: Connect the Live (L) and Neutral (N) wires from your AC power supply to the corresponding 'L' and 'N' terminals on the module.
- Connect Motor to Module: Connect the motor's L1 and L2 wires to the 'L1' and 'L2' terminals on the module. Connect the motor's Neutral (N) wire to the 'N' terminal on the module. Ensure the motor's Ground (E) wire is properly connected to the electrical system's ground.
- Collegare l'interruttore del pannello (facoltativo): If using a manual panel switch, connect its output wires to the 'S1' and 'S2' terminals on the module. Connect the Live (L) wire to the 'L' terminal of the panel switch.
- Connessioni sicure: Assicurarsi che tutti i collegamenti dei cavi siano ben saldi e sicuri.
- Ripristina alimentazione: Once all connections are verified, restore power at the circuit breaker.
7.2 APP Pairing (Tuya Smart / Smart Life)
To control the module via your smartphone, you need to pair it with the Tuya Smart or Smart Life application.
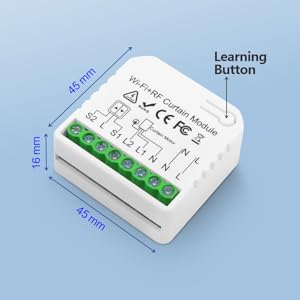
Image: QR code for downloading the Tuya Smart application. Scan this code to download the app.
Alternatively, download from Tuya Smart official websito.
- Scarica l'app: Download and install the "Tuya Smart" or "Smart Life" app from your smartphone's app store or by scanning the QR code above.
- Registrati/Accedi: Apri l'app e registra un nuovo account oppure accedi con uno esistente.
- Aggiungi dispositivo: Tocca l'icona "+" nell'angolo in alto a destra dell'app per aggiungere un nuovo dispositivo.
- Seleziona il tipo di dispositivo: Choose "Curtain Switch" or "Curtain Module" from the device list.
- Inserisci i dettagli Wi-Fi: Assicurati che il tuo telefono sia connesso a una rete Wi-Fi a 2.4 GHz. Inserisci la password Wi-Fi nell'app.
- Abilita modalità di associazione: Power on the module. The Wi-Fi indicator light on the module should blink rapidly. If not, press and hold the learning button on the module for 5-10 seconds until it blinks rapidly.
- Conferma lampeggiante: Nell'app, verifica che la spia lampeggi rapidamente e procedi.
- Abbinamento: The app will start searching for the device. Once found, add it to your account.
- Rinomina dispositivo: You can rename the device for easier identification (e.g., "Living Room Blinds").
7.3 Abbinamento del telecomando RF
The RF remote control is typically pre-paired at the factory. If re-pairing is needed or you have additional remotes, follow these steps:
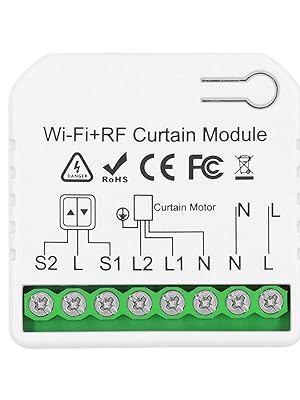
Image: Step-by-step visual guide on how to pair the 433Mhz RF remote control with the receiver module. It shows pressing the learning button on the receiver once, then pressing a button on the remote control.
- Entra in modalità di associazione: Premere il pulsante di apprendimento sul modulo ricevitore 1 voltaAttendi 3 secondi.
- Premere il pulsante del telecomando: Press any button (e.g., "Up" or "Down") on the RF remote control 1 voltaAttendi 3 secondi.
- Conferma: The module will indicate successful pairing (e.g., a beep or light flash).
7.4 Clearing RF Signals
Per cancellare tutti i telecomandi RF associati dal modulo:

Image: Visual guide on how to clear all paired 433Mhz RF remote control signals from the receiver module. It shows pressing the learning button on the receiver 8 times.
- Clear Signals: Premere il pulsante di apprendimento sul modulo ricevitore 8 volte.
- Conferma: The module will indicate that the data has been cleared successfully (e.g., a series of beeps or light flashes). After this, the previously paired transmitters will no longer work.
8. Funzionamento
8.1 Controllo APP (Tuya Smart / Smart Life)
Once paired, you can control your roller shutter from anywhere using the app.

Image: A smartphone screen showing the Tuya Smart app interface for controlling a roller shutter, with "Open", "Paused", and "Close" options, and a slider for percentage controllo.
- Aperto chiuso: Tap the "Open" or "Close" buttons in the app to fully open or close the shutter.
- Pausa: Tap the "Pause" button to stop the shutter at any desired position.
- percentualetage Controllo: Use the slider in the app to set the shutter to a specific opening percentage (ad esempio, aperto al 50%).
- Funzione timer: Imposta programmi per l'apertura e la chiusura automatica in orari specifici.
- Creazione della scena: Create smart scenes to automate actions based on conditions (e.g., open at sunrise, close at sunset).
- Controllo delle azioni: Condividi il controllo del dispositivo con i membri della famiglia tramite l'app.
8.2 Telecomando RF
Use the provided RF remote control for direct, local control of your roller shutter.

Image: A hand holding the RF remote control, with buttons for up, down, and stop functions. The image also illustrates the 50-meter control distance capability.
- Pulsante su: Press to open the roller shutter.
- Pulsante Giù: Press to close the roller shutter.
- Pulsante Stop/Pausa: Press to stop the roller shutter at its current position.
- The remote control base can be mounted on a wall using the included adhesive or screws for easy access.
8.3 Controllo vocale (Alexa / Google Home)
Integrate the module with Amazon Alexa or Google Home for hands-free voice control.

Image: An illustration showing Amazon Echo and Google Home devices, with a speech bubble indicating a voice command "Alexa, open the curtains!". This demonstrates the voice control capability of the module.
- Collega account: In your Alexa or Google Home app, enable the "Tuya Smart" or "Smart Life" skill/service and link your account.
- Scopri i dispositivi: Chiedi al tuo assistente vocale di "Trovare dispositivi" oppure avvia manualmente la ricerca dei dispositivi nell'app.
- Comandi vocali: Utilizzare comandi come:
- "Alexa, apri [Nome dispositivo]"
- "Ehi Google, chiudi [Nome dispositivo]"
- "Alexa, set [Device Name] to 50%" (for percentage controllo)
- "Hey Google, stop [Device Name]"
8.4 Controllo manuale dell'interruttore
If connected to a traditional manual wall switch, you can continue to operate the roller shutter directly from the wall switch.
- Press the "Up" button on the wall switch to open the shutter.
- Press the "Down" button on the wall switch to close the shutter.
- Press the "Stop" button (if available) or press the opposite direction button briefly to stop the shutter.
9. Manutenzione
- Pulizia: Wipe the module and remote control with a soft, dry cloth. Do not use liquid cleaners or aerosols.
- Sostituzione della batteria: The RF remote control uses a 27A 12V battery. If the remote's range or responsiveness decreases, replace the battery. To replace, carefully open the remote casing, remove the old battery, and insert a new one with correct polarity.
- Aggiornamenti del firmware: Periodically check the Tuya Smart or Smart Life app for available firmware updates for the module. Updates can improve performance and add new features.
10. Risoluzione Dei Problemi
| Problema | Possibile causa | Soluzione |
|---|---|---|
| Module not responding to APP. | No Wi-Fi connection, incorrect Wi-Fi password, module not paired, 2.4GHz/5GHz Wi-Fi conflict. |
|
| Module not responding to RF remote. | Remote battery low/dead, remote not paired, out of range. |
|
| Roller shutter does not move or moves incorrectly. | Incorrect wiring, motor issue, module malfunction. |
|
| Il controllo vocale non funziona. | Alexa/Google Home account not linked, device not discovered, incorrect commands. |
|
11. Garanzia e supporto
DieseRC products are manufactured with high-quality standards. For warranty information and technical support, please refer to the seller's policy on the platform where you purchased the product or contact DieseRC customer service directly.
Conservare la prova d'acquisto per eventuali richieste di garanzia.
For further assistance, you may visit the DieseRC brand store on Amazon: DieseRC Store
Ask a question about this manual
Ask about setup, troubleshooting, compatibility, parts, safety, or missing instructions. Manuals+ will review the question and use this page’s manual context to help answer it.