
1. Informazioni sulla sicurezza
Please read all instructions and warnings carefully before using this product. Failure to follow these safety guidelines may result in fire, electric shock, property damage, or injury.
- Non puntare la torcia direttamente negli occhi. Il fascio luminoso potente può causare danni temporanei alla vista o danni permanenti agli occhi.
- Tenere la torcia fuori dalla portata dei bambini.
- Do not disassemble the flashlight head as this may damage the reflector or LED.
- La torcia può generare calore significativo durante l'uso prolungato ad alti livelli di potenza. Maneggiare con cura per evitare ustioni.
- Utilizzare solo batterie AA consigliate. Non mischiare batterie vecchie e nuove o tipi diversi di batterie.
- Rimuovere le batterie se la torcia non verrà utilizzata per un periodo prolungato per evitare perdite.
2. Contenuto della confezione
Verifica che tutti gli articoli elencati di seguito siano inclusi nel tuo pacchetto:
- ThruNite Archer 2A V3 LED Flashlight x 1
- 1 clip da tasca
- O-ring di ricambio x 2
- Cordino x 1
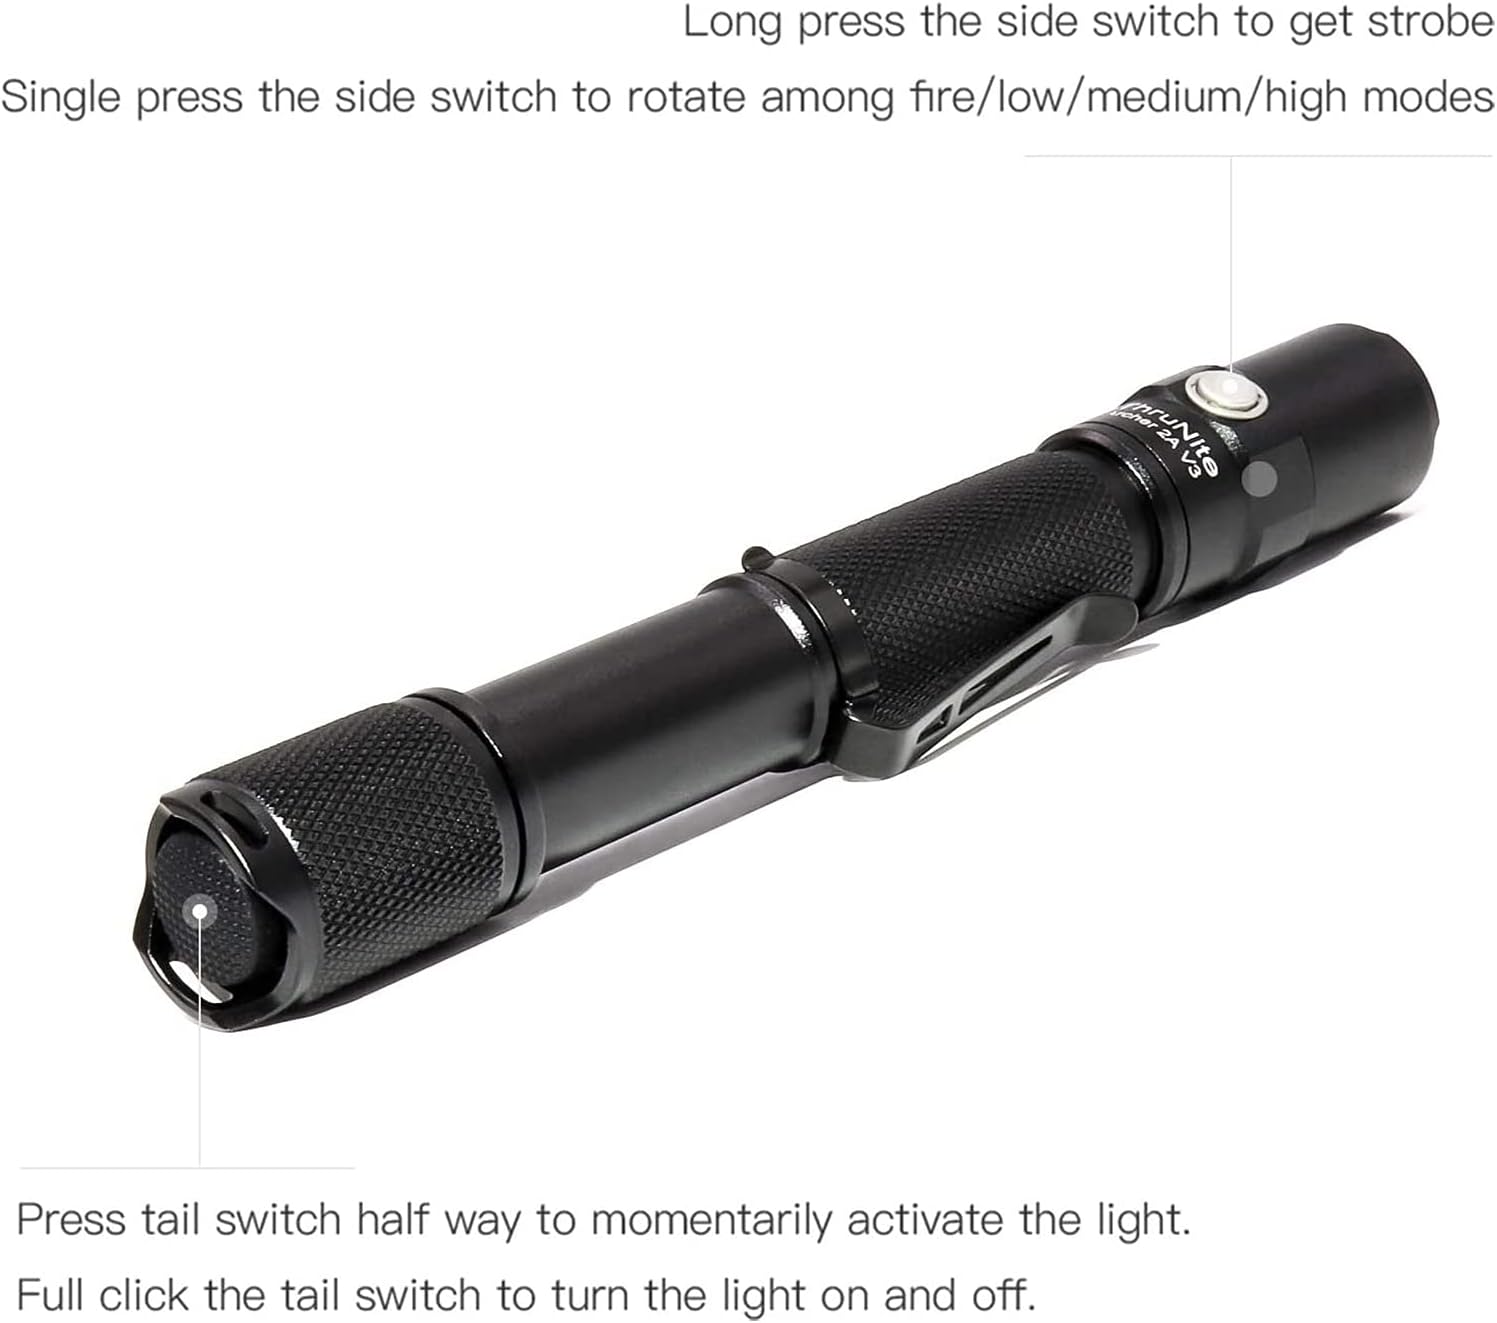
Image: All components included in the ThruNite Archer 2A V3 package, neatly laid out. This includes the flashlight body, a removable pocket clip, two spare O-rings for sealing, and a lanyard for secure carrying.
3. Impostazione
3.1 Installazione della batteria
The ThruNite Archer 2A V3 operates on two AA batteries (not included). Ensure correct polarity during installation.
- Svitare il tappo posteriore della torcia ruotandolo in senso antiorario.
- Insert two AA batteries into the battery compartment with the positive (+) end facing towards the flashlight head.
- Riavvitare il tappo posteriore in senso orario fino a quando non è ben stretto.
3.2 Attaching the Pocket Clip
The removable pocket clip can be attached to the flashlight body for convenient carrying.
- Slide the pocket clip onto the flashlight body, positioning it as desired.
- Ensure the clip is firmly seated in the groove to prevent accidental detachment.

Immagine: Un dettaglio view of the ThruNite Archer 2A V3 flashlight, highlighting the textured grip and the securely attached removable pocket clip. This clip allows for easy attachment to clothing or gear.
4. Istruzioni per l'uso
The Archer 2A V3 features both a tail switch and a side switch for versatile operation.
4.1 Basic Operation (Tail Switch)
- Momentary Activation: Press the tail switch halfway to momentarily activate the light. Release to turn off.
- Accensione/spegnimento costanti: Fully click the tail switch to turn the light on or off.
4.2 Mode Switching (Side Switch)
When the flashlight is on (via tail switch):
- Modalità ciclo: Single press the side switch to cycle through the general modes: Low → Medium → High.
- Modalità strobo: Long press the side switch to activate Strobe mode. Single press again to return to the previously used general mode.

Image: An illustrative diagram demonstrating the operational controls of the ThruNite Archer 2A V3. It shows how to use the tail switch for momentary and constant on/off functions, and the side switch for cycling through brightness modes (Low, Medium, High) and activating the Strobe function with a long press.
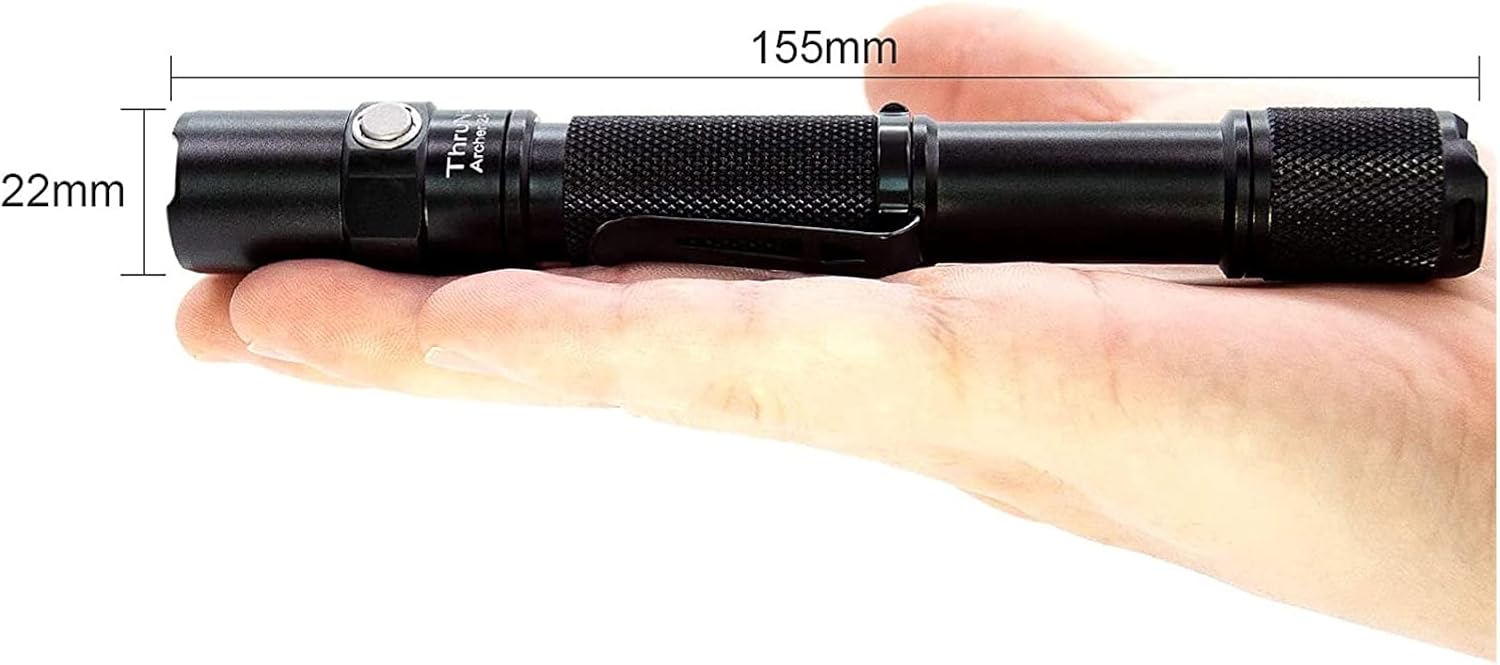
Image: A person is shown walking on a dark, unpaved path, illuminated by the powerful beam of the ThruNite Archer 2A V3 flashlight. The flashlight provides ample light to navigate the surroundings, demonstrating its effectiveness in low-light conditions.
5. Manutenzione
Una corretta manutenzione garantisce la longevità e le prestazioni ottimali della torcia.
- Pulizia: Clean the body of the flashlight with a soft, damp panno. Non usare detergenti abrasivi o solventi.
- Filettature e O-ring: Periodically lubricate the threads and O-rings with silicone grease to maintain water resistance and smooth operation. Replace worn O-rings with the provided spares.
- Cura della batteria: Remove batteries if the flashlight is not used for extended periods to prevent corrosion. Store batteries in a cool, dry place.
- Cura delle lenti: Keep the lens clean. If it gets dirty, gently wipe it with a lens cleaning cloth.
6. Risoluzione Dei Problemi
If you encounter issues with your ThruNite Archer 2A V3, try the following steps:
- La torcia non si accende:
- Check if the batteries are inserted correctly with the positive (+) end facing the head.
- Ensure the batteries are not depleted. Replace with fresh AA batteries.
- Confirm the tail cap is fully tightened. A loose tail cap can prevent electrical contact.
- Pulire i contatti e le filettature della batteria con un panno pulito.
- La luce è fioca o tremolante:
- Le batterie potrebbero essere scariche. Sostituirle.
- Assicurarsi che il tappo di coda e la testa siano ben serrati.
- Pulire i contatti e le filettature della batteria.
- Ingresso d'acqua:
- Check if O-rings are properly seated and not damaged. Replace if necessary.
- Ensure all parts are tightly screwed together.
Se questi passaggi non risolvono il problema, contattare l'assistenza clienti.
7. Specifiche
Detailed specifications for the ThruNite Archer 2A V3 LED Flashlight:
| Caratteristica | Dettaglio |
|---|---|
| Sorgente luminosa | XP-L V6 LED |
| Potenza massima | 500 lumen |
| Distanza del raggio | 108 metri (354 piedi) |
| Fonte di alimentazione | 2 batterie AA (non incluse) |
| Materiale | Aerospace Grade Aluminum with Type III Hard-Anodized Finish |
| Caratteristica speciale | Lightweight, Removable Clip |
| Dimensioni | Length: 155mm (6.1 inches), Diameter: 22mm (0.87 inches) |
| Peso dell'articolo | Circa 500 grammi (1.1 libbre) |
| Modalità | Low, Medium, High, Strobe |

Image: The ThruNite Archer 2A V3 flashlight displayed with its key dimensions: a length of 155mm and a diameter of 22mm, illustrating its compact and portable design.
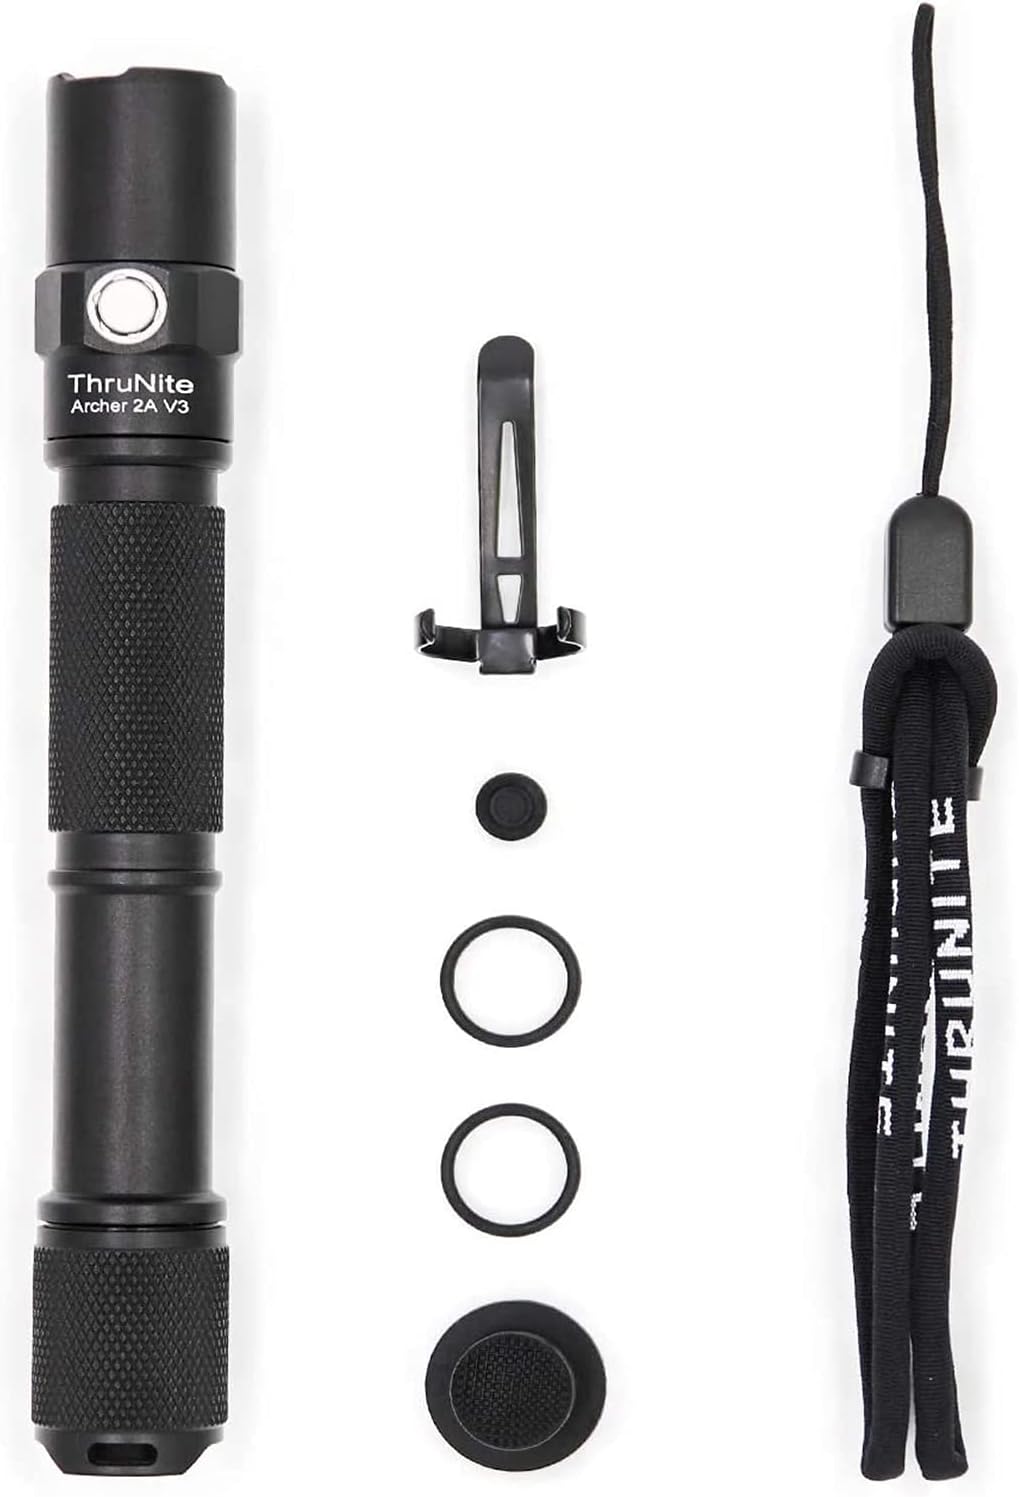
Image: A hand holding the ThruNite Archer 2A V3 flashlight, providing a clear perspective on its ergonomic design and compact size. The image also reiterates its dimensions, 6.1 inches (155mm) in length and 0.87 inches (22mm) in diameter, and highlights its lightweight nature at 48g (without batteries).
8. Garanzia e supporto
ThruNite is committed to providing quality products and excellent customer service.
8.1 Informazioni sulla garanzia
Specific warranty details may vary. Please refer to the product packaging or the official ThruNite websito per la politica di garanzia più aggiornata.
8.2 Assistenza clienti
If you have any questions, require assistance with setup, operation, or troubleshooting, or need to inquire about warranty service, please contact our customer service team. Contact information can typically be found on the product packaging or the official ThruNite websito.