
1. Prodotto finitoview
The Cuifati H310 LGA 1151 DDR4 Motherboard is designed to support 8th and 9th generation Intel Core processors. It features a Micro ATX form factor, dual-channel DDR4 memory support, and a range of expansion options including M.2 NVMe, PCIe slots, and multiple I/O ports for versatile connectivity.
Le caratteristiche principali includono:
- Wide CPU Compatibility: Supports 8th and 9th generation Intel Core processors (LGA 1151 socket).
- Memoria DDR4 a doppio canale: Supports up to 32GB DDR4 RAM across two DIMM slots, with frequencies up to 2666MHz.
- Alimentazione stabile: Features a three-phase power supply with solid capacitors and 24+8 pin power sockets for reliable operation.
- High-Speed H310 Chipset: Provides stable and efficient performance for various computing tasks.
- Grafica integrata: Equipped with an integrated graphics processor and multiple display outputs (DVI, HDMI, VGA) for multi-monitor setups.
- Rich Expansion Ports: Includes SATA 6Gb/s, NVME M.2, PCIe X16, PCIe X1, USB 3.0, USB 2.0, PS/2, RJ45, and audio ports.

Figura 1: Dall'alto verso il basso view of the Cuifati H310 LGA 1151 DDR4 Motherboard, showing CPU socket, RAM slots, and various connectors.
2. Configurazione e installazione
This section provides instructions for installing the Cuifati H310 motherboard and its components into a computer case.
2.1 Precauzioni di sicurezza
- Scollegare sempre l'alimentatore dalla presa a muro prima di installare o rimuovere qualsiasi componente.
- Indossare un braccialetto antistatico o toccare frequentemente un oggetto metallico collegato a terra per prevenire le scariche elettrostatiche (ESD).
- Maneggiare la scheda madre tenendola per i bordi per evitare di toccare i componenti sensibili.
2.2 Installazione della CPU
- Individuare il socket della CPU LGA 1151 sulla scheda madre.
- Spingere delicatamente verso il basso la leva di caricamento e tirarla lateralmente per aprire il coperchio del socket della CPU.
- Allineare il segno triangolare sulla CPU con il segno corrispondente sul socket. Inserire con cautela la CPU nel socket, senza forzarla.
- Chiudere il coperchio della presa e spingere la leva di caricamento nella sua posizione originale finché non scatta.
- Applicare la pasta termica alla CPU e installare il dissipatore della CPU seguendo le istruzioni del produttore.
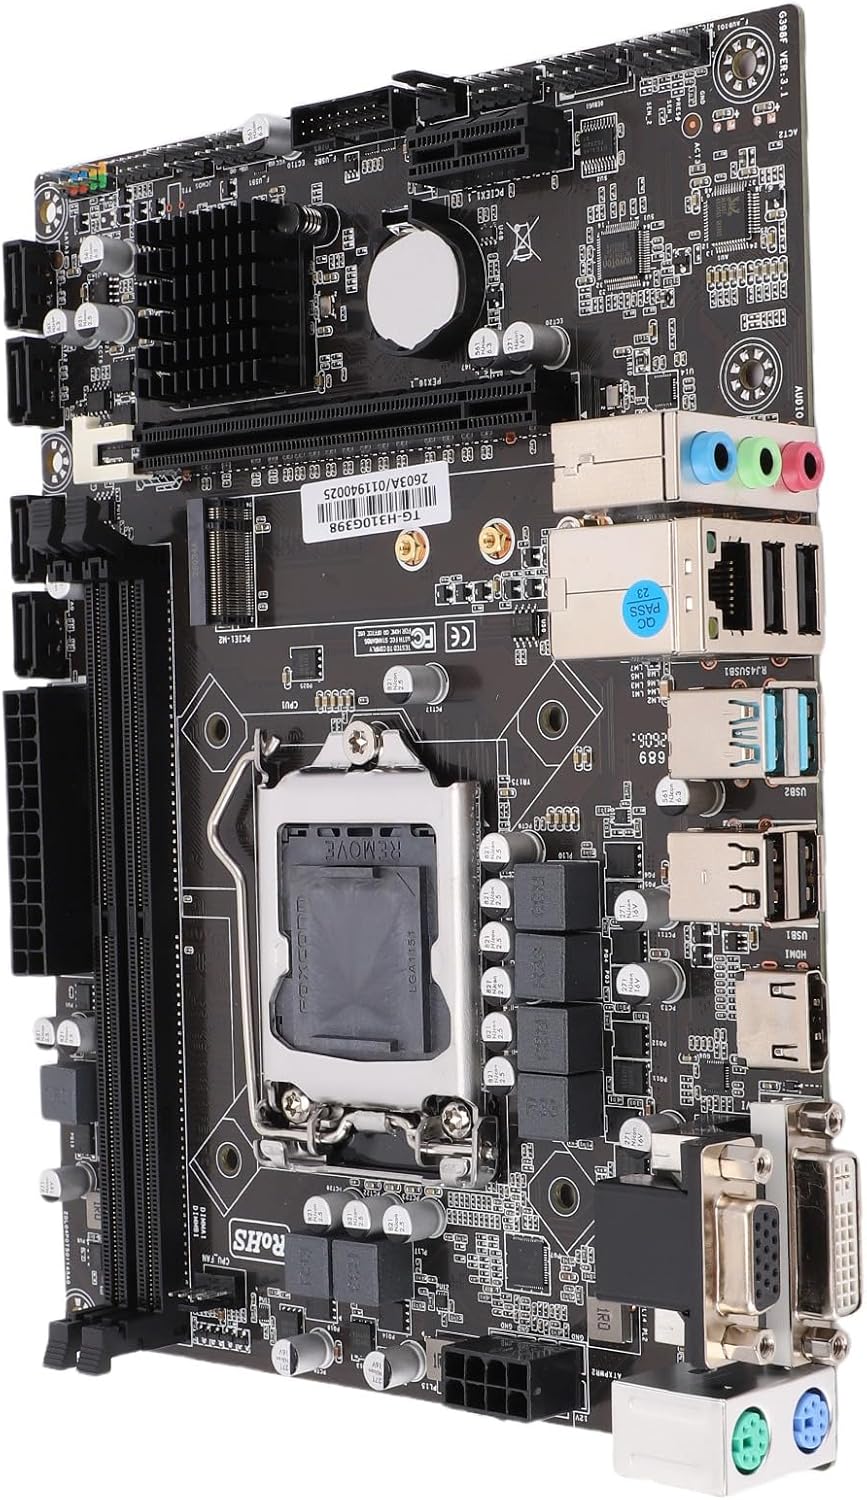
Figura 2: Angolato view of the motherboard, highlighting the LGA 1151 CPU socket and surrounding components.
2.3 Installazione RAM
- Aprire le clip su entrambe le estremità degli slot DIMM DDR4.
- Allineare la tacca sul modulo di memoria DDR4 con la chiave nello slot DIMM.
- Inserire saldamente il modulo di memoria nello slot finché le clip non scattano in posizione. Assicurarsi che entrambe le clip siano chiuse.
- For dual-channel operation, install memory modules in matching slots as indicated in the motherboard manual (typically alternating slots).
2.4 Storage Device Installation (M.2 NVMe / SATA)
2.4.1 SSD M.2 NVMe
- Individuare lo slot M.2 sulla scheda madre.
- Rimuovere la vite distanziatrice M.2.
- Insert the M.2 NVMe SSD into the slot at a 30-degree angle.
- Spingere delicatamente l'SSD verso il basso e fissarlo con la vite distanziatrice.
2.4.2 Unità SATA
- Collegare un'estremità di un cavo dati SATA a una porta SATA da 6 Gb/s sulla scheda madre.
- Collegare l'altra estremità del cavo dati SATA al disco rigido SATA o all'SSD.
- Collegare un cavo di alimentazione SATA dall'alimentatore (PSU) all'unità SATA.
2.5 Collegamenti di alimentazione
- Collegare il connettore di alimentazione principale ATX a 24 pin dell'alimentatore alla presa corrispondente sulla scheda madre.
- Connect the 8-pin ATX 12V CPU power connector from your PSU to the socket near the CPU.
2.6 Pannello frontale e connessioni I/O
- Connect the front panel headers (Power LED, HDD LED, Power Switch, Reset Switch) to the designated pins on the motherboard. Refer to the motherboard's silkscreen labels for correct orientation.
- Collegare i connettori USB 2.0 e USB 3.0 sul pannello frontale.
- Collegare il connettore audio del pannello frontale.
- Install the I/O shield into the computer case opening before installing the motherboard.

Figure 3: Rear I/O panel of the motherboard, showing ports for USB, DVI, VGA, HDMI, RJ45, and audio.
2.7 Installazione della scheda di espansione (PCIe)
- Locate the PCIe X16 slot for a graphics card or other PCIe X1 slots for expansion cards.
- Remove the corresponding slot cover from your computer case.
- Align the expansion card with the slot and press it firmly until it is seated correctly.
- Fissare la scheda alla custodia con una vite.
3. Istruzioni per l'uso
After successful installation, follow these steps for initial system operation.
3.1 Accensione iniziale
- Ensure all components are securely connected and the power supply is plugged into a wall outlet.
- Premere il pulsante di accensione sul case del computer.
- Il sistema dovrebbe accendersi e sul monitor dovrebbe apparire una schermata.
3.2 Configurazione BIOS/UEFI
- Durante l'avvio, premere ripetutamente il tasto DEL or F2 tasto (tasti comuni, possono variare) per accedere all'utilità di configurazione BIOS/UEFI.
- In the BIOS/UEFI, you can configure boot order, system time, CPU settings, memory settings, and other hardware parameters.
- Save changes and exit to continue booting into your operating system installer or existing OS.
3.3 Installazione del driver
- After installing your operating system, install the necessary drivers for the motherboard chipset, integrated graphics, audio, and LAN.
- Drivers are typically provided on a support CD/DVD or can be downloaded from the manufacturer's websito.
4. Manutenzione
Proper maintenance ensures the longevity and optimal performance of your motherboard and system.
4.1 Pulizia
- Regularly clean dust from inside your computer case, especially around fans and heatsinks, using compressed air.
- Prima di procedere alla pulizia, assicurarsi che il sistema sia spento e scollegato.
- Evitare di utilizzare detergenti liquidi direttamente sui componenti.
4.2 Aggiornamenti BIOS/UEFI
- Controllare il produttore website periodically for BIOS/UEFI updates.
- Updates can improve compatibility, stability, and performance.
- Follow the update instructions carefully to avoid system damage.
5. Risoluzione Dei Problemi
Questa sezione affronta i problemi più comuni che potresti incontrare e fornisce possibili soluzioni.
5.1 No Power / System Does Not Turn On
- Controllare i collegamenti di alimentazione: Assicurarsi che i connettori di alimentazione ATX a 24 pin e CPU a 8 pin siano saldamente inseriti.
- Alimentazione elettrica: Verify the PSU switch is in the 'ON' position and the power cable is firmly connected to both the PSU and the wall outlet.
- Intestazioni del pannello frontale: Confirm the power switch header is correctly connected to the motherboard.
5.2 No Display on Monitor (No POST)
- Monitorare la connessione: Ensure the monitor is connected to the correct display output (DVI, HDMI, or VGA) on the motherboard or graphics card and is powered on.
- Memoria RAM: Reinstallare i moduli RAM. Provare ad avviare il computer con un solo modulo RAM installato.
- PROCESSORE: Verify the CPU is correctly installed and the CPU cooler is properly seated.
- Scheda grafica: If using a dedicated graphics card, ensure it is properly seated in the PCIe slot and has adequate power. Try removing it and using the integrated graphics.
5.3 Periferica non rilevata
- Controllare le connessioni: Ensure the peripheral (e.g., USB device, SATA drive) is correctly connected.
- Autisti: Installare o aggiornare i driver necessari per la periferica.
- Impostazioni BIOS/UEFI: Check if the port or device is enabled in the BIOS/UEFI settings.
6. Specifiche
Detailed technical specifications for the Cuifati H310 LGA 1151 DDR4 Motherboard.
| Caratteristica | Dettaglio |
|---|---|
| Nome del modello | H310 LGA 1151 DDR4 |
| Produttore | Cuifati |
| Presa CPU | LGA1151 |
| CPU compatibili | 8th and 9th Generation Intel Core Processors (e.g., Intel Core i7-8700K, Intel Core i9-9900K) |
| Chipset | Intel H310 |
| Tecnologia della memoria | DDR4 doppio canale |
| Slot di memoria | 2 slot DIMM |
| Capacità massima della RAM | 32 GB (2 x 16 GB) |
| Velocità di clock della memoria | 2133 MHz, 2400 MHz, 2666 MHz |
| Interfaccia grafica | Integrated, PCI-Express x16 |
| Uscite di visualizzazione | 1 x VGA, 1 x DVI, 1 x HDMI |
| Slot di espansione | 1 x PCI Express X16, 1 x PCI Express X1 |
| Porte di archiviazione | 4 x SATA 6Gb/s, 1 x NVME M.2 connector |
| Porte USB | 2 x USB 3.0 (rear), 4 x USB 2.0 (rear), 1 x USB 3.0 header (supports 2 ports), 1 x USB 2.0 header (supports 2 ports) |
| Rete locale | Realtek 100/1000 Mbps Ethernet |
| Audio | Audio HD Realtek ALC662 a 6 canali |
| Connettore di alimentazione | 24+8 Pin ATX Power |
| Fattore di forma | Micro ATX (Approx. 21.5 x 17 cm / 8.5 x 6.7 inches) |
| Batteria | CR2032 (integrated) |
7. Informazioni sulla garanzia
The Cuifati H310 LGA 1151 DDR4 Motherboard comes with a Garanzia di 1 anno contro i difetti di fabbricazioneLa presente garanzia copre i difetti di materiali e di fabbricazione in condizioni di normale utilizzo durante il periodo di garanzia.
La garanzia non copre:
- Danni causati da incidenti, abusi, usi impropri, inondazioni, incendi, terremoti o altre cause esterne.
- Damage caused by operating the product outside the permitted or intended uses described by Cuifati.
- Damage caused by service (including upgrades and expansions) performed by anyone who is not a representative of Cuifati or an authorized Cuifati Service Provider.
- Products or parts that have been modified to alter functionality or capability without the written permission of Cuifati.
For warranty claims, please contact Cuifati customer support with your proof of purchase.
8. Assistenza clienti
If you encounter any issues not covered in this manual or require further assistance, please contact Cuifati customer support.
- Supporto online: Visit the official Cuifati websito per FAQ, download di driver e risorse di supporto.
- Informazioni sui contatti: Refer to your product packaging or the Cuifati websito per i dettagli di contatto più aggiornati.
When contacting support, please have your product model (H310 LGA 1151 DDR4) and purchase information ready.