1. Introduzione
This manual provides essential instructions for the safe and effective operation of your HTRC 3-Amp 6V/12V Smart Automatic Battery Charger and Maintainer, Model 3A-Z. This device is designed to charge and maintain various 6V and 12V batteries, including Lead-Acid (AGM, GEL, STD, Flooded, WET, EFB), Lithium, and LiFePO4 types. Please read this manual thoroughly before use and retain it for future reference.

Image 1.1: The HTRC 3-Amp 6V/12V Smart Automatic Battery Charger and Maintainer with alligator clips and ring terminals.
2. Istruzioni di sicurezza
AVVERTENZA: leggere tutte le avvertenze e le istruzioni di sicurezza. La mancata osservanza delle avvertenze e delle istruzioni può causare scosse elettriche, incendi e/o lesioni gravi.
- Quando si lavora con le batterie, indossare sempre occhiali protettivi e indumenti protettivi.
- Assicurarsi che l'area di ricarica sia ben ventilata.
- Never charge a frozen battery. Allow it to warm to room temperature first.
- Tenere il caricabatterie lontano da materiali e liquidi infiammabili.
- Non utilizzare il caricabatterie se ha subito un forte colpo, è caduto o è stato danneggiato in altro modo.
- Scollegare l'alimentazione CA prima di effettuare o interrompere i collegamenti alla batteria.
- Non tentare di caricare batterie non ricaricabili.
- This charger is not intended for use by persons (including children) with reduced physical, sensory, or mental capabilities, or lack of experience and knowledge, unless they have been given supervision or instruction concerning use of the appliance by a person responsible for their safety.
3. Contenuto della confezione
Verifica che tutti gli articoli siano presenti nel tuo pacco:
- HTRC 3-Amp 6V/12V Smart Automatic Battery Charger (Model 3A-Z)
- Cavo di uscita CC con morsetti a coccodrillo
- DC Output Cable with Ring Terminals
- Manuale di istruzioni
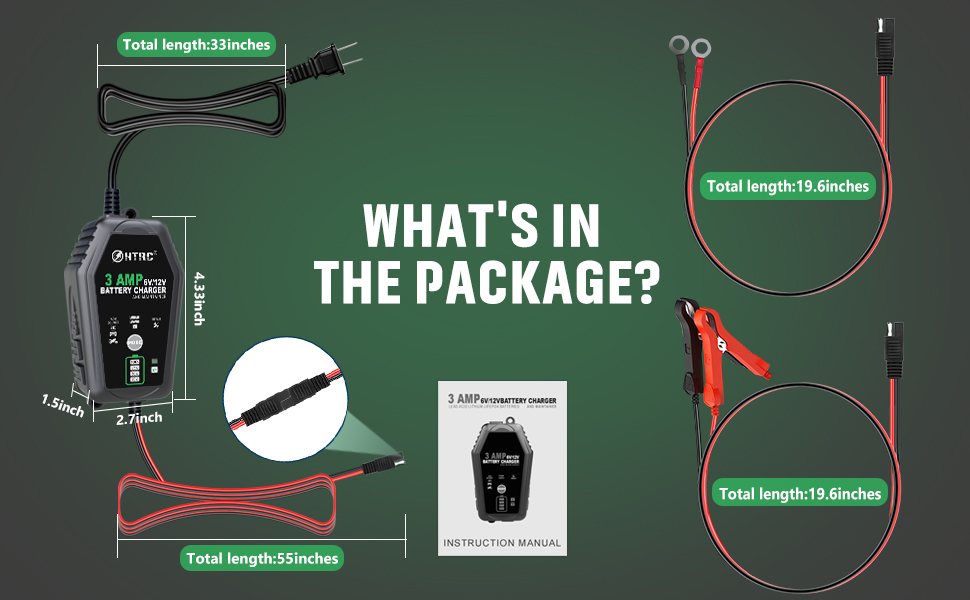
Image 3.1: Illustration of the HTRC 3-Amp battery charger and its included accessories.
4. Caratteristiche del prodotto
- Compatibilità universale: Charges 6V and 12V batteries, including Lead-Acid (AGM, GEL, STD, Flooded, WET, EFB), Lithium, and LiFePO4.
- Modalità di ricarica intelligenti: Features dedicated modes for different battery types and a repair mode.
- Compensazione automatica della temperatura: Adjusts charging parameters for optimal performance in hot (up to 104°F/40°C) and cold (down to 58°F/10°C) climates, preventing over- or under-charging.
- Protezione di sicurezza multilivello: Includes safeguards against over-load, short circuit, high-voltage, over-temperature, low-voltage, over-discharge, reverse connection, and overcharge.
- Interfaccia intuitiva: LCD screen displays charging status and battery information.
- Connettività flessibile: Comes with interchangeable alligator clips and ring terminals for various applications.

Image 4.1: The charger's broad battery compatibility for 6V and 12V systems.

Image 4.2: The charger's ability to adjust charging based on ambient temperature.

Immagine 4.3: Passoview of the charger's comprehensive safety protection features.
5. Impostazione
Before connecting the charger, ensure the battery terminals are clean and free of corrosion. Always connect the charger to the battery before plugging it into an AC outlet.
5.1 Collegamento alla batteria
- Scegli il metodo di connessione: Select either the alligator clips or the ring terminals based on your battery's accessibility and intended use. The charger features standard SAE connectors for easy interchangeability.
- Connetti Positivo: Attach the RED (+) connector (alligator clip or ring terminal) to the positive (+) battery terminal.
- Connetti negativo: Attach the BLACK (-) connector (alligator clip or ring terminal) to the negative (-) battery terminal.
- Garantire una connessione sicura: Confirm that both connections are firm and secure to prevent arcing or poor contact.
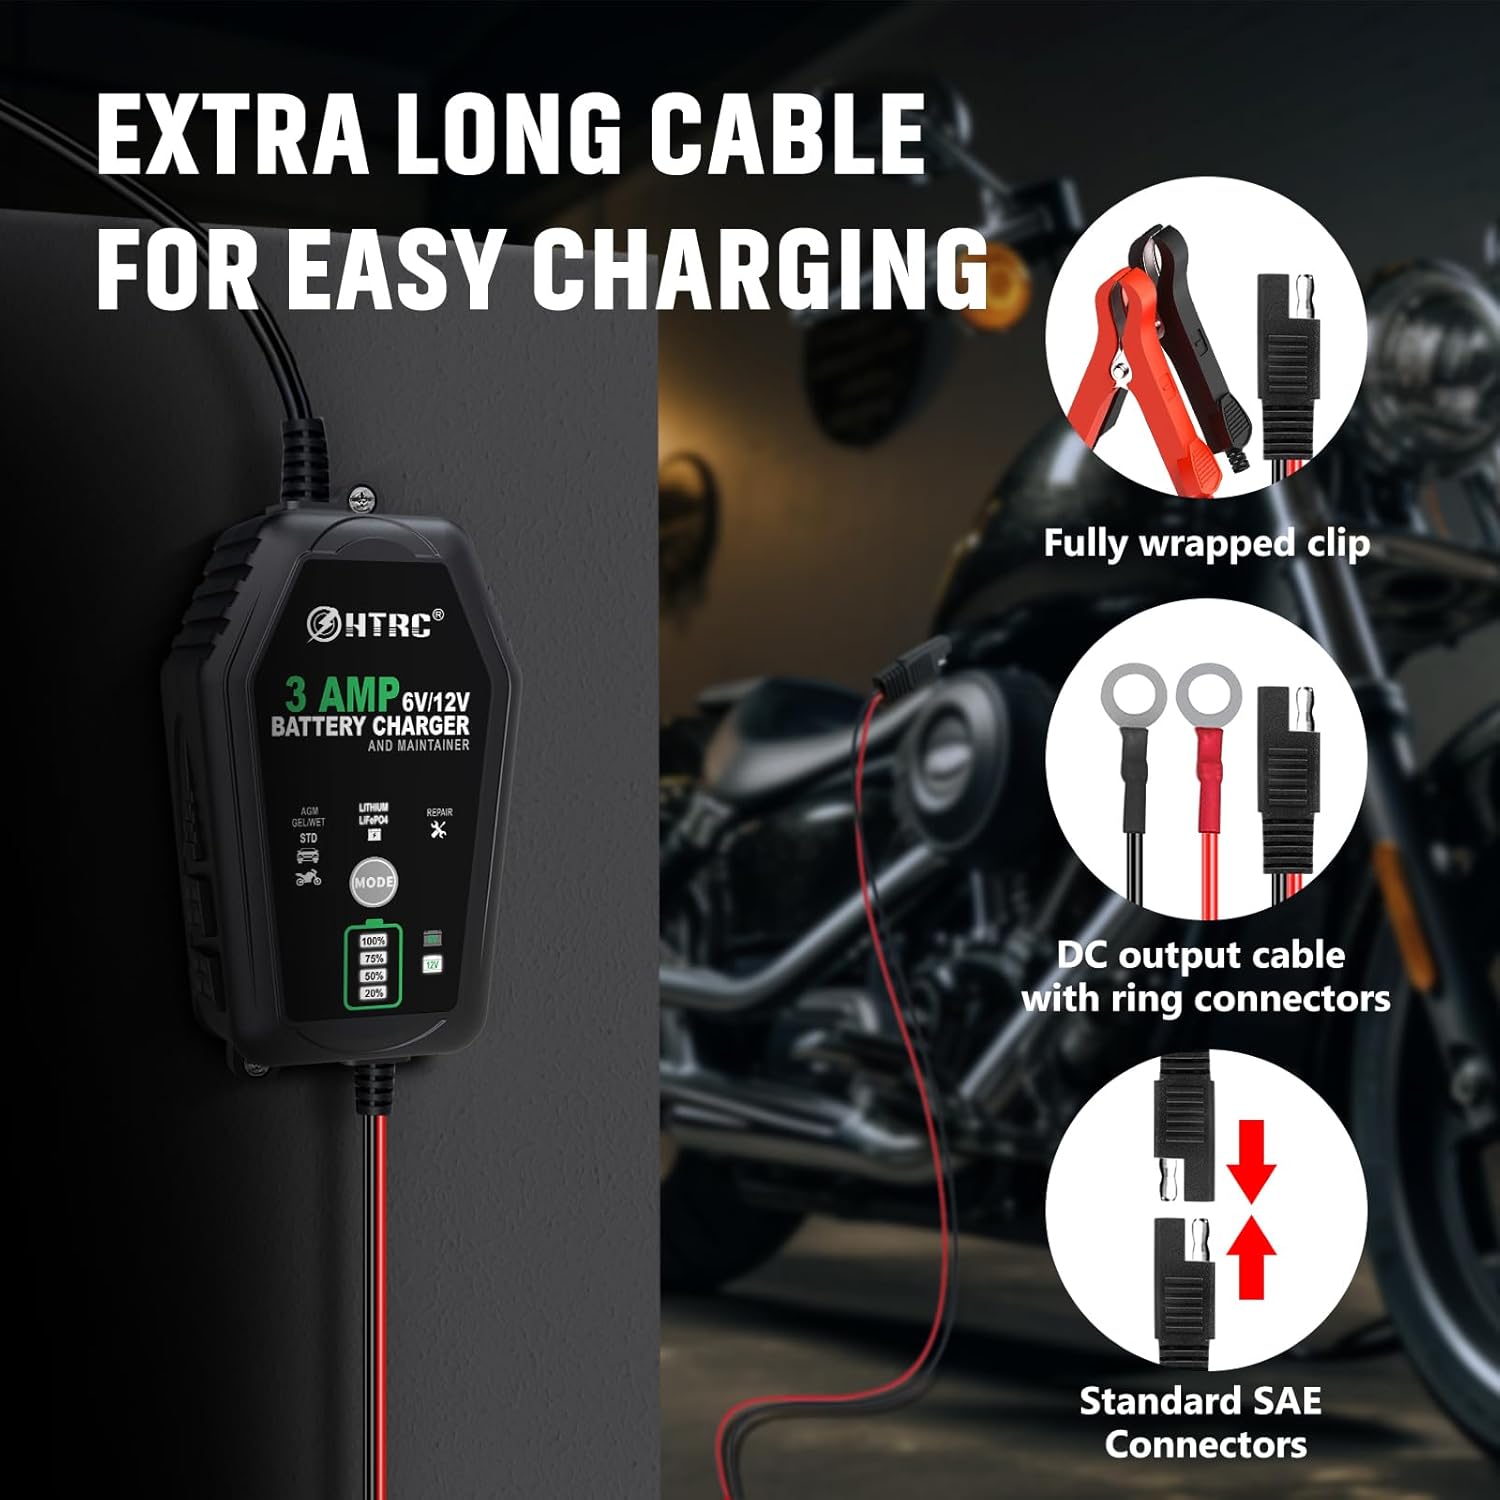
Image 5.1: The charger's flexible connection options: alligator clips and ring terminals.
5.2 Collegamento all'alimentazione
Once the charger is securely connected to the battery, plug the AC power cord into a standard 100-240V AC electrical outlet.
6. Istruzioni per l'uso
Il caricabatterie rileverà automaticamente il voltage (6V or 12V). You will need to manually select the appropriate charging mode.
6.1 Selezione della modalità di ricarica
Premere il tasto MODALITÀ button on the charger to cycle through the available charging modes:
- AGM/GEL/WET/STD: For standard Lead-Acid batteries, including AGM, Gel, Wet, and Standard flooded batteries.
- Lithium LiFePO4: Per batterie al litio ferro fosfato.
- Riparazione: A specialized mode designed to increase battery health status or activate deeply discharged batteries. Use this mode with caution and only when necessary.

Image 6.1: The charger's display indicating the three selectable charging modes.
6.2 Processo di ricarica
- After selecting the mode, the charger will begin the charging process. The LCD screen will display the charging progress (e.g., 20%, 50%, 75%, 100%) and the current battery voltage.
- The charger will automatically switch to maintenance mode once the battery is fully charged to prevent overcharging.
- When charging is complete, the display will show 100%.
6.3 Scollegamento del caricabatterie
Per scollegare il caricabatterie:
- Scollegare il cavo di alimentazione CA dalla presa elettrica.
- Disconnect the BLACK (-) connector from the negative (-) battery terminal.
- Disconnect the RED (+) connector from the positive (+) battery terminal.
7. Manutenzione
- Pulizia: Pulisci il caricabatterie casing con un panno morbido e asciutto. Non utilizzare detergenti abrasivi o solventi.
- Ispezione dei cavi: Regularly inspect the AC power cord and charging cables for any signs of damage, cuts, or fraying. Do not use if damaged.
- Magazzinaggio: Store the charger in a cool, dry place when not in use. Keep it away from moisture and direct sunlight.
8. Risoluzione Dei Problemi
| Problema | Possibile causa | Soluzione |
|---|---|---|
| Il caricabatterie non si accende. | Nessuna alimentazione CA; collegamento difettoso; malfunzionamento del caricabatterie. | Check AC outlet; ensure all connections are secure; contact support if problem persists. |
| Il caricabatterie non carica la batteria. | Incorrect mode selected; poor battery connection; battery too deeply discharged; battery fault. | Verify correct mode; check connections; try Repair mode for deeply discharged batteries; have battery tested by a professional. |
| Charger displays error code or warning. | Polarità inversa; cortocircuito; sovratemperatura. | Disconnect immediately; check connections for correct polarity; allow charger to cool down; inspect cables for damage. |
| Battery not holding charge after charging. | Battery is old or damaged; internal battery fault. | This indicates a battery issue, not a charger issue. Consider replacing the battery. |
9. Specifiche
| Specificazione | Dettaglio |
|---|---|
| Modello | 3A-Z |
| Ingresso volumetage | 100-240V AC |
| Volume di uscitatage | 6 V / 12 V CC (rilevamento automatico) |
| Corrente di uscita | 3 Amp |
| Potenza di uscita | 60W |
| Tipi di batteria supportati | Lead-Acid (AGM, GEL, STD, Flooded, WET, EFB), Lithium, LiFePO4 |
| Temperatura di esercizio | da -10°C a 40°C (da 14°F a 104°F) |
| Dimensioni (L x P x A) | 4.5 x 1.7 x 1.5 pollici (11.43 x 4.32 x 3.81 cm) |
| Peso dell'articolo | 0.02 chilogrammi (circa 0.71 once) |
| Certificazioni | CE |
| Produttore | ZHIHIUI |
10. Garanzia e supporto
Per informazioni sulla garanzia o assistenza tecnica, fare riferimento alla confezione del prodotto o contattare direttamente il produttore. Conservare la ricevuta d'acquisto come prova d'acquisto.