Introduzione
This manual provides detailed instructions for the proper use and maintenance of your Levenhuk Atom DNB250 Digital Day and Night Vision Binoculars. Please read this manual thoroughly before operating the device to ensure optimal performance and longevity. The Levenhuk Atom DNB250 offers high-definition imaging for both day and night observations, featuring optical and digital magnification, infrared illumination, and recording capabilities.
Contenuto della confezione
Disimballare con cura la scatola e assicurarsi che tutti gli articoli elencati di seguito siano presenti e in buone condizioni. Se alcuni articoli risultano mancanti o danneggiati, contattare il rivenditore.
- Levenhuk Atom DNB250 Digital Night Vision Binoculars
- Borsa da trasporto
- Cinghia da collo
- Batteria ricaricabile rimovibile
- Cavo USB di tipo C.
- Salvietta per la pulizia
- Manuale d'uso
- Scheda di garanzia

Image: Levenhuk Atom DNB250 Digital Night Vision Binoculars with all included accessories laid out.
Prodotto finitoview
Controlli e porte

Immagine: in alto view of the binoculars highlighting the control panel.
- Pulsante di accensione: Accende o spegne il dispositivo.
- Pulsante IR: Activates and adjusts the infrared illuminator brightness levels.
- Pulsante OK: Conferma le selezioni e scatta foto/avvia la registrazione video.
- Pulsante Menu: Accede al menu delle impostazioni del dispositivo.
- Zoom In/Up Button (+): Increases digital magnification or navigates up in menus.
- Zoom Out/Down Button (-): Decreases digital magnification or navigates down in menus.

Immagine: Lato view of the binoculars showing the USB-C port and microSD card slot.
- Slot per scheda MicroSD: For inserting a memory card (up to 128GB, not included) to store photos and videos.
- Porta USB di tipo C: Per caricare il dispositivo e trasferire i dati al computer.
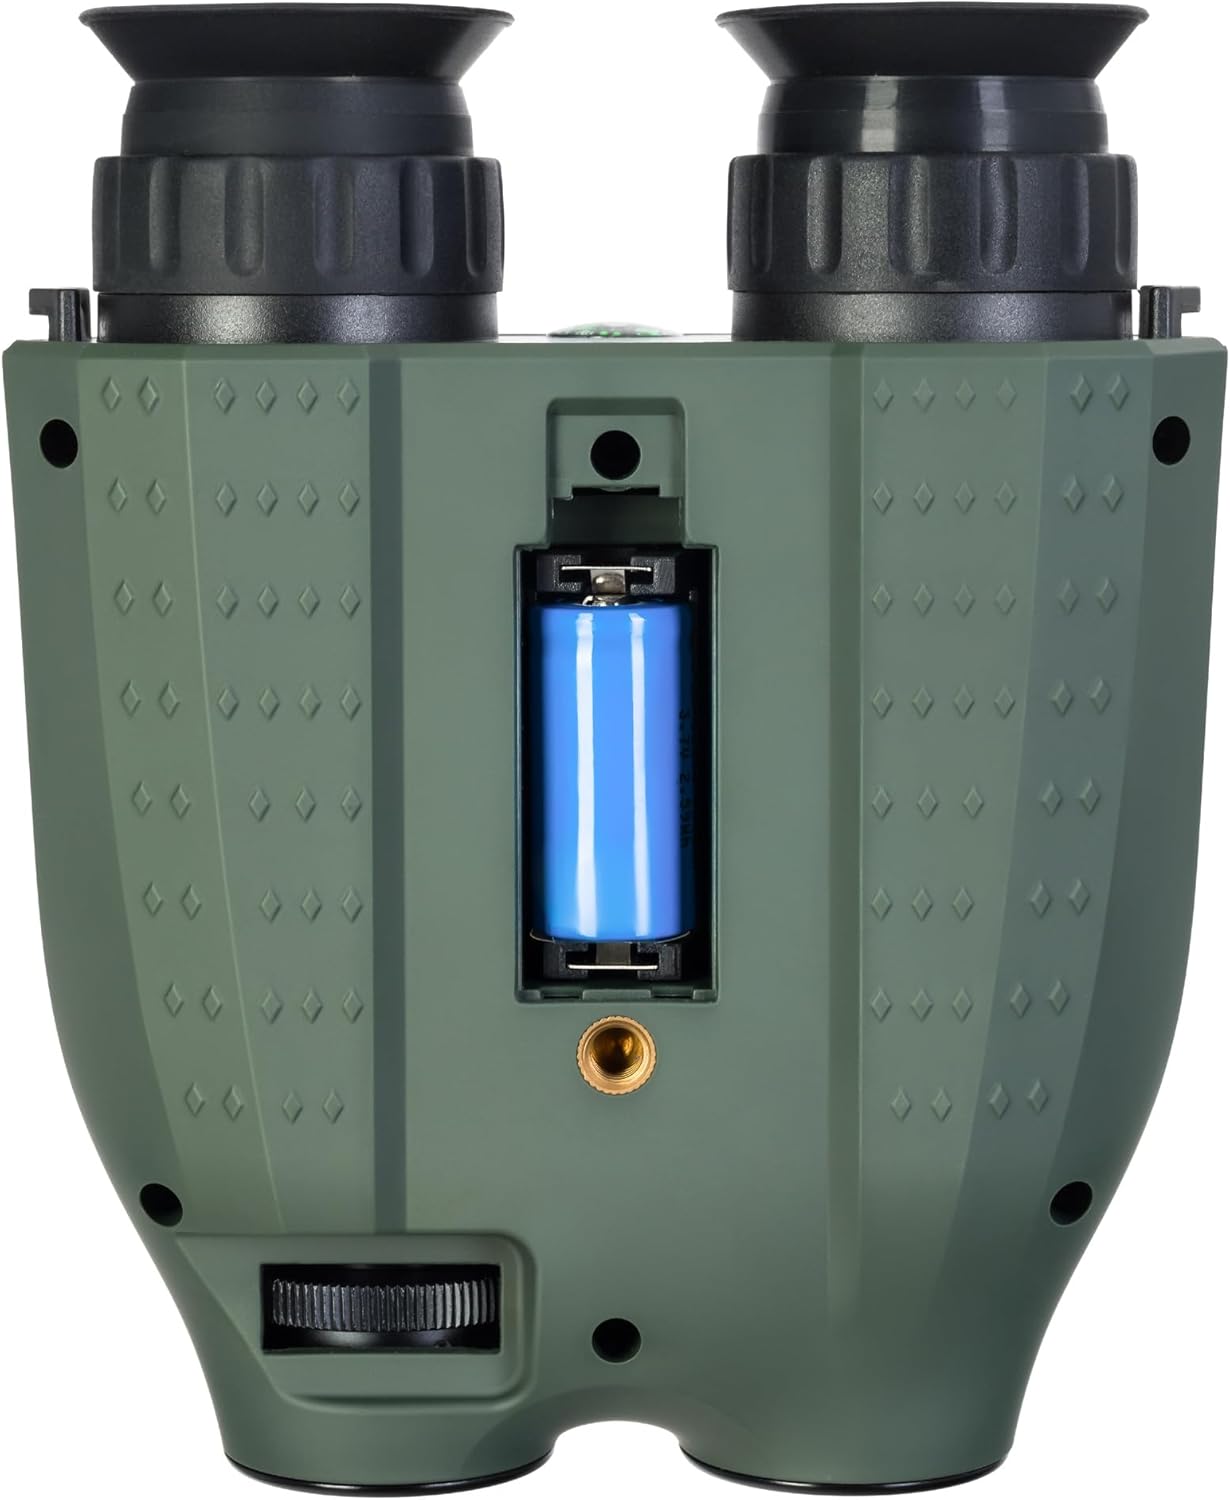
Immagine: In basso view of the binoculars showing the battery compartment and tripod mounting thread.
- Vano batteria: Houses the removable rechargeable battery.
- Tripod Mounting Thread: Allows attachment to a standard tripod.
Impostare
1. Installazione della batteria
- Individuare il vano batteria nella parte inferiore del dispositivo.
- Aprire il coperchio del vano.
- Inserire la batteria ricaricabile fornita, prestando attenzione alla corretta polarità.
- Chiudere saldamente il coperchio del vano batterie.
2. Installazione della scheda di memoria
A microSD card (up to 128GB) is required for storing photos and videos. It is not included in the package.
- Individuare lo slot per la scheda microSD sul lato del dispositivo.
- Inserisci delicatamente la scheda microSD nello slot finché non scatta in posizione.
- Per rimuoverla, premere la scheda verso l'interno finché non scatta fuori.
3. Carica della batteria
Before first use, fully charge the battery. The device can be charged using the supplied USB Type-C cable.
- Connect the USB Type-C cable to the device's USB port.
- Connect the other end of the cable to a USB power source (e.g., computer, wall adapter - not included).
- L'indicatore di carica mostrerà lo stato di carica.
Operazione
1. Accensione/Spegnimento
- To power on, press and hold the Power Button until the display activates.
- To power off, press and hold the Power Button again until the display shuts down.
2. Regolazione della messa a fuoco
Adjust the focus by rotating the eyepiece rings until the image appears clear on the internal displays.
3. Magnification (Optical and Digital Zoom)
The device features 6x optical magnification and up to 8x digital zoom.
- Utilizzare il Ingrandisci (+) E Rimpicciolisci (-) buttons to adjust the digital magnification.
4. Infrared (IR) Illumination
The infrared illuminator enhances visibility in low-light or complete darkness. It has three brightness levels.
- Premere il tasto Pulsante IR to cycle through the IR brightness levels (Low, Medium, High, Off).
- The IR illuminator automatically adapts to lighting conditions.
5. Registrazione di foto e video
The built-in recorder captures observations as photos (JPG, up to 8000x6000px) and videos (AVI, up to 2560x1440px).
- To take a photo: Press the Pulsante OK una volta.
- To start video recording: Press and hold the Pulsante OKPremere di nuovo per interrompere la registrazione.
- Captured media is stored on the inserted microSD card.
6. Modalità di visualizzazione
The binoculars are equipped with two color IPS screens that can be used together or separately.
- Day shooting provides full-color images.
- Night shooting provides monochrome images for enhanced visibility in darkness.
Video: Un oltreview of the Levenhuk Atom DNB250 Digital Night Vision Binoculars, demonstrating key features such as night vision range, magnification, high-resolution screen, photo/video capture, IR illumination, battery life, and mounting options.
Opzioni di montaggio
The Levenhuk Atom DNB250 can be used handheld or mounted for stable observation.
- Montaggio del treppiede: The device features a standard tripod mounting thread on its base, allowing it to be attached to a tabletop tripod (included) or any compatible full-size tripod for extended, stable viewing e registrazione.
- Montaggio sul casco: The NVD can also be mounted on a helmet for hands-free operation (helmet mount not included).
Manutenzione e cura
- Pulizia: Use the provided cleaning wipe to gently clean the lenses and external surfaces. Avoid abrasive materials or harsh chemicals.
- Magazzinaggio: When not in use, store the binoculars in the carrying pouch in a cool, dry place, away from direct sunlight and extreme temperatures.
- Cura della batteria: Rimuovere la batteria se il dispositivo non verrà utilizzato per un periodo prolungato.
- Durata: The device features a lightweight and durable ABS plastic body with a polymer coating for increased damage resistance and a reliable grip.
Risoluzione dei problemi
| Problema | Possibile causa | Soluzione |
|---|---|---|
| Il dispositivo non si accende. | Low or uncharged battery; incorrectly installed battery. | Charge the battery; ensure battery is installed with correct polarity. |
| L'immagine è sfocata. | Regolazione della messa a fuoco non corretta. | Adjust the eyepiece rings until the image is clear. |
| Impossibile registrare foto/video. | No microSD card; full microSD card; faulty microSD card. | Insert a microSD card; delete old files or use a new card; try a different card. |
| Scarsa visibilità notturna. | IR illuminator off or on low setting. | Increase IR brightness using the IR button. |
Specifiche
| Caratteristica | Dettaglio |
|---|---|
| Numero di modello | 83055 |
| Ingrandimento ottico | 6x |
| Digital Zoom | 1-8x |
| Diametro della lente dell'obiettivo | 21.3 millimetri |
| Gamma di visione notturna | Fino a 300 metri |
| Day Vision Range | Fino a 1000 metri |
| Illuminatore a infrarossi | Yes, with 3 brightness levels |
| Risoluzione della foto | Up to 8000 x 6000px (JPG) |
| Risoluzione video | Up to 2560 x 1440px (AVI) |
| Supporto per schede di memoria | MicroSD fino a 128GB (non inclusa) |
| Tipo di batteria | Removable 700mAh rechargeable battery |
| Battery Life (Night) | Up to 2 hours (IR activated) |
| Battery Life (Day) | Fino a 10 ore |
| Materiale | Acrilonitrile Butadiene Stirene (ABS) |
| Tipo di montaggio | Supporto per treppiede |
| Dimensioni (L x P x A) | Dimensioni: 17 x 7 x 17.5 cm |
| Peso | 700 grammi |
Garanzia e supporto
Levenhuk provides a lifetime warranty for all elements of this device, reflecting its commitment to high quality and standards. For warranty claims or technical support, please refer to the warranty card included in your package or visit the official Levenhuk websito.