1. Introduzione
Thank you for choosing the Ingco 20V Lithium-Ion Rotary Hammer Drill CRHLI20168. This manual provides essential information for the safe and efficient operation, maintenance, and troubleshooting of your new tool. Please read this manual thoroughly before first use and keep it for future reference.
The Ingco CRHLI20168 is a versatile cordless rotary hammer drill designed for drilling, hammer drilling, and light chiseling tasks in various materials including concrete, masonry, wood, and metal. Its 20V lithium-ion battery provides cordless convenience and powerful performance.
2. Istruzioni generali di sicurezza
AVVERTIMENTO: Leggere tutte le avvertenze di sicurezza, le istruzioni, le illustrazioni e le specifiche fornite con questo elettroutensile. La mancata osservanza di tutte le istruzioni elencate di seguito può causare scosse elettriche, incendi e/o lesioni gravi.
Sicurezza dell'area di lavoro:
- Mantenere l'area di lavoro pulita e ben illuminata. Le aree disordinate o buie favoriscono gli incidenti.
- Non utilizzare utensili elettrici in atmosfere esplosive, come in presenza di liquidi, gas o polvere infiammabili. Gli utensili elettrici creano scintille che possono incendiare la polvere o i fumi.
- Tenere lontani bambini e astanti mentre si utilizza un elettroutensile. Le distrazioni possono causare la perdita del controllo.
Sicurezza elettrica:
- Le spine degli utensili elettrici devono essere adatte alla presa. Non modificare mai la spina in alcun modo.
- Evitare il contatto del corpo con superfici messe a terra o collegate a massa, come tubi, radiatori, fornelli e frigoriferi. C'è un rischio maggiore di scosse elettriche se il corpo è collegato a massa o collegato a massa.
- Non esporre gli utensili elettrici alla pioggia o a condizioni di bagnato. L'ingresso di acqua in un utensile elettrico aumenta il rischio di scosse elettriche.
Sicurezza personale:
- Indossare sempre protezioni per gli occhi. Utilizzare occhiali di sicurezza, maschere o una visiera.
- Indossare protezioni acustiche quando si utilizza l'utensile per periodi prolungati.
- Vestiti in modo appropriato. Non indossare abiti larghi o gioielli. Tieni i capelli e gli abiti lontani dalle parti in movimento.
- Siate vigili, fate attenzione a ciò che fate e usate il buon senso quando utilizzate un elettroutensile.
3. Componenti del prodotto
Familiarize yourself with the components of your Ingco Rotary Hammer Drill before operation.
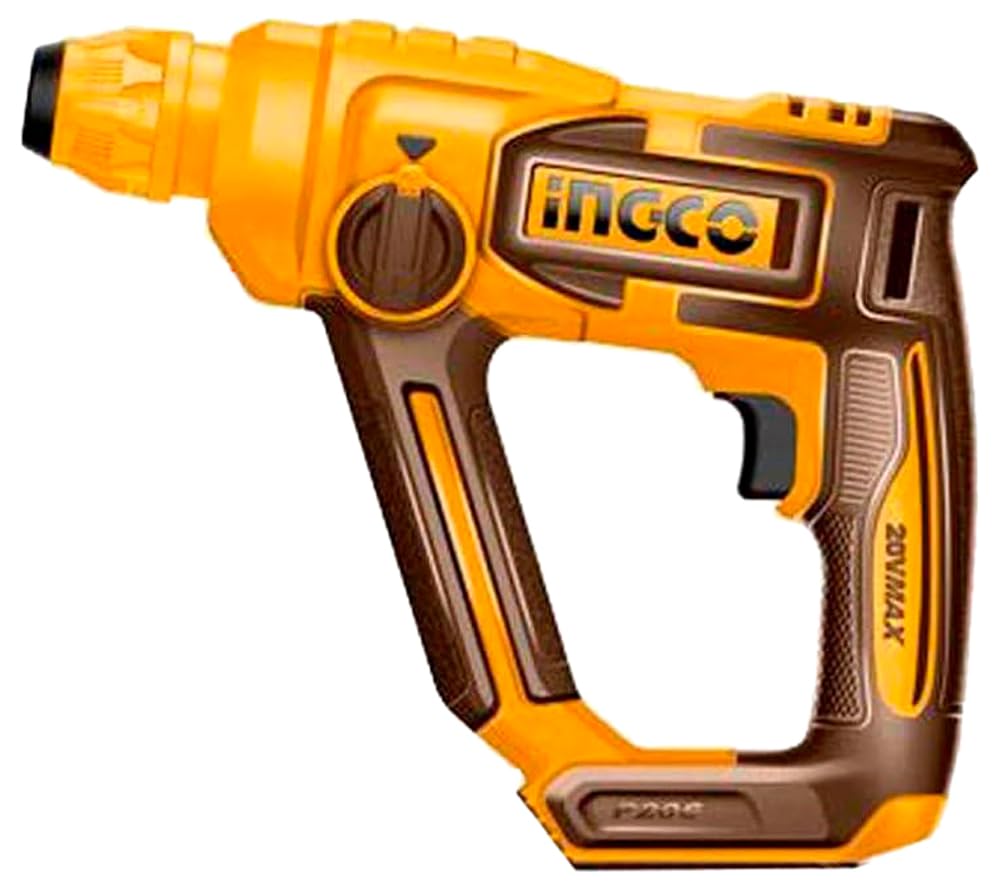
Figura 1: Ingco 20V Lithium-Ion Rotary Hammer Drill CRHLI20168. This image shows the main body of the rotary hammer drill, including the handle, chuck, and battery slot. The tool is yellow and black.
- Mandrino: Per tenere punte da trapano e scalpelli.
- Selettore di modalità: To select drilling, hammer drilling, or chiseling mode.
- Interruttore a grilletto: Attiva lo strumento e ne controlla la velocità.
- Interruttore avanti/indietro: Cambia la direzione di rotazione.
- Maniglia ausiliaria: Fornisce maggiore presa e controllo.
- Profondimetro: For setting drilling depth.
- Batteria: 20V Lithium-Ion battery (sold separately or included in kit).
- Luce da lavoro a LED: Illumina l'area di lavoro.
4. Impostazione
4.1 Installazione e ricarica della batteria:
- Ensure the battery pack is fully charged before first use. Refer to the battery charger manual for charging instructions.
- To install the battery, align the battery pack with the receptacle on the tool handle and slide it in until it clicks into place.
- Per rimuovere la batteria, premere il pulsante di rilascio della batteria e far scorrere il pacco batteria verso l'esterno.
4.2 Bit Installation:
- Prima di sostituire le punte, assicurarsi sempre che l'utensile sia spento e che la batteria sia stata rimossa.
- Pull back the chuck sleeve and insert the SDS-Plus drill bit or chisel into the chuck.
- Ruotare leggermente la punta finché non si innesta nel meccanismo di bloccaggio.
- Release the chuck sleeve. Pull on the bit to ensure it is securely locked. A slight axial play is normal for SDS-Plus systems.
- To remove the bit, pull back the chuck sleeve and pull the bit out.
4.3 Auxiliary Handle and Depth Gauge Adjustment:
- Allentare la maniglia ausiliaria ruotandola in senso antiorario.
- Regolare la maniglia in una posizione comoda e sicura.
- Inserire il calibro di profondità nel foro sull'impugnatura ausiliaria.
- Set the desired drilling depth by sliding the depth gauge.
- Tighten the auxiliary handle by twisting it clockwise to secure both the handle and the depth gauge.
5. Istruzioni per l'uso
5.1 Selezione della modalità operativa:
Ruotare il selettore di modalità per scegliere la funzione appropriata:
- Modalità di perforazione (simbolo di perforazione): Per forare legno, metallo e plastica senza percussione.
- Hammer Drilling Mode (Hammer and Drill Symbol): For drilling in concrete, brick, and masonry with hammer action.
- Chiseling Mode (Chisel Symbol): For light chiseling work. The rotation is disengaged, allowing only hammer action.
5.2 Avviamento e arresto:
- Per avviare l'utensile, premere l'interruttore a grilletto.
- Per arrestare l'utensile, rilasciare l'interruttore a grilletto.
- The integrated LED work light will illuminate when the trigger is pressed.
5.3 Speed Control and Direction:
- The tool features variable speed control. Press the trigger switch gently for lower speeds and harder for higher speeds.
- Use the forward/reverse switch to change the rotation direction. Ensure the tool is completely stopped before changing direction.
5.4 Drilling Tips:
- Fissare sempre il pezzo in lavorazione.
- Applicare una pressione costante e uniforme. Non forzare l'utensile.
- Per i fori profondi, estrarre periodicamente la punta per rimuovere i detriti.
- When drilling into hard materials, use appropriate drill bits and consider cooling the bit with water if necessary.
6. Manutenzione
Una manutenzione regolare garantisce prestazioni ottimali e prolunga la durata del tuo utensile.
- Pulizia: After each use, clean the tool with a soft cloth. Do not use harsh chemicals or abrasive cleaners. Keep ventilation openings clear of dust and debris.
- Manutenzione del mandrino: Periodically clean the chuck and apply a small amount of grease to the SDS-Plus shank of your bits to ensure smooth operation and prevent wear.
- Cura della batteria: Conservare le batterie in un luogo fresco e asciutto. Non conservare batterie completamente scariche per periodi prolungati.
- Ispezione: Regularly inspect the tool for any signs of damage, loose screws, or worn parts. If any damage is found, have the tool repaired by a qualified service technician before further use.
7. Risoluzione Dei Problemi
Questa sezione affronta i problemi più comuni che potresti riscontrare con il tuo trapano a percussione rotativo.
| Problema | Possibile causa | Soluzione |
|---|---|---|
| Lo strumento non si avvia. | Batteria non installata correttamente o scarica. | Assicurarsi che la batteria sia completamente inserita. Caricare la batteria. |
| Potenza o prestazioni ridotte. | Battery low or bit is dull/worn. | Recharge or replace battery. Replace or sharpen the drill bit. |
| Vibrazioni o rumori eccessivi. | Loose bit or damaged internal components. | Ensure bit is securely locked. If problem persists, discontinue use and contact service. |
| Bit gets stuck in workpiece. | Incorrect drilling technique or hitting rebar. | Use appropriate pressure. If hitting rebar, reposition the drill. Use reverse function to extract. |
8. Specifiche
| Caratteristica | Valore |
|---|---|
| Marca | Ingco |
| Modello | CRHLI20168 |
| Fonte di alimentazione | Alimentato a batteria |
| Voltage | 20V |
| Velocità a vuoto | 0-850 giri/min |
| Tasso di impatto | 0-5100 battiti al minuto |
| Tipo di trapano | Trapano a percussione |
| Caratteristiche speciali | Cordless, Battery-powered, Built-in LED work light |
| Materiale | Metallo |
| Colore | Giallo |
| Componenti inclusi | Tools (refer to product packaging for specific inclusions) |
9. Garanzia e supporto
Ingco products are manufactured to high-quality standards. For information regarding the standard manufacturer's warranty, please refer to the warranty card included with your product or visit the official Ingco websito. Conserva la ricevuta d'acquisto come prova d'acquisto.
For technical support, spare parts, or service inquiries, please contact your local Ingco dealer or authorized service center. Contact information can typically be found on the Ingco official websito o sulla confezione del prodotto.
Extended protection plans may be available from third-party providers. These plans are separate from the manufacturer's warranty and their terms and conditions should be reviewed directly with the provider.