
1. Introduzione
Thank you for choosing the Roadtime Cordless Caulking Gun, Model JY51. This tool is designed for efficient and precise application of sealants and adhesives from 300ml cartridges. Featuring a wireless design, 4 adjustable speeds, and an integrated LED light, it is ideal for various sealing, filling, caulking, and insulation tasks around doors, windows, bathtubs, and air conditioning openings. This manual provides essential information for safe and effective use of your caulking gun.

Image: The Roadtime Cordless Caulking Gun being used for filling wall gaps, woodworking, shower/washbasin installation, and tile repair, demonstrating its wide range of applications.
2. Istruzioni di sicurezza
Always follow basic safety precautions when using power tools to reduce the risk of injury. This tool is designed for use with Makita 18V batteries (not included).
- Leggi tutte le istruzioni: Before operating the tool, read and understand all safety warnings and instructions in this manual.
- Indossare dispositivi di sicurezza adeguati: Indossare sempre occhiali e guanti di sicurezza.
- Mantenere pulita l'area di lavoro: Le aree disordinate provocano incidenti.
- Evitare l'avvio accidentale: Ensure the trigger is not engaged before installing the battery or cartridge.
- Use correct battery: Only use Makita 18V batteries compatible with this tool.
- Secure the cartridge: Ensure the sealant cartridge is properly seated and secured before operation.
- Prevent unintended discharge: The tool features a push rod lock to prevent accidental dispensing. Always engage the lock when not in use.
- Conservare correttamente: Conservare l'utensile in un luogo asciutto e sicuro, fuori dalla portata dei bambini.
3. Prodotto finitoview e Caratteristiche principali
The Roadtime Cordless Caulking Gun JY51 offers a robust design with several features for enhanced performance and user convenience.
- Design senza fili: Provides unrestricted mobility for working in various locations.
- Makita 18V Battery Compatibility: Designed to work with Makita 18V B-series lithium batteries (e.g., BL1830, BL1840, BL1850, BL1850B, BL1860, BL1860B). Nota: la batteria non è inclusa.
- 4 velocità regolabili: Allows precise control over sealant extrusion, with speeds up to 196 mm/min and a pressure force of up to 2500 N.
- Luce LED integrata: Illuminates the work area, improving visibility in dimly lit spaces.
- Funzione antigoccia: Features an automatic reset system that retracts the push rod slightly when the trigger is released, minimizing sealant drip.
- Push Rod Lock: A separate lock mechanism prevents accidental activation of the push rod.
- Costruzione durevole: Made with high-quality metal parts for drop, abrasion, and corrosion resistance, ensuring a long service life.

Image: A detailed diagram of the caulking gun showing its gear sleeve latch, four-speed adjustment, trigger buttons, toggle switches, and LED light, along with overall dimensions (40cm/15.74inch length, 23cm/9.05inch height, 22cm/8.66inch catheter length).
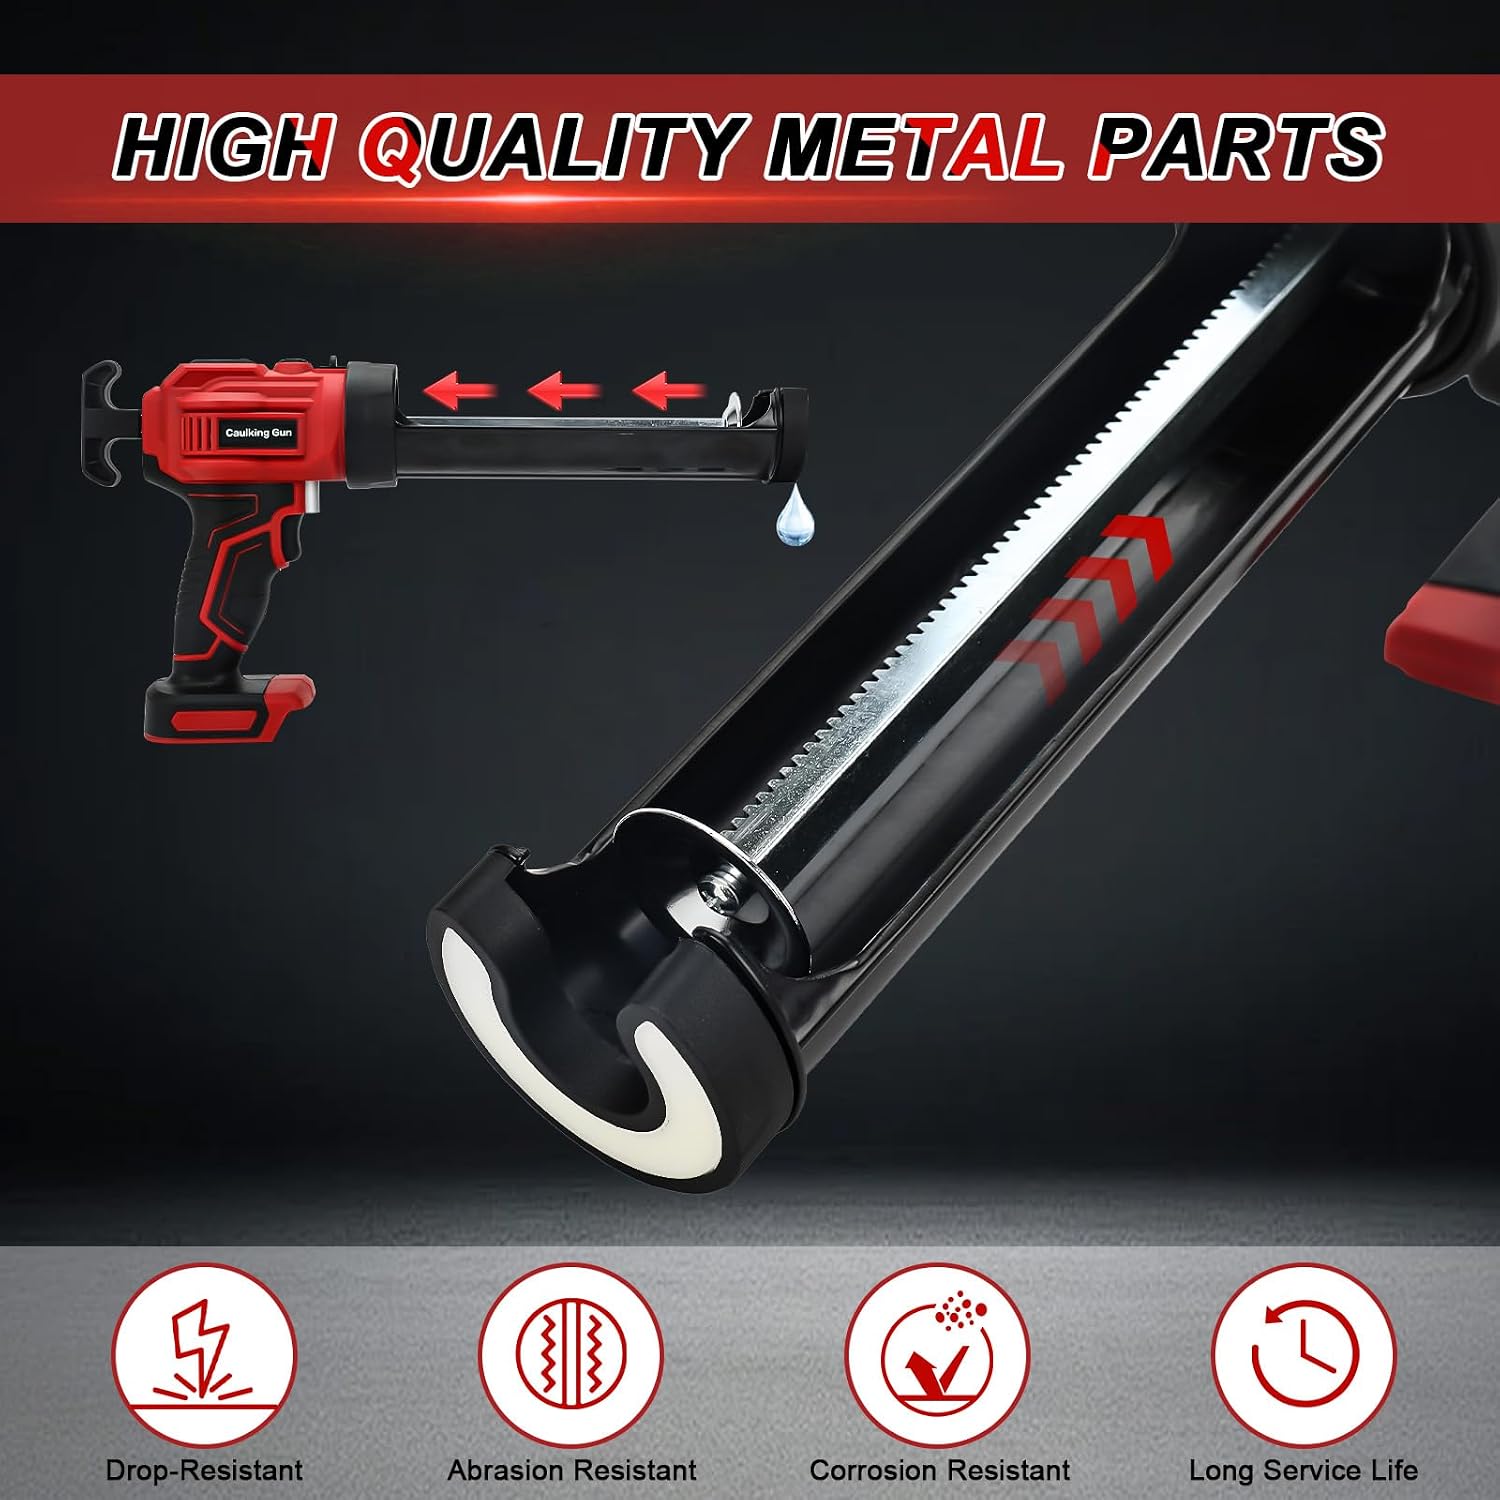
Immagine: un primo piano view illustrating the high-quality metal components of the caulking gun and the anti-drip feature, emphasizing its durability and precision.
4. Impostazione
Una corretta configurazione garantisce prestazioni e sicurezza ottimali.
- Installare la batteria:
- Ensure the caulking gun is turned off and the trigger is not engaged.
- Align the Makita 18V battery (e.g., BL1830, BL1840, BL1850, BL1850B, BL1860, BL1860B) with the battery port at the base of the tool.
- Far scorrere la batteria in posizione finché non scatta in modo sicuro.

Image: An illustration detailing the compatibility of the caulking gun with various Makita 18V B-series lithium batteries, and explicitly stating incompatibility with G-series and Ni-CD batteries.
- Caricare la cartuccia:
- Press the gear sleeve latch to retract the push rod fully.
- Prepare your 300ml sealant cartridge by cutting the tip of the nozzle to the desired bead size and puncturing the inner seal if necessary.
- Insert the cartridge into the gun's barrel, ensuring the nozzle faces forward and the base of the cartridge rests against the push rod.
- Release the gear sleeve latch to secure the cartridge.

Image: A hand demonstrating the process of loading a standard 300ml (10 oz) sealant cartridge into the caulking gun, highlighting the tool's capacity.
5. Istruzioni per l'uso
Follow these steps for effective and controlled sealant application.
- Seleziona velocità:
- Use the four-speed adjustment dial located on the rear of the tool to select the desired extrusion speed. Start with a lower speed for precise work and increase as needed.
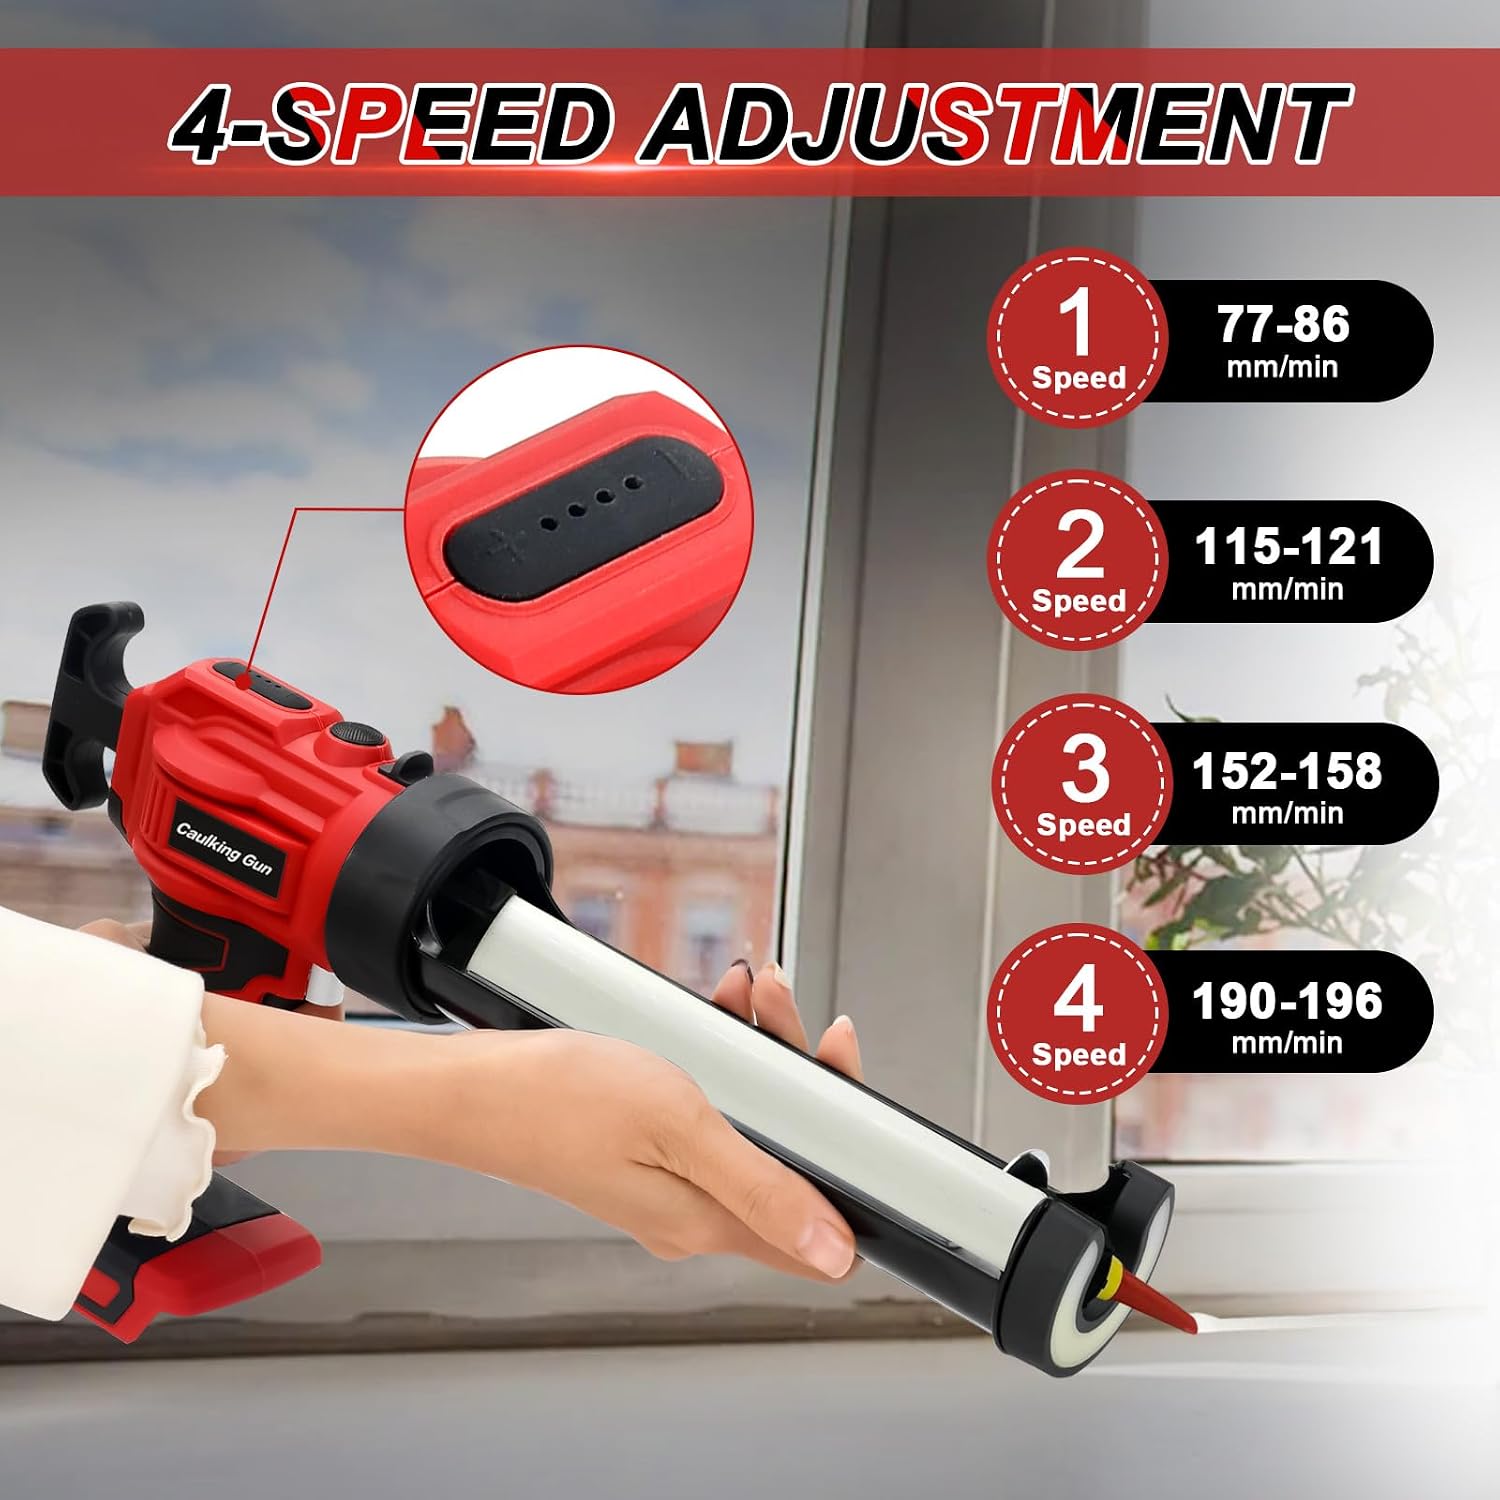
Image: A visual guide to the 4-speed adjustment dial, indicating the extrusion rates for each speed setting: Speed 1 (77-86 mm/min), Speed 2 (115-121 mm/min), Speed 3 (152-158 mm/min), and Speed 4 (190-196 mm/min).
- Attiva la luce LED:
- Press the dedicated LED light button to illuminate your work area. This is particularly useful in dark or confined spaces.

Image: A close-up shot demonstrating the built-in LED light in action, effectively illuminating details in a shadowed work area, enhancing visibility during application.
- Applicare il sigillante:
- Position the nozzle at the starting point of your application.
- Press the trigger to begin sealant extrusion. Maintain a consistent speed and angle for an even bead.
- When you release the trigger, the anti-drip function will automatically retract the push rod slightly to prevent excess sealant from dripping.

Image: The caulking gun applying a bead of sealant, with a visual indicator of the anti-drip function preventing excess material from flowing after the trigger is released.
- Engage Push Rod Lock:
- After use, or when moving the tool, engage the push rod lock to prevent accidental discharge.
6. Manutenzione
Regular maintenance ensures the longevity and optimal performance of your caulking gun.
- Pulizia: After each use, remove the sealant cartridge. Clean any excess sealant from the nozzle, barrel, and push rod using an appropriate solvent for the type of sealant used.
- Ispezione: Periodically inspect the tool for any signs of wear, damage, or loose parts. Ensure the gear sleeve latch and push rod lock function correctly.
- Magazzinaggio: Store the tool in a clean, dry environment, away from direct sunlight and extreme temperatures. Remove the battery before long-term storage.
- Lubrificazione: Lightly lubricate the push rod mechanism occasionally with a silicone-based lubricant to ensure smooth operation.
7. Risoluzione Dei Problemi
If you encounter issues with your caulking gun, refer to the following common problems and solutions.
| Problema | Possibile causa | Soluzione |
|---|---|---|
| Lo strumento non si accende | Batteria non installata correttamente o scarica. | Assicurarsi che la batteria sia completamente carica e correttamente inserita. |
| No sealant extrusion | Cartridge empty, nozzle blocked, or inner seal not punctured. | Replace cartridge, clear nozzle, or puncture inner seal. |
| Uneven sealant bead | Incorrect speed setting or inconsistent application technique. | Adjust speed, practice consistent movement, or check nozzle cut. |
| Sealant dripping after release | Anti-drip mechanism obstructed or malfunction. | Clean push rod and mechanism. If problem persists, contact support. |
8. Specifiche
| Caratteristica | Dettaglio |
|---|---|
| Numero di modello | JY51 |
| Marca | Roadtime |
| Compatibilità della batteria | Makita 18V B-series (Battery not included) |
| Dimensioni della cartuccia | 300 ml (10 once) |
| Forza di pressione | Fino a 2500N |
| Impostazioni di velocità | 4 adjustable speeds (up to 196 mm/min) |
| Luce LED | SÌ |
| Funzione anti-goccia | SÌ |
| Lunghezza utensile | Circa 40 cm (15.74 pollici) |
| Tool Height | Circa 23 cm (9.05 pollici) |
9. Garanzia e supporto
Information regarding specific warranty terms and customer support for the Roadtime Cordless Caulking Gun JY51 is not available in the provided product details. Please refer to the retailer or your purchase documentation for warranty details and contact information for support.