vLinker vLinker FS USB
Manuale di istruzioni dell'adattatore USB OBD2 vLinker FS
Model: vLinker FS USB | Brand: vLinker
1. Introduzione e oltreview
The vLinker FS USB OBD2 Adapter is a professional-grade diagnostic tool designed for automotive enthusiasts and professionals. It specializes in working with FORScan software and provides advanced diagnostic and programming capabilities for various vehicle makes, particularly Ford, Lincoln, Mazda, and Mercury vehicles.
This manual provides detailed instructions for setting up, operating, maintaining, and troubleshooting your vLinker FS USB adapter to ensure optimal performance and safe usage.
2. Caratteristiche del prodotto
- FORScan Optimization: Specifically designed and recommended by the FORScan Team for reliable connection and high-speed data transfer.
- Connessione veloce e stabile: Achieves 3Mpbs transmission rate and 3Mhz baud rate via USB 2.0/3.0, ensuring smooth data flow without dropped packets or corruption.
- Automatic Electronic Switching: Seamlessly switches between HS-CAN, MS-CAN, and Ford Car networks, allowing simultaneous access to all CAN buses.
- FEPS 18V Programming Voltage Uscita: Supports advanced programming functions within FORScan.
- Battery Saver and Protection: Features auto sleep/wake-up mode, over-voltage, over-current, over-temperature, and battery drain protection, allowing the device to remain plugged in safely.
- Ampia compatibilità con i veicoli: Supports all 12V/24V OBD2 standard compliant cars (99% of models after 2000, 92% after 1996 in USA; 12V gasoline after 2000, 12V diesel after 2004 in EU).
- Funzioni OBD2 complete: Capable of reading/clearing fault codes, accessing live data, I/M readiness, on-board monitor tests, O2 sensor tests, vehicle information, component tests, and freeze frame data.
- Support for Third-Party Apps: Compatible with FORScan, ELMconfig, ELM FF2, FoCCCus, and other OBD2 applications (apps not included).

Figure 2.1: The vLinker FS USB OBD2 Adapter with its integrated USB cable.

Figure 2.2: Diagram illustrating the automatic electronic switching capability between HS-CAN and MS-CAN, along with hacker-proof, battery saver, and overvoltage caratteristiche di protezione.
3. Specifiche
| Attributo | Valore |
|---|---|
| Marca | Linker |
| Modello | vLinker FS USB |
| Fonte di alimentazione | Elettrico con cavo |
| Dimensioni del prodotto | 3.61 cm L x 1.76 cm P x 0.85 cm A |
| Compatibilità del sistema operativo | Finestre |
| Peso dell'articolo | 3.88 once |
| Tasso di trasmissione | Fino a 3 Mpbs |
| Velocità in baud | Fino a 3 MHz |
| Buffer seriale | 8192 byte |
| Byte di richiesta OBD | Fino a 4128 byte |
4. Configurazione e installazione
4.1 Contenuto della confezione
Prima di procedere, assicurati che tutti gli articoli siano presenti nella confezione:
- 1 x vLinker FS USB Adapter
- 1 x Manuale utente (questo documento)
- 1 x scatola di imballaggio
4.2 Installazione di driver e software
- Download FTDI USB Driver: Navigate to the official FTDI webposto (www.ftdichip.com). Go to the "DRIVERS" section and select "VCP Drivers". Download the appropriate USB driver for your Windows operating system.
- Installa il driver USB: Follow the on-screen instructions to install the downloaded FTDI USB driver.
- Download Diagnostic Application: Download your preferred OBD2 diagnostic application (e.g., FORScan, ELMconfig, ELM FF2, FoCCCus) compatible with Windows. These applications are not included with the vLinker FS USB adapter and may require separate purchase or download.

Figure 4.1: Steps for downloading the FTDI driver and a compatible diagnostic application.
4.3 Connecting the Adapter to Your Vehicle and Computer
- Individuare la porta OBD2: Identify the OBD2 diagnostic port in your vehicle. This port is typically located under the dashboard on the driver's side.
- Collegare l'adattatore al veicolo: Firmly plug the vLinker FS USB adapter into your vehicle's OBD2 port.
- Collegare l'adattatore al computer: Plug the USB end of the vLinker FS USB adapter into an available USB port on your Windows PC.
- Accendere l'accensione: Turn your vehicle's ignition to the "ON" position (engine does not need to be running for most diagnostic functions).
Figure 4.2: Illustration of connecting the vLinker FS USB adapter to the vehicle's OBD2 port and a computer, followed by turning the ignition on.
5. Istruzioni per l'uso
5.1 Funzioni diagnostiche di base
Once the vLinker FS USB adapter is connected and recognized by your computer and diagnostic software, you can perform various functions:
- Leggi i codici: Retrieve Diagnostic Trouble Codes (DTCs) from the vehicle's Engine Control Unit (ECU).
- Cancella codici: Clear DTCs from the ECU. Note that clearing codes does not fix the underlying issue.
- Flusso di dati: View real-time sensor data and parameters from the vehicle.
- Prontezza I/M: Controllare lo stato dei monitor relativi alle emissioni per determinare se il veicolo è pronto per un test sulle emissioni.
- Test del monitor di bordo: Accedi ai risultati dei test di monitoraggio diagnostico di bordo per componenti/sistemi specifici.
- Test sensore O2: Recupera i risultati del test di monitoraggio del sensore O2.
- Informazioni sul veicolo: Display vehicle information such as VIN (Vehicle Identification Number), CID (Calibration ID), and CVN (Calibration Verification Number).
- Prova dei componenti: Perform specific tests on vehicle components as supported by your diagnostic software.
- Cornice di congelamento: View un'istantanea delle condizioni operative del veicolo al momento dell'impostazione del codice di errore.

Figura 5.1: Oltreview of the full OBD2 functions supported by the vLinker FS USB adapter.
5.2 Advanced Functions (FORScan Specific)
For users utilizing FORScan, the vLinker FS USB adapter unlocks advanced capabilities:
- Configurazione e programmazione del modulo: Modify vehicle settings and program new modules.
- Attivazione funzione nascosta: Enable or disable various vehicle features (e.g., global window open/close, secure idle, turn signal flash count, disabled door ajar chime, reverse tilt mirrors, Bambi mod, tire size correction, heated steering wheel, disabled double horn honk, perpendicular park assist).
- Access to All CAN Buses: Simultaneously access HS-CAN, MS-CAN, and Ford Car networks without manual switching.
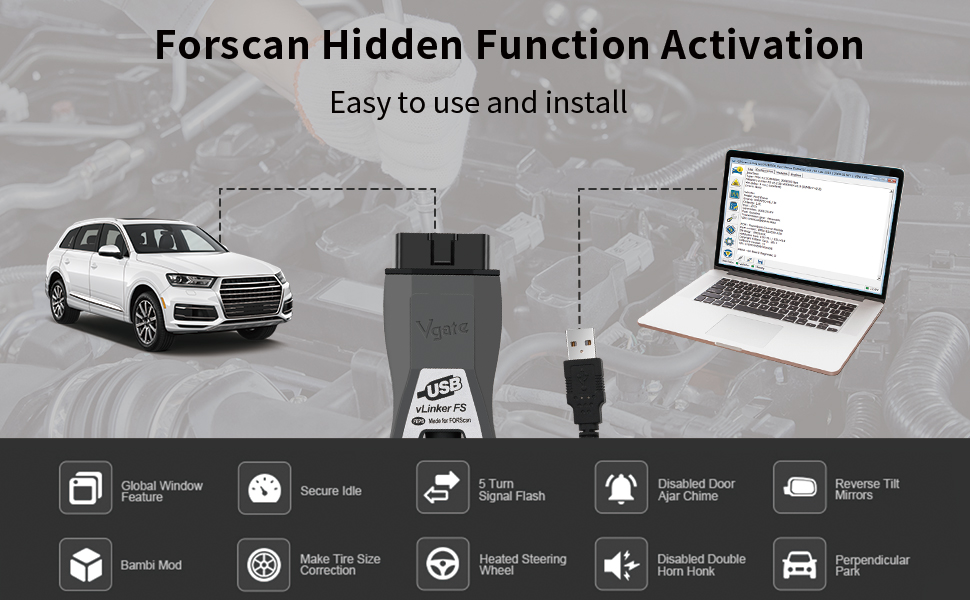
Figura 5.2: Esample of FORScan hidden function activation using the vLinker FS USB adapter.
6. Manutenzione
6.1 Aggiornamenti firmware
To ensure optimal performance and access to the latest features, it is recommended to keep the vLinker FS USB firmware updated. Firmware updates are free for the lifetime of the product.
- Collegare l'adattatore: Connect the vLinker FS USB adapter to your computer via USB.
- Identifica la porta COM: Open your computer's Device Manager and identify the COM port assigned to the vLinker FS USB.
- Launch Update Tool: Use the official vLinker firmware update tool (downloadable from the official webposto).
- Select COM Port and Baud Rate: In the update tool, select the identified COM port and set the default baud rate (e.g., 115200).
- Browse and Select Firmware File: Scarica l'ultimo firmware file from the official vLinker website. In the update tool, browse and select this firmware file.
- Inizia l'aggiornamento: Click the "Update" button to begin the firmware update process. During the update, the Blue (BT) light and Orange (Host) light on the adapter will remain on.
- Completamento: Once the update is complete, the Red (OBD) light and Orange (Host) light will turn off. Power cycle the device (unplug and replug) for changes to take effect.
Importante: If the update is interrupted or fails, unplug and replug the device, then re-attempt the update with the latest firmware from the official website. Pirated products cannot be updated.
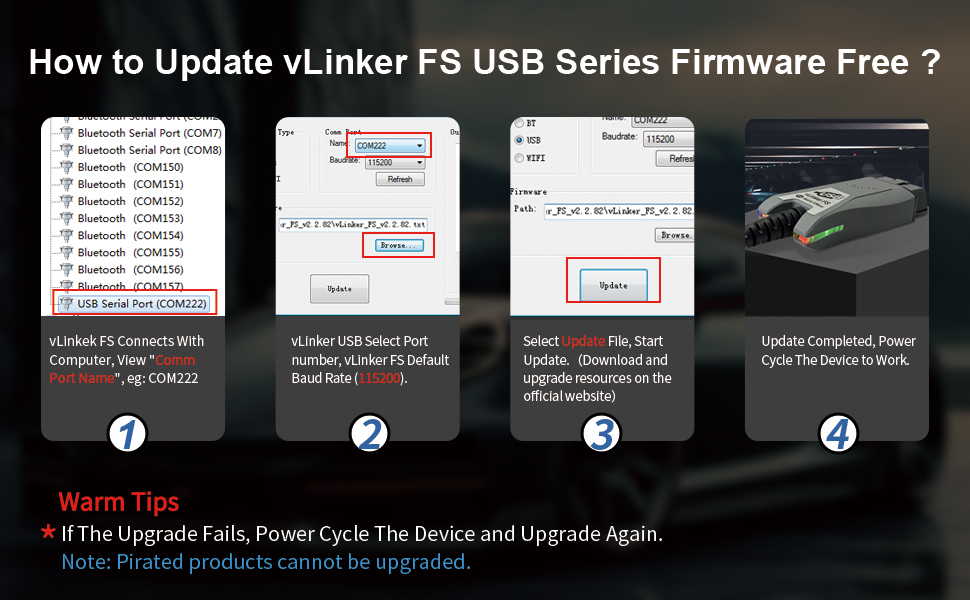
Figure 6.1: Step-by-step guide for updating the vLinker FS USB firmware.
6.2 Pulizia e conservazione
- Mantenere l'adattatore pulito e privo di polvere e detriti. Utilizzare un panno morbido e asciutto per la pulizia.
- Conservare l'adattatore in un luogo fresco e asciutto, lontano dalla luce solare diretta e da temperature estreme.
- Evitare di esporre il dispositivo all'umidità o a sostanze corrosive.
7. Risoluzione Dei Problemi
7.1 Problemi comuni e soluzioni
- Issue: Product does not light up after firmware update.
- Causa: The update process was interrupted or failed.
- Rimedio: Unplug and replug the device. Download the latest firmware from the official website and re-attempt the update.
- Issue: "USB not recognized" error message on computer.
- Causa: Some laptop models with USB 3.0 controllers may not be fully compatible, or the driver is not correctly installed.
- Rimedio:
- Connect the vLinker FS USB to a different USB port on your computer.
- Connect the vLinker FS USB via a USB 2.0 hub.
- Manually install the FTDI USB driver: Go to the official FTDI webposto (www.ftdichip.com), select "DRIVERS", click "VCP Drivers", and download the appropriate USB driver.
- Issue: Adapter not connecting to vehicle or software.
- Causa: Incorrect connection, ignition not on, or software configuration issues.
- Rimedio:
- Ensure the adapter is firmly plugged into the vehicle's OBD2 port and the computer's USB port.
- Verificare che l'accensione del veicolo sia in posizione "ON".
- Check your diagnostic software settings to ensure the correct COM port is selected for the vLinker FS USB.
- Confirm that the necessary drivers are installed correctly (refer to Section 4.2).
8. Garanzia e supporto
The vLinker FS USB car diagnostic scanner comes with a Garanzia di 1 anno dalla data di acquisto.
vLinker provides lifetime Firmware FREE updates to ensure your device remains up-to-date with the latest features and improvements.
For any technical assistance, troubleshooting, or inquiries, vLinker offers round-the-clock tech support. Should you encounter any issues, including failure to connect the device or other operational problems, please contact the vLinker support team. They are available to provide fast responses and technical assistance.
You can typically find contact information for support on the official vLinker websito o tramite il rivenditore presso il quale è stato acquistato il prodotto.
Ask a question about this manual
Ask about setup, troubleshooting, compatibility, parts, safety, or missing instructions. Manuals+ will review the question and use this page’s manual context to help answer it.