
EDM 33516
EDM Portable Air Conditioner Model 33516 User Manual
Modello: 33516 | Marca: EDM
Introduzione
Thank you for choosing the EDM Portable Air Conditioner Model 33516. This manual provides important information for the safe and efficient operation, maintenance, and troubleshooting of your new appliance. Please read this manual thoroughly before use and keep it for future reference.
Importanti istruzioni di sicurezza
- Leggere tutte le istruzioni prima di utilizzare l'apparecchio.
- Assicurare il volumetage indicated on the rating label matches your main power supply.
- Non immergere l'apparecchio, il cavo o la spina in acqua o altri liquidi.
- Sorvegliare i bambini per assicurarsi che non giochino con l'apparecchio.
- Scollegare dalla presa quando non in uso e prima di pulirlo.
- Non utilizzare alcun apparecchio con un cavo o una spina danneggiati oppure dopo che l'apparecchio stesso non funziona correttamente o è stato danneggiato in qualsiasi modo.
- Non utilizzare all'aperto.
- Non ostruire le aperture dell'aria.
- Posizionare l'unità su una superficie stabile e piana.
- Utilizzare solo acqua pulita nel serbatoio dell'acqua.
Prodotto finitoview
The EDM Portable Air Conditioner Model 33516 is a compact evaporative air cooler designed for personal and ambient climate control. It features a removable water tank, three speed settings, and integrated wheels for easy mobility.
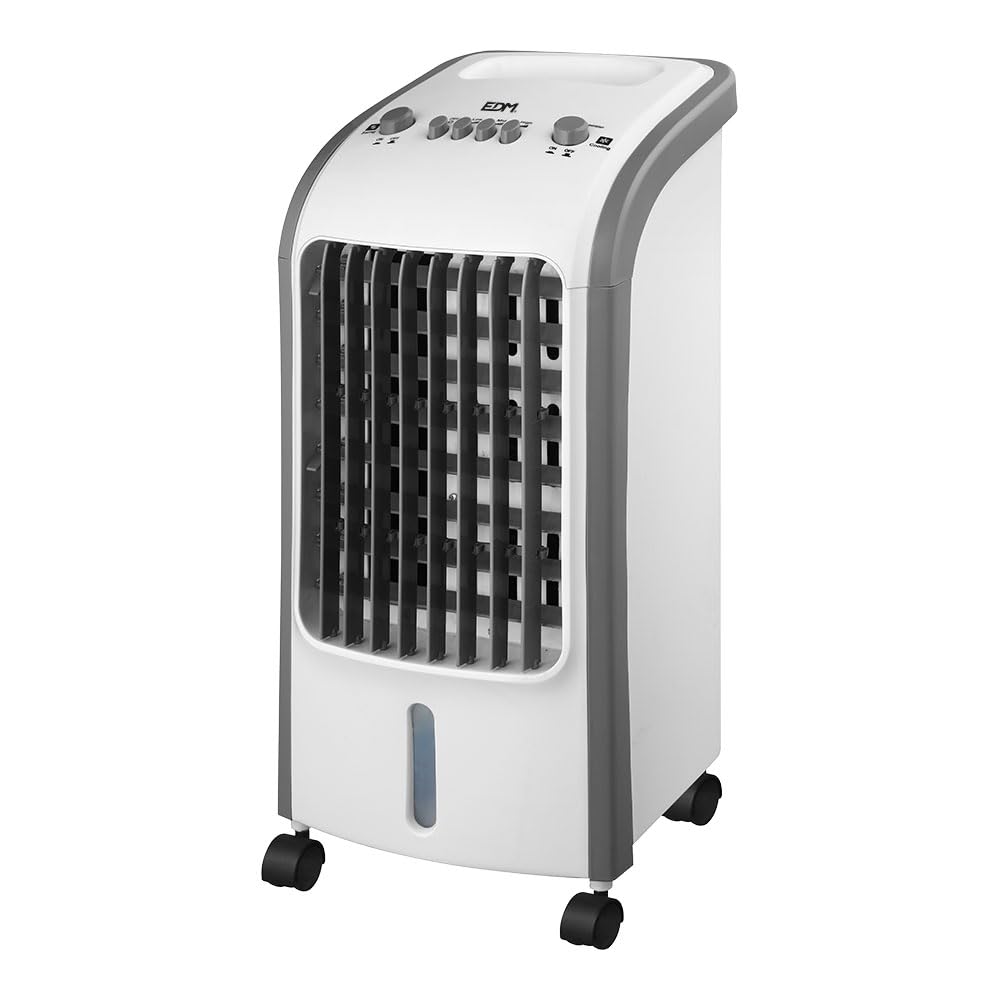
Figura 1: Davanti view of the EDM Portable Air Conditioner Model 33516. The unit is white and grey, with a front grille, control panel on top, and casters at the base.
Componenti:
- Pannello di controllo (in alto)
- Griglia di uscita dell'aria (anteriore)
- Water Tank (Bottom, removable)
- Casters (Base)
- Power Cord (Rear)
- Air Inlet Filter (Rear/Side)
Istruzioni di installazione
1. Disimballaggio e posizionamento
- Estrarre con cautela il condizionatore dall'imballaggio.
- Place the unit on a firm, level surface. Ensure there is at least 20 cm (8 inches) of clear space around the unit for proper airflow.
2. Riempimento del serbatoio dell'acqua
For cooling and humidification, the water tank must be filled with clean water.
- Estrarre delicatamente il serbatoio dell'acqua dalla parte inferiore dell'unità.
- Fill the tank with clean tap water. Do not exceed the "MAX" fill line.
- Carefully slide the water tank back into the unit until it clicks into place. Ensure it is securely seated to prevent leaks.

Figura 2: The removable water tank located at the bottom of the unit, shown partially pulled out for filling or cleaning.
3. Using Ice Packs (Optional)
For enhanced cooling, you can use the provided ice packs (or standard ice cubes) in the water tank.
- Freeze the ice packs thoroughly before use.
- After filling the water tank (as described above), place the frozen ice packs directly into the water tank.
- Chiudere saldamente il serbatoio dell'acqua.

Figura 3: Top left shows two blue ice packs next to the open water tank. These can be placed in the tank for colder air.
Istruzioni per l'uso
Ensure the unit is plugged into a 220-240V power outlet before operation.
Figura 4: Close-up of the control panel. Buttons include 'Swing ON/OFF', 'OFF', 'LOW', 'MID', 'HIGH' for fan speed, and 'Cool ON/OFF'.
Funzioni del pannello di controllo:
- OFF: Spegne l'unità.
- LOW / MID / HIGH: Selects the desired fan speed.
- Swing ON/OFF: Activates or deactivates the automatic oscillation of the air outlet louvers.
- Cool ON/OFF: Activates or deactivates the evaporative cooling function. This function requires water in the tank.
Funzionamento di base:
- Accensione: Press any of the speed buttons (LOW, MID, HIGH) to turn on the fan.
- Regola la velocità della ventola: Press the desired speed button (LOW, MID, HIGH).
- Attiva il raffreddamento: Press the "Cool ON/OFF" button. The unit will begin evaporative cooling. Ensure the water tank is filled.
- Attiva Swing: Press the "Swing ON/OFF" button to enable the automatic oscillation of the air louvers. Press again to stop.
- Spegni: Press the "OFF" button to turn off the unit.
Manutenzione
Regular cleaning and maintenance will ensure optimal performance and extend the lifespan of your air conditioner.
1. Pulizia dell'esterno
- Scollegare sempre l'unità prima di pulirla.
- Pulire le superfici esterne con un panno morbido, damp panno. Non usare detergenti abrasivi o solventi.
- Assicurarsi che non penetri acqua nel pannello di controllo o in altri componenti elettrici.
2. Pulizia del serbatoio dell'acqua
- Scollegare l'unità.
- Pull out the water tank (refer to Figure 2).
- Svuotare l'acqua rimanente.
- Pulire il serbatoio con un detergente delicato e risciacquare abbondantemente con acqua pulita.
- Lasciare asciugare completamente il serbatoio all'aria prima di reinserirlo nell'unità.
- Pulire regolarmente il serbatoio dell'acqua (ad esempio, settimanalmente) per prevenire la formazione di muffa e funghi.
3. Cleaning the Air Filter (Evaporative Pad)
The air filter/evaporative pad is located behind the rear grille. It should be cleaned periodically.
- Scollegare l'unità.
- Remove the rear grille (consult diagram if available, or gently unclip).
- Carefully remove the evaporative pad.
- Rinse the pad under running water to remove dust and mineral deposits. For heavy deposits, soak in a mild descaling solution (e.g., vinegar and water) before rinsing.
- Allow the pad to air dry completely before reinserting.
- Reattach the rear grille.
4. Conservazione
- If the unit will not be used for an extended period, empty and clean the water tank and evaporative pad thoroughly.
- Assicurarsi che tutte le parti siano asciutte.
- Conservare l'unità in un luogo fresco e asciutto, preferibilmente nella sua confezione originale.
Risoluzione dei problemi
| Problema | Possibile causa | Soluzione |
|---|---|---|
| L'unità non si accende. | Nessuna alimentazione elettrica. Cavo di alimentazione non collegato correttamente. | Controllare che l'unità sia collegata a una presa funzionante. Assicurarsi che il cavo di alimentazione sia collegato saldamente. |
| Nessuna aria fresca / Effetto di raffreddamento debole. | Il serbatoio dell'acqua è vuoto. "Cool" function is not activated. Evaporative pad is dirty or dry. L'umidità della stanza è troppo alta. | Riempire il serbatoio dell'acqua. Press the "Cool ON/OFF" button. Clean or moisten the evaporative pad. Evaporative coolers are less effective in high humidity. Consider ventilation. |
| Odore sgradevole. | Stagnant water or mold in the tank/pad. | Empty and clean the water tank and evaporative pad thoroughly. Use fresh water. |
| Perdita d'acqua. | Il serbatoio dell'acqua non è posizionato correttamente. Il livello dell'acqua supera la linea MAX. | Ensure the water tank is pushed in completely and securely. Non riempire eccessivamente il serbatoio dell'acqua. |
Se il problema persiste dopo aver verificato questi punti, contattare l'assistenza clienti.
Specifiche
| Numero di modello | 33516 |
| Marca | Elettroerosione a elettroni |
| Tipo | Raffreddatore ad aria evaporativo portatile |
| Energia | 80 L |
| Voltage | 220-240 V |
| Capacità del serbatoio dell'acqua | 3.6 litri |
| Velocità | 3 Speeds (Low, Mid, High) |
| Tipo di controllo | Pulsanti |
| Materiale | Plastica |
| Dimensioni (L x P x A) | 24 x 26 x 57 cm (circa) |
| Peso | 4.83 kg |
| Caratteristiche speciali | Removable water tank, With wheels, Swing function |
| Livello di rumore | 20 dB (tipico) |

Figura 5: Dimensional drawing of the unit, showing approximate measurements of 24 cm (depth), 26 cm (width), and 57 cm (height).
Garanzia e supporto
For warranty information or technical support, please refer to the warranty card included with your product or contact your retailer. Keep your proof of purchase for any warranty claims.
Documenti correlati33516

Ask a question about this manual
Ask about setup, troubleshooting, compatibility, parts, safety, or missing instructions. Manuals+ will review the question and use this page’s manual context to help answer it.