Introduzione
This manual provides detailed instructions for the safe and efficient operation, maintenance, and troubleshooting of your new VISLONE 100W Mini Table Saw. Please read this manual thoroughly before initial use to ensure proper handling and to maximize the lifespan of your tool. Keep this manual for future reference.
Informazioni sulla sicurezza
Dare sempre priorità alla sicurezza quando si utilizzano utensili elettrici. Il mancato rispetto di queste istruzioni può causare gravi lesioni o danni all'utensile.
- Leggi tutte le istruzioni: Familiarize yourself with the tool's functions and operating procedures before use.
- Indossare adeguati dispositivi di protezione individuale (DPI): Indossare sempre occhiali di sicurezza, protezioni acustiche e una maschera antipolvere. Evitare indumenti larghi o gioielli che potrebbero impigliarsi nelle parti in movimento.
- Garantire un ambiente di lavoro sicuro: Keep your work area clean, well-lit, and free from clutter. Do not operate the saw in damp o in condizioni di bagnato.
- Fissare il pezzo in lavorazione: Sempre clamp or secure the material being cut to prevent movement during operation.
- Tenere le mani libere: Never place hands near the saw blade while the tool is powered on or connected to power.
- Unplug when not in use or during maintenance: Always disconnect the power cord before changing blades, making adjustments, or performing any maintenance.
- Utilizzare la lama corretta: Ensure the saw blade is appropriate for the material being cut and is securely installed.
- Avoid forcing the tool: Allow the saw to cut at its own pace. Forcing it can lead to kickback or damage.
- Supervisionare i bambini: This tool is not a toy. Keep children and unauthorized persons away from the operating area.
Contenuto della confezione
Carefully unpack the box and ensure all items are present and undamaged. If any items are missing or damaged, contact customer support immediately.
- Mini Table Saw Unit
- Adattatore di alimentazione
- Cacciavite
- Wrenches (Hex Wrench)
- Mandrino per trapano
- Ruota in feltro
- Sponge Wheel
- Sticky Wheel
- Titanium-plated Emery Saw Blade
- Resin Saw Blade
- Steel Saw Blade
- Alloy Saw Blade
- Sanding Pieces
- Albero flessibile
- Pietre da rettifica
- Carte abrasive
- Ruote per lucidatura in feltro
- Sanding Slim Bands
- Bande di levigatura
- Dischi da taglio
- Small Sanding Papers
- Tamburi abrasivi
- Wheel Mandrel
- Felt Mandrel
- Stone Grinding Bits
- Spazzola
- Manuale dell'utente (questo documento)
Introduzione alla struttura
Familiarize yourself with the main components of the mini table saw:

Descrizione dell'immagine: This diagram illustrates the key parts of the mini table saw, including the safety bezel, miter fence, saw blade (lifting mechanism), switch, power socket, heat dissipation holes, cold rolled steel panel, miter gauge, dust collection port, and stainless steel feet.
- Safety Bezel: Transparent guard to protect against debris.
- Miter Fence: Adjustable guide for precise angle cuts.
- Saw Blade (Lifting): The cutting blade with an adjustable height mechanism.
- Interruttore: Pulsante di accensione/spegnimento.
- Presa di alimentazione: Punto di collegamento per l'adattatore di alimentazione.
- Foro di dissipazione del calore: Vents for cooling the motor.
- Cold Rolled Steel Panel: Durable and stable work surface.
- Calibro mitra: Scale for setting cutting angles.
- Porta di raccolta polvere: Presa per il collegamento di un sistema di aspirazione della polvere.
- Stainless Steel Feet: Anti-slip and shock-absorbing feet for stability.
Impostare
1. Ispezione iniziale
Before connecting to power, inspect the saw for any visible damage. Ensure all components are securely fastened.
2. Collegamento elettrico
Connect the provided power adapter to the power socket on the saw and then plug it into a suitable electrical outlet (240V). Ensure the power switch is in the 'OFF' position before plugging in.
3. Installing the Miter Fence
The miter fence is crucial for accurate cuts. Align the scales on both sides when installing the miter fence, then tighten the screws to secure it. This allows for precise 90-degree or 45-degree angle cutting.
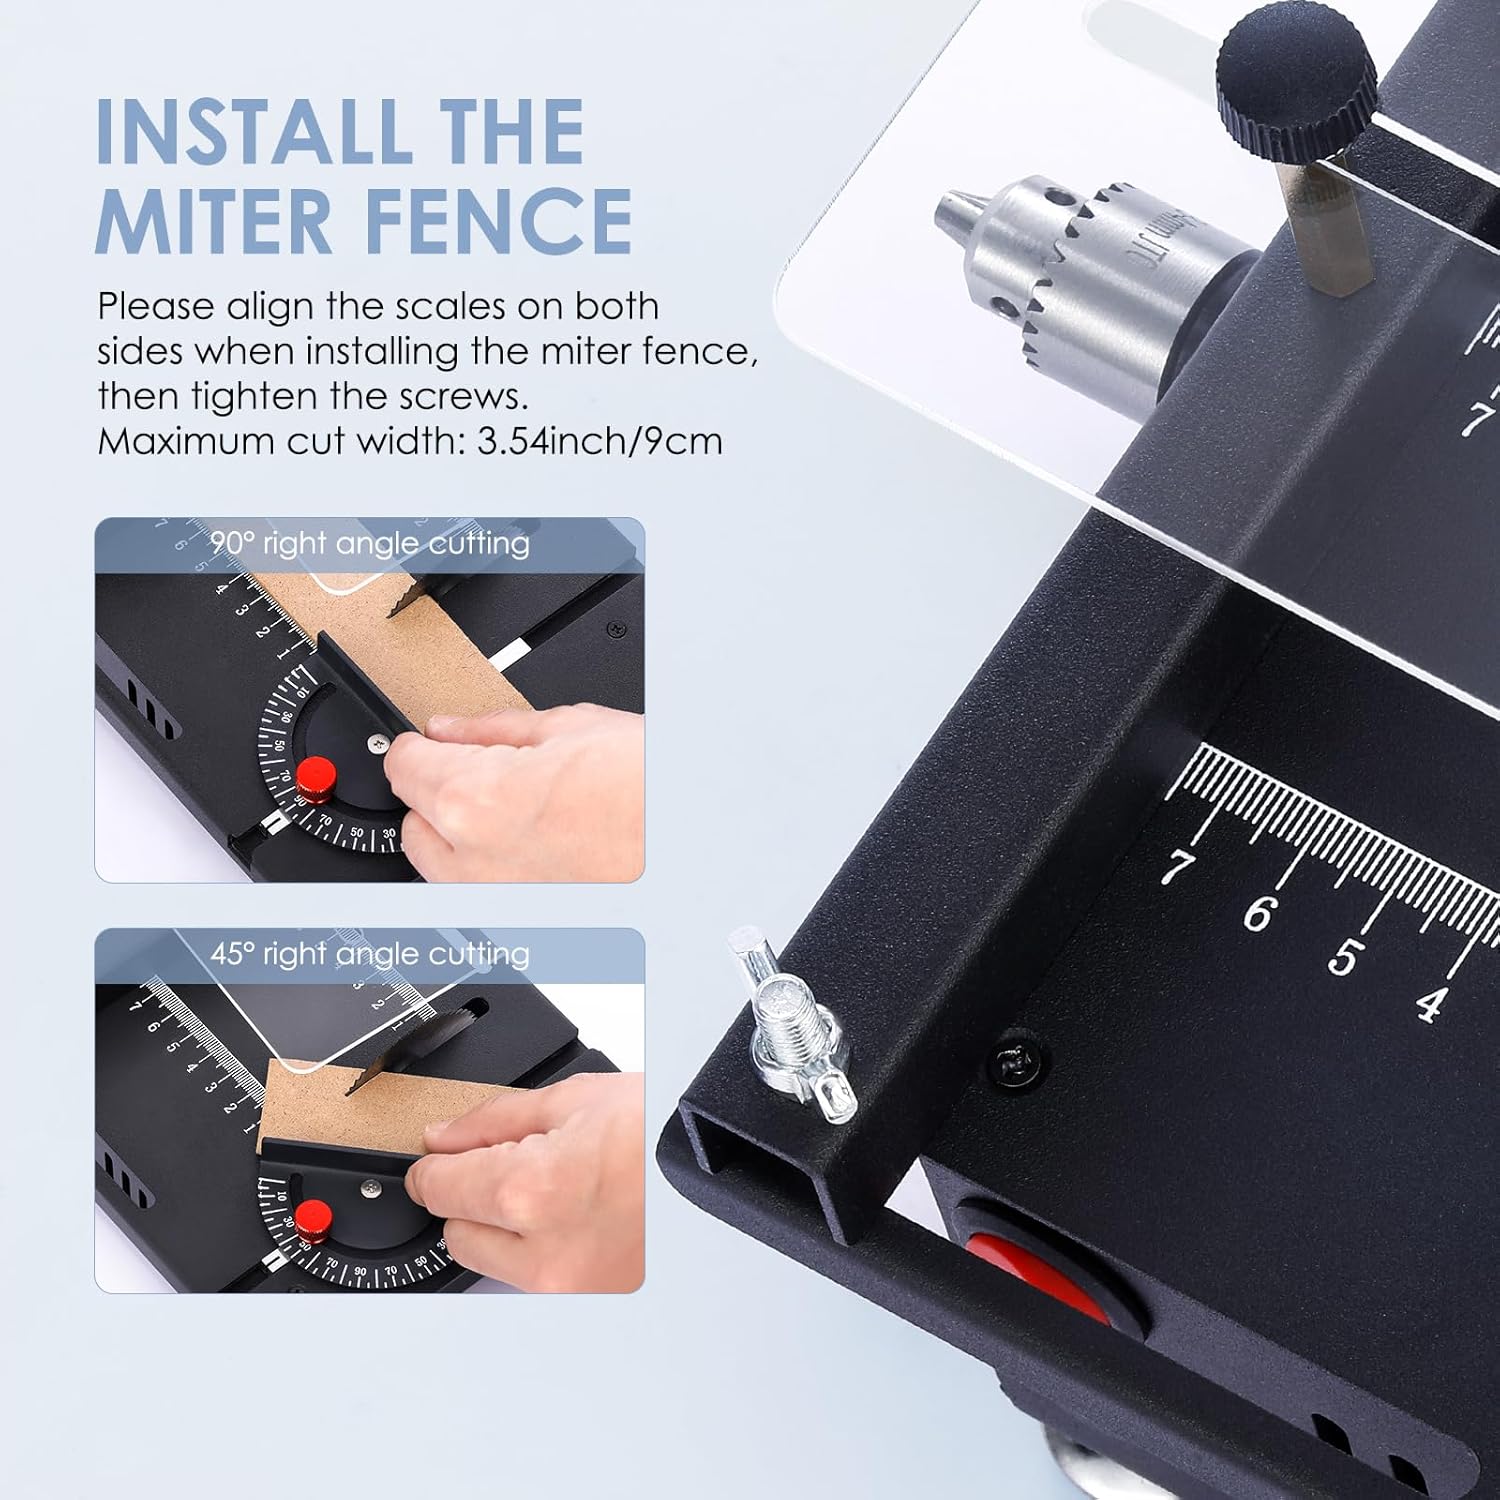
Descrizione dell'immagine: This image demonstrates how to install the miter fence, showing alignment with the scales for both 90-degree and 45-degree angle cutting. The maximum cut width is 3.54 inches (9 cm).
4. Adjusting Saw Blade Height
The saw blade's cutting depth can be adjusted from 0 to 16mm. Use the included hex wrench to adjust the blade height. Rotate clockwise to lift the blade and counter-clockwise to lower it. This allows for precise and flexible cutting operations.

Descrizione dell'immagine: This image highlights the adjustable saw blade mechanism, showing how to raise and lower the blade using a hex wrench. It also illustrates the accurate scale for precise measurements and the safety bezel.
Istruzioni per l'uso
1. Accensione/Spegnimento
To turn the saw on, press the red power switch. To turn it off, press the switch again.
2. Regolazione della velocità
The saw features a 7-speed adjustable motor with a maximum speed of 6000 RPM. Use the speed control dial to select the appropriate speed for your material and cutting task. Lower speeds are generally better for harder materials or more precise cuts, while higher speeds are suitable for softer materials.
3. Regolazione della profondità e dell'angolo di taglio
As mentioned in the setup, the cutting depth can be adjusted using the hex wrench. The cutting angle can be adjusted from 0° to 90° using the miter gauge. Ensure both are set correctly and securely before beginning a cut.
4. Material Compatibility and Blade Selection
This mini table saw is designed for small items and is suitable for materials such as PCB boards, wooden sticks, plastic sheets, thin wooden boards, cans, copper-clad panels, aluminum tubes, and copper tubes. Select the appropriate saw blade from the included accessories for the material you are cutting:
- Lame per il taglio di PCB: For circuit boards.
- Lame per seghe in acciaio rapido: General purpose for wood and plastic.
- Lame per seghe in lega: For harder materials.
- Lame per seghe in resina: For specific cutting needs, often for metal or stone.

Descrizione dell'immagine: This image displays four different types of circular saw blades: a titanium-plated emery saw blade, a high-speed steel saw blade, an alloy saw blade, and a resin saw blade, each suitable for different materials.
5. Using the Flexible Shaft
The flexible shaft extends the functionality of your table saw, allowing for detailed grinding, polishing, and drilling. It can hold drilling heads with a shank diameter of 0.5-3.2mm.

Descrizione dell'immagine: This image shows the flexible shaft attachment in use, demonstrating its capability to hold various grinding heads for detailed work, such as polishing a small stone.

Descrizione dell'immagine: This image provides a close-up of the precision drill chuck, highlighting its clamping range of 1.5-10mm, and shows various attachments like sanding drums, brushes, and polishing wheels that can be used with it.
Manutenzione
Regular maintenance ensures the longevity and optimal performance of your mini table saw.
- Pulizia: After each use, unplug the saw and use a brush or compressed air to remove sawdust and debris from the motor vents, blade area, and work surface.
- Cura della lama: Inspect blades for wear, damage, or dullness. Replace dull or damaged blades immediately. Clean resin and pitch buildup from blades using a suitable blade cleaner.
- Lubrificazione: Periodically apply a small amount of light machine oil to moving parts, such as the blade lifting mechanism, to ensure smooth operation.
- Magazzinaggio: Store the saw in a clean, dry place, away from direct sunlight and extreme temperatures.
- Ispezione del cavo: Regularly check the power cord for any cuts, fraying, or damage. Do not use the saw if the cord is damaged.
Risoluzione dei problemi
If you encounter issues with your mini table saw, refer to the following common problems and solutions:
| Problema | Possibile causa | Soluzione |
|---|---|---|
| La sega non si accende | No power supply; Loose connection; Faulty switch | Check power outlet and cord connection; Ensure switch is fully engaged; Contact support if switch is faulty. |
| La lama non taglia in modo efficiente | Dull or incorrect blade; Material too hard; Insufficient speed | Replace blade or use appropriate blade for material; Ensure material is within saw's capacity; Increase speed setting. |
| Vibrazione o rumore eccessivi | Loose blade; Unstable work surface; Damaged motor | Tighten blade mounting screw; Ensure saw is on a stable, level surface; Contact support if motor is suspected. |
| Blade height adjustment is stiff | Dust buildup; Lack of lubrication | Clean mechanism thoroughly; Apply light machine oil to moving parts. |
Specifiche
Refer to the table below for detailed technical specifications of the VISLONE Mini Table Saw:

Descrizione dell'immagine: Questa immagine fornisce una panoramica visivaview of the product's dimensions and key parameters, including cutting depth, speed, motor wattage, cutting angle, and speed mode.
| Caratteristica | Specificazione |
|---|---|
| Marca | VISLONE |
| Numero di modello | 778520bd-c713-4a62-88eb-085029215812 |
| Fonte di alimentazione | Elettrico con cavo |
| Cosatage | 100W |
| Voltage | 240 Volt |
| Velocità | Up to 6000 RPM (7-speed adjustable) |
| Profondità di taglio | 0-0.63 pollici (0-16 mm) |
| Angolo di taglio | 0-90 gradi |
| Materiale della lama | High Speed Steel (various types included) |
| Blade Length (Diameter) | 63 millimeters (2.48 inches) |
| Peso dell'articolo | 6.64 libbre |
| Dimensioni del pacco | 8.9 x 8.5 x 7.56 pollici |
| Raccomandazione di superficie | Acrylic, Iron, Metal, Plastic, Stone, Wood |
Garanzia e supporto
For warranty information or technical support, please refer to the product packaging or contact VISLONE customer service through the retailer where the product was purchased. Keep your purchase receipt as proof of purchase.