1. Importanti istruzioni di sicurezza
Always observe basic safety precautions when using this power tool to reduce the risk of fire, electric shock, and personal injury. Read all instructions carefully before operation.
- Sicurezza dell'area di lavoro: Mantenere l'area di lavoro pulita e ben illuminata. Aree disordinate o buie possono favorire incidenti. Non utilizzare utensili elettrici in atmosfere esplosive, ad esempio in presenza di liquidi, gas o polveri infiammabili.
- Sicurezza elettrica: Evitare il contatto del corpo con superfici messe a terra. Non esporre gli elettroutensili alla pioggia o all'umidità.
- Sicurezza personale: Indossare sempre protezioni per gli occhi. Utilizzare protezioni acustiche quando si lavora per periodi prolungati. Vestirsi in modo appropriato; evitare abiti larghi o gioielli. Raccogliere i capelli lunghi.
- Uso e cura dello strumento: Non forzare l'utensile elettrico. Utilizzare l'utensile elettrico corretto per l'applicazione. Scollegare la batteria dall'utensile elettrico prima di effettuare qualsiasi regolazione, sostituire accessori o riporre l'utensile elettrico.
- Uso e cura della batteria: Ricaricare solo con il caricabatterie specificato dal produttore. Non utilizzare le batterie con altri utensili elettrici.
- Servizio: Fate riparare il vostro elettroutensile solo da personale qualificato e utilizzando solo pezzi di ricambio identici.
2. Prodotto finitoview
The Vislone Mini 12V Cordless Angle Grinder is a compact and versatile tool designed for grinding, cutting, and polishing various materials. Its lightweight and cordless design offer portability and ease of use.

Immagine 2.1: Sopraview of the Vislone Mini Angle Grinder with key components labeled. This includes the Safety Shield, Bearing Switch, Brush Motor, Quick Stop Design, Lightweight Single Hand Operation area, and the 12V High Quality Battery.
Contenuto della confezione:
- 1 x Cordless Angle Grinder
- 2 batterie da 12 V 1300 mAh
- 1 x Caricabatterie
- 1 x Pair of Gloves (optional, may vary by package)
- 6 x Saw Blades (or 2 x 3-inch metal cutting wheels, may vary by package)
- 1 x Chiave inglese
- 1 x Manuale utente (inglese)
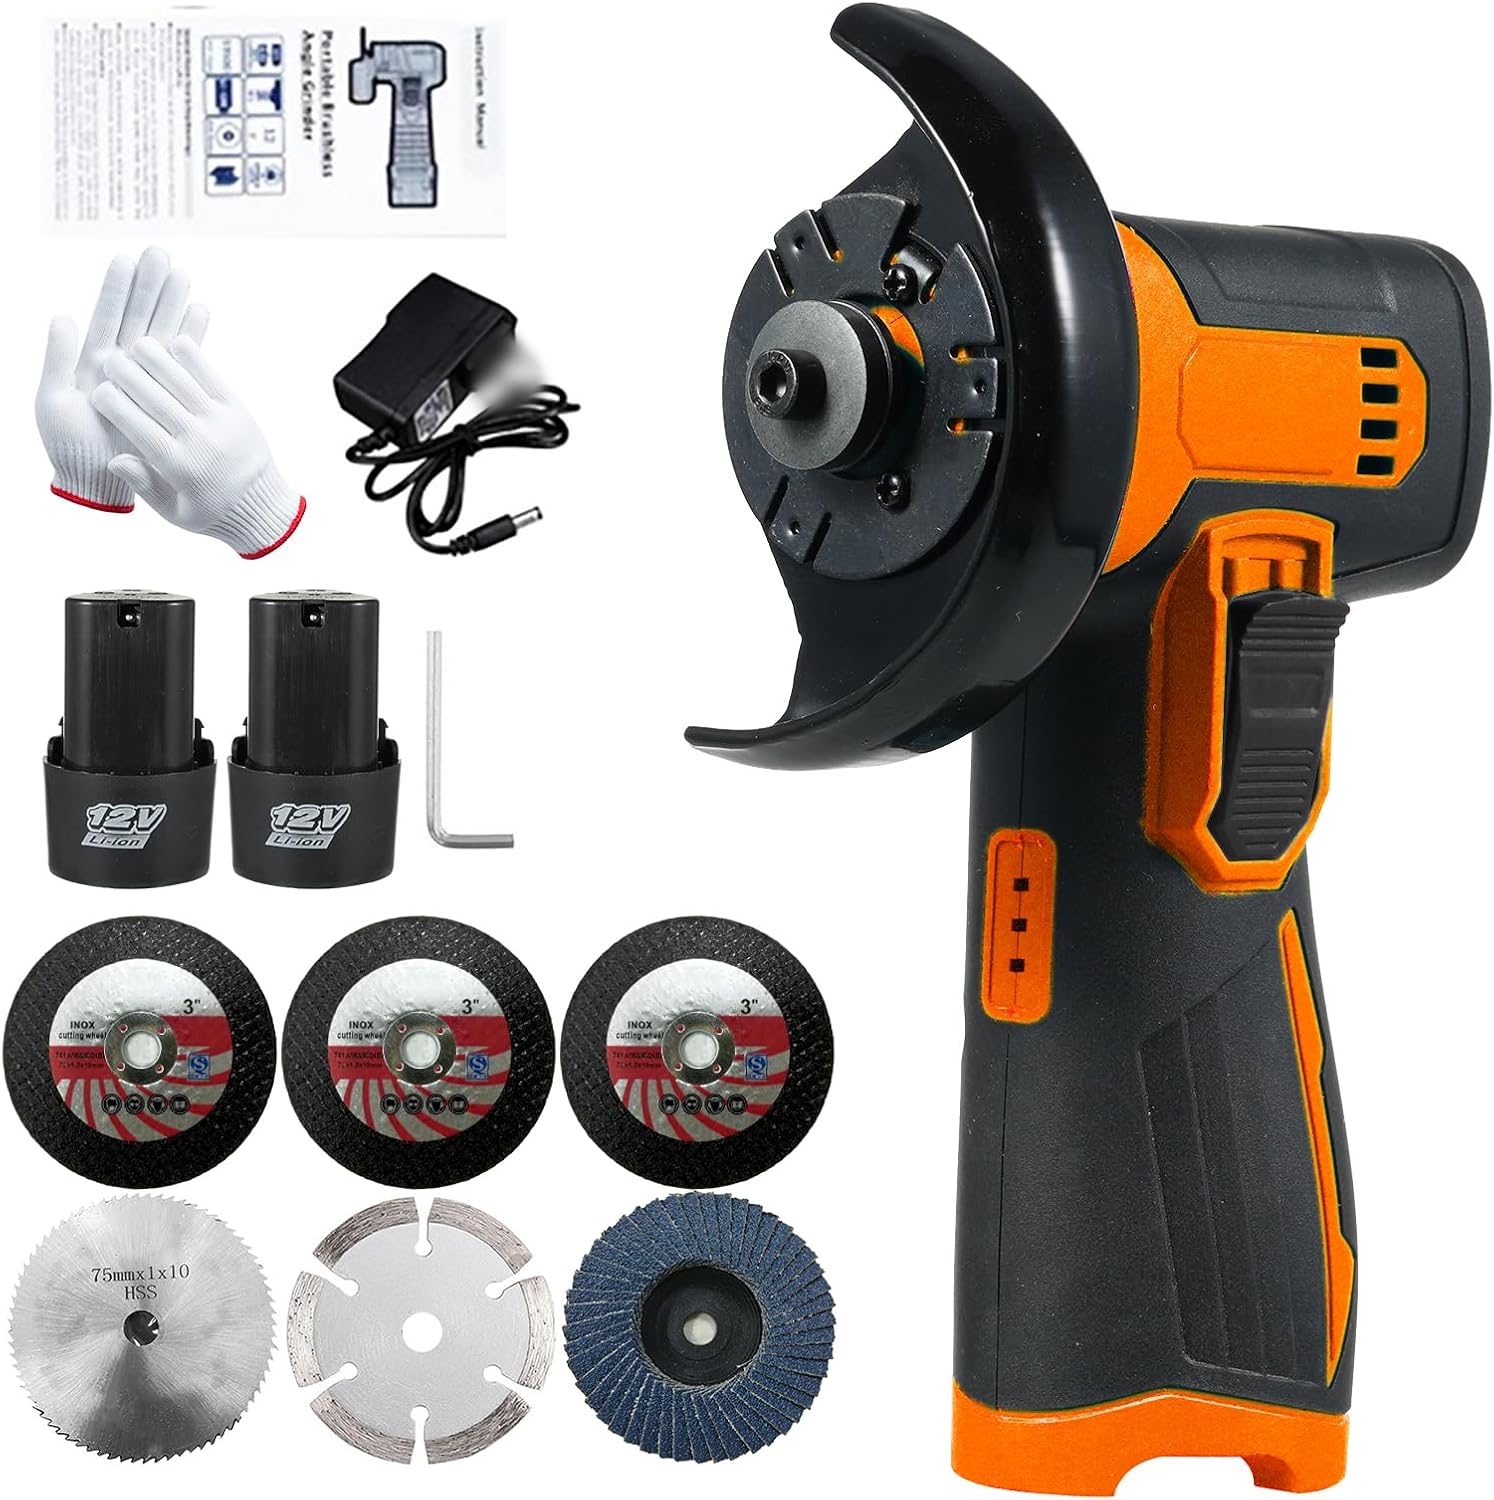
Immagine 2.2: The complete package contents, including the angle grinder, two 12V batteries, a charger, a pair of gloves, multiple cutting/grinding discs, and a wrench.
3. Impostazione
3.1 Caricamento della batteria
- Connect the charger to a standard power outlet (110-240V, 50/60Hz).
- Insert the 12V 1300mAh battery into the charger. Ensure it is securely seated.
- Allow the battery to charge fully. The charger typically has an indicator light that changes color or turns off when charging is complete.
- Una volta caricata, rimuovere la batteria dal caricabatterie.
3.2 Installazione/sostituzione dei dischi di molatura/taglio
Always ensure the battery is removed from the grinder before installing or changing discs to prevent accidental startup.
- Premere e tenere premuto il pulsante di blocco del mandrino (se presente) per impedire la rotazione del mandrino.
- Use the provided wrench to loosen the flange nut counter-clockwise.
- Rimuovere il vecchio disco (se presente) e pulire le flange.
- Place the new 76mm (3-inch) grinding or cutting disc onto the spindle, ensuring it is centered.
- Replace the flange nut and tighten it clockwise with the wrench while holding the spindle lock button. Do not overtighten.
- Ensure the safety shield is properly positioned to protect against sparks and debris.
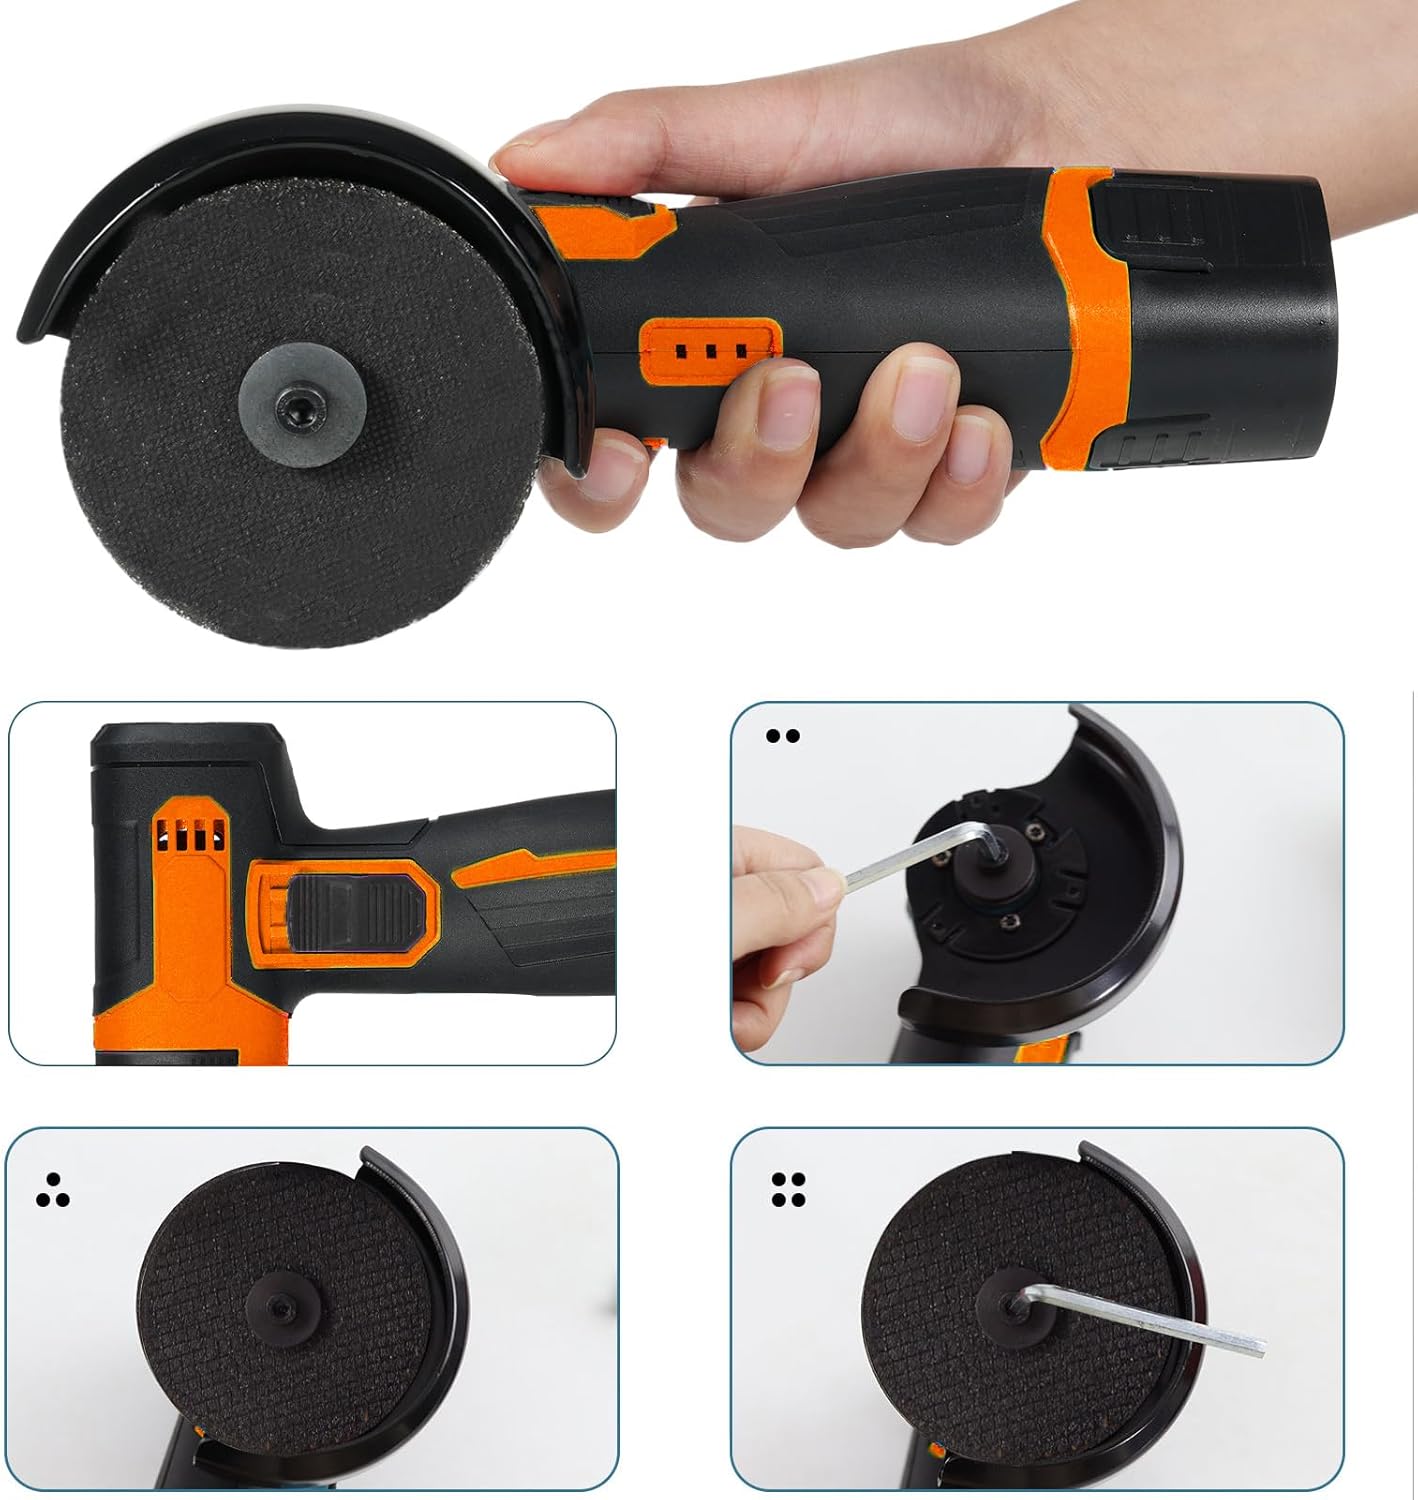
Immagine 3.1: Visual guide demonstrating the process of attaching a grinding disc to the angle grinder using the provided wrench and spindle lock mechanism.
4. Istruzioni per l'uso
4.1 Funzionamento generale
- Ensure the battery is fully charged and securely inserted into the grinder.
- Indossare adeguati dispositivi di protezione individuale (DPI), tra cui occhiali di sicurezza, guanti e protezioni acustiche.
- Fissare saldamente il pezzo in lavorazione per evitare che si muova durante il funzionamento.
- To start the grinder, press the power switch. The tool will reach its operating speed of 19,500 RPM quickly.
- Apply light, even pressure to the workpiece. Let the tool do the work. Avoid excessive force, which can damage the disc or the tool.
- Move the grinder smoothly across the material. For cutting, maintain a steady line. For grinding or polishing, use a consistent motion.
- To stop the grinder, release the power switch. The quick stop design will rapidly halt the disc rotation.
4.2 Applicazioni
This mini angle grinder is suitable for a variety of tasks, including:
- Taglio del metallo: Ideal for cutting small metal rods, pipes, and sheets.
- Metal Grinding/Polishing: Effective for smoothing welds, removing rust, and preparing metal surfaces.
- Tile Cleaning/Cutting: Can be used for cleaning grout lines or making small cuts in tiles.
- Wood Cutting/Polishing: Suitable for cutting thin wooden boards and polishing wood surfaces.
- Plastic Cutting: Capable of cutting various plastic materials.

Immagine 4.1: Examples of the grinder's versatility, showing its use for metal cutting, metal polishing, rust removal, welding scar polishing, wood cutting, and wood polishing.
5. Manutenzione
5.1 Pulizia
- Scollegare sempre la batteria prima della pulizia.
- Utilizzare un morbido, damp panno per pulire l'esterno dell'utensile. Non utilizzare prodotti chimici aggressivi o detergenti abrasivi.
- Periodically clean the ventilation openings to prevent overheating. Use compressed air if necessary.
- Remove any debris or dust from the disc guard and spindle area.
5.2 Conservazione
- Conservare l'utensile e le batterie in un luogo fresco e asciutto, lontano dalla luce solare diretta e dall'umidità.
- Prima di riporla per un lungo periodo, assicurarsi che la batteria sia parzialmente carica (circa il 50%) per prolungarne la durata.
- Tenere fuori dalla portata dei bambini.
5.3 Cura della batteria
- Do not store batteries in extreme temperatures.
- Avoid fully discharging the battery frequently, as this can reduce its overall life.
- If the battery becomes hot during use, allow it to cool down before recharging.
6. Risoluzione Dei Problemi
| Problema | Possibile causa | Soluzione |
|---|---|---|
| Lo strumento non si avvia | Batteria non carica o inserita in modo errato. | Assicurarsi che la batteria sia completamente carica e inserita correttamente. |
| Potenza o velocità ridotte | Battery low or disc worn out. | Recharge battery or replace the disc. |
| Vibrazione eccessiva | Disco installato in modo errato o danneggiato. | Check disc installation; replace if damaged or unbalanced. |
| L'utensile si surriscalda | Blocked ventilation or continuous heavy use. | Pulire le fessure di ventilazione. Lasciare raffreddare l'utensile. Ridurre il carico. |
7. Specifiche
| Caratteristica | Specificazione |
|---|---|
| Marca | VISLONE |
| Modello | ABS+CU+FE |
| Volume batteriatage | 12 Volt |
| Capacità della batteria | 1300 mAh |
| Velocità a vuoto | 19,500 giri al minuto |
| Diametro disco abrasivo | 76 mm (3 pollici) |
| Filettatura del mandrino | M5 |
| Ingresso del caricabatterie | 110-240 V, 50/60 Hz |
| Vol. uscita caricabatteriatage | 12.6 Volt |
| Corrente di uscita del caricabatterie | 2.0 A |
| Dimensioni del prodotto | 20 x 10.5 x 7.5 cm (7.9 x 4.1 x 2.9 pollici) |
| Peso del prodotto | 900 g (31.74 once) |
| Materiale | ABS, Copper, Iron |
8. Garanzia e supporto
For warranty information or technical support, please refer to the documentation included with your purchase or contact the manufacturer directly. Keep your purchase receipt as proof of purchase.
Manufacturer: Vislone