1. Introduzione
The Mastech MS8250D is a high-performance digital multimeter designed for accurate measurement of AC/DC voltage, AC/DC current, resistance, capacitance, frequency, and temperature. It features a 6600-count display, auto/manual ranging, True RMS, Non-Contact Voltage (NCV) detection, diode and continuity testing, and a USB interface for PC connectivity. This manual provides detailed instructions for safe and effective use of the device.
Caratteristiche principali:
- 6600-count digital display
- Automatic and Manual Ranging
- Vera misura RMS
- Volume senza contattotage (NCV) rilevamento
- Diode and Continuity Tester (buzzer < 50Ω)
- Registrazione del valore MAX/MIN
- Funzione Hold Data
- Retroilluminazione dello schermo
- Spegnimento automatico
- Modalità di misurazione relativa
- Indicazione di batteria scarica
- USB Interface for Windows OS
2. Informazioni sulla sicurezza
AVVERTIMENTO: To avoid electric shock or personal injury, and to avoid damage to the meter or to the equipment under test, read all safety information carefully before using the meter. This device complies with CE, RoHS, and UL safety standards.
- Assicurarsi sempre che i puntali di prova siano in buone condizioni e correttamente collegati.
- Non applicare più del volume nominaletage, come indicato sul contatore, tra i terminali o tra qualsiasi terminale e la terra.
- Prestare attenzione quando si lavora con voltagsuperiori a 30 V CA RMS, 42 V di picco o 60 V CC. Questi voltagrappresentano un rischio di scossa elettrica.
- Prima di misurare la corrente, assicurarsi che il circuito sia disattivato e che il misuratore sia collegato in serie.
- Scollegare sempre i puntali di prova dal circuito prima di modificare le funzioni o gli intervalli.
- Non utilizzare il misuratore se appare danneggiato o se la custodia è aperta.
- Per garantire letture accurate, sostituire la batteria non appena appare l'indicatore di batteria scarica.
- Adhere to the specified measurement categories (CAT III 1000V / CAT IV 600V) for safe operation.
3. Prodotto finitoview
Familiarize yourself with the components of your Mastech MS8250D Digital Multimeter.

Immagine 3.1: Davanti view of the Mastech MS8250D Digital Multimeter, showing the display, function dial, and input jacks. The display shows "1.987 V", indicating a voltage measurement. The function dial is set to T-RMS. Input jacks are labeled for µA mA, A, VΩHz%, and COM.
Componenti principali:
- Schermo LCD: Mostra le letture delle misurazioni, le unità e gli indicatori di funzione.
- Funzione Quadrante: Utilizzato per selezionare la funzione di misurazione desiderata (ad esempio, Voltage, Current, Resistance, Diode, Continuity, Temperature).
- Pulsanti funzione:
- TENERE: Blocca la lettura corrente del display.
- RANGE: Switches between auto and manual ranging.
- REL: Attiva la modalità di misurazione relativa.
- MASSIMO/MIN: Registra i valori massimi e minimi.
- FUNZIONE: Selects sub-functions within a dial position (e.g., AC/DC, Diode/Continuity).
- T-RMS: (Indicated on dial) True RMS measurement.
- Valore NC: Volume senza contattotage rilevamento.
- Pulsante retroilluminazione: Activates display backlight.
- Jack di ingresso:
- COMUNICAZIONE: Terminale comune per tutte le misurazioni (polo negativo).
- VΩHz%: Ingresso per voltage, resistance, frequency, capacitance, and diode/continuity measurements (positive lead).
- µA mA: Ingresso per microampere e milliampere current measurements (positive lead). Fused for protection.
- A: Ingresso per ampere current measurements (positive lead). Fused for protection.
Componenti inclusi:
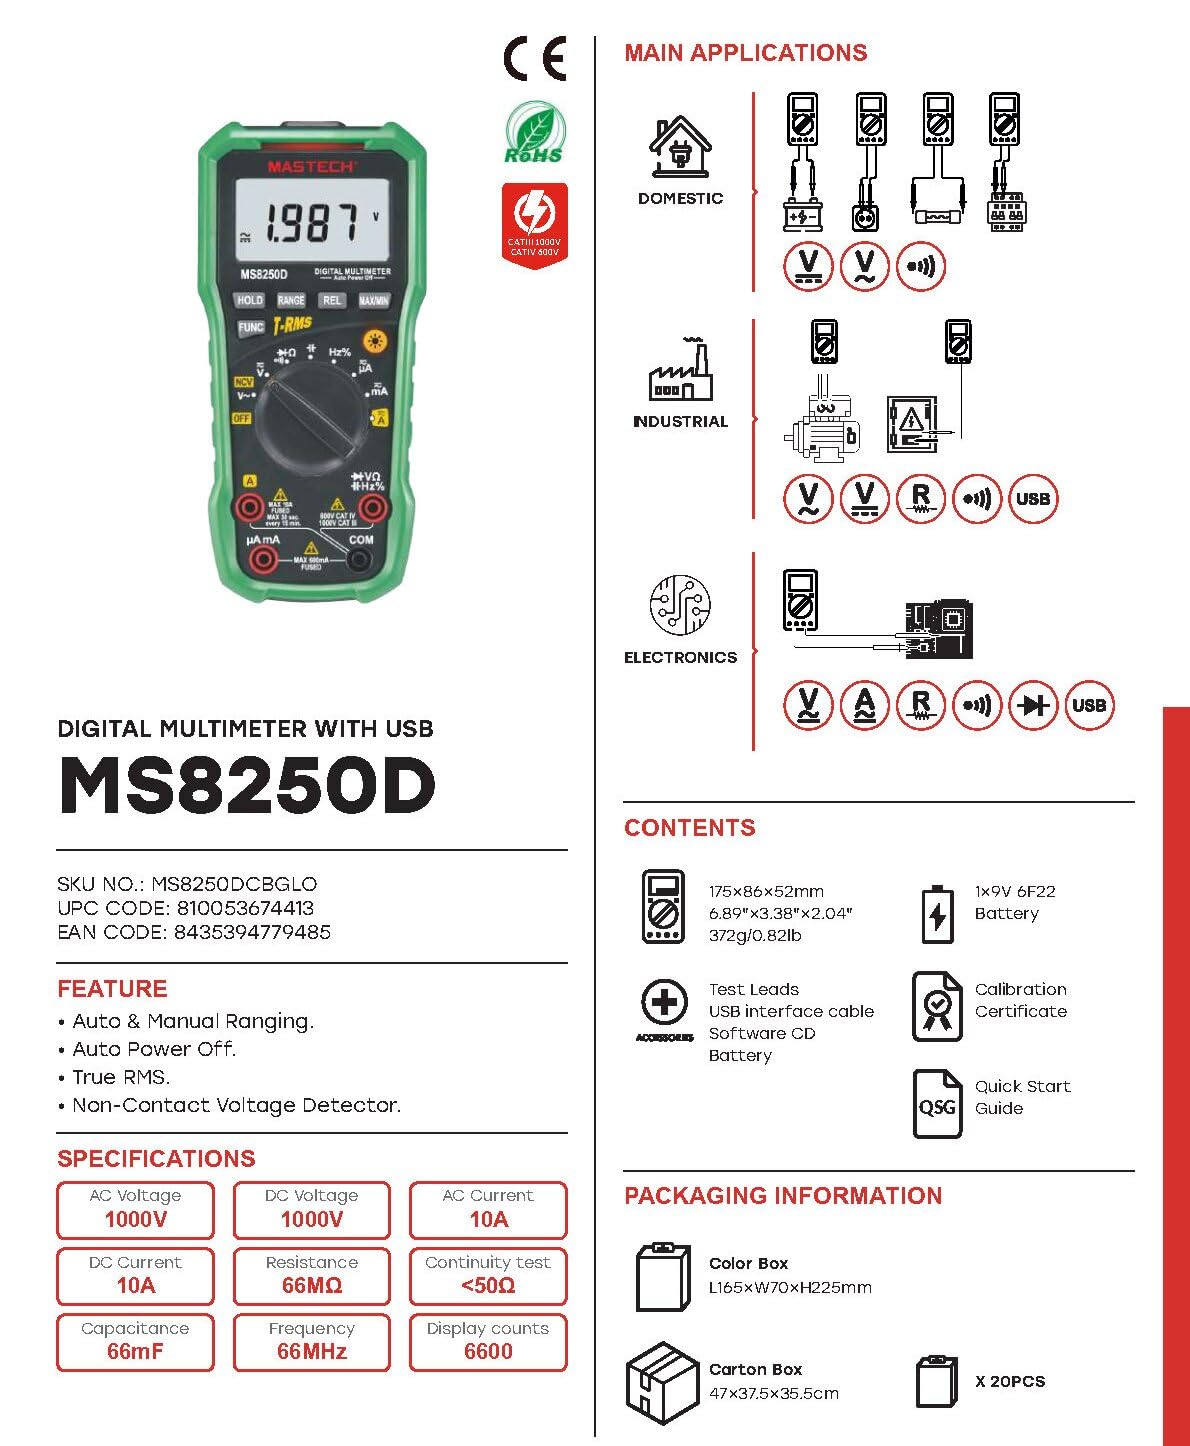
Immagine 3.2: Diagram showing the Mastech MS8250D Multimeter and its included accessories. The image also illustrates typical applications in domestic, industrial, and electronics settings.
- Multimetro digitale Mastech MS8250D
- Cavi di prova (rosso e nero)
- 1 batteria da 9 V 6F22 (preinstallata o inclusa separatamente)
- Cavo di interfaccia USB
- Software CD (for Windows OS)
- Certificato di calibrazione
- Guida Rapida
4. Impostazione
4.1 Installazione della batteria
The MS8250D requires one 9V 6F22 battery for operation. Two LR44 batteries are also mentioned in specifications, likely for a different internal component or an error in data. For the main power, use the 9V battery.
- Assicurarsi che il multimetro sia spento.
- Individuare il coperchio del vano batterie sul retro del misuratore.
- Utilizzare un cacciavite per allentare la/le vite/i che fissano il coperchio.
- Togliere il coperchio.
- Collegare la batteria da 9 V ai morsetti della batteria, rispettando la polarità corretta (+ e -).
- Posizionare la batteria nel vano.
- Richiudere il coperchio del vano batteria e fissarlo con la/le vite/i.
Nota: The meter also uses 2 LR44 batteries, which are typically included and pre-installed for specific functions like the backlight or non-contact voltage detection. Refer to the quick-start guide for specific details on these smaller batteries if replacement is needed.
4.2 Collegamento dei puntali di prova
Always connect the black test lead to the COM jack. Connect the red test lead to the appropriate input jack based on the measurement type:
- Per voltage, Resistance, Capacitance, Frequency, Diode, and Continuity measurements: Connect the red lead to the VΩHz% cricco.
- For Current measurements (µA or mA): Connect the red lead to the µA mA cricco.
- For High Current measurements (A): Connect the red lead to the A cricco.
Ensure the test leads are fully inserted into the jacks.
5. Istruzioni per l'uso
5.1 Accensione/spegnimento
To turn the meter ON, rotate the function dial from the "OFF" position to any desired measurement function. To turn the meter OFF, rotate the function dial back to the "OFF" position.
The meter features an Spegnimento automatico function to conserve battery life. It will automatically power off after a period of inactivity. To disable or re-enable this feature, refer to the quick-start guide or the full user manual provided on the software CD.
5.2 Auto Ranging and Manual Ranging
The MS8250D defaults to Auto Ranging, which automatically selects the best measurement range. Press the Consumo pulsante per passare a Regolazione manuale. In manual ranging, each press of the Consumo button cycles through available ranges. To return to auto ranging, press and hold the Consumo pulsante.
5.3 Misurazione del volume AC/DCtage(V)
- Impostare la manopola delle funzioni su V~ (Vol. ACtage) o V- (DC voltage) posizione.
- Collegare il puntale nero a COM jack e il puntale rosso al VΩHz% cricco.
- Collegare le sonde di prova al circuito o al componente da misurare.
- Leggi il vol.tage value on the display. The meter will automatically detect AC or DC if the dial is set to the combined V position, or you can use the FUNC button to toggle between AC and DC if available on your model.
5.4 Measuring AC/DC Current (A, mA, µA)
AVVERTIMENTO: Non collegare mai il misuratore in parallelo a un voltage sorgente quando si misura la corrente. Ciò potrebbe far saltare il fusibile o danneggiare il misuratore.
- Spegnere l'alimentazione al circuito.
- Impostare la manopola delle funzioni su A~ (Corrente CA), A- (Corrente CC), mA~, mA-, µA~, O µA- posizione.
- Collegare il puntale nero a COM cricco.
- Collegare il puntale rosso al A jack for high current, or µA mA jack for low current.
- Aprire il circuito in cui si desidera misurare la corrente e collegare il misuratore in serie al carico.
- Applicare corrente al circuito.
- Read the current value on the display. Use the FUNC pulsante per passare da CA a CC, se necessario.
5.5 Misurazione della resistenza (Ω)
- Impostare la manopola delle funzioni su Ω posizione.
- Collegare il puntale nero a COM jack e il puntale rosso al VΩHz% cricco.
- Assicurarsi che il circuito o il componente sottoposto a test sia disattivato.
- Collegare le sonde di prova al componente.
- Leggere il valore di resistenza sul display.
5.6 Test diodo e test di continuità
- Impostare la manopola delle funzioni su Diodo/Continuità position (often shared with resistance or capacitance).
- Collegare il puntale nero a COM jack e il puntale rosso al VΩHz% cricco.
- Utilizzare il FUNC button to select between Diode Test and Continuity Test.
- Per il test dei diodi: Collegare la sonda rossa all'anodo e la sonda nera al catodo del diodo. Il display mostrerà la tensione direttatage drop (typically 0.5V to 0.8V for silicon diodes). Reversing the probes should show "OL" (Open Loop).
- Per il test di continuità: Connect the probes across the circuit or component. If resistance is less than approximately 50Ω, the buzzer will sound, indicating continuity.
5.7 Misurazione della capacità (F)
- Impostare la manopola delle funzioni su Capacità position (often shared with resistance or diode).
- Collegare il puntale nero a COM jack e il puntale rosso al VΩHz% cricco.
- Ensure the capacitor is fully discharged before testing to avoid damage to the meter.
- Collegare le sonde di prova ai terminali del condensatore.
- Leggere il valore della capacità sul display.
5.8 Misurazione della frequenza (Hz) e del ciclo di lavoro (%)
- Impostare la manopola delle funzioni su Hz% position (often shared with voltagE).
- Collegare il puntale nero a COM jack e il puntale rosso al VΩHz% cricco.
- Collegare le sonde di prova alla sorgente del segnale.
- The display will show the frequency. Press the FUNC button to toggle to Duty Cycle measurement if available.
5.9 Senza contatto voltage (NCV) Rilevamento
- Impostare la manopola delle funzioni su VNC posizione.
- Hold the meter with the NCV sensor (usually at the top of the meter) near a live AC voltage fonte.
- Il misuratore indicherà la presenza di tensione alternatatage tramite un segnale acustico e/o un indicatore visivo (ad esempio, LED).
5.10 USB Interface (Windows OS)
The MS8250D includes a USB interface for connecting to a computer running Windows OS. This allows for data logging and real-time monitoring of measurements. Install the provided software from the CD and follow the on-screen instructions for driver installation and software usage.
6. Manutenzione
6.1 Pulizia
Pulisci la custodia del misuratore con un pannoamp panno e un detergente delicato. Non utilizzare abrasivi o solventi. Assicurarsi che il misuratore sia completamente asciutto prima dell'uso.
6.2 Sostituzione della batteria
When the low battery indicator appears on the display, replace the 9V battery immediately to ensure accurate readings. Follow the steps in Section 4.1 Battery Installation.
6.3 Sostituzione del fusibile
If the meter fails to measure current, the fuse may be blown. Fuses are located inside the meter. To replace a fuse:
- Assicurarsi che il misuratore sia spento e che tutti i puntali di prova siano scollegati.
- Aprire il coperchio del vano batteria (e potenzialmente anche la custodia principale, a seconda del modello).
- Rimuovere con cautela il vecchio fusibile.
- Replace with a fuse of the exact same type and rating (e.g., F600mA/250V for mA/µA range, F10A/250V for A range). Refer to the meter's internal markings or the full manual for specific fuse ratings.
- Rimontare il misuratore, assicurandosi che tutte le viti siano serrate.
AVVERTIMENTO: Never use a fuse with a different rating or bypass the fuse. This can damage the meter and pose a serious safety hazard.
7. Risoluzione Dei Problemi
| Problema | Possibile causa | Soluzione |
|---|---|---|
| Il misuratore non si accende. | Batteria scarica. | Sostituire la batteria da 9V. |
| Viene visualizzato "OL" (sovraccarico). | La misurazione supera l'intervallo selezionato o la capacità massima del misuratore. | Switch to a higher range (if in manual ranging) or ensure the measurement is within the meter's limits. |
| No current reading. | Blown fuse; incorrect lead connection; open circuit. | Check and replace fuse if necessary. Ensure leads are connected correctly (in series). Verify circuit continuity. |
| Letture imprecise. | Low battery; poor lead contact; external interference. | Replace battery. Ensure leads are firmly connected. Move away from strong electromagnetic fields. |
| Display shows "USB" but no PC connection. | Drivers not installed; incorrect software settings. | Install drivers from the provided CD. Refer to software manual for connection instructions. |
8. Specifiche
The following table details the technical specifications of the Mastech MS8250D Digital Multimeter.

Immagine 8.1: Detailed specifications table for the Mastech MS8250D, outlining ranges, resolutions, and accuracies for various measurement functions.
| Funzione | Allineare | Risoluzione | Precisione |
|---|---|---|---|
| Volume DCtage | |||
| 660mV | 0.1mV | ±(0.8%+3) | |
| 6.6V/66V/660V/1000V | 1 mV/10 mV/0.1 V/1 V | ±(0.5%+5) | |
| Volume ACtage (vero valore efficace) | |||
| 660mV | 0.1mV | ±(1.5%+5) | |
| 6.6 V/66 V | 1 mV/10 mV | ±(1.2%+5) | |
| 660 V/1000 V | 0.1 V/1 V | ±(1.0%+3) | |
| Corrente continua | |||
| 660µA / 6600µA / 66mA / 660mA | 0.1 µA/1 µA/10 µA/0.1 mA | ±(1.0%+5) | |
| 10A | 10mA | ±(2.0%+5) | |
| Corrente CA (vero valore efficace) | |||
| 660µA / 6600µA / 66mA / 660mA | 0.1µA / 1µA / 0.01mA / 0.1mA | ±(1.5%+5) | |
| 10A | 10mA | ±(3.0%+5) | |
| Resistenza | |||
| 660Ω / 6.6kΩ / 66kΩ / 660kΩ / 6.6MΩ | 0.1Ω / 1Ω / 10Ω / 100Ω / 1kΩ | ±(0.8%+5) | |
| 66 MΩ | 10kΩ | ±(1.5%+5) | |
| Capacità | |||
| 6.6nF/66nF/660nF/6.6µF/66µF | 1pF/10pF/0.1nF/1nF/10nF | ±(4.0%+5) | |
| 600µF | 1µF | ±(3.0%+5) | |
| 6.6 mF/66 mF | 1µF/10µF | ±(4.0%+5) | |
| Frequenza | |||
| 66Hz/660Hz/6.6kHz/66kHz | 0.01 Hz / 0.1 Hz / 1 Hz / 10 Hz | ±(1.5%+5) | |
| 660 kHz/6.6 MHz/66 MHz | 0.1 kHz / 1 kHz / 10 kHz | ±(1.5%+5) | |
| Ciclo di lavoro | |||
| 0.1%~99.9% | 0.1% | ±(2.0%+5) | |
Specifiche generali:
- Display: 6600 Conteggi
- Fonte di energia: 1x 9V 6F22 Battery (main power), 2x LR44 batteries (auxiliary, e.g., backlight)
- Spegnimento automatico: SÌ
- Vero valore efficace: SÌ
- Volume senza contattotage (NCV) Rilevatore: SÌ
- Diodo aperto Voltage: 3.2V
- Cicalino di continuità: < 50Ω
- MASSIMO/MIN: SÌ
- Data Hold: SÌ
- Visualizzazione batteria scarica: SÌ
- Retroilluminazione del display: SÌ
- Interfaccia USB: Yes (Windows OS)
- Valutazione di sicurezza: CAT III 1000 V / CAT IV 600 V
- Precisione della misurazione: 0.4% (general, specific accuracies per function in table)
- Volume di eserciziotage (Min): 3.2 Volt
- Valutazione superiore di temperatura: 50 gradi Celsius
- Dimensioni (L x P x A): Dimensioni: 20 x 15 x 25 cm
- Peso dell'articolo: 1 kg
- Materiale: Acrilonitrile Butadiene Stirene (ABS)
- Colore: Blu
- Produttore: MASTECH
- Paese di origine: Taiwan
- Certificazioni: Certificazione CE, RoHS, UL
9. Garanzia e supporto
Mastech products are designed for reliability and durability. For specific warranty information, please refer to the warranty card included with your product or contact Mastech customer support directly. Typically, Mastech offers a limited warranty against defects in materials and workmanship.
For technical support, troubleshooting assistance, or warranty claims, please contact your authorized Mastech dealer or visit the official Mastech websito per le informazioni di contatto.
Durata della disponibilità dei pezzi di ricambio UE: 1 anno


