
Mount-It! MI-4751WHT
Mount-It! Single Monitor Arm User Manual
Model: MI-4751WHT
Introduzione
This manual provides detailed instructions for the installation, operation, and maintenance of your Mount-It! Single Monitor Arm. Please read this manual thoroughly before installation and use to ensure proper function and safety.
The Mount-It! Single Monitor Arm is designed to provide an ergonomic and space-saving solution for mounting a single computer monitor to your desk. It features full motion adjustability, including tilt, swivel, and rotation, allowing you to position your monitor for optimal viewcomfort.
Informazioni sulla sicurezza
Si prega di osservare le seguenti precauzioni di sicurezza:
- Ensure the desk surface is stable and strong enough to support the weight of the monitor arm and the monitor.
- Non superare la capacità di peso massima di 19.8 libbre (9 kg).
- Assicurarsi che tutte le viti e i bulloni siano serrati saldamente prima dell'uso.
- Tenere bambini e animali domestici lontani dall'area di installazione.
- If any parts are missing or damaged, contact Mount-It! customer support immediately. Do not attempt to install with damaged parts.
Contenuto della confezione
Verificare che tutti i componenti siano presenti e in buone condizioni:
- Gruppo braccio monitor
- Scrivania Clamp (C-Clamp)
- Base passacavo
- Piastra VESA
- Kit hardware (viti, rondelle, chiavi a brugola)
- Clip di gestione dei cavi

Image: All components of the Mount-It! Single Monitor Arm, including the arm, desk clamp, grommet base, and VESA plate.

Image: A visual representation of the various parts included with the monitor mount, such as the arm, pole, VESA plate, and mounting hardware.
Configurazione e installazione
The Mount-It! Single Monitor Arm offers two installation options: C-Clamp e il Monte Grommet.

Immagine: Illustrazione che mostra il C-Clamp and Grommet mounting options for the monitor arm, with dimensions for desk thickness compatibility.
1. Scegli la tua opzione di montaggio
C-Clamp Installazione:
- Allega il C-clamp to the bottom of the pole.
- Posizionare il C-clamp sul bordo della scrivania.
- Stringere la clamp screw until the mount is securely fastened to the desk. Ensure it is stable and does not wobble.
Installazione del supporto con anello di tenuta:
- Se la scrivania è dotata di un foro passacavo, inserire la base passacavo attraverso il foro.
- Fissare la base del passacavo da sotto la scrivania utilizzando la piastra e il dado forniti.
- Attach the pole to the grommet base and tighten securely.
2. Attach the Monitor Arm to the Pole
Slide the monitor arm assembly onto the pole. Adjust the height as desired and secure it with the provided collar and screw.
3. Attach the VESA Plate to Your Monitor
The monitor arm supports VESA patterns of 75x75mm and 100x100mm.

Image: Diagram illustrating VESA compatibility (75x75mm, 100x100mm) and the maximum weight capacity of 19.8 lbs for the monitor arm.
- Carefully remove the VESA plate from the monitor arm by loosening the top screw.
- Allineare la piastra VESA con i fori di montaggio sul retro del monitor.
- Secure the VESA plate to the monitor using the appropriate screws from the hardware kit. Ensure they are tightened firmly but do not overtighten.
4. Mount the Monitor to the Arm
- With the VESA plate attached to your monitor, carefully slide the monitor onto the monitor arm's VESA head.
- Secure the monitor by tightening the screw on top of the VESA head.
5. Gestione dei cavi
Utilize the integrated cable management clips on the arm to route your monitor cables neatly along the arm and down the pole, reducing clutter.
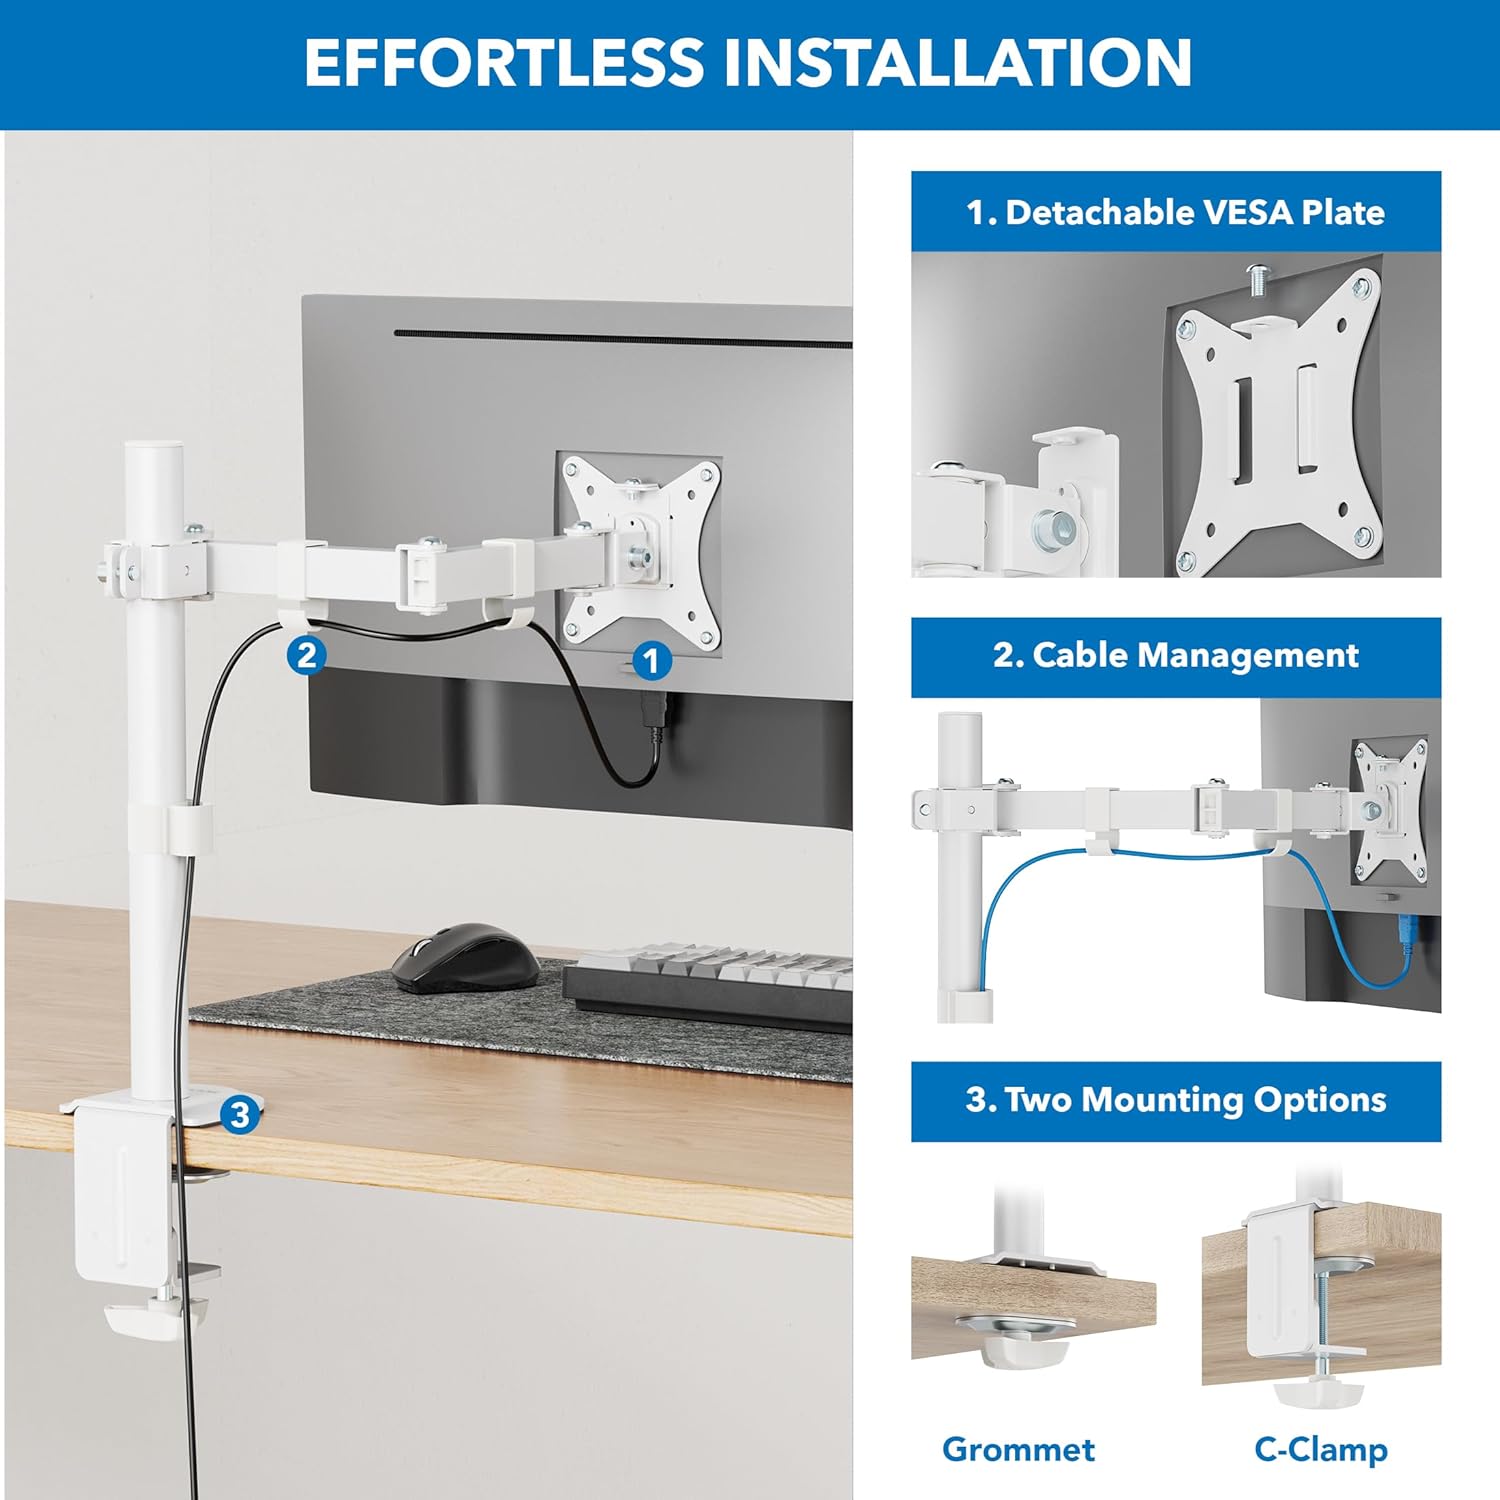
Image: Step-by-step illustration of the installation process, highlighting the detachable VESA plate, cable management, and two mounting options (Grommet and C-Clamp).
Funzionamento e regolazioni
The Mount-It! Single Monitor Arm offers a range of adjustments for optimal viewcomfort.
Regolazione dell'altezza:
To adjust the monitor height, loosen the collar screw on the pole, slide the arm to the desired height, and re-tighten the screw firmly.

Image: Illustration showing how the monitor arm allows for height adjustment along the central pole, with a pole height of 16 inches indicated.

Image: A person sitting at a desk with a monitor mounted on the arm, demonstrating how to adjust the monitor to eye level for ergonomic comfort.
Regolazione dell'inclinazione:
The monitor can be tilted +/- 45 degrees. Loosen the tilt knob or screw behind the VESA plate, adjust the angle, and re-tighten.

Image: Diagram showing the monitor's tilt range of +/- 45 degrees and the 16-inch pole height, illustrating ergonomic comfort adjustments.
Regolazione della rotazione:
The arm features multiple swivel points, allowing for +/- 90 degrees of rotation at each joint. This enables flexible positioning and screen sharing.

Image: Illustration of the monitor arm's full motion design, showing multiple swivel points with +/- 90-degree rotation for easy screen sharing and optimal positioning.

Image: A monitor mounted on the arm, demonstrating the tilt and swivel functionality to find the perfect screen position.
Rotazione (Ritratto/Paesaggio):
The VESA plate allows for 180-degree rotation, enabling quick switching between landscape and portrait orientations.
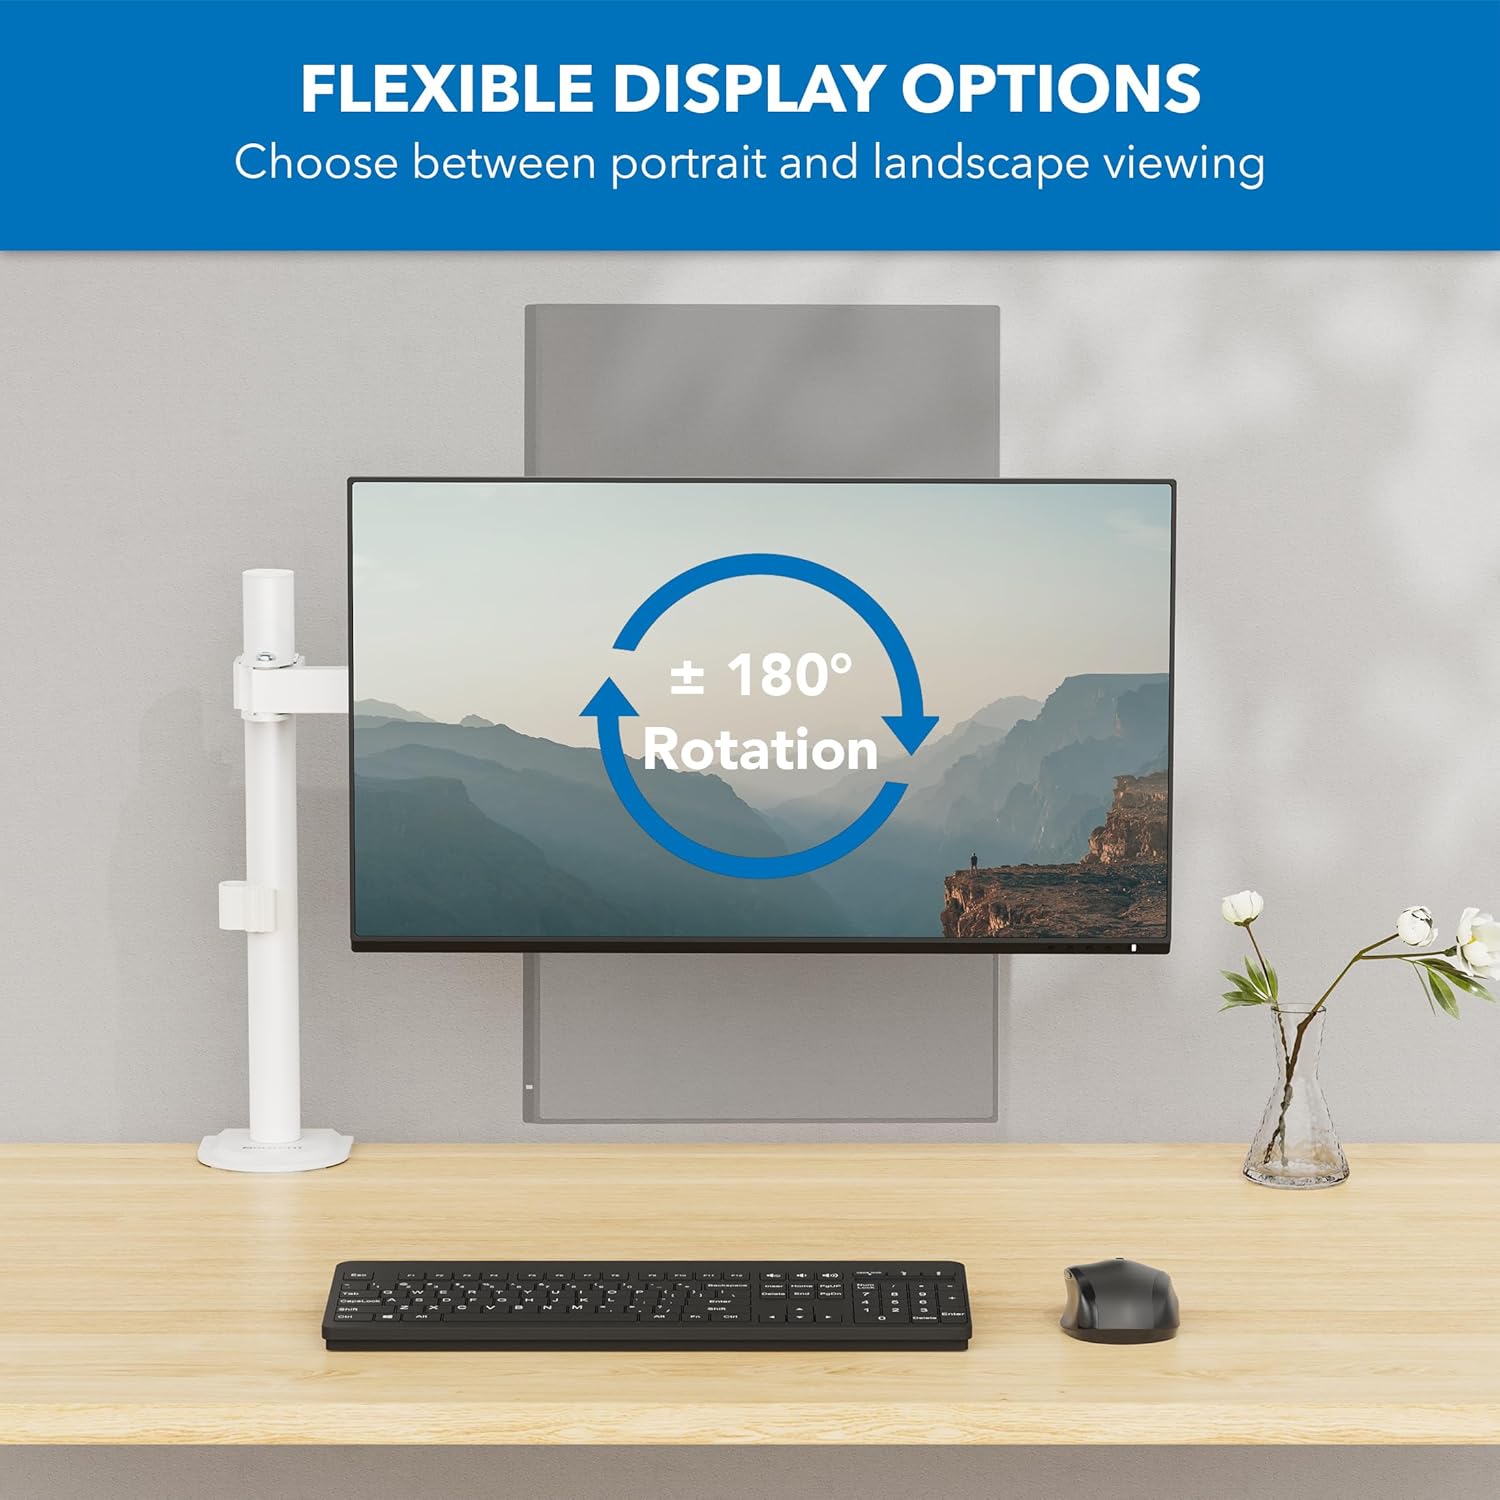
Image: Diagram showing the monitor's 180-degree rotation capability, allowing for flexible display options between portrait and landscape viewing.

Image: Two monitors, one in landscape and one in portrait orientation, demonstrating the arm's ability to switch display orientation.
Manutenzione
Regular maintenance ensures the longevity and safe operation of your monitor arm.
- Pulizia: Pulire il braccio del monitor con un panno morbido eamp panno. Evitare detergenti abrasivi o solventi che potrebbero danneggiare la finitura.
- Controllo di tenuta: Periodically check all screws and connections, especially the desk clamp/grommet mount and VESA plate screws, to ensure they remain tight. Re-tighten if necessary.
- Lubrificazione: The joints are designed for smooth movement and typically do not require lubrication. If movement becomes stiff, consult customer support.
Risoluzione dei problemi
If you encounter issues with your Mount-It! Single Monitor Arm, refer to the following common solutions:
| Problema | Possibile causa | Soluzione |
|---|---|---|
| Il braccio del monitor è instabile o traballa. | Scrivania clamp/grommet mount is not tight enough. Monitor is too heavy. | Assicurare la scrivaniaamp/grommet mount is securely tightened. Verify monitor weight is within the 19.8 lbs (9 kg) limit. |
| Il monitor si abbassa o non mantiene la posizione. | Tilt or swivel screws are loose. Monitor is too heavy. | Tighten the tilt and swivel adjustment screws. Confirm monitor weight is within specifications. |
| I cavi sono disordinati. | Gestione dei cavi non utilizzata. | Route cables through the integrated cable management clips on the arm and pole. |
| Il monitor non è compatibile con la piastra VESA. | Modello VESA errato. | Verify your monitor's VESA pattern is 75x75mm or 100x100mm. |
Specifiche
| Caratteristica | Dettaglio |
|---|---|
| Numero di modello | MI-4751WHT |
| Colore | Bianco |
| Materiale | Acciaio legato |
| Tipo di montaggio | Supporto da tavolo (C-Clamp, Occhiello) |
| Dimensioni del monitor compatibili | 17 - 32 pollici |
| Capacità di peso | Fino a 19.8 libbre (9 kg) |
| Compatibilità VESA | 75x75mm, 100x100mm |
| Angolo di inclinazione | +/- 45 gradi |
| Angolo di rotazione | +/- 90 degrees (at each joint) |
| Rotazione | 180 degrees (Portrait/Landscape) |
| Altezza del palo | 16 pollici |
| Peso dell'articolo | 6.45 libbre |
| Codice UPC | 810041739841 |

Image: Detailed technical drawing showing the dimensions of the monitor arm, including pole height, arm lengths, and various angles of adjustment.
Garanzia e supporto
Mount-It! products are designed for durability and performance. For warranty information, product support, or to purchase replacement parts, please visit the official Mount-It! websito o contattare direttamente il servizio clienti.
Informazioni sui contatti:
- Websito: www.mount-it.com
- Customer Service: Refer to the Mount-It! website for current contact methods (phone, email, chat).
Please have your model number (MI-4751WHT) and purchase date available when contacting support.
Ask a question about this manual
Ask about setup, troubleshooting, compatibility, parts, safety, or missing instructions. Manuals+ will review the question and use this page’s manual context to help answer it.