1. Introduzione
Thank you for choosing the pxton 666S Walkie Talkie. This manual provides essential information for the safe and efficient operation of your two-way radio. Please read this manual thoroughly before use to ensure optimal performance and to prevent damage to the device.

Image 1.1: pxton 666S Walkie Talkies in use, highlighting key features.
2. Prodotto finitoview
2.1 Componenti inclusi
- pxton 666S Walkie Talkie Unit(s)
- 1500mAh Batteria agli ioni di litio
- Base di ricarica
- Adattatore di alimentazione
- Clip per cintura
- Antenna
- Headphones (earpiece with microphone)
- Manuale d'uso
2.2 Caratteristiche principali
- VOX (Centrale a comando vocale): Comunicazione a mani libere.
- Riduzione del rumore: Migliora la chiarezza dell'audio in ambienti rumorosi.
- TOT (Time-Out Timer): Previene trasmissioni lunghe accidentali.
- Torcia incorporata: Per l'illuminazione in condizioni di scarsa illuminazione.
- Funzione di monitoraggio: Allows listening to weak signals.
- Funzione di scansione: Scans active channels.
- Lungo raggio: Up to 3 miles in open areas, 1.2 miles in suburban, 0.6 miles in urban.
- Batteria agli ioni di litio da 1500 mAh: Provides extended standby and talk time.
- Resistente all'acqua: Offre protezione contro gli schizzi.
- 16 canali: For diverse communication needs.
2.3 Parts of the Walkie Talkie
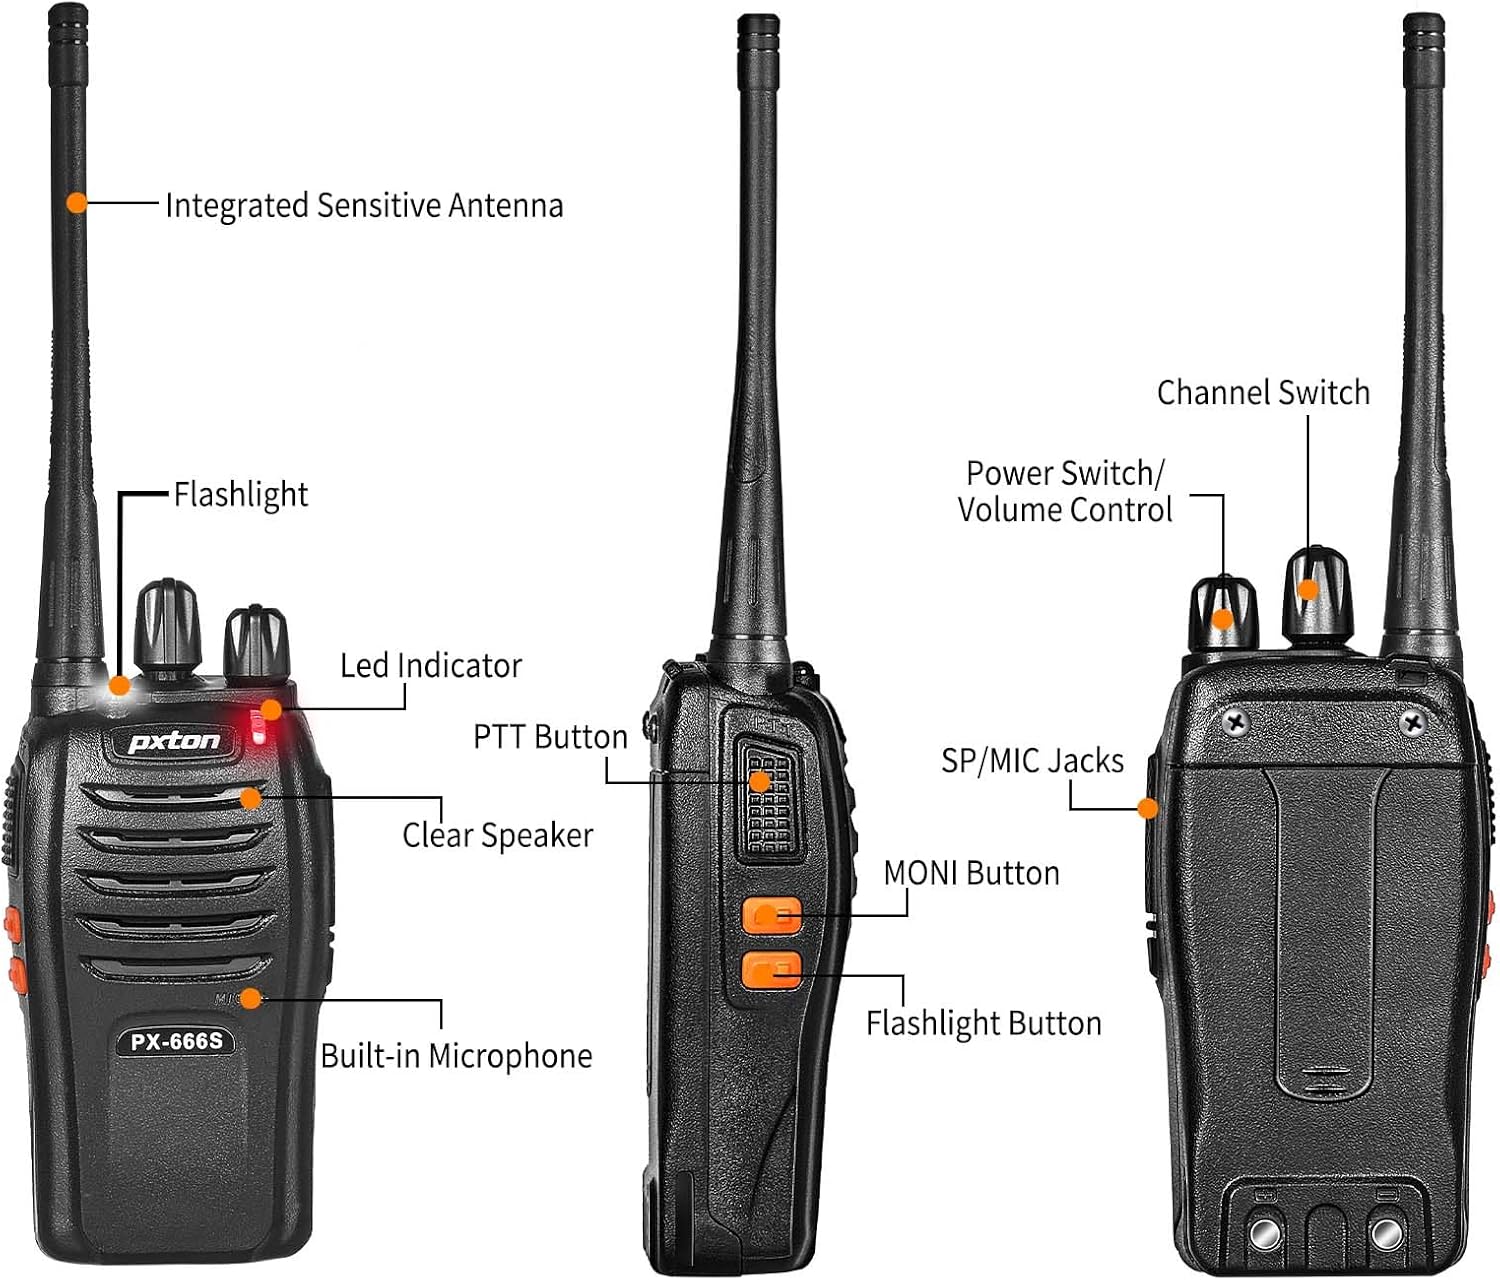
Immagine 2.1: Fronte e lato view of the pxton 666S with labeled components.

Immagine 2.2: Angolata view of the pxton 666S with labeled components.
3. Impostazione
3.1 Installazione e ricarica della batteria
- Assicurarsi che il walkie-talkie sia spento.
- Allineare la batteria agli ioni di litio da 1500 mAh con il vano batteria sul retro della radio.
- Spingere delicatamente la batteria in posizione finché non scatta in modo sicuro.
- To charge, place the walkie talkie into the charging base. Ensure the charging contacts align.
- Collegare l'adattatore di alimentazione alla base di ricarica e inserirlo in una presa a muro.
- The LED indicator on the radio will typically show red during charging and turn green when fully charged.
- Il tempo di ricarica completo è di circa 3-4 ore.

Image 3.1: Battery installation and specifications.

Image 3.2: Walkie talkie in charging base.
3.2 Collegamento degli accessori
- Antenna: Avvitare l'antenna in senso orario nel connettore sulla parte superiore della radio fino a quando non è saldamente avvitata. Non stringere eccessivamente.
- Clip da cintura: Attach the belt clip to the designated slots on the back of the radio using the provided screws.
- Cuffie: Insert the headphone jack into the SP/MIC jacks on the side of the radio. Ensure it is fully inserted for proper connection.
4. Istruzioni per l'uso
4.1 Accensione/spegnimento e controllo del volume
- Accensione: Rotate the Power Switch/Volume Control knob (top left knob) clockwise until you hear a click. The radio will emit a tone, and the LED indicator will flash.
- Spegni: Rotate the Power Switch/Volume Control knob counter-clockwise until you hear a click.
- Regolazione del volume: After powering on, continue rotating the Power Switch/Volume Control knob clockwise to increase volume or counter-clockwise to decrease volume.
4.2 Selezione del canale
- Rotate the Channel Switch knob (top right knob) to select your desired channel (1-16).
- Assicuratevi che tutte le radio del vostro gruppo siano impostate sullo stesso canale per la comunicazione.
4.3 Trasmissione e ricezione
- Per trasmettere: Press and hold the PTT (Push-To-Talk) button on the side of the radio. Speak clearly into the microphone (located below the speaker grille). Release the PTT button to stop transmitting.
- Per ricevere: When the PTT button is not pressed, the radio is in receive mode. You will hear incoming transmissions through the speaker or connected headphones.
4.4 Funzione VOX
The VOX function allows for hands-free operation. When activated, the radio will automatically transmit when it detects your voice, without needing to press the PTT button. Refer to your radio's programming software for VOX activation and sensitivity adjustment (programming cable sold separately).
4.5 Funzionamento della torcia
Press the dedicated Flashlight Button (often located below the PTT button) to turn the built-in LED flashlight on or off.
4.6 Monitoring and Scan Functions
- Pulsante MONI: Press and hold the MONI (Monitor) button to temporarily disable squelch and listen to all activity on the current channel, including weak signals.
- Funzione di scansione: The scan function allows the radio to automatically sweep through programmed channels to detect active transmissions. Activation and channel programming for scan typically require programming software.
4.7 Portata di comunicazione
The actual communication range varies significantly based on terrain and obstructions:
- Open Areas (e.g., flat terrain, mountain peaks): Fino a 3 miglia.
- Suburban/Countryside: Approximately 1.2 miles.
- City Limits (with buildings and obstructions): Approximately 0.6 miles.

Image 4.1: Communication distance in various environments.
5. Manutenzione
- Pulizia: Utilizzare un morbido, damp panno per pulire l'esterno della radio. Non utilizzare prodotti chimici o solventi aggressivi.
- Cura della batteria: Avoid fully discharging the battery frequently. Charge the battery regularly, even if not in use, to maintain its lifespan. Do not expose batteries to extreme temperatures.
- Magazzinaggio: Conservare il walkie-talkie in un luogo fresco e asciutto quando non lo si utilizza. Rimuovere la batteria se si prevede di non utilizzarlo per periodi prolungati.
- Antenna: Non piegare o modificare l'antenna, poiché ciò potrebbe comprometterne le prestazioni.
6. Risoluzione Dei Problemi
| Problema | Possibile causa | Soluzione |
|---|---|---|
| La radio non si accende. | La batteria è scarica o non è installata correttamente. | Caricare completamente la batteria. Reinstallare la batteria saldamente. |
| Impossibile trasmettere o ricevere. | Canale selezionato non corretto. Fuori portata. Batteria scarica. | Assicurarsi che tutte le radio siano sullo stesso canale. Avvicinarsi alle altre radio. Caricare la batteria. |
| Scarsa qualità audio o rumore statico. | Segnale debole. Ostruzioni. Volume troppo basso/alto. | Move to an open area. Adjust volume. Use MONI button to check for weak signals. |
| La durata della batteria è più breve del previsto. | Frequent transmissions. Old battery. Extreme temperatures. | Reduce transmission time. Replace old battery. Operate in moderate temperatures. |
7. Specifiche
| Caratteristica | Dettaglio |
|---|---|
| Marca | pxton |
| Numero di modello | 666S |
| Numero di canali | 16 |
| Gamma di frequenza | Frequenza ultra-alta |
| Raggio di conversazione (massimo) | 3 Miles (open areas) |
| Capacità della batteria | 1500mAh Ioni di litio |
| Durata media della batteria | Up to 120 hours standby, 12 hours continuous talk |
| Voltage | 3.7 Volt (CC) |
| Livello di resistenza all'acqua | Resistente all'acqua |
| Caratteristiche speciali | Long Range, Noise Reduction, VOX, Flashlight, Monitoring, Scan |
| Dispositivi compatibili | PX-888S, PX-777S, PX-888S Pro (with same programming tools/cables) |

Image 7.1: Size comparison of pxton 666S walkie talkie.
8. Garanzia e supporto
pxton offers a 30-day no-questions-asked replacement and refund policy for your peace of mind. Additionally, we provide lifelong after-sales service to ensure your satisfaction.
If you encounter any issues or have questions regarding your pxton 666S walkie talkie, please do not hesitate to reach out to pxton customer support. We are committed to assisting you and resolving any concerns you may have.
For support, please refer to the contact information provided with your purchase or visit the official pxton websito.