
1. Introduzione
This manual provides detailed instructions for the assembly, installation, operation, and maintenance of your TOOQ DB1202TN-B Dual Monitor Desk Mount with Laptop Tray. Please read this manual thoroughly before installation and use to ensure proper setup and safe operation. Keep this manual for future reference.

Figure 1: TOOQ DB1202TN-B Dual Monitor Desk Mount with Laptop Tray in use.
2. Informazioni sulla sicurezza
- Leggi tutte le istruzioni: Ensure you understand all instructions and warnings before installation and use.
- Capacità di peso: Do not exceed the maximum weight capacity of 9 kg (19.8 lbs) per monitor arm and 9 kg (19.8 lbs) for the laptop tray. Exceeding this limit may result in serious injury or property damage.
- Dimensioni del monitor: Questo supporto è progettato per monitor da 17 a 32 pollici.
- Laptop Size: The tray is suitable for laptops between 12 and 17 inches.
- Compatibilità VESA: Assicurati che i tuoi monitor siano compatibili con VESA (75x75mm o 100x100mm).
- Spessore della scrivania: Verify your desk thickness is within the specified range for clamp o installazione passacavo.
- Montaggio: Assemble the product according to the instructions. Incorrect assembly can lead to product failure or injury.
- Bambini: Tenere le parti di piccole dimensioni lontano dalla portata dei bambini.
- Manutenzione: Regularly check that the mount is secure and all fasteners are tight.
3. Contenuto della confezione
Verificare che tutti i componenti siano presenti e integri prima di procedere con l'installazione. Se qualche componente risulta mancante o danneggiato, contattare l'assistenza clienti.
- 1x Main Pole
- 2x Monitor Arms
- 1x Laptop Tray
- 1x Desk Clamp Assemblea
- 1x Grommet Mount Assembly
- 1x Hardware Kit (screws, washers, Allen keys)
- 1x Manuale di istruzioni

Figure 2: Included mounting hardware (M-A: M4x12, M-B: M5x12, M-C: D5 washers).
4. Specifiche
| Caratteristica | Dettaglio |
|---|---|
| Modello | DB1202TN-B |
| Compatibilità delle dimensioni del monitor | 17" - 32" |
| Capacità di peso del monitor | 9 kg (19.8 lbs) per arm |
| Laptop Size Compatibility | 12" - 17" |
| Laptop Tray Weight Capacity | 9 kg (19.8 libbre) |
| Compatibilità VESA | 75x75mm, 100x100mm |
| Angolo di inclinazione | +45° / -45° |
| Angolo di rotazione | +90° / -90° |
| Angolo di rotazione | +180° / -180° |
| Materiale | Acciaio legato |
| Colore | Nero |
| Dimensioni del prodotto | 43.5 x 29.5 x 13.5 cm (circa, come confezionato) |
| Peso del prodotto | 5.4 kg |

Figure 3: Detailed technical drawing with dimensions.
5. Configurazione e installazione
The TOOQ DB1202TN-B offers two installation options: desk clamp o montaggio tramite occhiello. Scegli il metodo più adatto alla tua scrivania.
5.1 Scrivania Clamp Installazione
- Fissare la scrivania clamp base to the main pole using the provided screws.
- Posizionare il clamp on the edge of your desk. Ensure the desk thickness is compatible with the clampgamma di.
- Stringere la clamp screw until the mount is securely fastened to the desk. Do not overtighten.

Figura 4: Scrivania clamp installazione.
5.2 Grommet Mount Installation
- Se la scrivania è dotata di un foro passacavo, rimuovere la copertura passacavo esistente.
- Assemble the grommet base components as per the diagram in the manual (not provided here, but implied).
- Insert the main pole through the grommet hole.
- Fissare la base passacavo da sotto la scrivania utilizzando la piastra e il dado forniti. Serrare saldamente.

Figure 5: Grommet mount installation.
5.3 Attaching Monitor Arms and Laptop Tray
- Slide the monitor arms onto the main pole at your desired height. Secure them with the locking collars.
- Slide the laptop tray arm onto the main pole and secure it.
- Attach the VESA plates to the back of your monitors using the appropriate M4x12 or M5x12 screws and D5 washers from the hardware kit. Ensure the screws are not overtightened and do not damage the monitor.
- Carefully slide the monitors (with VESA plates attached) onto the monitor arms. Ensure they click into place securely.
- Place your laptop onto the laptop tray. Adjust the width-adjustable claws to securely hold your laptop.

Figure 6: Attaching monitor arms and adjusting height.

Figure 7: Laptop holder with adjustable width claws (276-472mm).
6. Istruzioni per l'uso e regolazioni
This monitor mount offers various adjustment options to achieve an ergonomic setup.
- Regolazione dell'altezza: Loosen the locking collar on the main pole to slide the monitor arms and laptop tray up or down. Retighten the collar once the desired height is reached.
- Regolazione dell'inclinazione: The monitor and laptop tray can be tilted +45° to -45°. Use the provided Allen key to adjust the tension if the screen does not hold its position.
- Regolazione della rotazione: Swivel your monitors up to 90° horizontally or vertically.
- Regolazione della rotazione: Rotate your monitors +180° to -180° for portrait or landscape orientation.
- Laptop Tray Tilt: The laptop tray also offers tilt adjustment for comfortable typing and viewangoli di inclinazione.
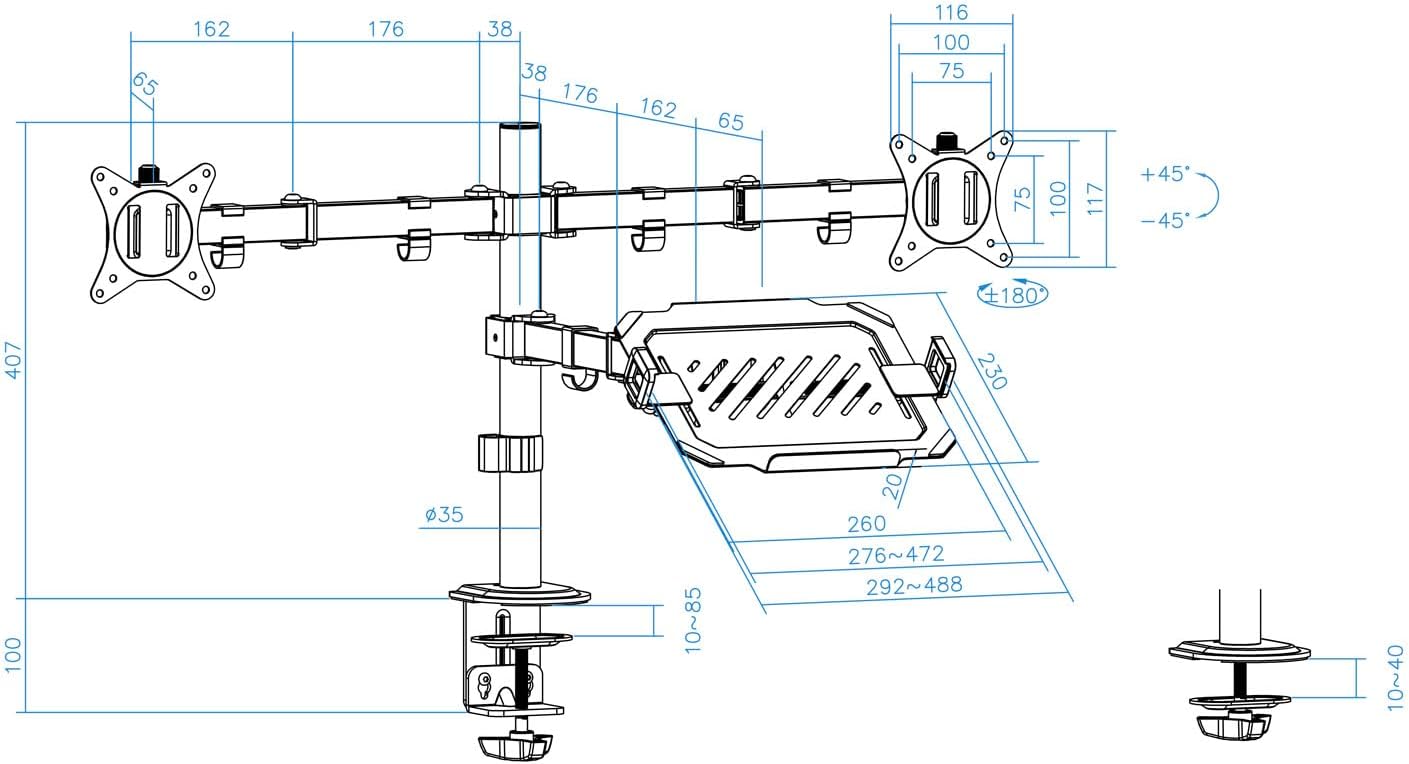
Figure 8: Laptop tray tilt adjustment.

Figure 9: Monitor swivel and rotation capabilities.
6.1 Gestione dei cavi
Utilize the integrated cable clips along the arms and main pole to route and organize your monitor and laptop cables. This helps maintain a clean and tidy workspace.

Figure 10: Cable management clips.
7. Manutenzione
- Pulizia: Pulisci il supporto con un panno morbido eamp panno. Evitare detergenti abrasivi o solventi.
- Controllo di tenuta: Periodically check all screws and fasteners to ensure they remain tight and secure. Retighten as necessary.
- Lubrificazione: No lubrication is required for normal operation.
8. Risoluzione Dei Problemi
- Il monitor si abbassa o non mantiene la posizione:
- Ensure the monitor weight does not exceed the maximum capacity (9 kg per arm).
- Tighten the tilt adjustment screw on the VESA plate using the provided Allen key.
- Il monte è instabile:
- Verify the desk clamp o il supporto passacavo sia fissato saldamente alla scrivania.
- Ensure the main pole and arm collars are tightened.
- Laptop tray sags:
- Ensure the laptop weight does not exceed the maximum capacity (9 kg).
- Tighten the tilt adjustment screw for the laptop tray.
- Parti mancanti:
- Refer to the "Package Contents" section. If parts are missing, contact customer support.
9. Garanzia e supporto
For warranty information or technical support, please refer to the documentation included with your purchase or visit the official TOOQ websito. Conserva la ricevuta d'acquisto come prova d'acquisto.