Introduzione
This manual provides essential information for the setup, operation, and maintenance of your new Tucus replacement remote control. This remote is designed to be compatible with various JVC Micro COMPACT COMPONENT Stereo Systems, including models RM-SUXQ30UW, RM-SUXQ30US, UX-Q30S, UX-Q30B, UX-Q30P, and UX-Q30W. While it is a replacement remote and not the original device's remote, common functions are expected to operate normally. Please review this guide thoroughly to ensure proper use and longevity of your remote control.
Impostare
1. Installazione della batteria
The remote control requires two (2) AA batteries (not included) for operation. Follow these steps to install them:
- Individuare il vano batterie sul retro del telecomando.
- Per aprire il coperchio del vano batteria, farlo scorrere verso il basso o verso l'esterno.
- Inserire due batterie AA, assicurandosi che i terminali positivo (+) e negativo (-) siano allineati correttamente con le marcature all'interno del vano.
- Riposizionare il coperchio del vano batteria finché non scatta in posizione.

Figura 1: Retro del telecomando con il coperchio del vano batterie.
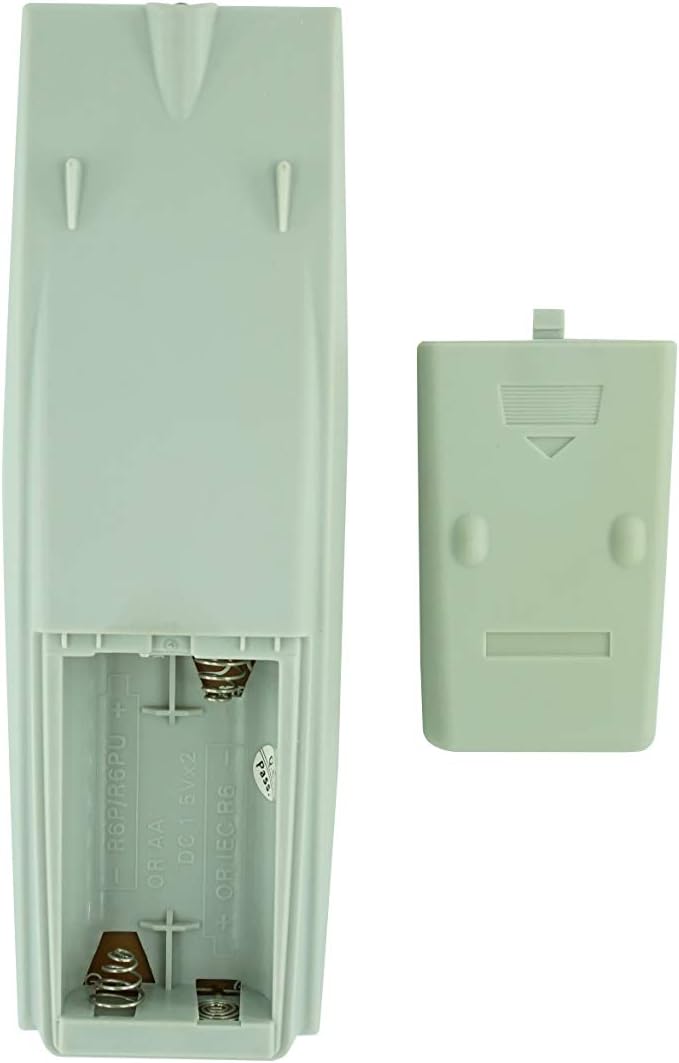
Figura 2: Vano batteria con coperchio rimosso, pronto per l'inserimento della batteria.
2. Utilizzo iniziale
Once batteries are installed, the remote control is ready for use. Point the remote directly at your JVC Micro COMPACT COMPONENT Stereo System. No additional programming is typically required for this replacement remote for the listed compatible models.
Istruzioni per l'uso
This remote control provides access to the primary functions of your JVC stereo system. Below is a general overview of common button functions. Please note that while the functionality is guaranteed, the exact button layout may differ slightly from your original remote.

Figura 3: Fronte view del telecomando con disposizione dei pulsanti.
Funzioni chiave:
- STANDBY/ACCESO: Powers the stereo system on or off.
- DISPLAY: Changes or shows display information.
- OROLOGIO/TIMER: Accede alle impostazioni dell'orologio e del timer.
- SONNO: Sets a sleep timer for automatic power off.
- Pulsanti numerici (0-9, +10): Direct input for track numbers, radio frequencies, etc.
- BASSI / ALTI: Regola i livelli dei bassi e degli acuti.
- Navigation (UP, DOWN, LEFT, RIGHT, SET): Utilizzato per la navigazione e la selezione del menu.
- Playback Controls (PLAY/PAUSE, STOP, FAST FORWARD, REWIND, SKIP): Controlla la riproduzione multimediale.
- Source Selection (CD, TAPE, FM/AM, AUX/MD): Seleziona la sorgente di ingresso audio.
- FM MODE / REV.MODE: Toggles FM stereo/mono or tape reverse mode.
- AUTO PRESET: Esegue la scansione e salva automaticamente le stazioni radio.
- PRGM / RANDOM / REPEAT: Controls program, random, and repeat playback modes.
- PTY SEARCH / PTY SELECT: For Program Type search and selection on radio.
- DISPLAY / TA/News / Info: Provides additional display information or traffic/news announcements.
- AHB PRO: Attiva o disattiva Active Hyper-Bass PRO.
- VOLUME (+/-): Regola il livello del volume principale.
For specific advanced functions, please refer to the original instruction manual of your JVC Micro COMPACT COMPONENT Stereo System.
Manutenzione
Pulizia del telecomando
Per preservare l'aspetto e la funzionalità del telecomando, pulirlo regolarmente:
- Pulisci la superficie con un panno morbido e asciutto.
- Per sporco ostinato, leggermente dampPulire il panno con acqua o con un detergente delicato e non abrasivo. Non spruzzare il detergente direttamente sul telecomando.
- Evitare l'uso di prodotti chimici aggressivi, solventi o spugne abrasive, poiché potrebbero danneggiare la finitura del telecomando o i componenti interni.
Sostituzione della batteria
Sostituisci le batterie quando la risposta del telecomando diventa lenta o smette di funzionare. Sostituisci sempre entrambe le batterie contemporaneamente con batterie nuove dello stesso tipo (AA). Non mischiare batterie vecchie e nuove o tipi diversi di batterie.
Magazzinaggio
Se il telecomando non verrà utilizzato per un periodo prolungato, rimuovere le batterie per evitare perdite e potenziali danni al telecomando.
Risoluzione dei problemi
- Il telecomando non risponde:
- Controllare che le batterie siano inserite correttamente con la polarità corretta (+/-).
- Sostituire le vecchie batterie con quelle nuove.
- Ensure there are no obstructions between the remote control and the stereo system's infrared receiver.
- Assicuratevi di trovarvi nel raggio d'azione del telecomando.
- Some buttons not working or unexpected behavior:
- This remote is a replacement and while common functions are supported, the button layout or specific advanced functions might not perfectly match your original remote. Refer to the button layout image in the Operating Instructions section.
- Ensure the stereo system is powered on and set to the correct input source.
- Il telecomando sembra danneggiato:
- If the remote has been dropped or exposed to liquids, internal damage may have occurred. In such cases, replacement may be necessary.
Specifiche
| Marca | Generico |
| Produttore | TUCUS |
| Numero di modello | DVT-C9F24992D65E215A7DD6011D34514A46 |
| Modelli compatibili | JVC RM-SUXQ30UW, RM-SUXQ30US, UX-Q30S, UX-Q30B, UX-Q30P, UX-Q30W Micro COMPACT COMPONENT Stereo SYSTEM |
| Tipo di materiale | Altro |
| Fonte di alimentazione | 2 batterie AA (non incluse) |
| ASIN | B0D79958PW |
| Data prima disponibilità | 17 giugno 2024 |
Informazioni sulla garanzia
This product comes with a 3-month warranty from the date of purchase. This warranty covers manufacturing defects and ensures the remote control functions as intended for compatible models. Please retain your proof of purchase for any warranty claims.
Assistenza clienti
If you have any questions regarding the compatibility or functionality of this remote control, or if your specific device model is not listed, please contact the seller directly for assistance. The seller stocks a wide range of remote controls and parts and can confirm suitability for your needs.
For general inquiries or to provide feedback, please refer to the contact information provided by your retailer or the seller.


