1. Introduzione
The PEAKMETER PM2016S is a compact and intelligent digital clamp meter designed for accurate electrical measurements. This instrument features a liquid crystal display with a maximum count value of 5999 and a backlight function for improved visibility in various environments. It offers a range of measurement functions with automatic range selection, making it suitable for both beginners and experienced users. The PM2016S can measure AC and DC voltage, AC current, resistance, frequency, and also includes continuity testing, Non-Contact Voltage (NCV) detection, and V/Ω/A auto-scan capabilities. Its portable design ensures ease of use and convenience.
2. Informazioni sulla sicurezza
WARNING: To avoid electric shock or personal injury, read and understand all instructions and safety information before using this instrument.
- Prima dell'uso, assicurarsi sempre che lo strumento sia in buone condizioni di funzionamento.
- Non applicare più del volume nominaletage, as marked on the instrument, between the terminals or between any terminal and earth ground.
- Prestare attenzione quando si lavora con voltagsuperiori a 30 V CA RMS, 42 V di picco o 60 V CC. Questi voltagrappresentano un rischio di scossa elettrica.
- Do not use the instrument if it appears damaged or if the insulation is compromised.
- Ensure the test leads are in good condition, without any cracks or breaks in the insulation.
- Prima di modificare le funzioni, scollegare sempre i puntali di prova dal circuito.
- Per garantire letture accurate, sostituire immediatamente le batterie quando compare l'indicatore di batteria scarica.
- Rispettare i codici di sicurezza locali e nazionali.
This instrument complies with EN61010-1, EN61010-2-033, EN61326, CAT. III 600V safety ratings.
3. Caratteristiche del prodotto
- High Quality Jaw Head: Durable and precise clamp mechanism for current measurement.
- Clear LCD Display and Backlight: Easy-to-read 6000-count display with backlight for visibility in various lighting conditions.
- Facile da usare: Simple, intuitive controls, often requiring just one click for common functions.
- Auto Range: Seleziona automaticamente l'intervallo di misurazione appropriato, semplificando il funzionamento.
- Data Hold: Blocca la lettura visualizzata per una comoda registrazione.
- Volume senza contattotage (NCV) Rilevamento: Rileva in modo sicuro la tensione CAtage senza contatto diretto.
- V/Ω/A Auto Scan: Automatically identifies and measures voltage, resistenza o corrente.
- Test di continuità: Controlla la continuità elettrica tramite un cicalino acustico.
- Misurazione della frequenza: Measures frequency via clamp o volumetage ingresso.
- Compatto e leggero: Design portatile per la massima portabilità e facilità d'uso.
- Spegnimento automatico: Si spegne automaticamente dopo 10 minuti di inattività per preservare la durata della batteria.
4. Contenuto della confezione

Il pacchetto in genere include i seguenti articoli:
- Scatola colorata (imballaggio)
- PEAKMETER PM2016S Digital Clamp metro
- Cavi di prova (rosso e nero)
- AAA Batteries (2x 1.5V)
- Manuale d'uso
Description: This image displays the complete contents of the PEAKMETER PM2016S Digital Clamp Multimeter package, including the device itself, test leads, batteries, and the user manual, all presented within its retail packaging.
5. Impostazione
5.1 Installazione della batteria
The PM2016S requires two 1.5V AAA batteries. To install or replace batteries:
- Assicurarsi che il contatore sia spento.
- Individuare il coperchio del vano batterie sul retro del misuratore.
- Utilizzare un cacciavite per aprire il vano batteria.
- Inserire le due batterie AAA, rispettando la polarità corretta (+ e -).
- Riposizionare il coperchio del vano batteria e fissarlo con la vite.
5.2 Collegamento dei puntali di prova
Per volumetage, resistance, frequency (voltage), and continuity measurements, connect the test leads:
- Inserire il puntale di prova nero nel jack di ingresso "COM" (comune).
- Inserire il puntale di prova rosso nel jack di ingresso "VΩ".
6. Istruzioni per l'uso
The PM2016S features an auto-ranging function, simplifying most measurements. Press the red power button to turn the meter on or off. The meter will typically start in auto-scan mode (V/Ω/A Auto Scan).
6.1 CA/CC voltage Misurazione
- Collegare i puntali di prova come descritto nella Sezione 5.2.
- Turn on the meter. It will automatically detect AC or DC voltage.
- Toccare i puntali di prova rosso e nero nei punti del circuito in cui si desidera misurare il volumetage.
- Leggi il vol.tage valore sul display LCD.
Description: This video demonstrates the unboxing of the PEAKMETER PM2016S and its accessories, followed by a practical demonstration of measuring AC voltage using the test leads. The user connects the leads to a power outlet and the meter displays the voltage lettura.
6.2 Misurazione della corrente alternata (Clamp Funzione)
- Assicurarsi che il contatore sia acceso.
- Premere il tasto clamp grilletto per aprire le ganasce.
- Enclose a single conductor (not a bundle of wires) within the jaws. Ensure the jaws are fully closed.
- The meter will display the AC current reading.
Description: This video demonstrates the AC current measurement function of the PEAKMETER PM2016S. The user clamps the meter around a power cable connected to an appliance (kettle), and the meter displays the current draw.
6.3 Misurazione della frequenza
The PM2016S can measure frequency in two ways:
- Via Test Leads (Voltage Frequency): Nel voltage measurement mode, the meter can display frequency. Press the "Hz/NCV" button to toggle to frequency display.
- Via Clamp (Current Frequency): Quando si misura la corrente alternata con il clamp, the meter can also display the frequency of the current. Press the "Hz/NCV" button to toggle to frequency display.

Description: This image shows the clear LCD display of the PM2016S, highlighting its backlight feature and the various measurement indicators, including frequency (Hz).
6.4 Senza contatto voltage (NCV) Rilevamento
- Press the "Hz/NCV" button to activate NCV mode. The display will show "NCV".
- Move the top end of the meter near a live AC voltage fonte.
- The meter will beep and the NCV indicator will light up, with the frequency of beeps and light increasing man mano che si avvicina al volumetage fonte.
Description: This video demonstrates the NCV (Non-Contact Voltage) function of the PEAKMETER PM2016S. The user activates NCV mode and brings the meter near a power outlet, showing the audible and visual alerts when voltage viene rilevato.
6.5 Prova di continuità
- Collegare i puntali di prova come descritto nella Sezione 5.2.
- The meter will automatically enter continuity mode if resistance is low.
- Mettere a contatto i due punti di cui si desidera verificare la continuità con le sonde di prova.
- If there is continuity (resistance less than 30Ω), the buzzer will sound.
6.6 Mantenimento dei dati e retroilluminazione
- Data Hold: Press the "HOLD" button (often combined with the backlight button) to freeze the current reading on the display. Press again to release.
- Retroilluminazione: Press and hold the "HOLD" button (or a dedicated backlight button if present) to turn the backlight on or off.

Description: This image highlights the user-friendly design of the PM2016S, showing the main power button and other function buttons, emphasizing its easy operation.
7. Manutenzione
7.1 Pulizia
Pulisci la custodia con l'adamp panno e detergente delicato. Non utilizzare abrasivi o solventi. Mantenere i terminali di ingresso liberi da sporco e umidità.
7.2 Sostituzione della batteria
Quando sul display compare l'indicatore di batteria scarica, sostituire le batterie come descritto nella Sezione 5.1. Rimuovere le batterie se il misuratore non viene utilizzato per un periodo prolungato per evitare perdite.
8. Risoluzione Dei Problemi
- Nessun display/misuratore non acceso: Controllare l'installazione delle batterie e assicurarsi che non siano scariche. Sostituirle se necessario.
- Letture imprecise: Ensure test leads are properly connected. Check for damaged leads. Verify the correct measurement function is selected (though auto-ranging minimizes this). Ensure the clamp le ganasce sono completamente chiuse per le misurazioni di corrente.
- "OL" o indicazione di sovraccarico: The measured value exceeds the meter's range. Select a higher range if available, or ensure the input is within the meter's specifications.
- Nessun rilevamento NCV: Ensure NCV mode is active. The NCV sensor is typically at the top of the clamp head; ensure it is close to the AC source.
9. Specifiche
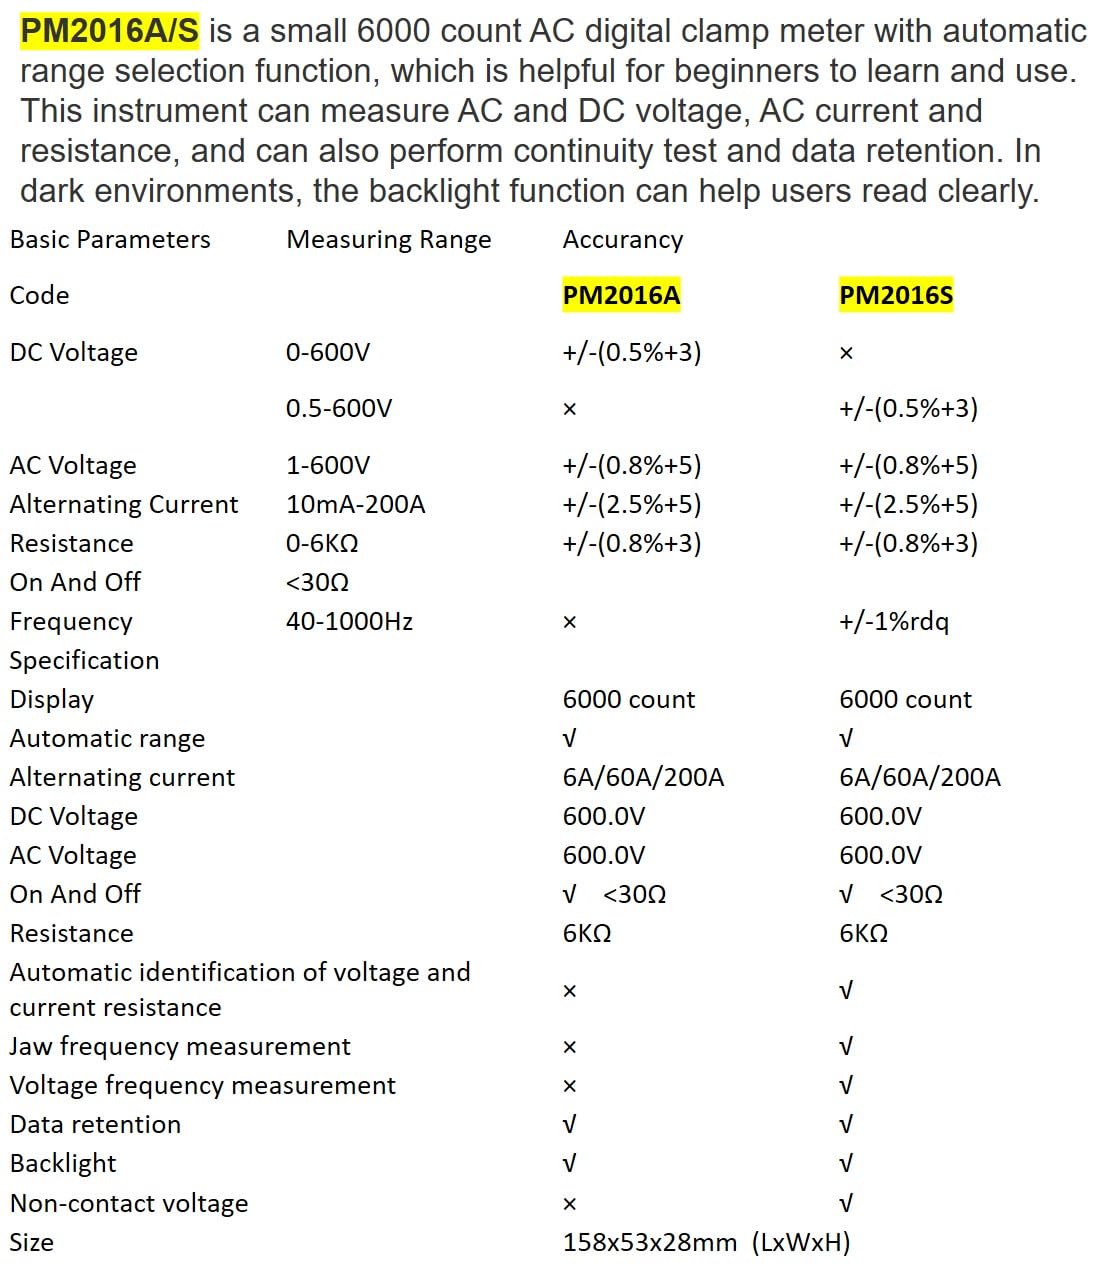
Description: This image presents a comprehensive table detailing the basic parameters, measuring ranges, and accuracy for both the PM2016A and PM2016S models, including features like display count, auto-ranging, and NCV.
| Parametro | Range (PM2016S) | Accuracy (PM2016S) |
|---|---|---|
| Volume DCtage | 0.5~600 V | ±(0.5%+3) |
| Volume ACtage | 1.0~600 V | ±(0.8%+5) |
| Corrente alternata | 6A/60A/200A | ±(2.5%+8) |
| Resistenza | 0~6 kΩ | ±(0.8%+3) |
| Frequenza | Da 60 Hz a 1000 Hz | ±(1.0%+5) |
| Display | 6000 conteggi | |
| Auto Range | SÌ | |
| Continuità | <30Ω | |
| V/Ω/A Auto Scan | SÌ | |
| Frequenza (Clamp) | SÌ | |
| Frequency (Voltage) | SÌ | |
| Conservazione dei dati | SÌ | |
| Retroilluminazione | SÌ | |
| VNC | SÌ | |
| Alimentazione elettrica | 2*1.5V AAA Batteries | |
| Peso netto | 122.4g (senza batterie) | |
| Misurare | 158mm*55mm*29mm | |
| Jaw Size | Diametro 20mm | |
| Valutazione di sicurezza | EN61010-1, EN61010-2-033, EN61326, CAT. III 600V | |

Description: This image provides a visual representation of the physical dimensions of the PEAKMETER PM2016S, including its length, width, and jaw opening size, along with its weight.
10. Garanzia e supporto
The PEAKMETER PM2016S Digital Clamp Multimeter comes with a Garanzia di 1 anno dalla data di acquisto. Questa garanzia copre difetti di materiali e lavorazione in condizioni di normale utilizzo.
For technical support, warranty claims, or service inquiries, please contact your retailer or the manufacturer directly. Keep your purchase receipt as proof of purchase for warranty purposes.