1. Introduzione
The PEAKMETER PM8250 is a professional handheld digital multimeter designed for accurate and reliable electrical measurements, particularly in photovoltaic (PV) systems. It features a high DC voltage measurement capability up to 1700V, auto and manual ranging, and various functions including AC/DC voltage, current, resistance, capacitance, frequency, temperature, and specialized functions like LPF, MAX/MIN/PEAK, Continuity, Diode, and NCV detection. This manual provides essential information for the safe and effective operation of your PM8250 multimeter.

Figura 1: Fronte view of the PEAKMETER PM8250 Multimeter, showing the display, rotary switch, and function buttons.
2. Informazioni sulla sicurezza
To ensure safe operation and service of the multimeter, follow these safety precautions:
- Rispettare sempre i codici di sicurezza locali e nazionali.
- Non utilizzare il misuratore se appare danneggiato o se la custodia è aperta.
- Verificare il funzionamento del misuratore misurando un volume nototage o corrente prima dell'uso.
- Observe the input limits for each measurement range. The maximum DC voltage è 1700V.
- Prestare attenzione quando si lavora con voltagsuperiori a 60 V CC o 30 V CA RMS, poiché rappresentano un rischio di scossa elettrica.
- Assicurarsi che i puntali di prova siano in buone condizioni e correttamente collegati.
- Sostituire le batterie non appena appare l'indicatore di batteria scarica per evitare letture errate.
- The device complies with safety ratings EN61010-1, EN61010-2-030, EN61326, and CAT III 1000V.
3. Caratteristiche del prodotto
The PM8250 multimeter offers a range of features for versatile measurement:
- Display: Display digitale da 6000 conteggi.
- Gamma: Automatic and Manual range selection.
- Alto volumetage CC: Misura il volume DCtage up to 1700V, suitable for photovoltaic panels.
- Misurazione relativa: Misura la differenza tra un valore memorizzato e la lettura corrente.
- MAX/MIN/PEAK: Records maximum, minimum, and peak values during a measurement session.
- LPF (filtro passa basso): Filters out high-frequency interference for accurate AC voltage measurements in variable frequency drive (VFD) environments.
- Test di continuità: Indicazione acustica della continuità del circuito.
- Prova del diodo: Controlla la funzionalità del diodo.
- NCV (Volume senza contattotage) Rilevamento: Rileva AC voltage senza contatto diretto.
- Misura della temperatura: Measures temperature using a K-type probe.
- Spegnimento automatico: Automatically powers off after approximately 10 minutes of inactivity to conserve battery life.
- Retroilluminazione: Illumina il display per l'uso in condizioni di scarsa illuminazione.
- Data Hold: Blocca la lettura corrente sul display.
4. Impostazione
4.1 Installazione della batteria
The PM8250 requires four 1.5V AA batteries for operation. To install or replace batteries:
- Assicurarsi che il multimetro sia spento e che i puntali di prova siano scollegati.
- Individuare il coperchio del vano batterie sul retro del misuratore.
- Svitare la/le vite/i di fissaggio e rimuovere il coperchio.
- Inserire quattro batterie AA da 1.5 V, rispettando la polarità corretta (+/-) come indicato all'interno del vano.
- Richiudere il coperchio del vano batteria e fissarlo con la/le vite/i.
4.2 Collegamento dei puntali di prova
Connect the test leads to the appropriate input jacks for your desired measurement:
- Inserire il puntale nero nel COM Jack (comune).
- Per volumetage, resistance, capacitance, frequency, diode, continuity, and temperature measurements, insert the red test lead into the VΩHzTemp cricco.
- Per misurazioni di corrente fino a 600 mA, inserire il puntale di prova rosso nel mA cricco.
- For current measurements up to 10A, insert the red test lead into the 10A jack (if applicable, refer to meter markings).

Figura 2: Indietro view of the multimeter showing the battery compartment and test lead connections.
5. Istruzioni per l'uso
To operate the multimeter, turn the rotary switch to the desired function. The meter will typically default to auto-ranging. Press the 'RANGE' button to switch between auto and manual ranging if needed.
5.1 Volume CCtage Misurazione (V–)
Per misurare DC voltage, including high voltage PV systems:
- Posizionare il selettore su V– position (1700V range).
- Collegare i puntali di prova in parallelo al circuito o al componente in prova.
- Leggi il vol.tage valore sul display.

Figura 3: Misurazione del volume DCtage of a battery using the multimeter.
5.2 Volume ACtage Misurazione (V∼)
Per misurare AC voltage:
- Posizionare il selettore su V posizione.
- Connect the test leads in parallel to the AC source.
- Leggi il vol.tage valore sul display.
- Premere il tasto LPF button to activate the Low Pass Filter for measurements in noisy environments (e.g., VFD outputs).
5.3 Misurazione della resistenza (Ω)
Per misurare la resistenza:
- Posizionare il selettore su Ombra posizione.
- Assicurarsi che il circuito sia disattivato prima di collegare i puntali di prova al componente.
- Leggere il valore di resistenza sul display.

Figure 4: Measuring resistance using the multimeter.
5.4 Current Measurement (mA/A)
To measure DC or AC current:
- Posizionare il selettore su mA or A posizione. Utilizzare il FUNC button to select AC or DC current.
- Connect the test leads in series with the circuit. Ensure the correct input jack (mA or 10A) is used.
- Leggere il valore corrente sul display.
- Attenzione: Never connect the meter in parallel when measuring current, as this can blow the fuse or damage the meter.
5.5 Misurazione della temperatura (Temp)
Per misurare la temperatura:
- Posizionare il selettore su Temporaneo posizione.
- Insert the K-type thermocouple probe into the VΩHzTemp E COM jacks.
- Posizionare la punta della termocoppia sull'oggetto da misurare.
- Press the ℃/℉ button to switch between Celsius and Fahrenheit units.
5.6 Altre funzioni
- Continuità/Diodo: Set the rotary switch to the continuity/diode position. Use the FUNC pulsante per passare da una modalità all'altra.
- Valore NC: Posizionare il selettore su VNC position. Bring the top of the meter near an AC voltage source to detect its presence.
- MAX/MIN/PEAK: Premere il tasto MAX/MIN/PICCO button to cycle through maximum, minimum, and peak hold readings.
- Parente: Premere il tasto REL button to store the current reading as a reference and display subsequent measurements relative to it.
- Data Hold: Premere il tasto PRESA pulsante per bloccare la lettura corrente del display. Premere nuovamente per rilasciare.
- Retroilluminazione: Press the backlight button (often combined with another function) to turn the display backlight on/off.
6. Manutenzione
6.1 Pulizia
Pulisci la custodia con l'adamp panno e detergente delicato. Non utilizzare abrasivi o solventi. Assicurarsi che il misuratore sia asciutto prima dell'uso.
6.2 Sostituzione della batteria
Sostituire le batterie quando sul display compare l'indicatore di batteria scarica. Per le istruzioni, fare riferimento alla Sezione 4.1.
6.3 Sostituzione del fusibile
If the current measurement function fails, the fuse may need replacement. The meter uses a 600mA FUSED input for mA ranges and a 10A MAX input for higher current ranges. Fuse replacement should only be performed by qualified personnel. Use only fuses of the specified type and rating.
6.4 Conservazione
Se il misuratore non viene utilizzato per un periodo prolungato, rimuovere le batterie per evitare perdite e danni.
7. Risoluzione Dei Problemi
- Nessuna visualizzazione: Controllare l'installazione e la carica delle batterie. Sostituire le batterie se necessario.
- Letture errate: Ensure test leads are properly connected and not damaged. Verify the correct function and range are selected. Check for blown fuses in current modes.
- Spegnimento automatico: This is a normal function. Press any button or turn the rotary switch to reactivate the meter.
8. Specifiche
| Misurazione | Allineare | Precisione |
|---|---|---|
| Volume DCtage | 600mV/6V/60V/600V/1700V | ±(0.8%+3) |
| Volume ACtage | 600mV/6V/60V/600V/1000V | ±(1.0%+3) |
| Corrente continua | 60mA / 600mA | ±(1.2%+3) |
| Corrente alternata | 60mA / 600mA | ±(1.5%+3) |
| Resistenza | 600Ω/6kΩ/60kΩ/600kΩ/6MΩ | ±(1.2%+5) |
| 60MΩ | ±(2.0%+5) | |
| Capacità | 10nF/100nF/1µF/10µF/100µF | ±(3.0%+5) |
| 1 mF/10 mF | ±(4.0%+5) | |
| 100 mF | ±(5.0%+5) | |
| Frequenza | Da 10 Hz a 10 MHz | ±(1.0%+5) |
| Ciclo di lavoro | 5%~95% | ±(3.0%+5) |
| Temperatura | -20 ℃ ~ 1000 ℃ (-4 ℉ ~ 1832 ℉) | ±(2.0%+2) |
Specifiche generali:
- Display: 6000 conteggi
- Alimentazione elettrica: 4 batterie AA da 1.5 V
- Misurare: Dimensioni: 204 mm x 94 mm x 57 mm
- Peso: Circa 410 g
- Valutazione di sicurezza: EN61010-1, EN61010-2-030, EN61326, CAT III 1000V
- Spegnimento automatico: After about 10 minutes of no operation
- Massimo volume di eserciziotage: 1700 Volt (CC)
- Valutazione superiore di temperatura: 60 gradi Celsius
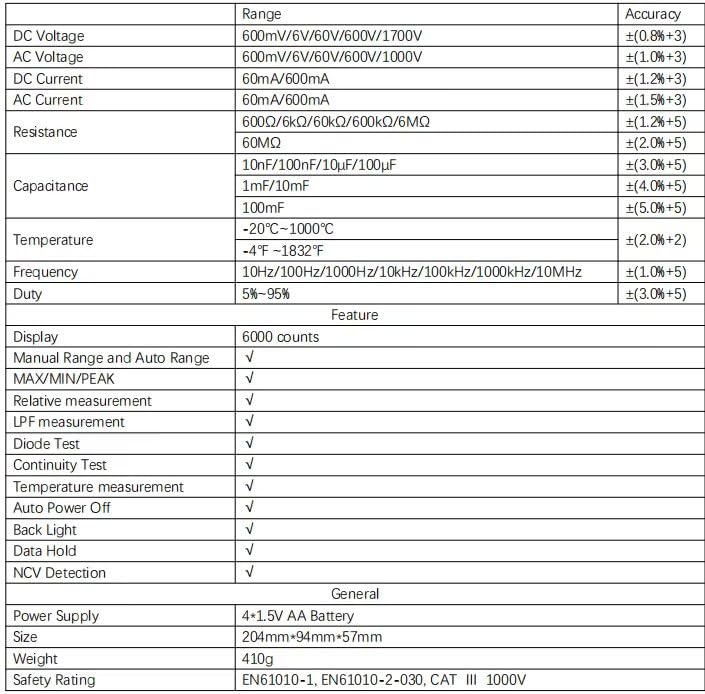
Figure 5: Detailed specifications table for the PM8250 multimeter.
9. Garanzia e supporto
The PEAKMETER PM8250 multimeter comes with an EU Spare Part Availability Duration of 1 year. For warranty claims, technical support, or service inquiries, please contact your original point of purchase or the manufacturer directly. Keep your purchase receipt as proof of purchase.