1. Introduzione
The PEAKMETER PM8215 is a compact, handheld digital multimeter designed for measuring various electrical parameters. This instrument offers high stability and accuracy, featuring a 4000-count display. It is suitable for a wide range of users, from hobbyists to professionals, for tasks requiring AC/DC voltage, AC/DC current, resistance, frequency, and capacitance measurements, along with continuity and diode testing.
2. Informazioni sulla sicurezza
Always read and understand all safety instructions before operating the multimeter.
- This device complies with safety standards EN61010-1, EN61010-2-033, EN61326, and is rated for CAT. III 600V.
- Non applicare voltage o corrente che supera i limiti massimi specificati per il multimetro.
- Prestare la massima attenzione quando si lavora con circuiti sotto tensione. Alta vol.tagpossono causare gravi lesioni o la morte.
- Assicurarsi che i puntali di prova siano in buone condizioni e che l'isolamento non presenti danni.
- Do not operate the multimeter if it appears damaged or if the casing è aperto.
- Per garantire letture accurate, sostituire immediatamente la batteria quando appare l'indicatore di batteria scarica.
- Prima di modificare le funzioni, scollegare sempre i puntali di prova dal circuito.
3. Prodotto finitoview
3.1 Caratteristiche principali
- Display: Display digitale da 4000 conteggi.
- Funzioni di misurazione: Volume AC/DCtage, AC/DC Current, Resistance, Frequency, Capacitance.
- Funzioni speciali: Buzzer, Continuity Test, Diode Test, Low Battery Indication.
- Modalità operative: Auto Range, Auto Power Off.
- Portabilità: Mini pocket design, lightweight (approx. 75g), and ultra-thin (12mm thickness).
- Sicurezza: Equipped with a 400mA/250V fuse for protection.
3.2 Caratteristiche fisiche


4. Impostazione
4.1 Installazione della batteria
The PM8215 multimeter is powered by one 3.0V CR2032 button battery.
- Assicurarsi che il multimetro sia spento.
- Individuare il vano batteria sul retro del dispositivo.
- Utilizzare un piccolo cacciavite o una moneta per aprire il coperchio della batteria.
- Inserire la batteria CR2032 rispettando la polarità corretta (+/-).
- Chiudere saldamente il coperchio della batteria.
Nota: Per mantenere la precisione della misurazione, sostituire la batteria quando sul display compare l'indicatore di batteria scarica.
5. Istruzioni per l'uso
5.1 Accensione/spegnimento
To power on the multimeter, rotate the central selector knob from the 'OFF' position to any desired measurement function. To power off, rotate the knob back to the 'OFF' position.
5.2 Auto Range Function
The PM8215 features an auto-ranging function, which automatically selects the appropriate measurement range. This simplifies operation as you do not need to manually select the range for most measurements.
5.3 Funzioni di misura
Connect the test leads to the appropriate input jacks and the circuit under test. Select the desired function using the rotary switch.
- Volume DCtage (V–): Rotate the knob to the 'V–' position. Connect the red test lead to the positive side and the black test lead to the negative side of the DC voltage fonte.
- Volume ACtage (V∼): Rotate the knob to the 'V∼' position. Connect the test leads across the AC voltage fonte.
- DC Current (mA/µA–): Rotate the knob to the 'mA/µA–' position. Use the 'SEL' button to switch between mA and µA. Connect the multimeter in series with the circuit.
- AC Current (mA/µA∼): Rotate the knob to the 'mA/µA∼' position. Use the 'SEL' button to switch between mA and µA. Connect the multimeter in series with the circuit.
- Resistenza (Ω): Rotate the knob to the 'Ω' position. Ensure the circuit is de-energized before measuring resistance. Connect the test leads across the component.
- Frequenza (Hz): Rotate the knob to the 'Hz' position. Connect the test leads across the signal source.
- Capacità (F): Rotate the knob to the 'F' position. Ensure the capacitor is discharged before measurement. Connect the test leads across the capacitor.
- Test diodo (→|): Rotate the knob to the '→|' position. Connect the red lead to the anode and the black lead to the cathode of the diode. The display will show the forward voltage goccia. Invertire i cavi per verificare se il circuito è aperto.
- Continuity Test (♫): Rotate the knob to the '♫' position. If the resistance between the test leads is below a certain threshold (typically 50Ω), the buzzer will sound, indicating continuity.
5.4 pulsanti funzione
- SEL (Seleziona): Used to toggle between different measurement types within a single rotary switch position (e.g., AC/DC current, or diode/continuity).
- RANGE: Allows manual selection of measurement ranges, overriding the auto-ranging function. Press repeatedly to cycle through available ranges.
- TENERE: Blocca la lettura corrente sul display. Premere di nuovo per rilasciare.
6. Manutenzione
6.1 Pulizia
Pulisci il multimetro casing con annuncioamp panno e detergente delicato. Non utilizzare detergenti abrasivi o solventi. Assicurarsi che il dispositivo sia completamente asciutto prima dell'uso.
6.2 Sostituzione della batteria
Refer to Section 4.1 for instructions on replacing the CR2032 button battery.
6.3 Sostituzione del fusibile
The multimeter is equipped with a 400mA/250V fuse. If the current measurement function stops working, the fuse may need replacement. Fuse replacement should only be performed by qualified personnel. Open the casing carefully, replace the fuse with one of identical specifications, and ensure the casing is properly sealed before reuse.
7. Risoluzione Dei Problemi
- Nessuna visualizzazione: Check if the multimeter is turned ON. Verify battery installation and replace if necessary.
- Letture errate: Ensure test leads are properly connected and not damaged. Verify the correct function is selected for the measurement. Check battery level.
- Misurazione della corrente non funzionante: Il fusibile potrebbe essere bruciato. Per la sostituzione del fusibile, fare riferimento alla Sezione 6.3.
- Il cicalino non suona durante il test di continuità: The resistance of the circuit may be too high, or the function is not correctly selected.
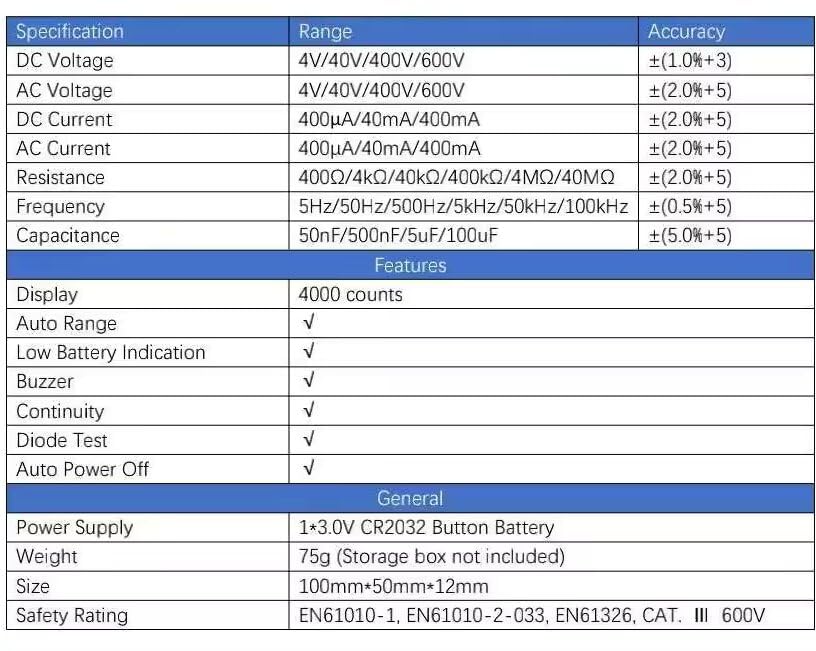
8. Specifiche
| Specificazione | Allineare | Precisione |
|---|---|---|
| Volume DCtage | 4V/40V/400V/600V | ±(1.0%+3) |
| Volume ACtage | 4V/40V/400V/600V | ±(2.0%+5) |
| Corrente continua | 400 µA/40 mA/400 mA | ±(2.0%+5) |
| Corrente alternata | 400 µA/40 mA/400 mA | ±(2.0%+5) |
| Resistenza | 400Ω/4kΩ/40kΩ/400kΩ/4MΩ/40MΩ | ±(2.0%+5) |
| Frequenza | 5Hz/50Hz/500Hz/5kHz/50kHz/100kHz | ±(0.5%+5) |
| Capacità | 50nF/500nF/5uF/100uF | ±(5.0%+5) |
| Caratteristiche | ||
| Display | 4000 conteggi | |
| Auto Range | √ | |
| Indicazione di batteria scarica | √ | |
| Cicalino | √ | |
| Test diodi | √ | |
| Spegnimento automatico | √ | |
| Generale | ||
| Alimentazione elettrica | 1*3.0V CR2032 Button Battery | |
| Peso | 75g (Storage box not included) | |
| Misurare | 100mm*50mm*12mm | |
| Valutazione di sicurezza | EN61010-1, EN61010-2-033, EN61326, CAT. III 600V | |
9. Garanzia e supporto
9.1 Informazioni sulla garanzia
The PEAKMETER PM8215 Digital Mini Multimeter comes with a Garanzia di 1 anno from the date of purchase. This warranty covers manufacturing defects and ensures the product meets its specified performance. Please retain your proof of purchase for warranty claims.
9.2 Assistenza clienti
Per assistenza tecnica, risoluzione di problemi non contemplati da questo manuale o richieste di garanzia, contattare il rivenditore o direttamente il produttore. Fare riferimento alla confezione del prodotto o al manuale ufficiale del produttore. websito per i contatti.