1. Introduzione
The PEAKMETER PM8233E is a smart pocket handheld digital multimeter designed for measuring DC and AC voltage, DC and AC current, resistance, frequency, and temperature. It features a 2000-count display, data hold, diode test, and continuity functions, making it a versatile tool for electrical testing and troubleshooting. This manual provides essential information for safe and effective operation of your device.
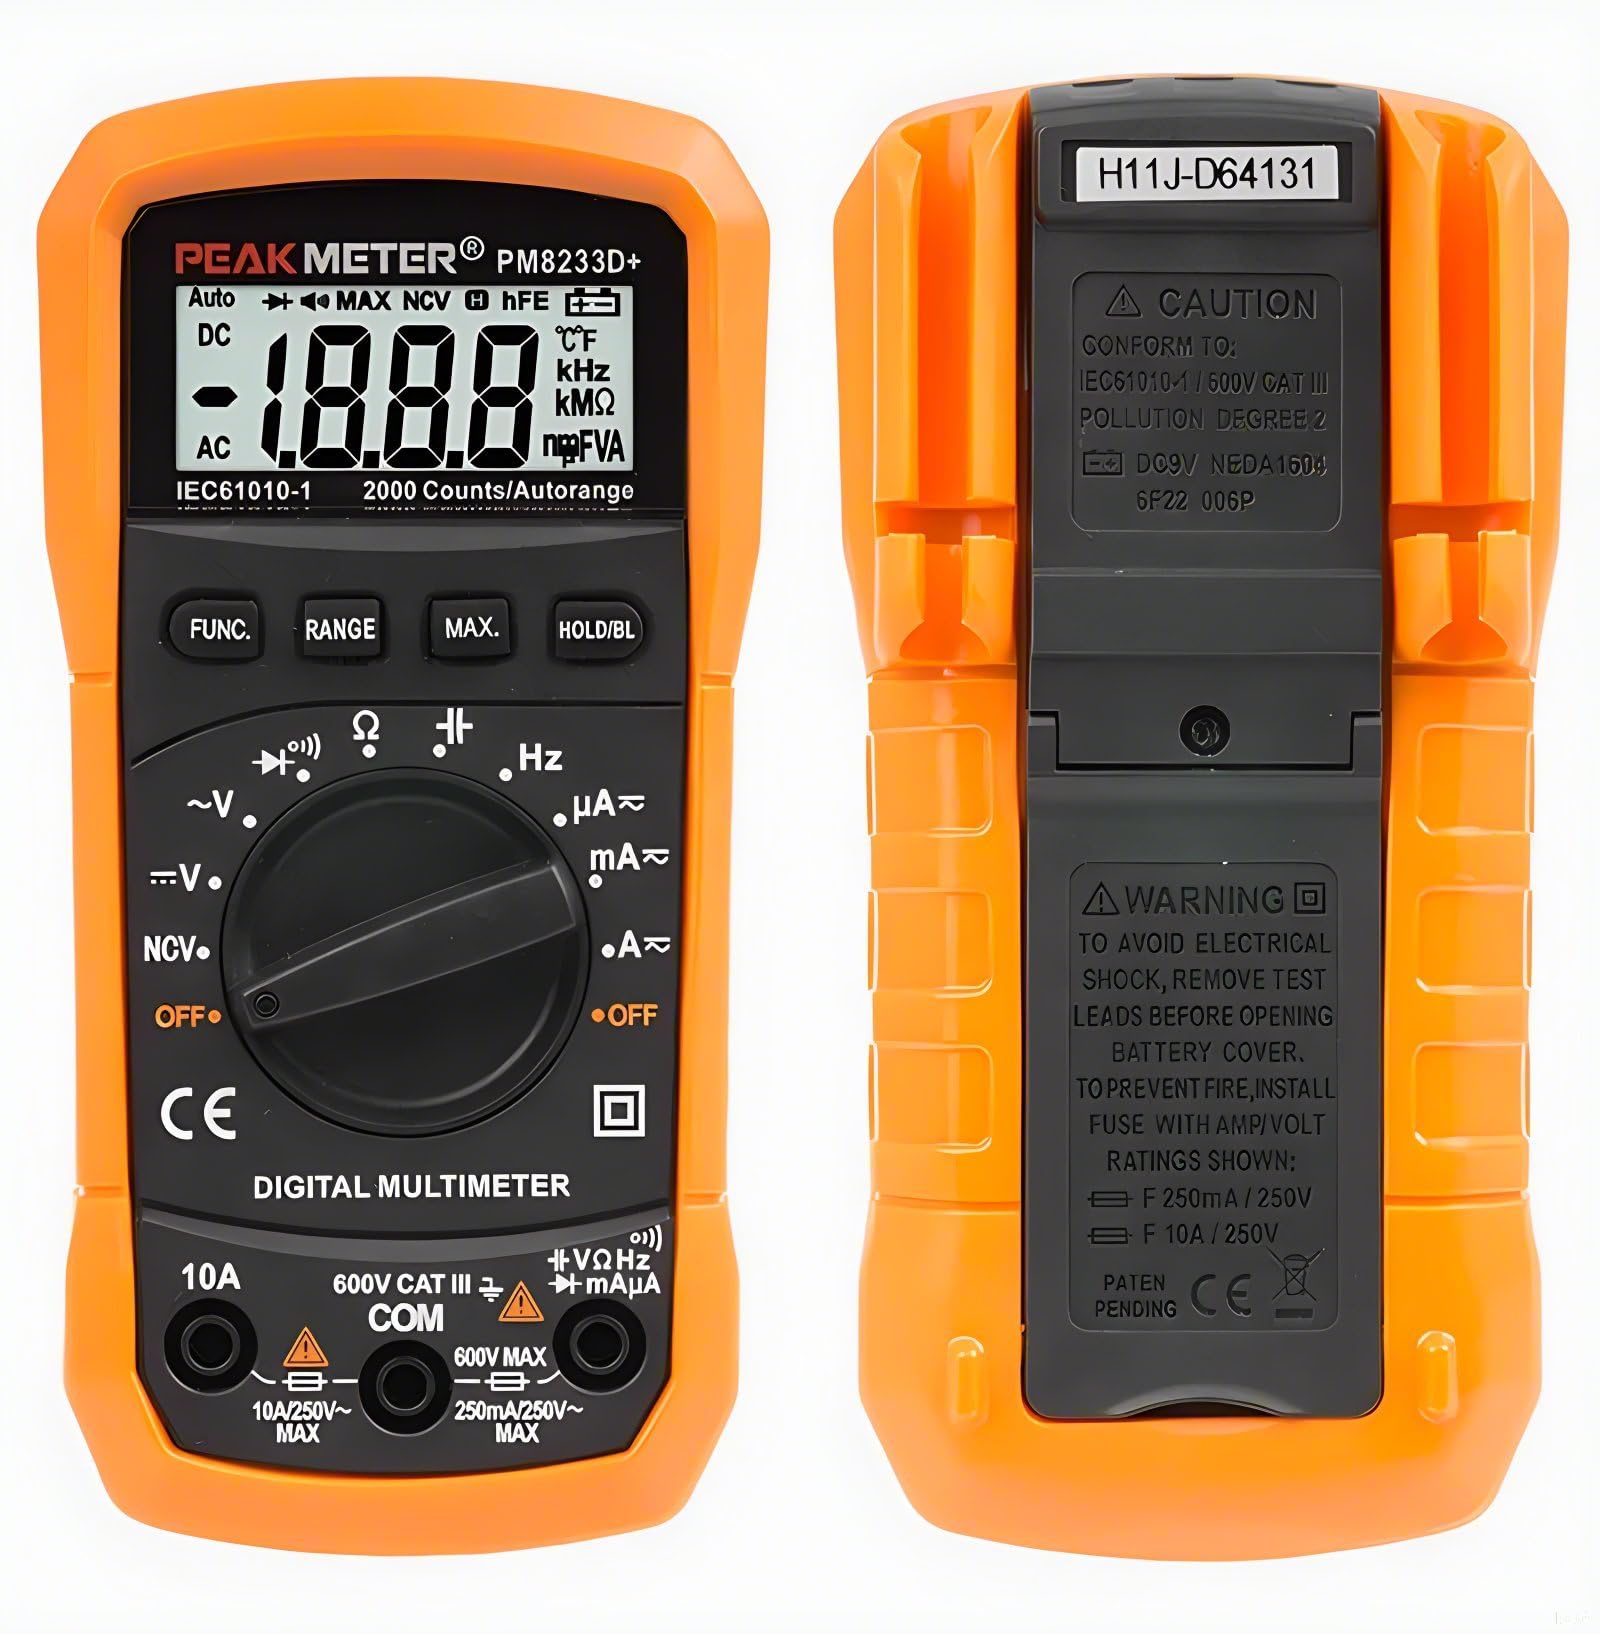
Figure 1: PEAKMETER PM8233E Digital Multimeter
2. Informazioni sulla sicurezza
WARNING: To avoid electrical shock, remove test leads before opening the battery cover. To prevent fire, install fuses with the specified Amp/Volt ratings: F 250mA / 250V and F 10A / 250V.
This device conforms to IEC61010-1 / 600V CAT III, Pollution Degree 2 standards. Always adhere to the following safety precautions:
- Non superare i valori massimi di input specificati per ciascun intervallo di misurazione.
- Prestare attenzione quando si lavora con voltagsuperiori a 30 V CA RMS, 42 V di picco o 60 V CC, poiché rappresentano un rischio di scossa elettrica.
- Prima di effettuare qualsiasi misurazione, assicurarsi che i puntali siano in buone condizioni e correttamente collegati.
- Never use the multimeter if it appears damaged or if the protective casing è compromesso.
- Prima di sostituire le batterie o i fusibili, spegnere sempre il dispositivo e scollegare i puntali di prova.
- Non utilizzare il multimetro in atmosfere esplosive o in presenza di gas o polveri infiammabili.

Figure 2: Back of the Multimeter with Safety Warnings
3. Contenuto della confezione
Verifica che tutti gli articoli siano presenti nel tuo pacco:
- PEAKMETER PM8233E Digital Multimeter
- Cavi di prova
- Manuale d'uso

Figura 3: Contenuto della confezione
4. Caratteristiche e componenti del prodotto
The PM8233E multimeter is designed for ease of use and durability. Key components include:
- Schermo LCD: Large 3 1/2 digit display for clear readings.
- Interruttore rotante: Selects measurement functions and ranges.
- Pulsanti funzione: For Data Hold, Range, Max Value, and Backlight.
- Jack di ingresso: Per il collegamento dei puntali di prova (COM, VΩmA, 10A).
- Custodia protettiva in gomma: Provides protection against impacts.
- Telaio di supporto: Cavalletto integrato per l'utilizzo a mani libere.
- Test Probe Convenience Slot: Located on the back for easy storage of test leads.

Figure 4: Multimeter Components (LCD, Battery Jar, Support Frame)

Figure 5: Test Probe Convenience Slot
5. Impostazione
5.1 Installazione della batteria
- Assicurarsi che il multimetro sia spento e che i puntali di prova siano scollegati.
- Individuare il vano batteria sul retro del dispositivo.
- Svitare il coperchio della batteria e rimuoverlo.
- Inserire una nuova batteria da 9 V 6F22, rispettando la polarità corretta.
- Riposizionare il coperchio della batteria e fissarlo con la vite.
6. Istruzioni per l'uso
Before any measurement, ensure the test leads are correctly inserted into the appropriate input jacks (COM and VΩmA for most measurements, 10A for high current). Always select the correct function using the rotary switch.
6.1 CA/CC voltage Misurazione
- Set the rotary switch to the desired AC V (~) or DC V (---) range.
- Collegare il puntale di prova nero alla presa COM e il puntale di prova rosso alla presa VΩmA.
- Collegare le sonde di prova in parallelo al circuito o al componente in prova.
- Leggi il vol.tage valore sul display.
6.2 Misurazione della corrente continua
- Set the rotary switch to the desired DC A (---) range (e.g., 200µA, 2mA, 20mA, 200mA, 10A).
- For currents up to 200mA, connect the red test lead to the VΩmA jack. For currents up to 10A, connect the red test lead to the 10A jack. The black test lead always connects to COM.
- Aprire il circuito e collegare le sonde di prova in serie al circuito o al componente.
- Leggere il valore corrente sul display.
6.3 Misurazione della resistenza
- Set the rotary switch to the Ω (Ohms) range.
- Collegare il puntale di prova nero alla presa COM e il puntale di prova rosso alla presa VΩmA.
- Prima di misurare la resistenza, assicurarsi che il circuito sia disattivato.
- Collegare le sonde di prova al componente da misurare.
- Leggere il valore di resistenza sul display.
6.4 Prova di continuità
- Set the rotary switch to the continuity (speaker icon) range.
- Collegare il puntale di prova nero alla presa COM e il puntale di prova rosso alla presa VΩmA.
- Collegare le sonde di prova al circuito o al componente.
- Se la resistenza è inferiore a circa 50Ω, il cicalino suonerà, indicando la continuità.
6.5 Test diodi
- Set the rotary switch to the diode (arrow with line) range.
- Collegare il puntale di prova nero alla presa COM e il puntale di prova rosso alla presa VΩmA.
- Collegare la sonda di prova rossa all'anodo e la sonda di prova nera al catodo del diodo.
- Il display mostrerà il volume in avantitage goccia. Invertire le sonde; il display dovrebbe visualizzare 'OL' (Open Loop) per un diodo funzionante.
6.6 Funzione di conservazione dei dati
Premere il tasto PRESA per bloccare la lettura corrente sul display. Premerlo nuovamente per disattivare il blocco e riprendere le letture in tempo reale.
6.7 Retroilluminazione
Premere il tasto RETROILLUMINAZIONE button to turn on the display backlight for better visibility in low-light conditions. Press it again to turn it off.
6.8 Auto Range
The PM8233E features auto-ranging, which automatically selects the appropriate measurement range. For specific applications, manual ranging might be available by pressing the Consumo button (refer to specific model features).
6.9 Operational Demonstrations
Video 1: Dimostrazione di AC voltage, DC voltage, capacitance, and DC current measurements using a PEAKMETER multimeter.
7. Manutenzione
7.1 Pulizia
Pulisci la custodia con l'adamp panno e detergente delicato. Non utilizzare abrasivi o solventi. Mantenere i terminali di ingresso liberi da sporco e umidità.
7.2 Sostituzione della batteria
When the battery low indicator appears on the display, replace the 9V battery as described in Section 5.1.
7.3 Sostituzione del fusibile
If the current measurement function fails, the fuse may need replacement. Refer to the safety warnings in Section 2 for fuse specifications (F 250mA / 250V and F 10A / 250V). Fuse replacement should only be performed by qualified personnel.
8. Risoluzione Dei Problemi
- Nessuna visualizzazione: Controllare l'installazione della batteria e il livello di carica. Sostituire la batteria se necessario.
- Letture errate: Ensure test leads are properly connected and the correct function/range is selected. Verify the circuit is de-energized for resistance measurements.
- Misurazione della corrente non funzionante: Check the fuse. If blown, replace with the correct rating.
- 'OL' sullo schermo: Indicates an open circuit or a value exceeding the selected range.
9. Specifiche
The following table outlines the specifications for the PEAKMETER PM8233E Digital Multimeter:
| Misurazione | Allineare | Accuracy (PM8233E) |
|---|---|---|
| Volume DCtage | 200mV/2V/20V/200V/600V | ±(0.5%+2) |
| Volume ACtage | 2V/20V/200V/600V | ±(0.8%+2) |
| Corrente continua | 200µA/2mA/20mA/200mA/10A | ±(1.0%+3) (200µA-200mA), ±(3.0%+5) (10A) |
| Corrente alternata | 200µA/2mA/20mA/200mA/10A | ±(1.2%+3) (200µA-200mA), ±(3.0%+5) (10A) |
| Resistenza | 200Ω/2kΩ/20kΩ/200kΩ/2MΩ/20MΩ | ±(0.8%+2) (200Ω-2MΩ), ±(1.0%+2) (20MΩ) |
| Frequenza | 20 kHz | ±(1.0%+2) |
| Temperatura | Temperatura -20 ~ 1000°C | ±(3.0%+3) |
Caratteristiche generali:
- Display: 2000 conteggi
- Intervallo automatico: SÌ
- Data Hold: SÌ
- Retroilluminazione: SÌ
- Prova del diodo: SÌ
- Continuità: SÌ
- Valore massimo detenuto: SÌ
- Alimentazione elettrica: DC9V 6F22 battery
- Peso: Circa 110 g
- Misurare: 140 x 67 x 30 mm
- Valutazione di sicurezza: EN61010-1, -2-030, EN61010-2-033, EN61326, CAT.III 600V
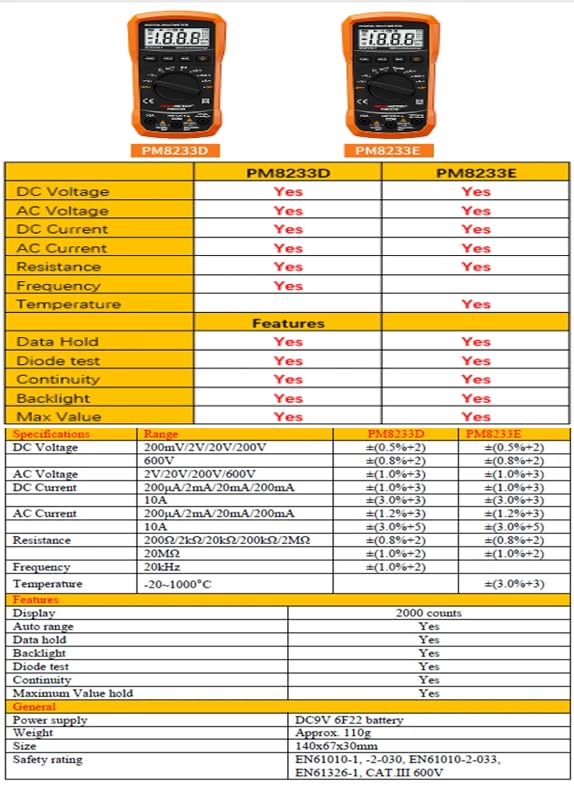
Figure 6: Detailed Specifications for PM8233E
10. Garanzia e supporto
The PEAKMETER PM8233E Digital Multimeter comes with a 1-year warranty from the date of purchase. For technical support or warranty claims, please contact your retailer or the manufacturer directly. Keep your purchase receipt as proof of purchase.