PEAKMETER PM2128
PEAKMETER PM2128 / PM2128S Digital Clamp Manuale di istruzioni del multimetro
Models: PM2128, PM2128S
1. Introduzione
This instruction manual provides essential information for the safe and effective operation of your PEAKMETER PM2128 / PM2128S Digital Clamp Multimeter. Please read this manual thoroughly before use and retain it for future reference. This device is designed for measuring AC/DC voltage, AC/DC current, resistance, capacitance, frequency, temperature, and performing continuity tests.
1.1 Informazioni sulla sicurezza
Always adhere to basic safety precautions when using this instrument to avoid potential electric shock, injury, or damage to the meter or equipment under test. Pay close attention to all warnings and cautions.
- Non applicare voltage o corrente che supera i limiti massimi specificati.
- Prestare la massima attenzione quando si lavora su circuiti sotto tensione.
- Assicurarsi che i puntali di prova siano in buone condizioni e correttamente collegati.
- Non utilizzare il misuratore se appare danneggiato o se la custodia è aperta.
- Spegnere sempre l'alimentazione del circuito e scaricare tutti i componenti ad alto volumetagcondensatori prima di misurare la resistenza, la continuità o la capacità.
- Per garantire letture accurate, sostituire le batterie quando compare l'indicatore di batteria scarica.
2. Prodotto finitoview
The PEAKMETER PM2128 / PM2128S is a compact and versatile digital clamp multimeter featuring auto-ranging capabilities and a 6000-count display. It is designed for precise electrical measurements in various applications.

Figure 2.1: PEAKMETER PM2128 Digital Clamp Multimeter with its packaging and carrying case.
2.1 Caratteristiche principali
- Regolazione automatica e manuale: Automatically selects the appropriate measurement range, with an option for manual selection.
- Visualizzazione di 6000 conteggi: Fornisce letture ad alta risoluzione.
- Vero valore efficace: Accurate measurements for non-sinusoidal waveforms (PM2128S model).
- Protezione da sovraccarico: Garantisce la sicurezza in tutti gli intervalli di misurazione.
- Spegnimento automatico: Conserves battery life by powering off after 10 minutes of inactivity.
- Volume massimotage: Capable of handling up to 1000V DC or 1000V AC between measurement terminal and ground.
- Diverse Measurements: Include volume CC/CAtage, AC/DC Current, Resistance, Capacitance, Frequency, Temperature, LowZ, and DC uA.
- Volume senza contattotage(NCV): Rileva AC voltage senza contatto diretto.
- Analogue Bar Graph Display: Provides a visual representation of measurement trends.

Figure 2.2: Visual representation of the multimeter's fully functional capabilities.
2.2 Componenti
Familiarize yourself with the main components of the clamp multimetro:
- Clamp Mascella: Utilizzato per la misurazione della corrente CA/CC senza contatto.
- Interruttore rotante: Seleziona la funzione di misurazione primaria.
- Schermo LCD: Mostra le letture delle misurazioni, le unità e gli indicatori.
- Pulsanti funzione: (e.g., FUNC, RAN, REL, HOLD, HZ/%) For selecting sub-functions, range, relative measurement, data hold, and frequency/duty cycle.
- Jack di ingresso: For connecting test leads (COM, INPUT).
- Grilletto: Apre il clamp mascella.
- Sensore NCV: Located at the top of the clamp jaw for non-contact voltage rilevamento.
- Torcia elettrica: Fornisce illuminazione in ambienti bui.

Figura 2.3: dettagliata view of the NCV sensor and flashlight on the clamp metro.
3. Impostazione
3.1 Installazione della batteria
The PEAKMETER PM2128 / PM2128S requires 1 Lithium Polymer battery (included). To install or replace the battery:
- Assicurarsi che il misuratore sia spento.
- Individuare il coperchio del vano batterie sul retro del misuratore.
- Utilizzare un cacciavite per allentare la vite che fissa il coperchio.
- Remove the cover and insert the battery, observing correct polarity (+ and -).
- Riposizionare il coperchio della batteria e serrare la vite.
3.2 Accensione/spegnimento
To power on the meter, rotate the rotary switch from the 'OFF' position to any desired measurement function. To power off, rotate the rotary switch back to the 'OFF' position. The meter also features an automatic shutdown function after approximately 10 minutes of inactivity to conserve battery life.
4. Istruzioni per l'uso
This section details how to perform various measurements using your clamp multimetro.
4.1 CA/CC voltage Misurazione
- Insert the black test lead into the 'COM' jack and the red test lead into the 'INPUT' jack.
- Rotate the rotary switch to the 'V~' (AC Voltage) o 'V=' (Volume DCtage) position. If the symbol is combined, press the 'FUNC' button to toggle between AC and DC.
- Collegare i puntali di prova in parallelo al circuito o al componente che si desidera misurare.
- Leggi il vol.tage valore sul display LCD.
4.2 Misurazione della corrente CA/CC (Clamp)
Attenzione: For current measurement using the clamp, ensure only one conductor passes through the clamp ganascia. La misurazione di più conduttori darà luogo a una lettura imprecisa.

Figure 4.1: Operating the clamp ganascia per la misurazione della corrente.
- Rotate the rotary switch to the 'A~' (AC Current) or 'A=' (DC Current) position. If the symbol is combined, press the 'FUNC' button to toggle between AC and DC.
- Premere il grilletto per aprire il clamp mascella.
- Enclose a single conductor of the circuit with the clamp mascella.
- Rilasciare il grilletto per chiudere la clamp jaw around the conductor.
- Leggere il valore corrente sul display LCD.
4.3 Misurazione della resistenza
- Insert the black test lead into the 'COM' jack and the red test lead into the 'INPUT' jack.
- Rotate the rotary switch to the 'Ω' (Resistance) position.
- Assicurarsi che il circuito sia disattivato e che tutti i condensatori siano scarichi.
- Collegare i puntali di prova al componente per misurarne la resistenza.
- Leggere il valore della resistenza sul display LCD.
4.4 Misurazione della capacità
- Insert the black test lead into the 'COM' jack and the red test lead into the 'INPUT' jack.
- Rotate the rotary switch to the 'F' (Capacitance) position.
- Prima di collegare i puntali di prova, assicurarsi che il condensatore sia completamente scarico.
- Collegare i puntali di prova ai terminali del condensatore.
- Leggere il valore della capacità sul display LCD.
4.5 Misurazione della frequenza
- Insert the black test lead into the 'COM' jack and the red test lead into the 'INPUT' jack.
- Rotate the rotary switch to the 'Hz' (Frequency) position.
- Collegare i puntali di prova in parallelo al circuito in cui si desidera misurare la frequenza.
- Leggere il valore della frequenza sul display LCD.
4.6 Misurazione della temperatura
If your model includes a K-type thermocouple (check package contents), you can measure temperature:
- Rotate the rotary switch to the 'TEMP' position.
- Inserire la termocoppia di tipo K nei jack di ingresso, rispettando la polarità.
- Posizionare la sonda termocoppia sull'oggetto di cui si desidera misurare la temperatura o nelle sue vicinanze.
- Leggere il valore della temperatura sul display LCD.
4.7 Prova di continuità
- Insert the black test lead into the 'COM' jack and the red test lead into the 'INPUT' jack.
- Rotate the rotary switch to the continuity symbol (often shared with resistance or diode test, use 'FUNC' to select).
- Assicurarsi che il circuito sia disattivato.
- Collegare i puntali di prova al componente o al filo.
- Se la resistenza è inferiore a circa 30Ω, il cicalino suonerà, indicando la continuità.
4.8 Senza contatto voltage (NCV) Rilevamento
- Rotate the rotary switch to the 'NCV' position.
- Sposta la parte superiore del clamp jaw (where the NCV sensor is located) close to the conductor or outlet.
- Il misuratore indicherà la presenza di tensione alternatatage through audible beeps and/or visual indicators on the display.
4.9 Bassa impedenza Voltage (LowZ) Misurazione
The LowZ function is designed to detect ghost voltages by providing a low impedance input. This helps to drain away stray voltages that can give false readings on standard high-impedance multimeters.
- Insert the black test lead into the 'COM' jack and the red test lead into the 'INPUT' jack.
- Rotate the rotary switch to the 'LowZ' position.
- Collegare i puntali di prova in parallelo al circuito.
- Leggi il vol.tage valore sul display LCD.
4.10 Funzione di conservazione dei dati
Premere il pulsante 'HOLD' per bloccare la lettura corrente sul display. Premerlo nuovamente per disattivare il blocco e riprendere le misurazioni in tempo reale.
5. Specifiche
The following table outlines the technical specifications for the PEAKMETER PM2128 and PM2128S models.

Figure 5.1: Comprehensive specifications for PM2128 and PM2128S.
| Caratteristica | Specificazione |
|---|---|
| Numero di modello | EC-PM2128 |
| Display | 6000 Conteggi |
| Fonte di alimentazione | 1 batteria ai polimeri di litio (inclusa) |
| Tempo di spegnimento automatico | 10 minuti |
| Volume massimotage (Input to Ground) | 1000 V CC o 1000 V CA |
| Dimensioni del prodotto (L x P x A) | 5.91 x 3.94 x 7.09 pollici (150 x 100 x 180 mm) |
| Peso dell'articolo | 1 chilogrammo (circa 2.2 libbre) |
| Valutazione di sicurezza | EN61010-1, EN61010-2-032, EN61326, CAT.III 1000V |
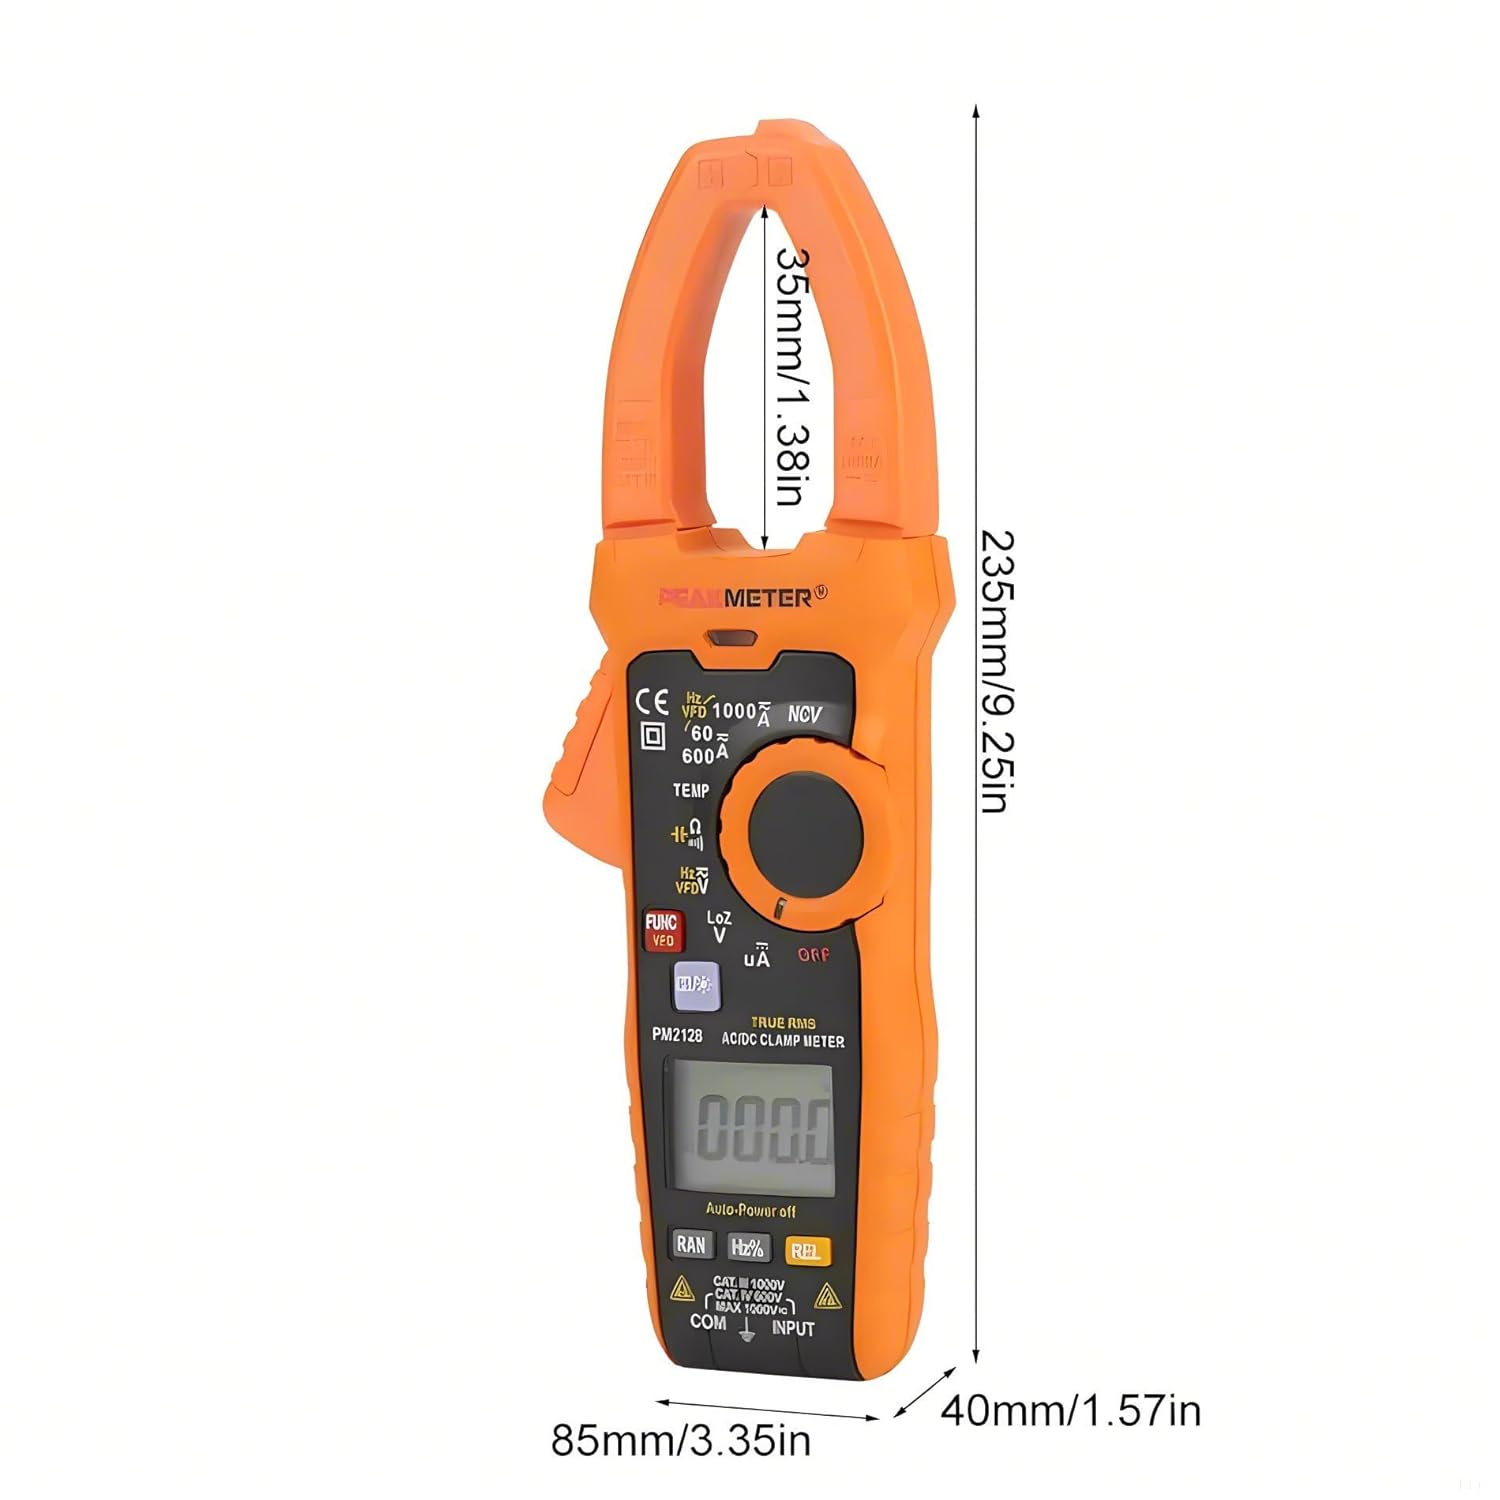
Figure 5.2: Dimensions of the PEAKMETER PM2128.
6. Manutenzione
6.1 Pulizia
Per pulire il misuratore, pulire la custodia con un pannoamp panno e un detergente delicato. Non utilizzare abrasivi o solventi. Assicurarsi che il misuratore sia completamente asciutto prima dell'uso.
6.2 Sostituzione della batteria
When the low battery indicator appears on the display, replace the battery promptly to ensure accurate measurements. Refer to Section 3.1 for battery installation instructions.
6.3 Conservazione
If the meter is not used for an extended period, remove the battery to prevent leakage and damage. Store the meter in a cool, dry place, away from direct sunlight and extreme temperatures.
7. Risoluzione Dei Problemi
This section addresses common issues you might encounter with your clamp multimetro.
- Nessuna visualizzazione: Check if the rotary switch is in an 'OFF' position. Ensure the battery is correctly installed and has sufficient charge. Replace the battery if necessary.
- Letture imprecise: Verify that the correct measurement function is selected. Check test lead connections and ensure they are not damaged. Ensure the battery is not low. For current measurements, confirm only one conductor is within the clamp mascella.
- Meter Shuts Off Automatically: This is a normal function (Auto Power Off) after 10 minutes of inactivity. To disable or reset, refer to the specific instructions in the full product manual if available, or simply turn the rotary switch to 'OFF' and then back to the desired function.
- 'OL' o 'OVER' sul display: Indicates an overload or out-of-range measurement. Select a higher range if available, or ensure the input does not exceed the meter's maximum specifications.
8. Garanzia e supporto
PEAKMETER products are manufactured to high-quality standards. This product is covered by a standard manufacturer's warranty against defects in materials and workmanship. For specific warranty terms, duration, and to obtain technical support or service, please refer to the warranty card included with your product or contact your point of purchase. Please have your model number (PM2128 or PM2128S) and purchase information ready when contacting support.
Ask a question about this manual
Ask about setup, troubleshooting, compatibility, parts, safety, or missing instructions. Manuals+ will review the question and use this page’s manual context to help answer it.