CONOPU DH-CS13
Manuale utente del deumidificatore CONOPU DH-CS13
Modello: DH-CS13
1. Introduzione
Thank you for choosing the CONOPU DH-CS13 Dehumidifier. This appliance is designed to efficiently remove excess moisture from your indoor environment, creating a more comfortable and healthier living space. With its advanced dual semiconductor technology, quiet operation, and smart features like automatic defrost and auto shut-off, the DH-CS13 is an ideal solution for managing humidity in various room sizes.
Si prega di leggere attentamente questo manuale prima di utilizzare il deumidificatore per garantirne prestazioni ottimali e sicure. Conservare il manuale per riferimento futuro.
2. Istruzioni di sicurezza
To reduce the risk of fire, electric shock, or injury when using your dehumidifier, basic safety precautions should always be followed, including the following:
- Leggere tutte le istruzioni prima di utilizzare l'apparecchio.
- Only use the dehumidifier with the provided power adapter.
- Non utilizzare il deumidificatore se il cavo di alimentazione o la spina sono danneggiati.
- Tenere l'apparecchio lontano da fonti di calore, dalla luce solare diretta e da materiali infiammabili.
- Assicurarsi che il deumidificatore sia posizionato su una superficie stabile e piana per evitare che si ribalti.
- Non ostruire le prese d'aria o le uscite. Mantenere uno spazio libero adeguato attorno all'unità per un corretto flusso d'aria.
- Non immergere l'apparecchio, il cavo di alimentazione o la spina in acqua o altri liquidi.
- Scollegare il deumidificatore prima di pulirlo, spostarlo o eseguirne la manutenzione.
- Do not allow children or pets to play with or near the dehumidifier.
- Questo apparecchio è progettato solo per uso interno.
- Svuotare regolarmente il serbatoio dell'acqua per evitare traboccamenti e mantenere l'efficienza.
3. Prodotto finitoview
The CONOPU DH-CS13 Dehumidifier is a compact and efficient unit designed for optimal moisture removal.

Figura 3.1: Fronte view of the CONOPU DH-CS13 Dehumidifier, showcasinil suo elegante design bianco e il pannello di controllo superiore.
Componenti chiave:
- Griglia di ingresso dell'aria: Situate sui lati, dove viene aspirata l'aria umida.
- Griglia di uscita dell'aria: Located on the top, where dry air is expelled.
- Pannello di controllo: Top-mounted panel with touch buttons for power, mode, timer, and light control.
- Serbatoio dell'acqua: Removable 3000ml capacity tank at the bottom for collecting condensed water. Features a transparent window for easy level monitoring.
- Maniglie integrate: Integrated side handles for convenient portability.
- Porta di alimentazione: Located at the back for connecting the power adapter.
4. Impostazione
Per configurare il deumidificatore per la prima volta, segui questi passaggi:
- Disimballare: Carefully remove the dehumidifier and all packaging materials from the box. Retain the packaging for future storage or transport.
- Posizionamento:
- Posizionare il deumidificatore su una superficie solida e piana.
- Ensure there is at least 20 cm (8 inches) of space around all sides of the unit to allow for proper airflow. Avoid placing it directly against walls or furniture.
- The optimal operating environment temperature is between 15°C and 40°C (59°F and 104°F).
- This unit is suitable for rooms ranging from 5 m² to 30 m².

Figure 4.1: Illustrates suitable room sizes (5m² to 30m²) and proper placement for optimal dehumidification.
- Collegamento elettrico: Insert the power adapter into the power port on the back of the dehumidifier, then plug the adapter into a suitable electrical outlet.
- Serbatoio dell'acqua: Assicurarsi che il serbatoio dell'acqua sia inserito correttamente nell'unità. Il deumidificatore non funzionerà se il serbatoio è pieno o non è posizionato correttamente.
5. Istruzioni per l'uso
The CONOPU DH-CS13 Dehumidifier offers various modes and settings for efficient moisture control.
5.1 Pannello di controllo
Il pannello di controllo si trova nella parte superiore dell'unità ed è dotato di pulsanti sensibili al tocco e spie luminose.
- Pulsante di accensione: Accende/Spegne l'unità.
- Pulsante Modalità: Cycles through different operating modes (e.g., L1, L2, Sleep).
- Pulsante Timer: Sets the operating timer (6, 12, or 24 hours).
- Pulsante luci: Turns the indicator lights ON/OFF, especially useful for Sleep Mode.
- Indicatore di sbrinamento: Illuminates when automatic defrost is active.
- Indicatore di serbatoio pieno: Blinks red when the water tank is full or removed.
5.2 Accensione/Spegnimento
Premere il tasto Pulsante di accensione once to turn the dehumidifier ON. Press it again to turn the unit OFF.
5.3 Dehumidification Modes and Speeds
The dehumidifier features dual semiconductor modules and fans for enhanced efficiency, capable of collecting up to 800ml of water per 24 hours.

Figure 5.1: Illustrates the dual semiconductor technology and improved humidity levels (e.g., from 80% to 45%).
- Continuous Speed (L1/L2): Premere il tasto Pulsante Modalità to cycle between L1 and L2 speeds. L2 provides faster dehumidification for quicker results.
- Modalità risparmio: Premere il tasto Pulsante Modalità until Sleep Mode is activated. In this mode, the dehumidifier operates at a low noise level of approximately 30 dB, making it ideal for use in bedrooms or quiet environments. You can also press the Pulsante luci to turn off the indicator lights for an undisturbed sleep.

Figure 5.2: The dehumidifier operating in Sleep Mode, demonstrating its low noise level of 30dB, suitable for nighttime use.
5.4 Funzione timer
Impostare il deumidificatore in modo che funzioni per una durata specifica:
- Premere il tasto Pulsante timer repeatedly to select 6, 12, or 24 hours.
- L'unità si spegnerà automaticamente una volta trascorso il tempo impostato.
5.5 Sbrinamento automatico
The dehumidifier is equipped with an automatic defrost function. If frost builds up on the internal components in colder temperatures, the unit will automatically activate defrost mode. The Defrost Indicator light will illuminate. Dehumidification will resume once the defrost cycle is complete.

Figure 5.3: Visual representation of the automatic defrost process, showing frost accumulation and subsequent melting on the cooling fins.
6. Manutenzione
Una manutenzione regolare garantisce la longevità e il funzionamento efficiente del deumidificatore.
6.1 Svuotamento del serbatoio dell'acqua
The dehumidifier features a 3000ml water tank and an automatic shut-off function when the tank is full or removed. The Full Tank Indicator will blink red.
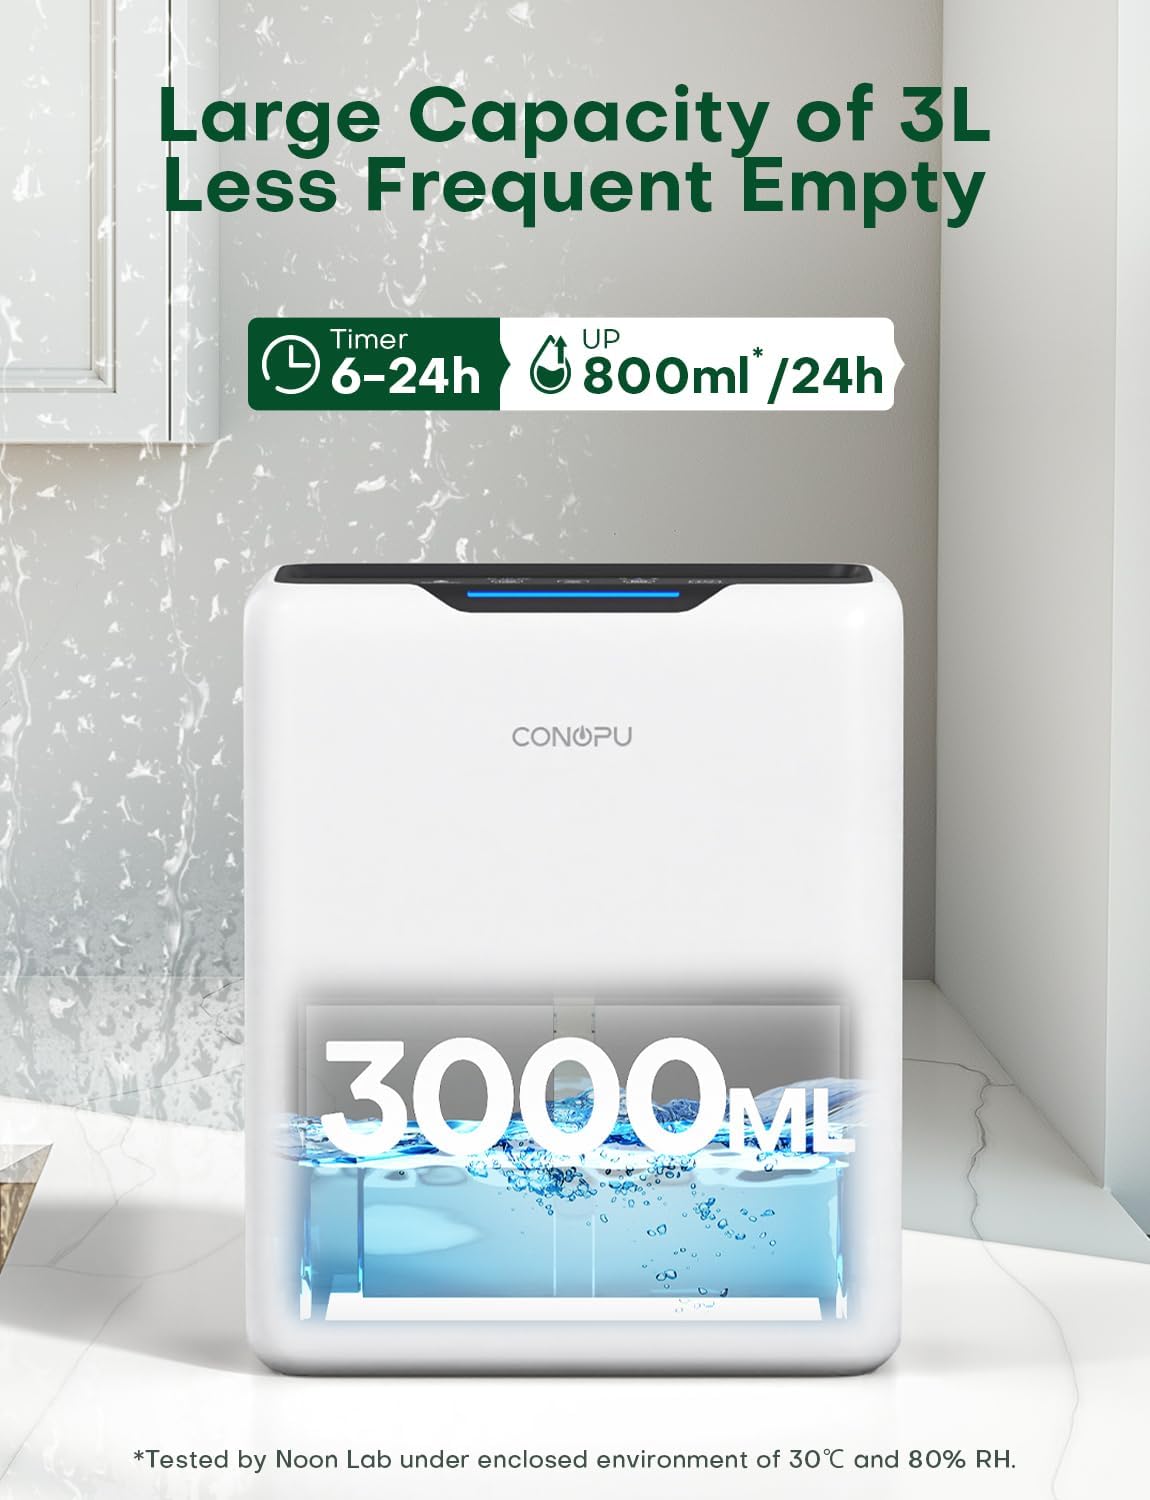
Figure 6.1: The dehumidifier's 3000ml water tank, indicating its large capacity and the amount of water collected per day.
- When the Full Tank Indicator blinks, gently pull out the water tank from the unit.
- Trasportare con cautela il serbatoio in un lavandino o in uno scarico.
- Versare l'acqua raccolta.
- Se necessario, sciacquare il serbatoio con acqua pulita. Non utilizzare detergenti aggressivi o abrasivi.
- Reinserire il serbatoio dell'acqua vuoto nel deumidificatore finché non scatta in posizione. L'unità riprenderà a funzionare automaticamente.
6.2 Pulizia dell'unità
- Esterno: Pulire l'esterno del deumidificatore con un panno morbido, damp panno. Non usare detergenti abrasivi o solventi.
- Prese d'aria/uscite: Use a soft brush or vacuum cleaner attachment to gently remove dust and debris from the air inlet and outlet grilles. Ensure the unit is unplugged before cleaning.
7. Risoluzione Dei Problemi
Se riscontri problemi con il tuo deumidificatore, fai riferimento ai seguenti problemi comuni e alle relative soluzioni:
| Problema | Possibile causa | Soluzione |
|---|---|---|
| Il deumidificatore non si accende. |
|
|
| Nessuna raccolta d'acqua o bassa deumidificazione. |
|
|
| L'unità è rumorosa. |
|
|
| Full Tank Indicator blinks but tank is not full. |
|
|
8. Specifiche
| Caratteristica | Specificazione |
|---|---|
| Marca | CONOP |
| Numero di modello | DH-CS13 |
| Colore | Bianco |
| Dimensioni del prodotto (L x P x A) | Dimensioni: 33.5 x 17.5 x 27.5 cm |
| Peso | 3.07 kg |
| Capacità del serbatoio dell'acqua | 3000 ml (3 litri) |
| Capacità di deumidificazione | Fino a 800 ml/giorno (a 30°C, 80% RH) |
| Consumo energetico | Less than 1.3 kWh/day |
| Numero di velocità | 2 (L1, L2) |
| Livello di rumore (modalità sospensione) | Circa. 30 dB |
| Area di copertura | 5 - 30 m² |
| Caratteristiche speciali | Automatic Defrost, Auto Shut-off (Full Tank), Timer (6/12/24h), Dual Semiconductor Technology |
| Produttore | SC-EU |
9. Garanzia e supporto
CONOPU products are manufactured to the highest quality standards. For any questions, technical support, or warranty claims, please contact our customer service team. Please have your model number (DH-CS13) and purchase information ready when contacting support.
For the most up-to-date warranty information and contact details, please refer to the official CONOPU websito o la documentazione di acquisto.
Ask a question about this manual
Ask about setup, troubleshooting, compatibility, parts, safety, or missing instructions. Manuals+ will review the question and use this page’s manual context to help answer it.