Introduzione
This manual provides detailed instructions for the assembly, operation, and maintenance of your HOTEEL 10x12 Hardtop Gazebo. Please read all instructions carefully before beginning assembly and retain this manual for future reference. The gazebo features a galvanized steel double roof, a sturdy aluminum frame, and flame-retardant curtains with netting, designed for outdoor use.
Informazioni importanti sulla sicurezza
- During assembly, do NOT stand directly under the roof structure unless wearing appropriate safety headwear.
- Please clear snow from the roof promptly to prevent damage to the gazebo structure.
- Assembly requires 2-4 people and typically takes 2-4 hours.
- DO NOT fully tighten screws prior to complete assembly to allow for adjustments.
Caratteristiche del prodotto

The HOTEEL 10x12 Hardtop Gazebo provides a spacious outdoor living area.

Features include a mesh design for insect prevention, hanging hooks for lights or fans, and a double-track system for curtains and netting.
- Tetto doppio in acciaio zincato: Provides superior airflow, durability, corrosion resistance, and UV protection.
- Telaio in alluminio robusto: Weighing 257.5 lbs, designed with 4 anchor bases and triangular braces for stability against winds of 47-54 mph.
- Flame-Retardant Curtains & Netting: Premium 160g/m² polyester CPAI-84 flame-retardant curtains block 90% of UV rays. 35g/m² netting ensures a bug-free environment.
- Sistema di drenaggio integrato: Sloped roof and water gutters efficiently collect and drain rainwater through the poles.
- Multi-Use Hanging Hooks: Conveniently located for hanging lights, fans, or potted plants.
Istruzioni di montaggio
For a visual guide, please refer to the official installation video below. Detailed steps are also provided.
Official HOTEEL 10x12 Hardtop Gazebo Installation Instruction Video. This video demonstrates the step-by-step assembly process for the gazebo frame, roof, curtains, and netting.
Fase 1: assemblare il telaio
- Set up Poles with Base: Attach the base plates to the bottom of each pole (A1/A2) using the provided screws (1#). Ensure all connections are secure but do not fully tighten yet.
- Connect Beams (Width): Connect the width beams (B1, B2) using the central connector (N) and screws (1#).
- Connect Beams (Length): Connect the length beams (B3, B4, B5) using the central connectors (N) and screws (1#).
- Connect Joint Bars & Sidewall Tracks: Integrate the joint bars (C) and sidewall tracks (D) into the length beams (B3, B4, B5) using screws (1#). Repeat for width beams (B1, B2).
- Connect Poles and Beams: With assistance, raise the poles and connect them to the assembled beams using screws (1#) and bolts (5#).
- Affix Solidifying Bars: Attach the solidifying bars (H1, H2) to the frame corners using screws (1#).
- Installare i ganci di sospensione: Insert the hanging hooks (U) into the designated tracks on the beams and secure with screws (10#).
- Affix Joint Covers: Place the joint covers (K1, K2) over the beam connections and secure with screws (7# and 6#).
Fase 2: Installare il telaio del tetto
- Assemble Roof Bars and Connectors: Attach the roof bars (E2) to the inside roof connectors (L1) using screws (1#).
- Connect Inside Roof Connector with Corner Roof Bar: Secure the inside roof connector to the corner roof bar (E1) using screws (1#).
- Connect Outside to Inside Roof Connectors: Connect the outside roof connector (L2) to the inside roof connector (L1) using screws (1#).
- Connect Poles (A2) and Middle Beams: Attach the remaining poles (A2) to the middle beams using screws (1#).
- Attach Net Frames: Secure the net frames (G2, M1, G3) with finishing ends using screws (1#).
- Fix Cross-Bars to Roof Bars: Fix each end of the cross-bar (H3) onto the roof bar (E2) using bolts (8#).
- Insert Hooks into Cross-Bar: Insert the remaining hooks (9#) into the cross-bars (H3).
Step 3: Assemble the Roof Panel
- Assemble Roof Panels (Width & Length): Carefully place the roof panels (G1, G5) onto the roof frame. Secure them using screws (1#) and washers (11#).
- Affix Solidify Bars to Roof Bar: Attach the solidify bars (F1, F2, F3) to the roof bars using screws (1#).
- Attach Top Mosquito Netting: Secure the top mosquito netting to the upper roof structure.
- Hang Curtains and Netting: Hang the curtains and netting onto the double-track system. Ensure they can slide smoothly.

The sloped roof and integrated water gutters ensure efficient rainwater drainage.
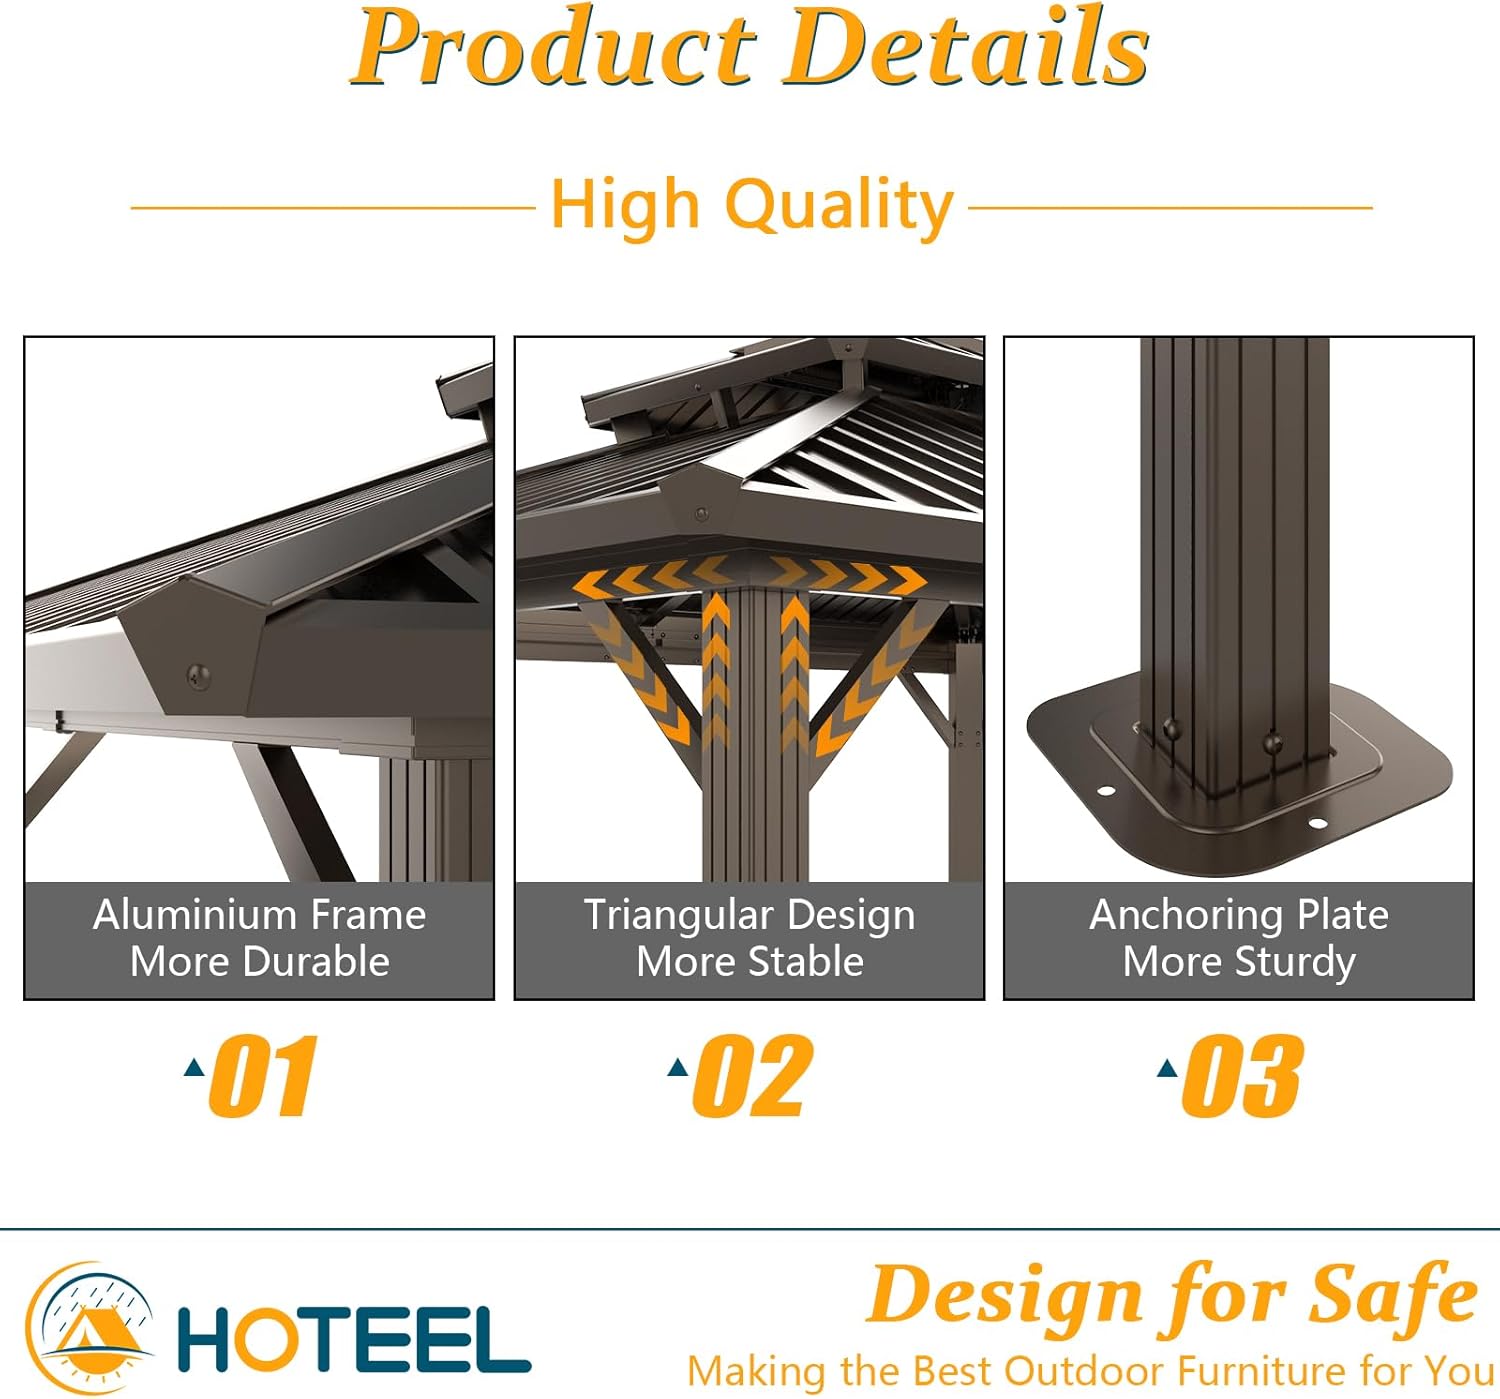
Robust aluminum frame with triangular design and sturdy anchoring plates for enhanced stability.
Manutenzione
- Regularly inspect all screws and connections to ensure they remain tight. Tighten as necessary.
- Clean the roof panels and frame periodically with mild soap and water. Avoid abrasive cleaners.
- Ensure the drainage system is free of debris to prevent water accumulation.
- During heavy snowfall, clear snow from the roof to prevent structural damage.
- Curtains and netting can be removed for cleaning or storage during extreme weather conditions.
Specifiche
| Attributo | Dettaglio |
|---|---|
| Marca | Hoteel |
| Numero di modello | Heavy Duty Hardtop Gazebo |
| Dimensioni del prodotto | 143.7"L x 118.11"W x 108.27"H (10x12 piedi) |
| Peso dell'articolo | 257.5 libbre |
| Materiale del telaio | Galvanized Steel, Aluminum, Aluminum Alloy, and Iron |
| Materiale del tetto | Acciaio galvanizzato |
| Livello di resistenza all'acqua | Impermeabile |
| Protezione dai raggi ultravioletti | 50++ (90% UV block by curtains) |
| Assemblaggio richiesto | SÌ |
| Colore | Marrone |
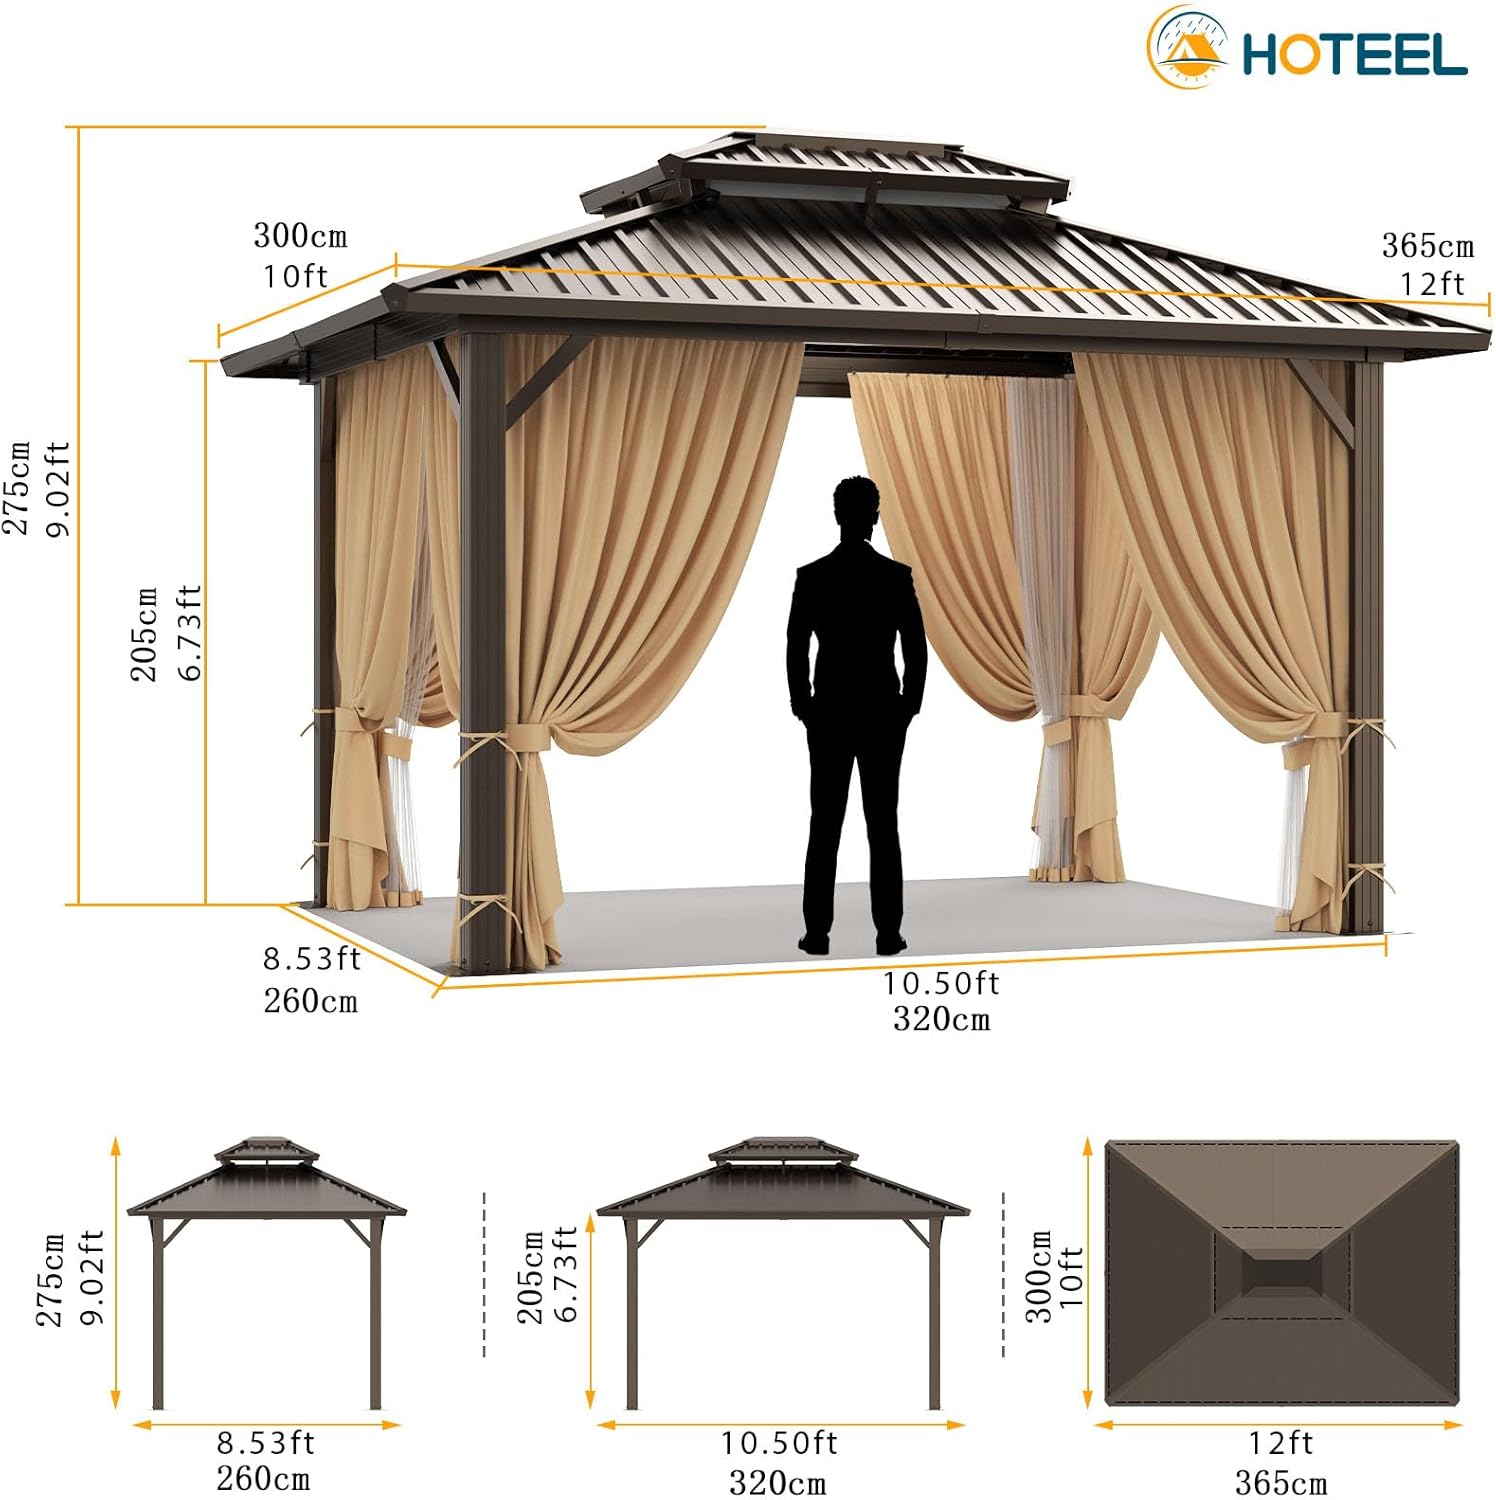
Detailed dimensions of the HOTEEL 10x12 Hardtop Gazebo.
Garanzia e supporto
Your HOTEEL 10x12 Hardtop Gazebo is backed by a comprehensive 5-year coverage service. For any questions, concerns, or assistance with your product, our 24/7 Online Customer Services are available to provide expert support and quick solutions.
Please contact HOTEEL Direct for support.