1. Introduzione
This manual provides detailed instructions for the installation, operation, and maintenance of your new Jingelsye Car Radio Stereo. Please read this manual thoroughly before using the product to ensure proper function and safety. Keep this manual for future reference.

Image: Jingelsye Car Radio Stereo seamlessly integrated into a vehicle dashboard.
2. Informazioni sulla sicurezza
- Installazione professionale consigliata: Data la complessità degli impianti elettrici delle auto, si consiglia vivamente l'installazione da parte di un professionista.
- Disconnessione dell'alimentazione: Always disconnect the vehicle's battery before performing any installation or maintenance.
- Cablaggio: Assicurarsi che tutti i collegamenti elettrici siano sicuri e adeguatamente isolati per evitare cortocircuiti e danni.
- Sicurezza di guida: Do not operate features that distract from driving. Always prioritize road safety.
- Temperatura: Evitare di esporre l'unità a temperature estreme o alla luce solare diretta per periodi prolungati.
3. Contenuto della confezione
Verifica che tutti gli articoli elencati di seguito siano inclusi nel tuo pacchetto:
- Car Radio x1
- Cavo di alimentazione x1
- Canbus x1
- Modulo GPS x1
- Cavo RCA x1
- x2 cavo USB
- Piede di porco x1
- Reversing Control Cable x1
- Telecamera di retromarcia x1
- Microfono x1

Immagine: Tutti i componenti inclusi nella confezione del prodotto.
4. Configurazione e installazione
4.1 Controllo di compatibilità del veicolo
Before installation, confirm your vehicle's compatibility. This unit is designed for Jeep Grand Cherokee models from 2011, 2012, and 2013. Crucially, check the screw hole positions on your original air conditioning control panel.

Image: Compatibility check for the air conditioning control panel. Ensure screw holes are on the left and right sides for proper fit.
4.2 Collegamenti di cablaggio
Follow these steps to connect the main components. Refer to the wiring guide video for visual assistance.
- Connect the 4G Antenna (if applicable for your model) and GPS Antenna to their respective ports on the head unit.
- Connect the Rear Camera Signal Wire and Camera Extension Cables.
- Connect the Power Cable and Canbus module.
- Collegare l'antenna radio.
- Connect the 4-pin and 6-pin USB Cables.
- Connect the RCA Cable for audio/video outputs.
Video: Detailed wiring guide for the car radio stereo, demonstrating connections for various cables and antennas.
5. Istruzioni per l'uso
5.1 Funzioni di base
The unit features a 9-inch HD touchscreen with a 1280x800 resolution for clear visuals. Power on the unit using the designated power button. Adjust volume using the on-screen controls or steering wheel controls.

Immagine: Il display touchscreen HD da 9 pollici.
5.2 CarPlay wireless e Android Auto
Connect your iPhone or Android smartphone wirelessly for seamless access to navigation, music, messages, and calls. Use voice commands for hands-free operation.
- Abilita il Bluetooth sul tuo smartphone.
- Sull'autoradio, vai alle impostazioni Bluetooth e cerca i dispositivi disponibili.
- Select the device starting with "SYU-Android" and enter the pairing password (usually 0000).
- Confirm the connection for CarPlay or Android Auto on your phone.

Image: Steps for connecting to Wireless CarPlay.

Immagine: Interfacce Wireless CarPlay e Android Auto.

Image: Voice control for hands-free operation.
5.3 Navigazione GPS
The unit supports various navigation applications like Apple Maps, Waze, and Google Maps. Ensure a stable internet connection for real-time traffic updates and map downloads.
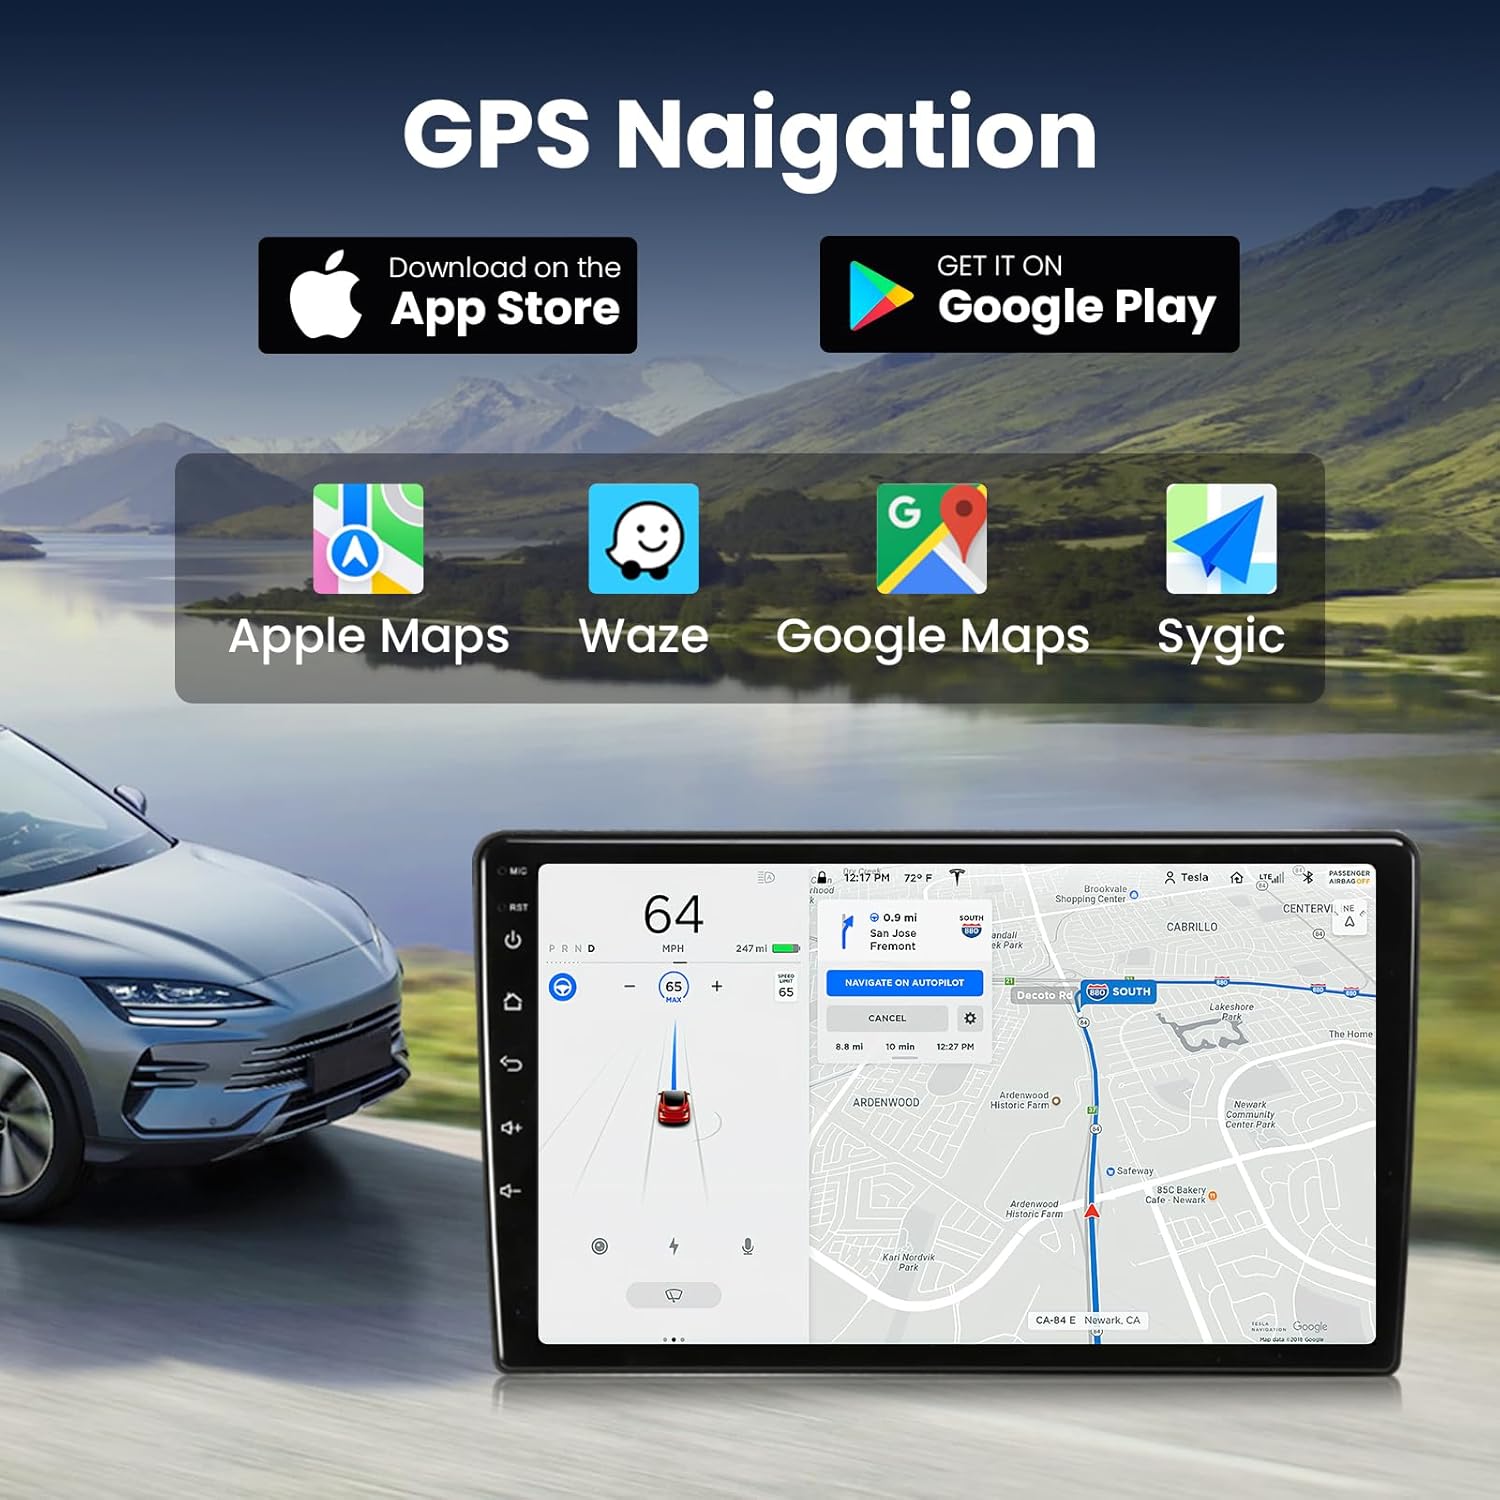
Immagine: Interfaccia di navigazione GPS con app supportate.
5.4 Audio Settings (DSP Sound, EQ, FM Radio)
Utilize the built-in DSP (Digital Sound Processor) and 15-band equalizer to customize your audio experience. The FM radio with RDS provides station information.
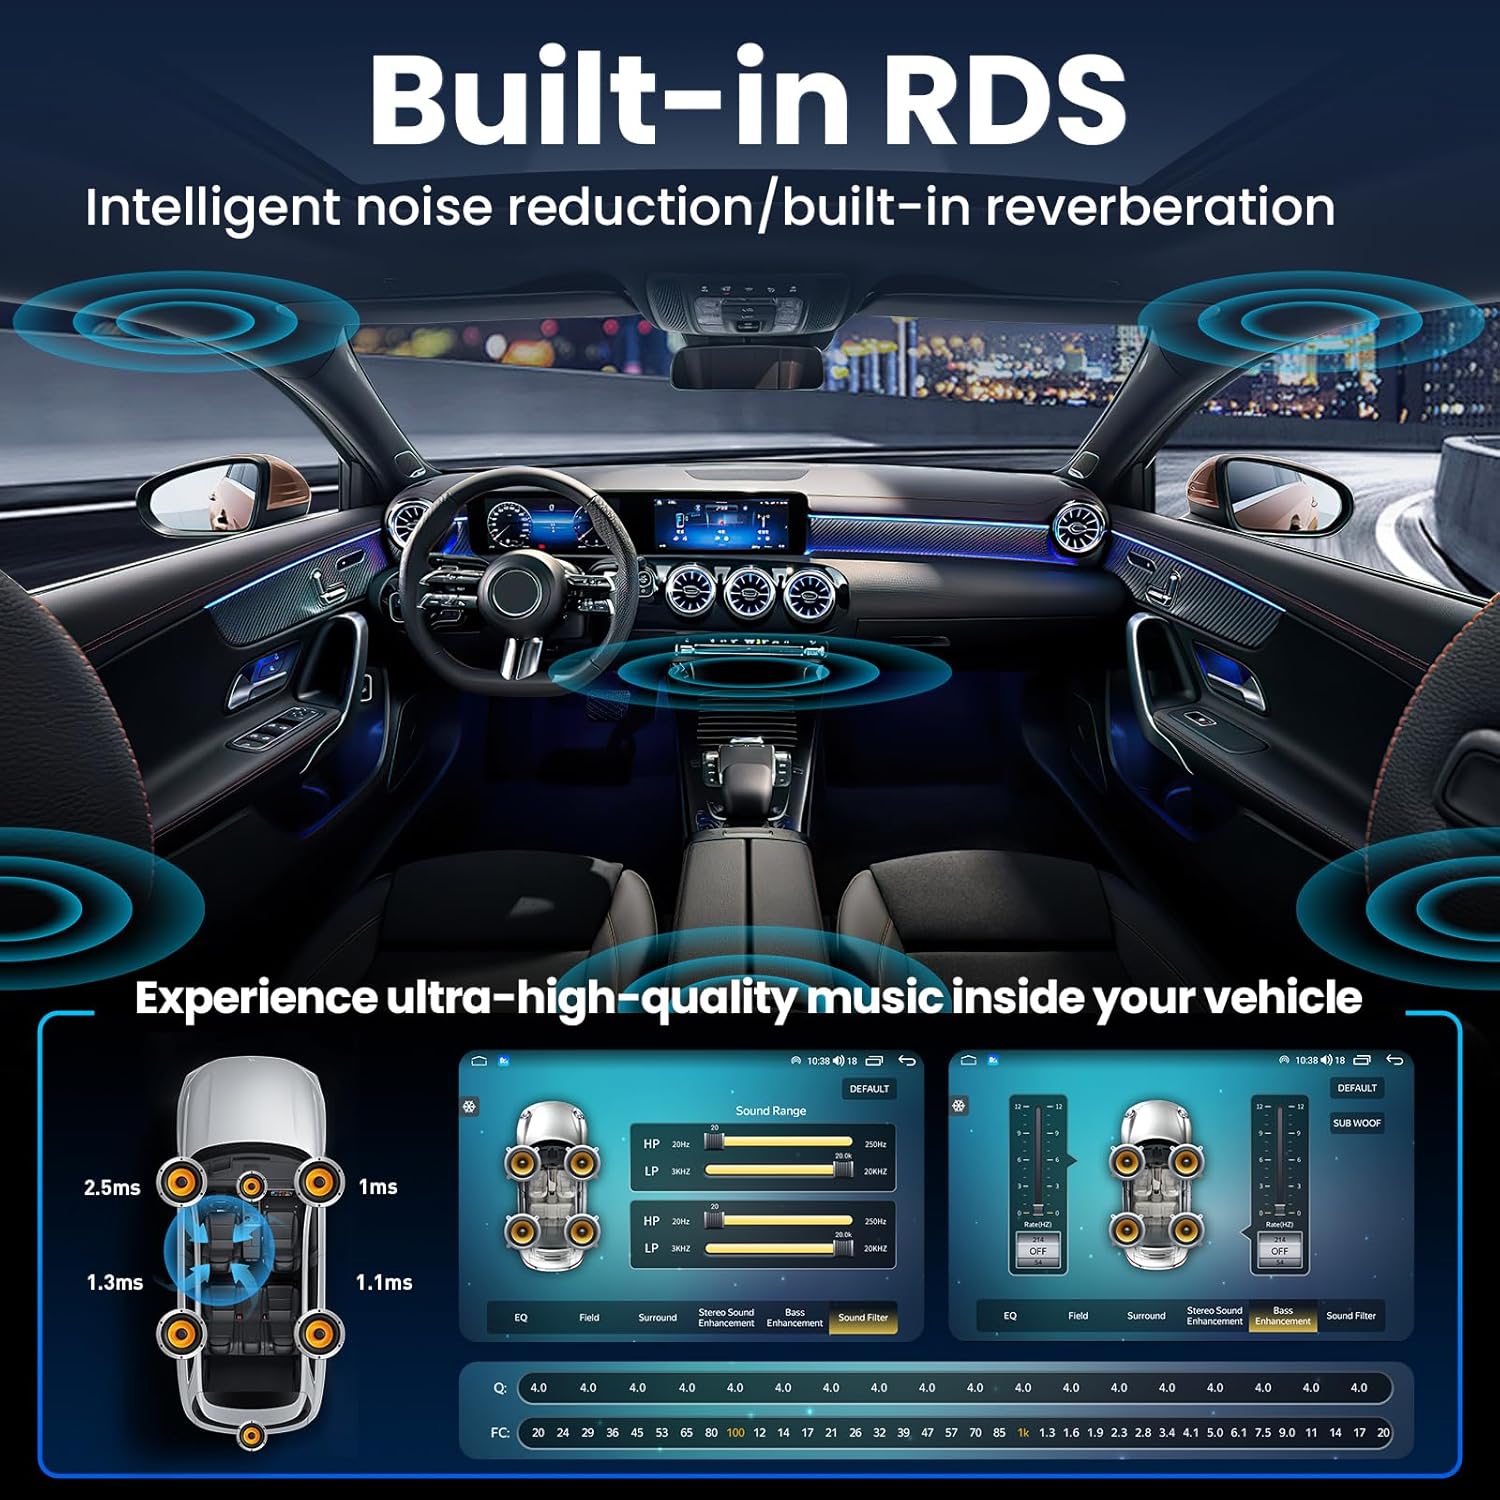
Image: DSP Sound settings and 15-band equalizer interface.

Immagine: Interfaccia radio FM RDS.

Image: Various audio output modes.
5.5 Display Settings and UI Theme
Customize the user interface (UI) theme and adjust display brightness for optimal viewing in various lighting conditions. The unit supports OTA (Over-The-Air) updates to keep the firmware current.

Image: OTA (Over-The-Air) updates feature.

Image: Display clarity and specifications.
5.6 Connessione Wi-Fi
Connect to a 5G WiFi network for internet access, enabling online streaming, app downloads, and real-time updates.

Image: 5G WiFi connection and app usage.
5.7 Funzionamento della telecamera posteriore
The included 1080P backup camera automatically activates when the vehicle is in reverse, providing a clear view of the area behind your car. This enhances safety during parking and reversing maneuvers.

Immagine: Posterioreview camera display and steering wheel controls.

Image: Rear camera installation diagram.
5.8 Controllo del volante
The unit retains full functionality of your factory steering wheel controls, allowing convenient and safe operation of audio and other features without taking your hands off the wheel.
6. Manutenzione
- Pulizia: Utilizzare un panno morbido e asciutto per pulire lo schermo e l'unità. Evitare detergenti abrasivi o solventi.
- Aggiornamenti software: Controlla e installa regolarmente gli aggiornamenti software OTA per garantire prestazioni ottimali e l'accesso alle nuove funzionalità.
- Connessioni via cavo: Controllare periodicamente tutti i collegamenti dei cavi per assicurarsi che siano sempre saldi.
7. Risoluzione Dei Problemi
| Problema | Possibile causa | Soluzione |
|---|---|---|
| L'unità non si accende | Collegamento elettrico allentato, fusibile bruciato, cablaggio errato. | Controllare i collegamenti dei cavi di alimentazione. Ispezionare i fusibili del veicolo. Verificare il cablaggio secondo la guida all'installazione. |
| Nessun suono | Volume troppo basso, modalità muto attivata, cablaggio altoparlanti errato, impostazioni DSP. | Increase volume. Check mute status. Verify speaker connections. Adjust DSP sound settings. |
| CarPlay/Android Auto wireless non si connette | Bluetooth not enabled, incorrect pairing, software glitch. | Ensure Bluetooth is on and visible. Re-pair the device. Restart the car stereo and phone. |
| Lo schermo si blocca o non risponde | Software issue, excessive background apps. | Restart the unit. Close unnecessary applications. Check for and install software updates. |
| La telecamera di backup non viene visualizzata | Incorrect camera wiring, faulty camera, signal wire issue. | Verify camera signal wire connection. Ensure camera is powered. Check for adapter needs if using factory camera. |
Se i problemi persistono dopo aver provato queste soluzioni, contattare l'assistenza clienti.
8. Specifiche
| Caratteristica | Dettaglio |
|---|---|
| Modello | 2G RAM 64G ROM |
| Sistema operativo | Androide 13 |
| Dimensioni dello schermo | 9 pollici |
| Risoluzione dello schermo | 1280x800 |
| Connettività | Bluetooth 5.0, USB, Wi-Fi 5G |
| Caratteristiche speciali | Wireless CarPlay & Android Auto, 15-Band EQ, RDS, Hi-Fi Audio, GPS, Microphone, 1080P Backup Camera |
| Peso dell'articolo | 1.79 chilogrammi (3.94 libbre) |
| Dimensioni del pacco | 18 x 13.5 x 4.6 pollici |
9. Garanzia e supporto
For warranty information and technical support, please refer to the documentation included with your purchase or visit the official Jingelsye website. Our dedicated technical support team is available to assist with any issues or questions you may have regarding your car radio stereo.