
1. Prodotto finitoview
The AODK 59 Inch Gaming Desk is designed for an enhanced gaming and work experience. It features integrated LED lighting, convenient USB charging ports, and ample storage solutions. The desk is constructed with a durable metal frame and high-quality MDF board, ensuring stability and longevity.
- Luci LED colorate: Features 10 static colors, 10 dynamic modes, and 6 brightness levels with memory function.
- Porte di ricarica USB e prese di corrente: Equipped with 3 power outlets and 2 USB charging ports for electronic devices.
- Potente funzione di archiviazione: Includes 3 fabric drawers, a side hook, and an open storage shelf for a gaming PC. The shelf design is reversible.
- Supporto ergonomico per monitor: Raises your monitor to a suitable height for improved posture and reduced fatigue.
- Spacious, Sturdy & Durable: A 59"(L) x 19.7"(D) desktop provides ample space. Made of premium metal frame and high-quality MDF board, resistant to scratches and water damage. Adjustable non-slip foot pads ensure stability.
2. Informazioni sulla sicurezza
Si prega di leggere attentamente tutte le istruzioni prima del montaggio e dell'uso. Conservare il manuale per riferimento futuro.
- Segui sempre attentamente le istruzioni di montaggio.
- Ensure the desk is assembled on a stable, even surface.
- Do not use the desk on uneven surfaces or attempt to anchor it to the wall or floor as it is not designed for this purpose.
- Always adhere to the weight limits of the desk and its components.
- Tenere i bambini e gli animali domestici lontani dall'area di raccolta.
- Non serrare eccessivamente le viti durante il montaggio per evitare danni.
- Ensure all electrical connections (USB ports, power outlets, LED lights) are properly secured and not overloaded.
3. Contenuto della confezione
Verify all components are present before beginning assembly. Refer to the included user manual for a detailed parts list.
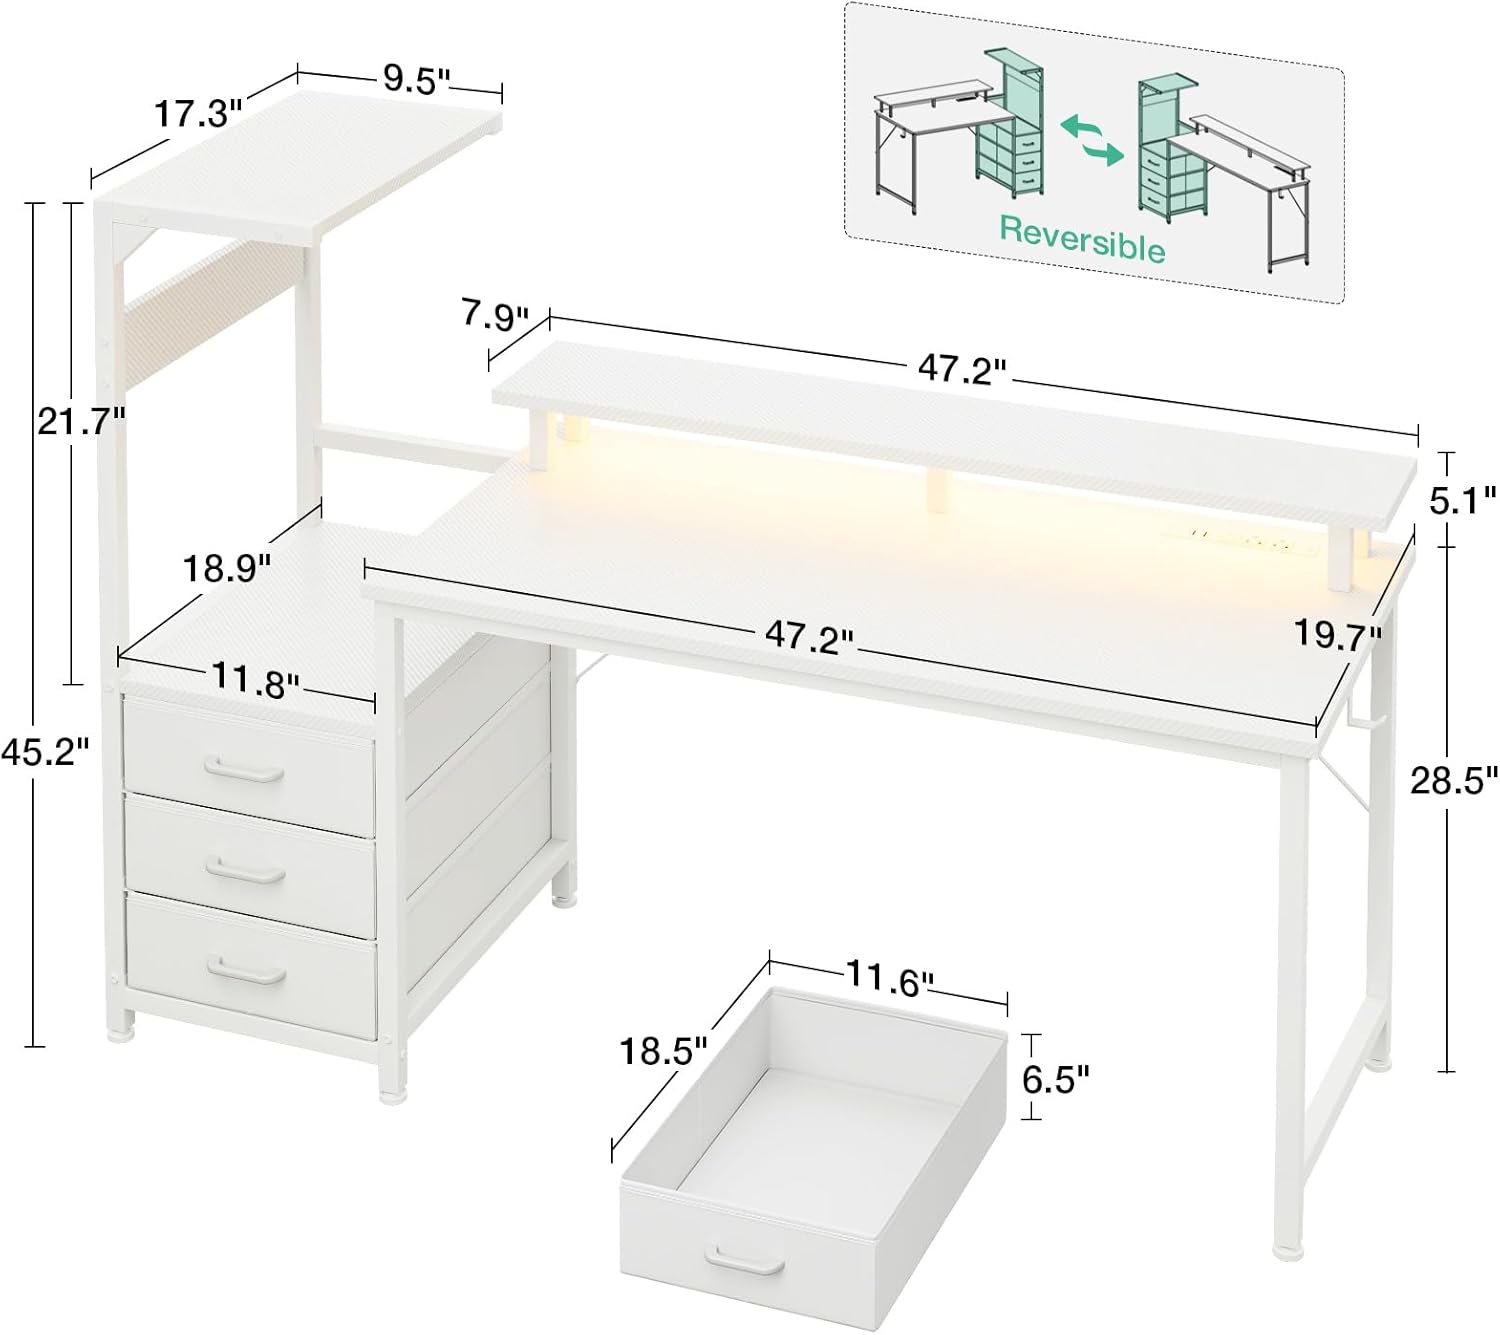
Image: All components of the AODK 59 Inch Gaming Desk laid out with dimensions.
The package includes all necessary parts for assembly, such as the desktop, frame components, storage shelves, fabric drawers, monitor stand, LED light strip, USB charging ports, power outlets, and a side hook. All parts are clearly labeled for easy identification.
4. Installazione e assemblaggio
Assembly is designed to be straightforward with clearly labeled parts and detailed instructions. An Allen key and screwdriver are included. It is recommended to have two people for assembly for ease and safety.
Guida video di montaggio
Video: AODK Gaming Desk assembly guide, demonstrating step-by-step construction.
Fasi chiave dell'assemblaggio:
- Preparare i componenti: Unpack all parts and verify against the parts list in the included manual.
- Montare il telaio principale: Connect the main desk frame components using the provided screws and Allen key.
- Installa unità di archiviazione: Attach the side storage unit, including the PC tower shelf and fabric drawer supports. Note that the storage unit is reversible and can be installed on either the left or right side.
- Inserire cassetti in tessuto: Fold and insert the fabric drawers into their designated slots.
- Allega Desktop: Secure the main desktop surface to the assembled frame.
- Installare il supporto del monitor: Attach the monitor stand to the main desktop.
- Mount Power Outlet & USB Ports: Secure the recessed power outlet and USB charging ports into the designated slot on the desktop.
- Installare la striscia luminosa a LED: Affix the LED light strip to the underside of the monitor stand using the provided adhesive.
- Attach Side Hook: Install the side hook for headphones or other accessories.
For detailed visual instructions, please refer to the included paper manual or the video guide above.
5. Istruzioni per l'uso
Funzionamento della luce a LED

Image: Close-up of the LED light controller with buttons labeled C, M, and Power/Speed/Brightness.
The LED light strip is controlled via an inline remote:
- Pulsante Colore Statico (C): Premere una volta per passare alla modalità colore statico. Ogni pressione cambia il colore.
- Pulsante Modalità Dinamica (M): Press once to switch to dynamic effect mode. Each press changes the dynamic mode. Press and hold for 3 seconds to enter demo mode, cycling through various dynamic modes.
- Speed & Brightness and Power Button:
- In static mode, press to adjust brightness (6 grades).
- In modalità dinamica, premere per regolare la velocità della modalità dinamica.
- Press and hold to shut down the strip when it is on. Press once to turn it on when off.
La striscia LED è dotata di una funzione di memoria di spegnimento, che ripristina l'ultimo colore, luminosità e modalità alla successiva accensione.
Porte di ricarica USB e prese di corrente

Image: Close-up of the recessed power outlet featuring three AC outlets and two USB ports.
The desk is equipped with 3 standard AC power outlets (125V/12A) and 2 USB charging ports (5V/2A). Simply plug the desk's main power cord into a wall outlet to activate these features. Use these to conveniently power and charge your electronic devices.
6. Manutenzione
- Pulizia: Pulisci le superfici della scrivania con un panno morbido eamp stoffa. Evitare prodotti chimici aggressivi che potrebbero danneggiare la finitura.
- Spolverare: Regularly dust the desk and its components to prevent buildup.
- Elementi di fissaggio: Controllare periodicamente tutte le viti e gli elementi di fissaggio per assicurarsi che siano ben serrati. Serrare nuovamente se necessario, ma senza esagerare.
- Componenti elettrici: Ensure power cords and LED light connections are not pinched or damaged.
- Cassetti in tessuto: I cassetti in tessuto possono essere puliti con un detergente delicato e acqua. Lasciare asciugare completamente all'aria.
7. Risoluzione Dei Problemi
- Luci LED non funzionanti: Check if the desk's main power cord is plugged in. Ensure the LED light strip's USB connector is securely plugged into one of the desk's USB ports. Verify the inline remote is not damaged.
- Prese di corrente/porte USB non funzionanti: Confirm the desk's main power cord is fully plugged into a working wall outlet. Check for any tripped circuit breakers in your home.
- La scrivania ondeggia: Ensure all assembly screws are tightened. Adjust the non-slip foot pads on the bottom of the desk legs to level the desk on uneven surfaces.
- Drawers Stick/Don't Slide Smoothly: Ensure the fabric drawers are correctly assembled and inserted. Check for any obstructions in the drawer slots.
If you encounter any product-related issues not covered here, please contact AODK customer support for assistance.
8. Specifiche
| Caratteristica | Dettaglio |
|---|---|
| Marca | AODK |
| Modello | B0D9QJTCGS |
| Dimensioni del prodotto | 19.69"P x 59.44"L x 45.2"A |
| Colore | White (Carbon Fiber Texture) |
| Materiale | Legno ingegnerizzato (parte superiore), metallo (base) |
| Caratteristiche speciali | Built-In USB Outlet, Desk with LED lights, Ergonomic Monitor Stand, Reversible Storage |
| Prese di corrente | 3 prese CA (125 V/12 A) |
| Porte USB | 2 porte di ricarica USB (5 V/2 A) |
| Numero di cassetti | 3 (Tessuto) |
| Componenti inclusi | Built-in Outlet, Built-in USB Port, Headphone Hook, Assembly Tools |
| Assemblaggio richiesto | SÌ |
9. Garanzia e supporto
The AODK 59 Inch Gaming Desk comes with a Limited Warranty. For specific details regarding warranty coverage and duration, please refer to the warranty card included in your package or contact customer support.
Assistenza clienti: If you encounter any product-related issues, please feel free to contact us. Our professional customer support team is ready to assist you within 24 hours.
Contact information can typically be found on the product packaging or the official AODK websito.