
1. Introduzione
This manual provides essential information for the safe and efficient operation of your Pretul DESI-36P2 3.6V Cordless Screwdriver. Please read it thoroughly before first use and keep it for future reference. This compact cordless screwdriver is designed for light-duty fastening tasks, featuring a two-position handle and an integrated LED work light.

Figura 1: Pretul DESI-36P2 Cordless Screwdriver. This image shows the screwdriver in its straight configuration, highlighting its compact design and yellow and black color scheme.
2. Informazioni sulla sicurezza
Quando si utilizzano utensili elettrici, osservare sempre le precauzioni di sicurezza di base per ridurre il rischio di incendi, scosse elettriche e lesioni personali.
- Sicurezza dell'area di lavoro: Mantieni la tua area di lavoro pulita e ben illuminata. Le aree disordinate o scure provocano incidenti.
- Sicurezza elettrica: Non esporre gli utensili elettrici alla pioggia o a condizioni di bagnato. L'ingresso di acqua in un utensile elettrico aumenta il rischio di scosse elettriche.
- Sicurezza personale: Rimani vigile, fai attenzione a ciò che fai e usa il buon senso quando usi un elettroutensile. Non usare un elettroutensile quando sei stanco o sotto l'effetto di droghe, alcol o medicinali.
- Uso e cura dello strumento: Non forzare l'utensile elettrico. Utilizza l'utensile elettrico corretto per la tua applicazione. Farà il lavoro meglio e in modo più sicuro alla velocità per la quale è stato progettato.
- Cura della batteria: Ricaricare solo con il caricabatterie specificato dal produttore. Un caricabatterie adatto a un tipo di pacco batteria può creare un rischio di incendio se utilizzato con un altro pacco batteria.
3. Componenti e caratteristiche del prodotto
Familiarize yourself with the parts of your Pretul DESI-36P2 cordless screwdriver.
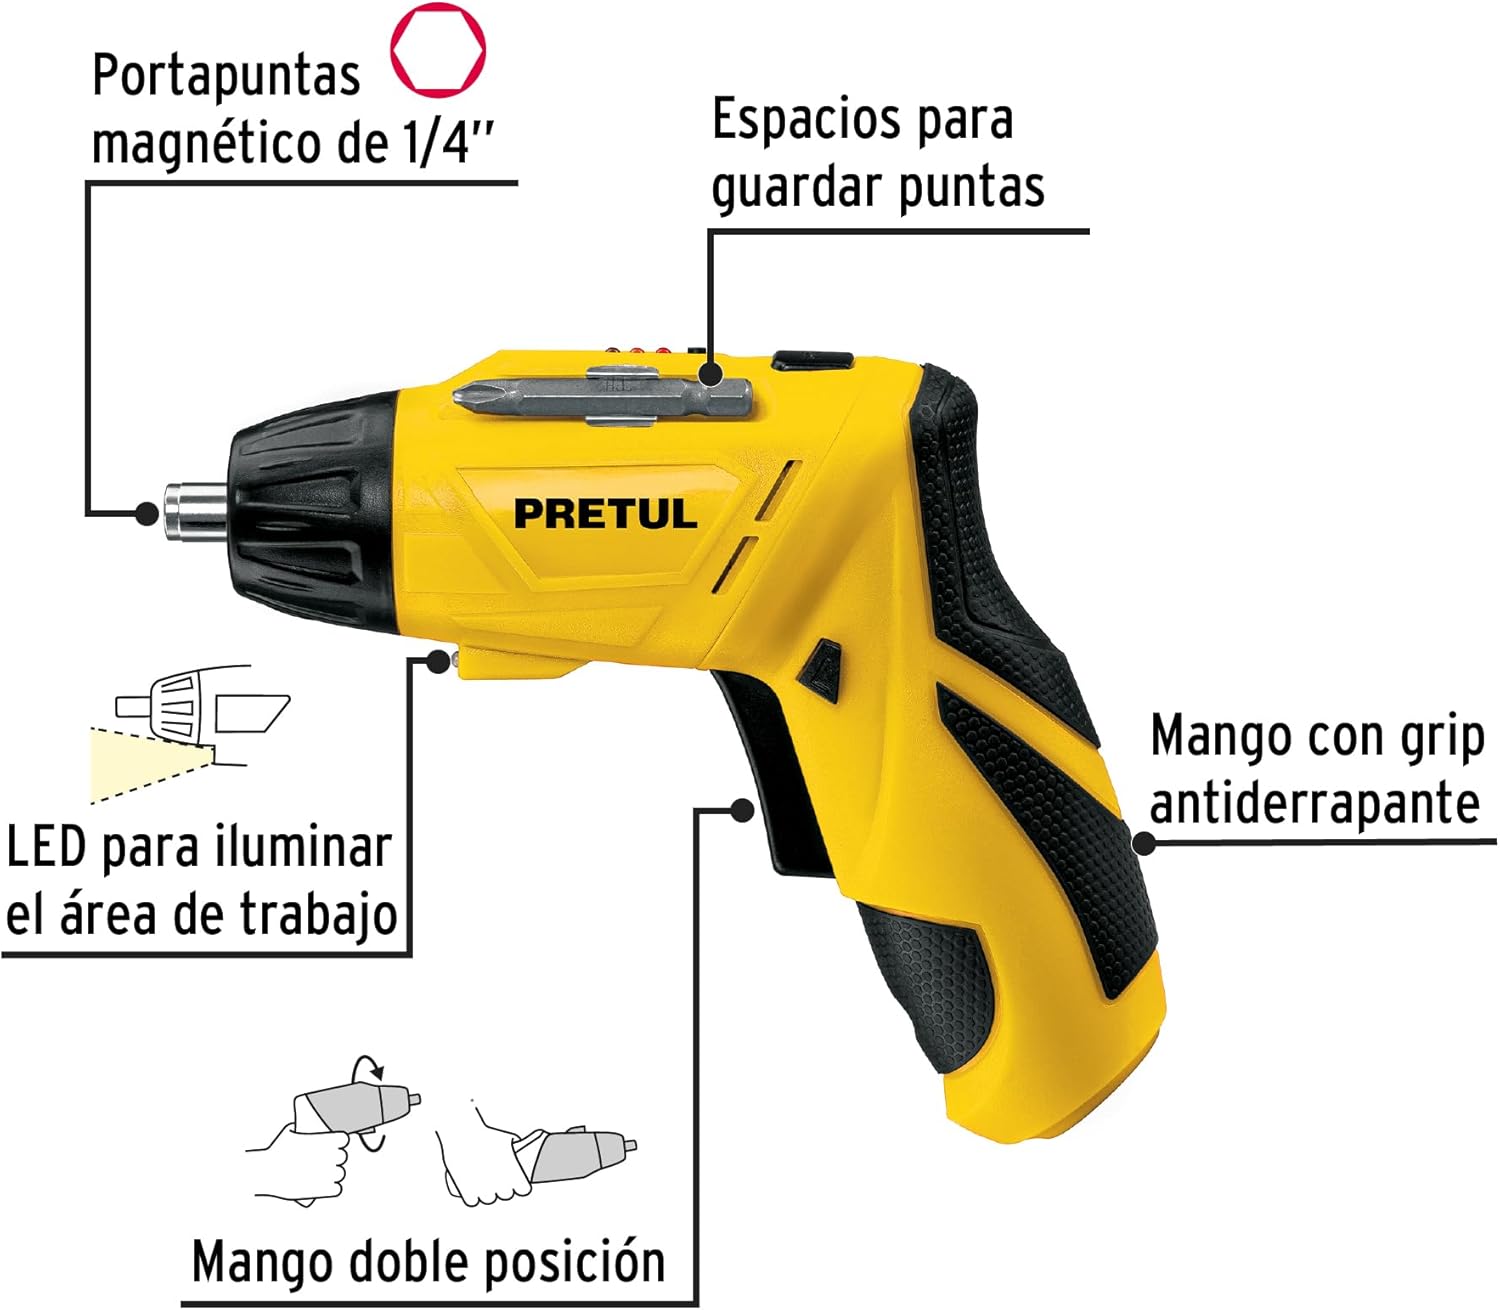
Figura 2: Key features of the Pretul DESI-36P2. This diagram illustrates the magnetic 1/4" bit holder, bit storage slots, anti-slip grip handle, LED work light, and the two-position handle mechanism.
- Magnetic 1/4" Hex Bit Holder: Securely holds screwdriver bits for quick changes.
- Bit Storage Slots: Conveniently located on the tool for storing extra bits.
- Anti-slip Grip Handle: Garantisce una maneggevolezza comoda e sicura durante il funzionamento.
- Luce da lavoro a LED: Illumina l'area di lavoro per una migliore visibilità in spazi scarsamente illuminati.
- Maniglia a due posizioni: Allows the screwdriver to be used in a straight or pistol-grip configuration for versatility and access in tight spaces.
- Interruttore avanti/indietro: Controls the direction of rotation for tightening and loosening screws.
- Pulsante di accensione: Attiva il cacciavite.
4. Impostazione
4.1 Carica iniziale
Before first use, fully charge the screwdriver's internal battery. Connect the charger to a standard electrical outlet and then to the charging port on the screwdriver. The charging indicator (if present) will show the charging status. Disconnect the charger once the battery is fully charged.
4.2 Fissaggio delle punte del cacciavite
- Select the appropriate 1/4" hex screwdriver bit for your task.
- Insert the bit firmly into the magnetic bit holder at the front of the screwdriver until it is securely seated.
- To remove a bit, simply pull it out from the holder.
4.3 Regolazione della posizione della maniglia
The screwdriver features a two-position handle for enhanced versatility:
- Impugnatura a pistola: Standard configuration for most tasks.
- Impugnatura dritta: For reaching into confined spaces. To change the handle position, firmly grasp the handle and the body of the screwdriver, then pivot the handle until it locks into the desired position.
5. Istruzioni per l'uso
5.1 Accensione/Spegnimento
Press and hold the power button to activate the screwdriver. Release the button to stop operation. The LED work light will activate when the power button is pressed.
5.2 Selezione della direzione di rotazione
Use the forward/reverse switch, typically located near the trigger, to select the desired rotation direction:
- Per la rotazione in avanti, spingere l'interruttore verso sinistra (stringendo le viti).
- Per invertire la rotazione, spingere l'interruttore verso destra (allentando le viti).
- Ensure the switch is in the center position to lock the tool and prevent accidental activation.
5.3 viti di fissaggio
- Ensure the correct bit is installed and the rotation direction is set to forward.
- Place the bit onto the screw head, applying gentle pressure.
- Press the power button to start driving the screw. Release the button once the screw is fully seated or the desired torque is reached.
5.4 Allentamento delle viti
- Ensure the correct bit is installed and the rotation direction is set to reverse.
- Place the bit onto the screw head, applying gentle pressure.
- Press the power button to start loosening the screw. Release the button once the screw is free.
6. Manutenzione
Una manutenzione regolare garantisce prestazioni ottimali e prolunga la durata del tuo utensile.
- Pulizia: Mantenere le aperture di ventilazione dell'utensile libere e prive di detriti. Utilizzare un panno morbido eamp panno per pulire l'esterno. Non utilizzare prodotti chimici aggressivi o detergenti abrasivi.
- Portainserti: Periodically inspect the bit holder for wear or damage. Clean any accumulated dust or metal shavings.
- Conservazione della batteria: Store the screwdriver in a cool, dry place away from direct sunlight and extreme temperatures. For long-term storage, ensure the battery is partially charged (around 50%).
- Ispezione: Regularly check for loose screws, damaged cords (if applicable), or any other conditions that may affect safe operation.
7. Risoluzione Dei Problemi
Se riscontri problemi con il tuo cacciavite, fai riferimento ai seguenti problemi comuni e alle relative soluzioni:
| Problema | Possibile causa | Soluzione |
|---|---|---|
| Il cacciavite non si accende. | La batteria è scarica. | Caricare completamente la batteria. |
| Il cacciavite non è potente. | La batteria è scarica. | Ricaricare la batteria. |
| La punta scivola dalla testa della vite. | Dimensione della punta errata o punta usurata. | Utilizzare la dimensione corretta della punta; sostituire le punte usurate. |
| Handle does not lock into position. | Not fully pivoted. | Ensure the handle is fully pivoted until it clicks into place. |
Se il problema persiste dopo aver provato queste soluzioni, contattare l'assistenza clienti.
8. Specifiche
Technical specifications for the Pretul DESI-36P2 Cordless Screwdriver.

Figura 3: Dimensions of the Pretul DESI-36P2. This image shows the screwdriver with measurements indicating a length of 17.5 cm and a height of 13 cm.
| Caratteristica | Specificazione |
|---|---|
| Numero di modello | DESI-36P2 (26402) |
| Marca | prezzo |
| Fonte di alimentazione | Batteria |
| Volume batteriatage | 3.6 Volt |
| Velocità | 230 giri al minuto |
| Coppia | 3E+1 Pound-inches (approximately 30 in-lbs) |
| Bit Holder | 1/4" Hex Magnetic |
| Materiale | Plastica, Metallo |
| Dimensioni (L x H) | 17.5 cm x 13 cm (circa, in base all'immagine) |
| Peso | 530 g (0.53 kg) |
| Componenti inclusi | 5 Phillips bits 1" (PH1, PH2, PH3), Charger, 2 Phillips bits 2" (PH1, PH2), 1/4" Magnetic extension |
9. Garanzia e supporto
The Pretul DESI-36P2 Cordless Screwdriver comes with a Garanzia di 1 anno dalla data di acquisto. Conservare la prova d'acquisto per eventuali reclami in garanzia.

Figura 4: Product packaging showing the included components and a "1 year warranty" seal.
For technical support, service, or warranty inquiries, please contact Pretul customer service through their official channels or the retailer where the product was purchased.