1. Introduzione
This manual provides essential information for the assembly, operation, and maintenance of your Composad Espresso Double Depth Shoe Rack, Model K04. Designed for efficient shoe storage, this unit features three flaps and a double-depth design to maximize capacity while maintaining a compact footprint. Please read these instructions carefully before proceeding with assembly and use to ensure proper functionality and safety.

Figura 1: Fronte view of the Composad Espresso Double Depth Shoe Rack.
2. Informazioni importanti sulla sicurezza
To ensure user safety and product longevity, adhere to the following guidelines:
- The product does not contain hazardous materials beyond legally permitted limits.
- Assembly must be performed by a competent individual following the provided instructions. Incorrect assembly can compromise stability.
- If necessary, secure the furniture to a wall capable of supporting its weight. Wall plugs are not included and must be selected based on your wall type.
- Keep plastic bags and small parts out of reach of children to prevent suffocation or ingestion hazards.
- Distribute the load evenly inside the furniture and do not exceed the indicated weight capacity.
- Avoid direct contact with liquids and heat sources. Place the unit in a cool, dry location.
- Do not use the furniture for purposes other than its intended design.
3. Contenuto della confezione
Prima del montaggio, verificare che tutti i componenti siano presenti e integri. La confezione in genere include:
- Furniture panels (main body, flaps)
- Ferramenta di montaggio (viti, tasselli, cerniere, maniglie)
- Manuale di istruzioni
Note: Wall plugs for securing the unit to a wall are not included and must be purchased separately based on your specific wall material.
4. Istruzioni di montaggio
Assembly of the Composad Espresso Shoe Rack is required. Please follow the detailed step-by-step instructions provided in the separate assembly guide included with your product. Ensure you have the necessary tools (e.g., screwdriver, hammer) before beginning.
- Fase 1: Disimballare e identificare i componenti. Lay out all panels and hardware. Compare them with the parts list in the assembly guide.
- Fase 2: assemblare il telaio principale. Follow the diagrams to connect the side panels, top, and bottom panels.
- Step 3: Install Flap Mechanisms. Attach the internal shoe compartments and flap hinges according to the instructions.
- Step 4: Attach Flaps and Handles. Secure the three front flaps and install the handles. Ensure flaps open and close smoothly.
- Step 5: Position and Secure (Optional but Recommended). Place the assembled shoe rack in its desired location. For enhanced stability and safety, especially in households with children or pets, it is recommended to secure the unit to a wall using appropriate wall plugs and screws (not included).
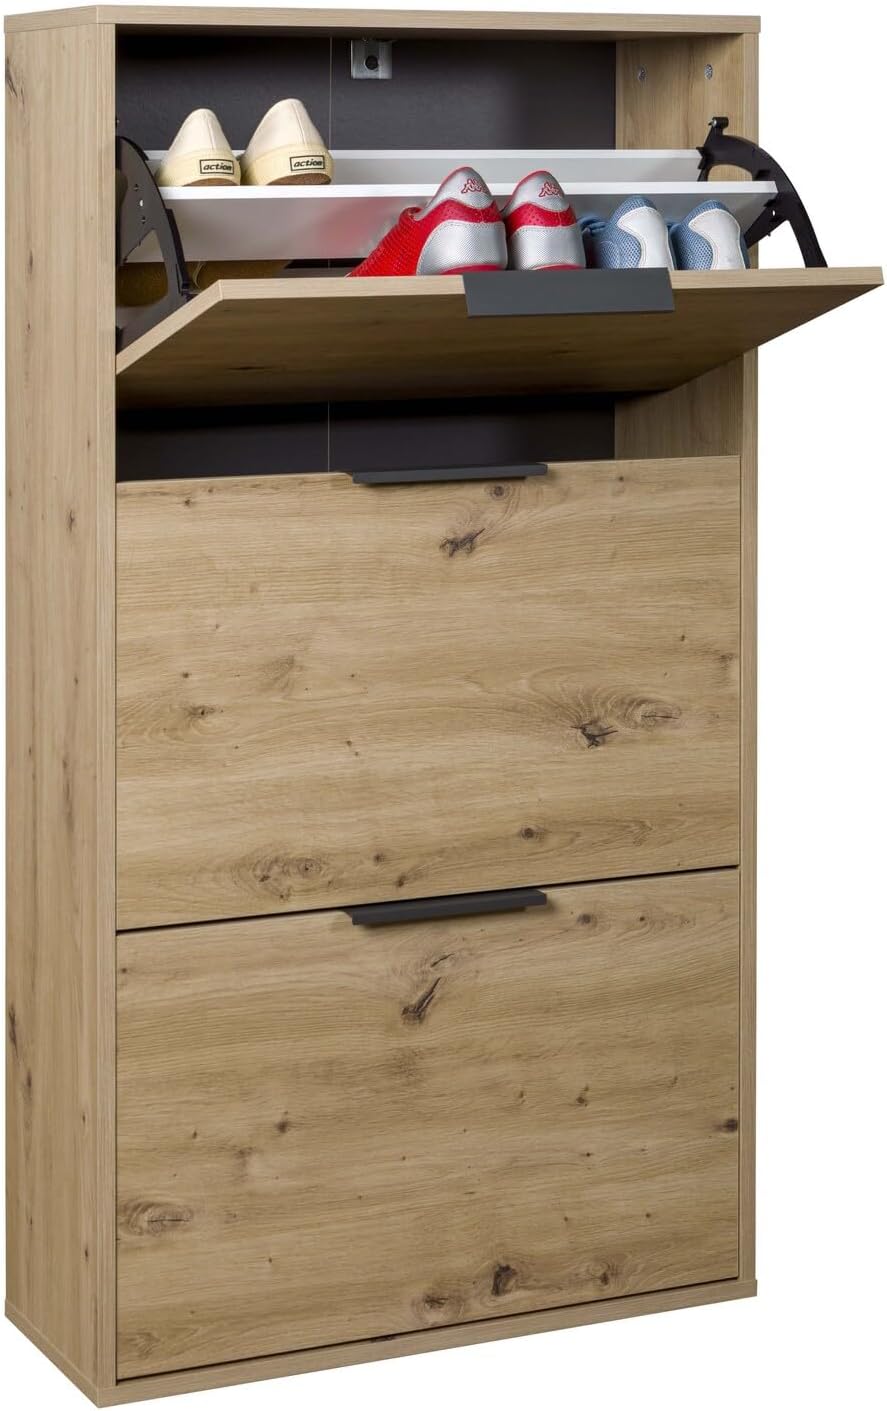
Figure 2: Shoe rack with one flap open, illustrating the internal structure.
5. Istruzioni per l'uso
The Composad Espresso Shoe Rack is designed for straightforward use:
- Apertura delle alette: Gently pull the handle of each flap outwards to open. The flap will tilt forward, revealing the shoe compartments.
- Posizionamento delle scarpe: Place shoes into the designated slots within each compartment. The double-depth design allows for efficient storage of up to 18 pairs of shoes (depending on shoe size and style).
- Chiusura delle alette: Push the flap back into the unit until it is flush with the main body. Ensure no shoes obstruct the closing mechanism.

Figura 3: primo piano view of shoes stored within an open flap.

Figure 4: Detail of the handle design.
6. Cura e manutenzione
To maintain the appearance and functionality of your shoe rack:
- Pulizia: Pulire le superfici con un panno morbido, damp panno. Evitare detergenti abrasivi, prodotti chimici aggressivi o umidità eccessiva, che possono danneggiare la finitura.
- Spolverare: Spolverare regolarmente l'unità con un panno asciutto e morbido.
- Fuoriuscite: Pulire immediatamente eventuali fuoriuscite per evitare macchie o danni alla finitura del legno.
- Condizioni ambientali: Keep the unit in a cool, dry environment. Avoid prolonged exposure to direct sunlight or extreme temperature changes.
7. Risoluzione Dei Problemi
Se riscontri problemi con la tua scarpiera, tieni presente quanto segue:
- Le alette non si chiudono agevolmente: Check for any obstructions (e.g., shoes, debris) in the compartments or hinges. Verify that the internal mechanisms were assembled correctly according to the instructions.
- Shoes not fitting: Ensure shoes are placed correctly within the compartments. The double-depth design accommodates most standard shoe sizes, but very large or high-top shoes may require specific placement or may not fit.
- L'unità sembra instabile: Re-check all assembly screws to ensure they are tightened. If not already done, secure the unit to a wall using appropriate wall anchors and screws.
8. Specifiche del prodotto
| Caratteristica | Specificazione |
|---|---|
| Marca | Composad |
| Nome del modello | Espresso Double Depth Shoe Rack |
| Numero di modello | SCA400K76504 (Doppia 25 cm a 3 Ribalte K04) |
| Dimensioni (L x P x A) | Dimensioni: 65 x 25 x 119.5 cm |
| Peso | 28.12 kg |
| Numero di lembi | 3 |
| Capacità della scarpa | Up to 18 pairs (approximate, varies by shoe size) |
| Materiale | Ecological panel, 100% recycled FSC certified wood |
| Tipo di finitura | Stained (Oak Mielato) |
| Assemblaggio richiesto | SÌ |
| Origine | Fatto in Italia |
9. Garanzia e supporto
For information regarding warranty coverage, product support, or to report missing/damaged parts, please refer to the documentation provided at the time of purchase or contact Composad customer service. Contact details can typically be found on the product packaging or the official Composad websito.