1. Introduzione
The Wolezek Grow Light Strips are designed to provide optimal lighting for indoor plants at all growth stages. Featuring a full spectrum LED configuration, adjustable light modes, multiple brightness levels, and an automatic timer, these lights support photosynthesis and promote healthy plant development. The product's design prioritizes efficiency, durability, and ease of installation.

Immagine: Oltreview of Wolezek LED Grow Light Strips highlighting key features.
2. Contenuto della confezione
Verifica che tutti i componenti siano presenti nel tuo pacchetto:
- Grow Light Strips x 4
- Adattatore di alimentazione x 1
- Manuale utente x 1
- Cavo di alimentazione x 1
- Fascette x 8
- Double-sided Tapes x 8
- Viti x 8
- Cable Organizers x 8

Image: All items included in the Wolezek Grow Light Strips package.
3. Specifiche
| Numero di modello | BL-K40B |
| Marca | Wolezek |
| Tipo di sorgente luminosa | LED (spettro completo) |
| Configurazione LED | 6000K Cool White, 3500K Warm White, 660nm Red, 450nm Blue (105 LEDs per strip, 420 total) |
| Wavelength Coverage | Da 380 nm a 800 nm |
| Cosatage | 40 Watt |
| Voltage | 12 Volt |
| Dimensioni del prodotto | 13.8"L x 2"W x 1"H (per strip) |
| Peso dell'articolo | 1.52 libbre |
| Materiale | Acrilonitrile-butadiene-stirene (ABS), Alluminio |
| Tipo di montaggio | Under Cabinet Mount (Versatile) |
| Lunghezza del cavo di alimentazione | 9.8 piedi |

Image: Full spectrum light distribution and LED composition details.
4. Configurazione e installazione
The Wolezek Grow Light Strips offer flexible installation options to suit various environments. Ensure the power adapter is unplugged before installation.
4.1 Connessione iniziale
- Connect the power cord to the TYPE-C interface on the grow light strip.
- Collegare l'alimentatore al cavo di alimentazione.
- Collega l'alimentatore a una presa elettrica standard.
4.2 Metodi di montaggio
Choose one of the following methods for mounting your grow light strips:
- Utilizzando le viti: Secure the light strips to a surface using the provided screws. This method offers a permanent and sturdy installation.
- Utilizzo del nastro biadesivo: For non-permanent or lighter applications, attach the light strips using the included double-sided tape. Ensure the surface is clean and dry for optimal adhesion.
- Utilizzo delle fascette: Ideal for attaching to wire shelving, plant racks, or other structures. Thread the zip ties through the designated holes on the light strips and secure them.

Image: Visual guide for three installation methods: screws, double-sided tape, and zip ties.
5. Istruzioni per l'uso
The Wolezek Grow Light Strips feature an integrated controller for easy adjustment of light settings.
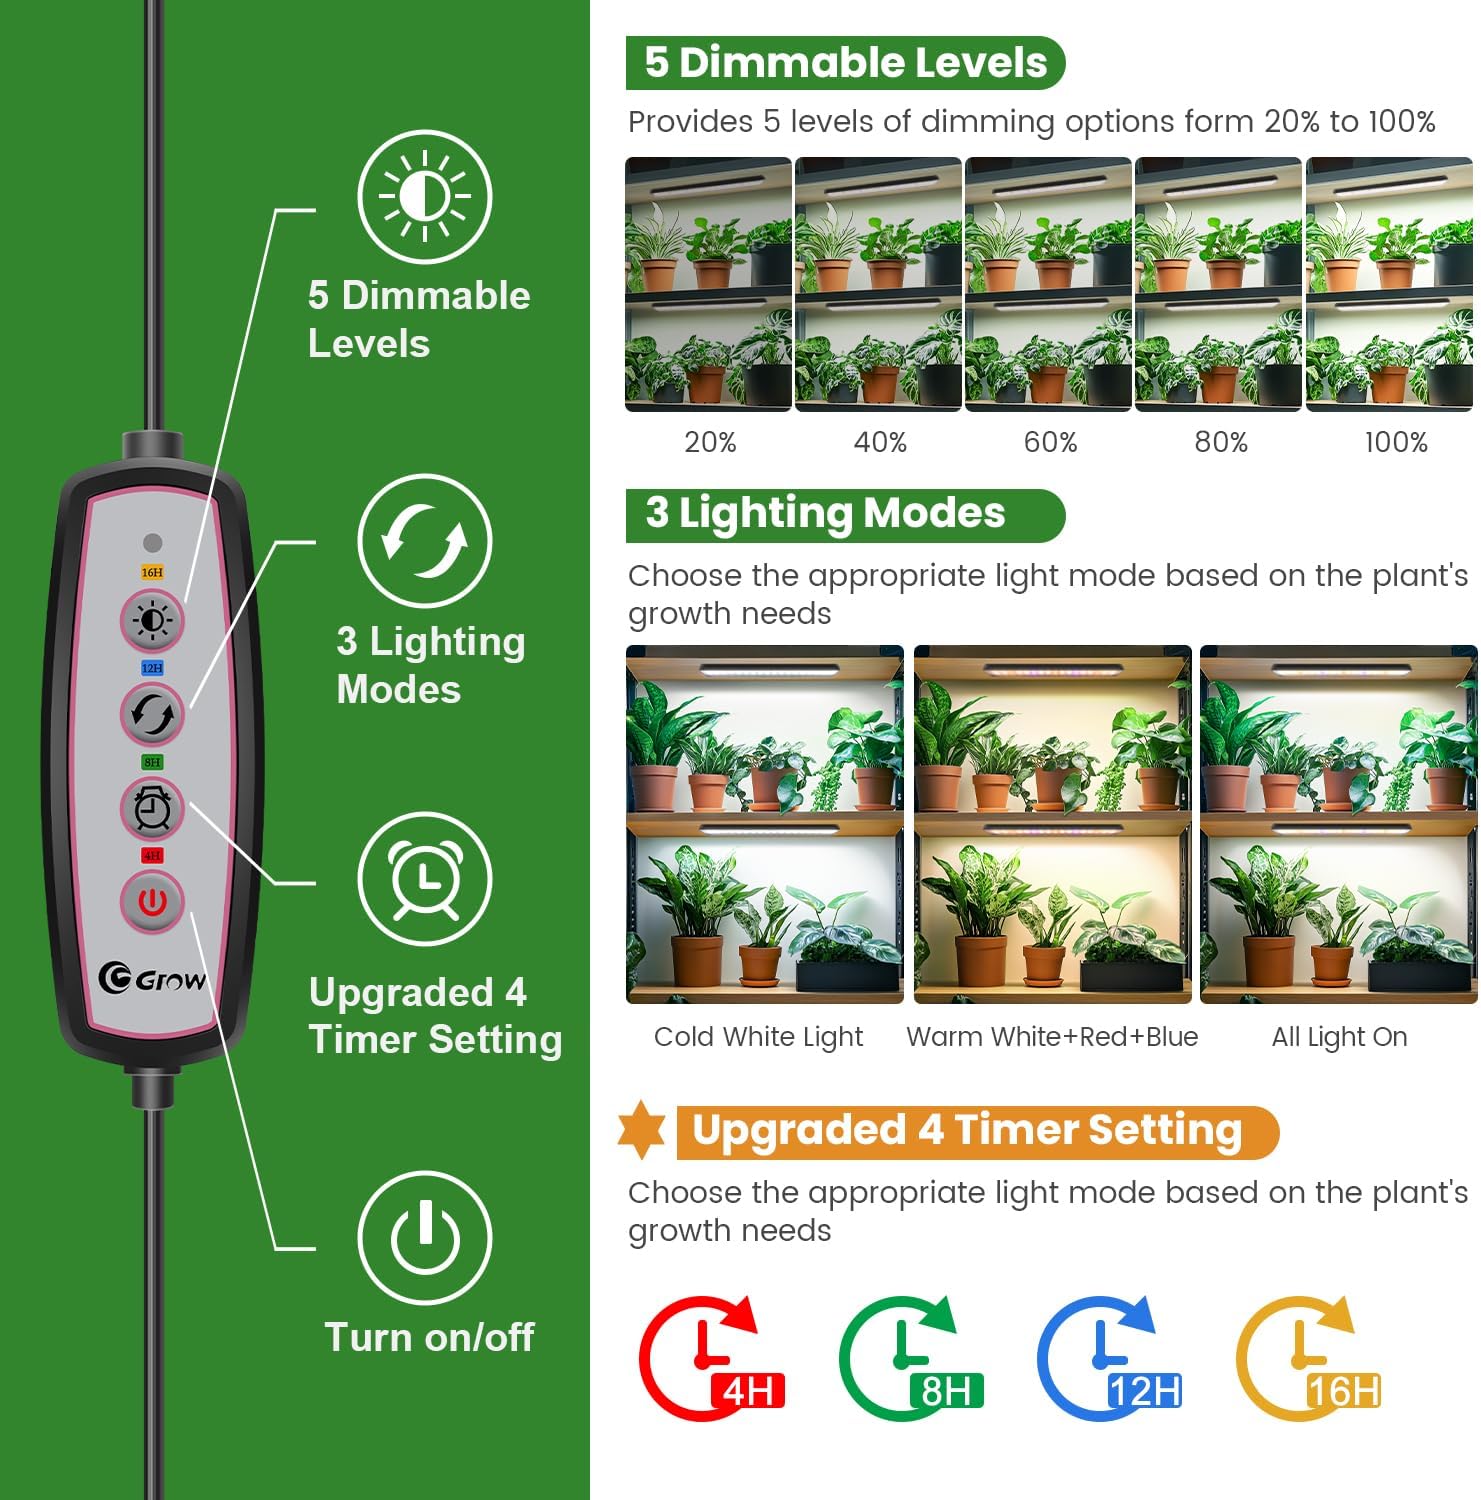
Image: The inline controller with its various functions.
5.1 Accensione/spegnimento
- Premere il tasto Pulsante di accensione per accendere o spegnere le luci.
5.2 modalità di illuminazione
Cycle through the three available light modes by pressing the Pulsante Modalità:
- Luce bianca fredda: Primarily 6000K cool white LEDs.
- Warm White + Red + Blue Light: Combination of 3500K warm white, 660nm red, and 450nm blue LEDs.
- All Light On: Activates all LED types for a full spectrum output.

Image: Visual representation of the three light modes.
5.3 livelli di luminosità
Adjust the light intensity by pressing the Pulsante luminosità. There are 5 dimmable levels, ranging from 20% to 100% brightness.

Image: Illustration of the 5 dimmable brightness levels.
5.4 Timer automatico
Set the automatic timer by pressing the Pulsante timer. The timer will automatically turn the lights on and off at the same time each day.
- ore 4:XNUMX: 4 hours on, 20 hours off.
- ore 8:XNUMX: 8 hours on, 16 hours off.
- ore 12:XNUMX: 12 hours on, 12 hours off.
- ore 16:XNUMX: 16 hours on, 8 hours off.
Note: This plant light does not work with smart sockets if the timer function is desired.

Image: Details of the 4 timing options available on the controller.
6. Manutenzione
To ensure optimal performance and longevity of your Wolezek Grow Light Strips, follow these simple maintenance guidelines:
- Pulizia: The PC cover helps prevent dust and water mist from accumulating on the LEDs. To clean the light strips, ensure they are unplugged from the power source. Gently wipe the surface with a soft, dry cloth. Avoid using abrasive cleaners or harsh chemicals.
- Ispezione: Controllare periodicamente il cavo di alimentazione e i collegamenti per verificare la presenza di eventuali danni. In caso di danni, interrompere l'uso e contattare l'assistenza clienti.
- Posizionamento: Ensure the lights are placed in an area with adequate ventilation to prevent overheating, although the aluminum housing is designed for efficient heat dissipation.
7. Risoluzione Dei Problemi
If you encounter any issues with your Wolezek Grow Light Strips, refer to the following common troubleshooting steps:
- Le luci non si accendono:
- Check if the power adapter is securely plugged into both the light strip and the electrical outlet.
- Assicurati che la presa di corrente sia funzionante testandola con un altro dispositivo.
- Verify that the power button on the inline controller has been pressed.
- Il timer non funziona correttamente:
- Confirm that the desired timer setting (4H, 8H, 12H, or 16H) is selected on the controller.
- The timer function operates on a 24-hour cycle from the moment it is set. If the timing seems off, reset the timer by unplugging and replugging the unit, then setting the timer at the desired start time.
- Luminosità o sfarfallio incoerenti:
- Check all connections to ensure they are firm.
- Assicurarsi che l'alimentazione elettrica sia stabile e non subisca fluttuazioni.
- Se il problema persiste, contatta l'assistenza clienti.
For issues not covered here, please contact Wolezek customer support for assistance.
8. Garanzia e supporto
Wolezek products are designed for quality and reliability. For specific warranty details, including coverage period and terms, please refer to the product packaging or contact Wolezek customer service directly.
Assistenza clienti:
If you require technical assistance, have questions about your product, or need to initiate a warranty claim, please visit the official Wolezek website or contact their customer support team through the retailer where the product was purchased.
Spesso è possibile trovare le informazioni di contatto dell'assistenza sul sito ufficiale del produttore website or through your purchase platform (e.g., Amazon's 'Your Orders' section).