Introduzione
This manual provides essential information for the safe operation, assembly, maintenance, and troubleshooting of your new Electric Children's Buggy Can-am Maverick. Please read this manual thoroughly before assembly and use to ensure proper function and safety.

Image: A dynamic side view of the Electric Children's Buggy Can-am Maverick, showcasing its robust design and vibrant blue and black color scheme.
Informazioni importanti sulla sicurezza
To reduce the risk of injury, adult supervision is required at all times. Never use this vehicle on roadways, near cars, near steep inclines or steps. Do not submerge the vehicle in water or other liquids.
- Always ensure the child is wearing appropriate safety gear, such as a helmet.
- Prima di ogni utilizzo, assicurarsi che tutti i dispositivi di fissaggio siano ben serrati.
- Only operate on flat, dry surfaces away from hazards.
- Tenere mani, capelli e vestiti lontani dalle parti in movimento.
Installazione e assemblaggio
Assembly is required for this product. Please follow the steps below carefully.
Disimballaggio e ispezione iniziale
Carefully remove all components from the packaging. Verify that all parts listed in the packing list are present and undamaged. If any parts are missing or damaged, do not proceed with assembly and contact customer support.
Fasi di assemblaggio
- Installazione della ruota: Attach the wheels to the axles, ensuring they are securely fastened with the provided hardware.
- Montaggio del volante: Connect the steering wheel to the steering column. Ensure it clicks into place or is secured with the designated screw.
- Installazione del sedile: Place the seats into the designated slots and secure them. Ensure seatbelts are accessible and functional.
- Collegamento della batteria: Connect the battery terminals. Refer to the battery compartment for specific instructions. Ensure the connection is firm.
- Primo addebito: Prima del primo utilizzo, caricare completamente la batteria per 8-12 ore. Non sovraccaricare.

Immagine: Posteriore view of the electric buggy with the door open, highlighting the spacious interior and robust rear suspension components.
Istruzioni per l'uso
Controlli finitiview

Image: The dashboard of the electric buggy, featuring the steering wheel, a digital speedometer display, and a multimedia screen.
- Pulsante di avvio/arresto: Located near the key slot, press to turn the vehicle on or off.
- Pedale dell'acceleratore: Press to move forward. Release to brake.
- Volante: Girare a sinistra o a destra per sterzare il veicolo.
- Selettore di marcia: (If applicable) Switch between forward, neutral, and reverse.
- Multimedia Screen: Provides entertainment and vehicle information.
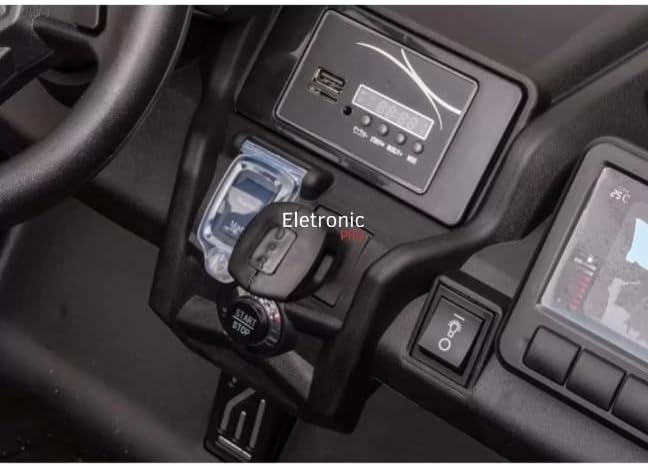
Immagine: un primo piano view of the electric buggy's central console, showing the start/stop button and the key ignition slot.
Guidare il Veicolo
- Ensure the child is seated properly and the seatbelt is fastened.
- Press the Start/Stop button to power on the vehicle.
- Gently press the accelerator pedal to move forward. Release the pedal to stop.
- Use the steering wheel to navigate.
- Always supervise the child during operation.

Image: The interior of the electric buggy, featuring two black, contoured seats equipped with safety seatbelts.
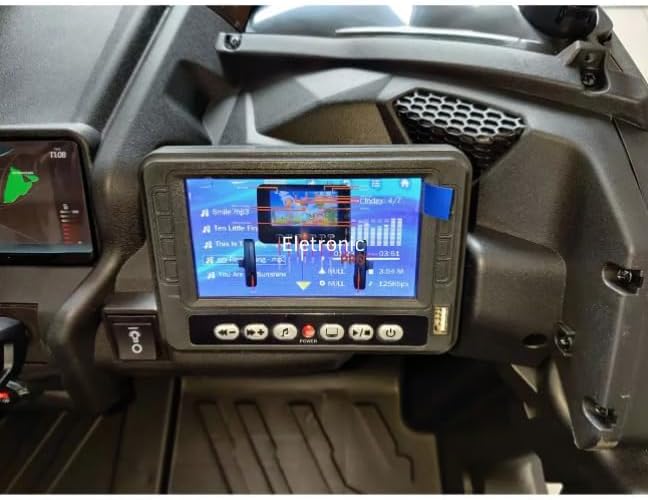
Image: A close-up of the electric buggy's multimedia screen, showing a music playback interface with song titles and an equalizer display.
Manutenzione
Cura della batteria
- Caricare la batteria dopo ogni utilizzo.
- Non permettere alla batteria di scaricarsi completamente.
- If storing for extended periods, charge the battery once a month.
- Only use the charger provided with the vehicle.
Pulizia e conservazione
- Pulisci il veicolo con un pannoamp panno. Non usare detergenti abrasivi.
- Conservare il veicolo in un luogo asciutto e fresco, lontano dalla luce solare diretta e dall'umidità.
- Protect the vehicle from extreme temperatures.
Risoluzione dei problemi
| Problema | Possibile causa | Soluzione |
|---|---|---|
| Il veicolo non si muove | Battery is low or disconnected; Loose wire connection; Blown fuse. | Charge battery; Check battery connections; Check fuse and replace if necessary. |
| Il veicolo funziona lentamente | Battery is low; Overloaded vehicle; Operating on rough terrain. | Ricaricare la batteria; Ridurre il carico; Utilizzare su superfici più lisce. |
| No sound from multimedia screen | Volume is too low; Audio cable disconnected. | Increase volume; Check audio connections. |
Specifiche
- Modello: DK-CA001
- Marca: Generico
- Età consigliata: 36 mesi - 8 anni
- Materiali: Plastic, Rubber, Steel Alloy
- Dimensioni del prodotto: Dimensioni: 145 x 84 x 79 cm
- Peso del prodotto: 42 kg
- Assemblaggio richiesto: SÌ
- Certificazione: Non applicabile
Garanzia e supporto
This product comes with a return policy of 7 days from the date of purchase. For any issues, questions, or to claim warranty support, please contact the seller directly. Please retain your proof of purchase for any warranty claims.
Venditore: ELETRONIC PRO LTDA